Repository navigation
Required Components to Source Yourself
The piBrick PocketCM5 kit does not include every component needed to complete your device. Before assembling your piBrick, you need to obtain a compatible Raspberry Pi Compute Module 5 (CM5) and battery.
Storage is also an important consideration. Depending on your CM5 model and preferred setup, you can use a microSD card, onboard eMMC storage, or an M.2 NVMe SSD.
This guide explains what you need to prepare, how to choose compatible components, and where to find the relevant installation instructions.
| Component | Requirement | Notes |
|---|---|---|
| Raspberry Pi Compute Module 5 (CM5) | Required | Sold separately. Choose a compatible model. |
| 1S LiPo Battery | Required for portable operation | Sold separately. Must meet the specifications below. |
| microSD Card | Optional | Used for supported boot and storage configurations. |
| M.2 NVMe SSD | Optional | Provides additional high-speed storage through the piBrick MainBoard. |
| CM5 with eMMC | Alternative storage configuration | Onboard storage is included in selected CM5 variants. |
Important: Check the compatibility of each component with your piBrick model and hardware revision before purchasing.
The piBrick PocketCM5 requires a compatible single-cell (1S) LiPo battery for portable operation.
| Specification | Requirement |
|---|---|
| Battery type | LiPo, single-cell (1S) |
| Nominal voltage | 3.7 V |
| Recommended capacity | 5000 mAh |
| Battery model / size code | 105080 |
| Approximate dimensions | 80 × 50 × 10 mm |
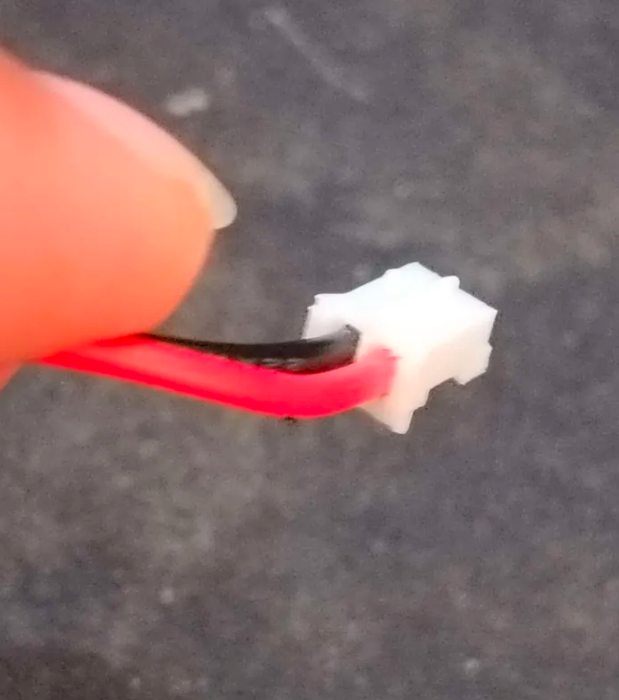
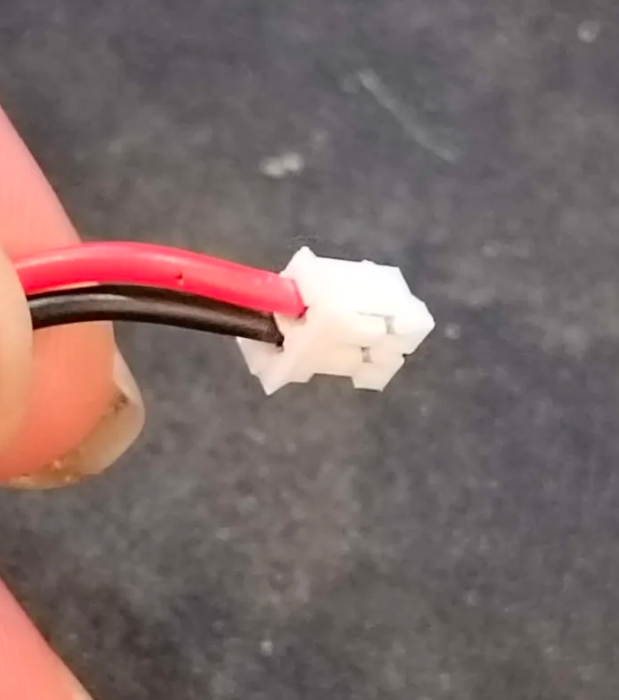
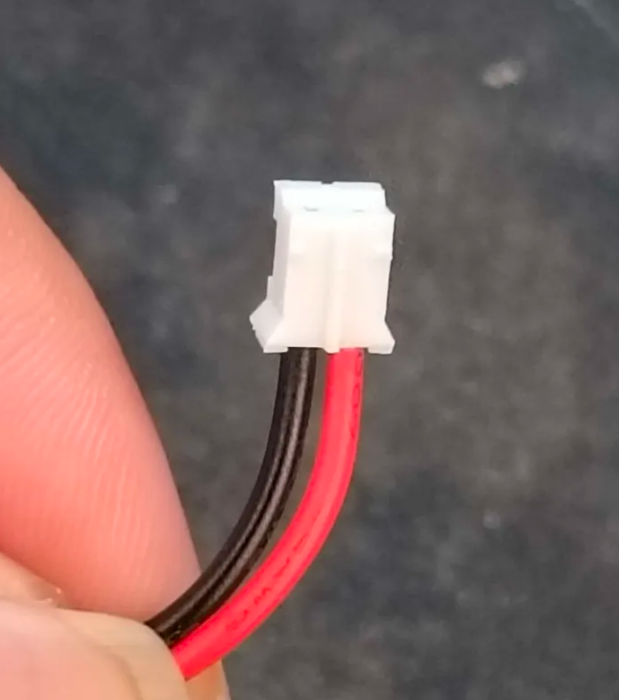
| Connector | JST-PH, 2-pin |
| Connector pitch | 2.0 mm |
| Protection | Integrated battery protection circuit (PCM/BMS) |
The dimensions and connector must be checked carefully before ordering. Batteries with the same capacity may have different dimensions, connector types, or cable orientations.
The battery connects to the battery connector on the piBrick MainBoard.
Pay close attention to the cable orientation and polarity. A connector that physically fits does not necessarily have the correct wiring.
 |
 |
 |
Before connecting the battery:
- Confirm that it is a compatible 1S LiPo battery with integrated PCM/BMS protection.
- Check the connector type and 2.0 mm pitch.
- Compare the battery cable orientation with the verified reference photo for your board revision.
- Verify positive (+) and negative (−) polarity. Do not rely on wire colors alone.
- Never force the connector into place or reverse its polarity.
⚠️ Battery safety: Never use a damaged or swollen battery. Avoid short-circuiting the terminals, and disconnect the battery if excessive heat, smoke, or an unusual odor occurs. Follow the battery manufacturer's safety instructions.
The Raspberry Pi Compute Module 5 (CM5) is the main computing module used by piBrick PocketCM5.
Important: Choose a CM5 Wireless variant. piBrick PocketCM5 is designed to use the CM5's onboard wireless connectivity, so make sure the module you purchase includes Wi-Fi and Bluetooth.
CM5 variants differ in RAM capacity, wireless connectivity, and onboard eMMC storage. Check the full part number before purchasing to ensure you select the correct configuration.
CM5 modules are available with or without onboard wireless connectivity.
-
Wireless (
CM51...) — Includes onboard Wi-Fi and Bluetooth. Choose this version for piBrick. -
Non-wireless (
CM50...) — Does not include onboard Wi-Fi and Bluetooth. Avoid this version if you want to use the CM5's integrated wireless connectivity.
Do not select a module based on its RAM or eMMC capacity alone. Two modules with the same memory configuration may have different wireless capabilities.
The CM5 part number identifies its wireless capability, RAM capacity, and eMMC storage capacity.
For example, CM5104032 means:
| Part number segment | Value | Meaning |
|---|---|---|
CM5 |
CM5 |
Compute Module 5 |
| Wireless digit | 1 |
Includes Wi-Fi and Bluetooth |
| RAM code | 04 |
4 GB RAM |
| eMMC code | 032 |
32 GB onboard eMMC storage |
Use this table to identify the configuration you want:
| Part number segment | Code | Meaning |
|---|---|---|
| Wireless | 0 |
No onboard wireless |
| Wireless | 1 |
Wireless — choose this |
| RAM | 02 |
2 GB |
| RAM | 04 |
4 GB |
| RAM | 08 |
8 GB |
| RAM | 16 |
16 GB |
| eMMC | 000 |
0 GB — Lite, no onboard eMMC |
| eMMC | 008 |
8 GB |
| eMMC | 016 |
16 GB |
| eMMC | 032 |
32 GB |
| eMMC | 064 |
64 GB |
| eMMC | 128 |
128 GB |
These codes describe the CM5 part-number format. Check the seller's actual product listing to confirm that the specific configuration is available.
We recommend the CM5 Lite (wireless version) for piBrick PocketCM5.
The CM5 Lite provides greater flexibility when experimenting with different operating systems and storage configurations. Since it has no onboard eMMC storage, you can easily install, replace, or switch operating systems without having to manage a pre-installed eMMC system.
With the CM5 Lite, you can conveniently:
- Switch operating systems: Keep different OS installations on separate microSD cards and switch between them by changing the card.
- Install an OS more easily: Flash a compatible OS image to a microSD card using your preferred imaging tool.
- Switch between microSD and NVMe: Choose your preferred boot and storage setup without having to work around an existing eMMC installation.
- Experiment safely: Keep separate OS installations for testing, development, and everyday use.
| Feature | CM5 Lite (Recommended) | CM5 with eMMC |
|---|---|---|
| Wireless | Choose the wireless variant | Choose the wireless variant |
| RAM | Depends on selected variant | Depends on selected variant |
| Onboard eMMC | No | Yes |
| OS installation | Straightforward microSD-based installation | Requires a supported eMMC installation method when using onboard eMMC |
| Switch between OS installations | Convenient with separate microSD cards | Possible, but managing the onboard eMMC adds complexity |
| Switch between microSD and NVMe | Flexible; select the desired boot device | Depends on boot configuration and the installed OS |
| M.2 NVMe SSD | Supported through the piBrick MainBoard | Supported through the piBrick MainBoard |
CM5 Lite does not mean a lower-performance processor. It simply means the module has no onboard eMMC storage.
Important: NVMe boot support and boot-device selection depend on the CM5 boot configuration and the operating system. Make sure your chosen OS supports the intended boot method.
When purchasing a CM5 for piBrick PocketCM5:
-
Choose the wireless version. The part number must start with
CM51. - Choose your preferred RAM capacity: 2 GB, 4 GB, 8 GB, or 16 GB.
-
Choose the Lite storage configuration. The eMMC code should be
000. - Verify the complete SKU on the seller's listing before ordering.
For example, CM5102000 is a wireless CM5 Lite with 2 GB RAM, while CM5104000 is a wireless CM5 Lite with 4 GB RAM.
For the complete list of variants and ordering information, see the official Raspberry Pi CM5 datasheet.
The piBrick MainBoard supports M.2 NVMe SSDs in 2230 and 2242 form factors for additional storage.
An NVMe SSD is useful for installing Linux, storing applications and development tools, and keeping larger files. However, an SSD is optional if you prefer to use another supported storage configuration.
Check the following before purchasing:
- Interface: Choose a compatible M.2 NVMe PCIe SSD, not an M.2 SATA-only drive.
- Physical size: The piBrick MainBoard supports M.2 2230 (30 mm long) and M.2 2242 (42 mm long) SSDs.
- Capacity: Choose a capacity suitable for your operating system and intended workload.
- Thermal clearance: Ensure that the SSD and any heatsink fit inside the enclosure.
- Boot configuration: Confirm that your chosen operating system and firmware configuration support your intended boot arrangement.
- Make sure your piBrick is completely powered off and disconnected from its battery before assembly.
- Open the enclosure using the Case Opening Guide.
- Locate the M.2 SSD connector on the piBrick MainBoard.
- Insert the SSD into the connector at a slight angle.
- Gently lower the SSD until its mounting notch aligns with the corresponding mounting point on the MainBoard.
- Secure the SSD using the M2.0 × 3 mm screw supplied in the piBrick package.
- Check that the SSD is seated properly and secured without excessive force before closing the enclosure.
- Reassemble the device.
- Boot Linux and verify that the SSD is detected.
Important: Use the supplied M2.0 × 3 mm screw for the SSD mounting point. Do not overtighten it, as excessive force can damage the SSD or the MainBoard.
- CM5 Lite + microSD: A convenient setup for trying different operating systems using separate microSD cards.
- CM5 Lite + NVMe SSD: A good option for a dedicated Linux installation with additional storage.
- microSD + NVMe SSD: You can use both storage devices together, depending on your operating system and boot configuration.
For maximum flexibility when experimenting with different operating systems, we recommend the wireless CM5 Lite variant.
- 🚀 Quick Start Guide — Assemble your piBrick, boot Linux, and install the drivers.
- 🔧 Assembly Guide — Follow the hardware assembly procedure.
- ⚙️ Software Setup — Configure the operating system and software.
- 🌡️ Heatsinks & Cooling — Find compatible cooling solutions.
- 📷 Camera & Optional Peripherals — Explore optional hardware additions.
- 🩺 Troubleshooting — Diagnose common hardware and software issues.
This page covers components that must be sourced separately and storage choices for piBrick PocketCM5. Verify component specifications and compatibility against your hardware revision before purchasing or assembling your device.