- Clone the repository (or click use template)
git clone https://github.com/clxrityy/nextjs-supabase-auth.git- Include your
.envvariables
NEXT_PUBLIC_SUPABASE_URL=
NEXT_PUBLIC_SUPABASE_ANON_KEY=
NEXT_PUBLIC_SERVICE_ROLE_KEY=- Acquire them on the supabase dashboard
More information about quickstarting Supabse with Nextjs: Using Supabase with Nextjs
The middleware will redirect any unauthenticated user to the /login page.
import { createMiddlewareClient } from "@supabase/auth-helpers-nextjs";
import { NextRequest, NextResponse } from "next/server";

export default async function middleware(req: NextRequest) {
  // Response object
  const res = NextResponse.next();

  // Initialize supabase middleware client
  const supabase = createMiddlewareClient({ req, res });

  // Deconstruct the session object from supabase auth
  const {
    data: { session },
  } = await supabase.auth.getSession();

  // If no session is present, rewrite the route to /login
  if (!session) {
    return NextResponse.rewrite(new URL("/login"), req.url);
  }

  // Otherwise, return the response
  return res;
}

export const config = {
  /**
   * @see https://nextjs.org/docs/app/building-your-application/routing/middleware#matcher
   */
  matcher: ["/((?!api|_next/static|_next/image|favicon.ico).*)"],
};
More information about Nextjs middleware: Routing: Middleware
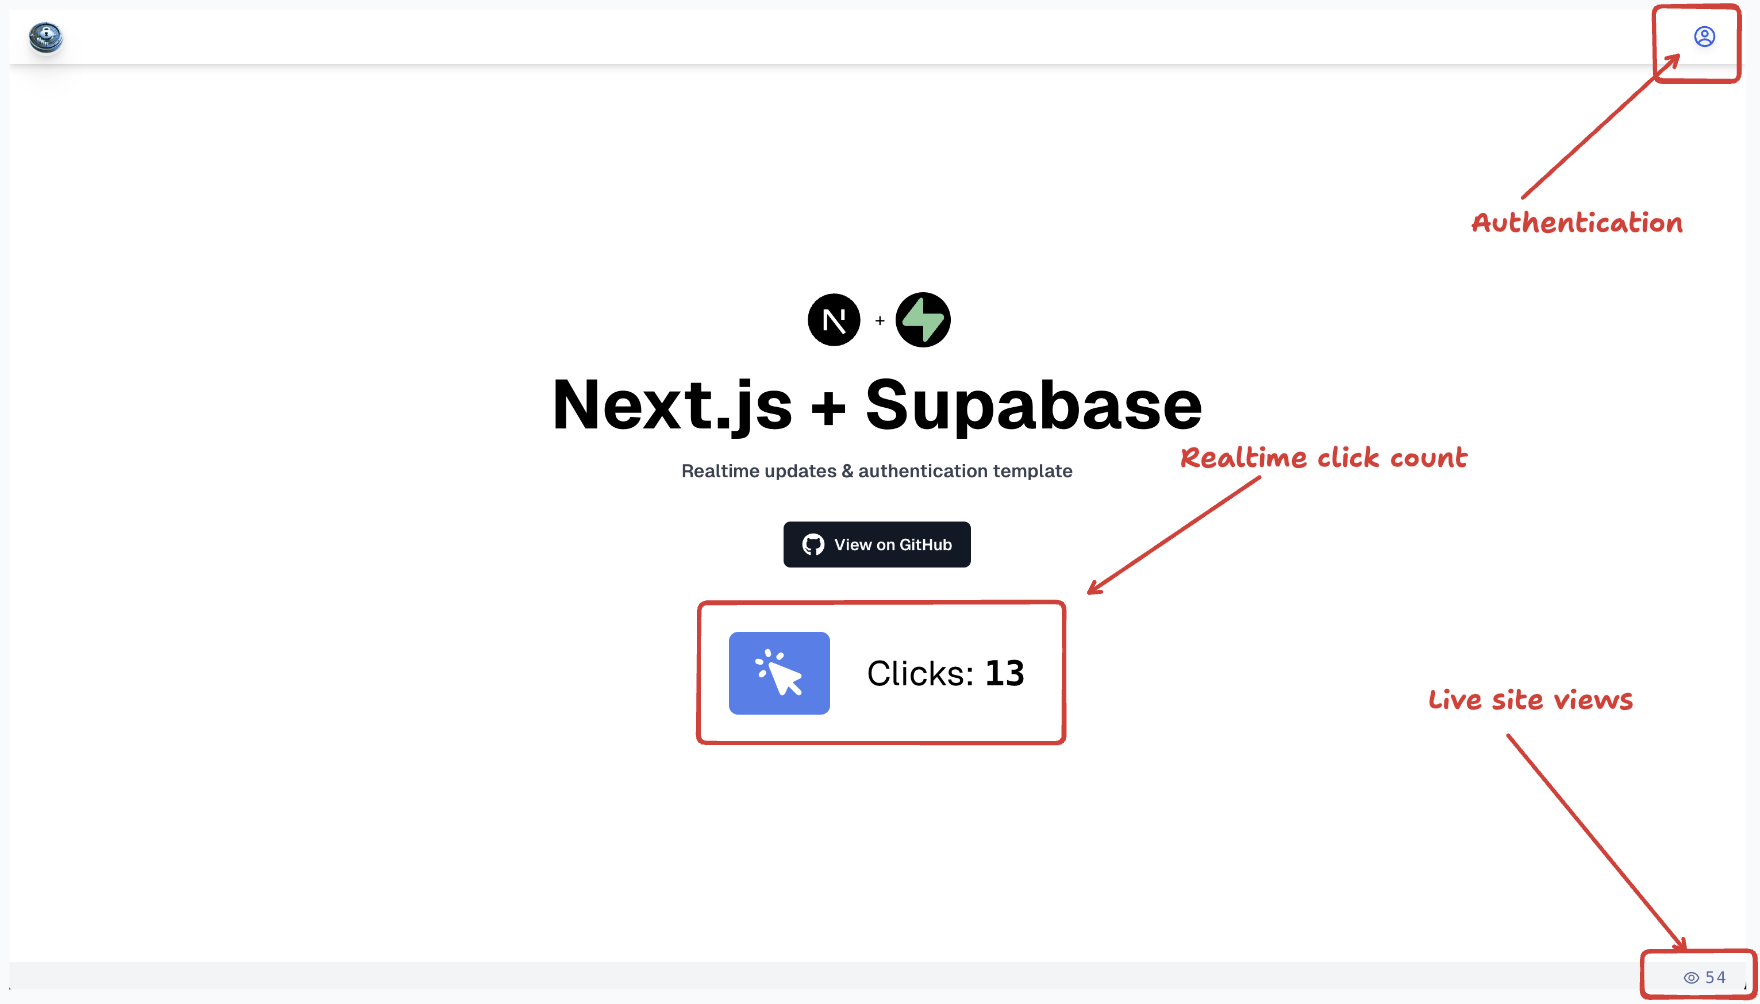
Once the user is redirected to the /login route, they're prompted with a form to either login or sign up. There are no external authentication providers (such as Google, Discord, GitHub, etc.) configured currently, but they can easily be set up.
You must login with your email & password
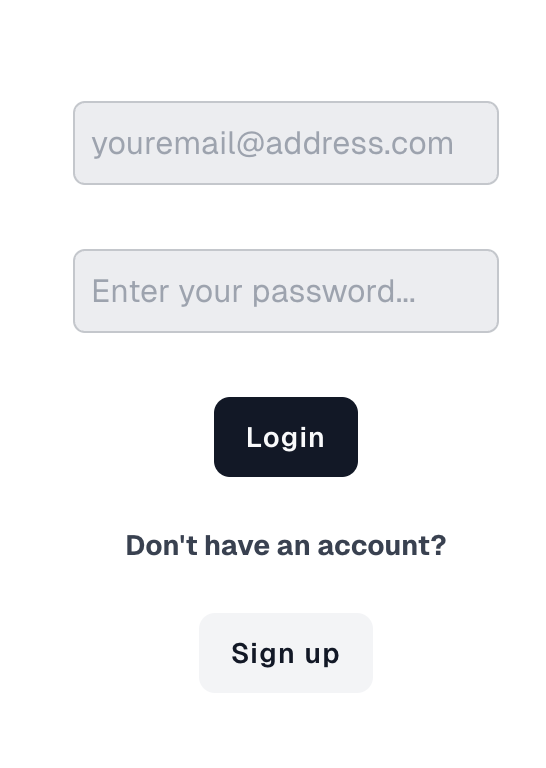
Note: The form is currently configured so that the email & password inputs work for logging in OR signing up (rather than having a separate
/sign-uproute).
- The
email&passwordvalues are saved withuseState()and set with thehandleChange()function.
const [data, setData] = useState<{
  email: string;
  password: string;
}>();

const handleChange = (e: React.ChangeEvent<HTMLInputElement>) => {
  const { name, value } = e.target;

  setData((prev: any) => ({
    ...prev,
    [name]: value,
  }));
};- A
<form />element is rendered with aPOSTaction to/api/auth/login.
<form action={"/api/auth/login"} method="post">
  <input type="text" name="email" onChange={handleChange} />
  <input type="password" name="password" />
  <Button onClick={login}>Login</Button>
</form>- Upon clicking the Login button, the
login()function is called; which will use the data to sign in with supabase auth (and make the post request to the API route).
const login = async () => {
  if (data) {
    try {
      const { data: authData, error } =
        await supabaseClient.auth.signInWithPassword({
          email: data.email,
          password: data.password,
        });

      if (error) {
        console.log(`Error: ${error.message}`);
      }
    } catch (e) {
      console.log(`Error: ${e}`);
    } finally {
      redirect("/");
    }
  }
};As previously stated, there is no sign up route. The values within the input elements on the login page can be used to sign up as well.
- A separate form is rendered which has a POST action to
/api/auth/sign-upand the Sign Up button will run thesignUp()function on click.
const signUp = async () => {
  if (data) {
    try {
      const { data: authData, error } = await supabaseClient.auth.signUp({
        email: data.email,
        password: data.password,
      });

      if (error) {
        console.log(`Error: ${error.message}`);
      }
    } catch (e) {
      console.log(`Error: ${e}`);
    }
  }
};<form
className="flex flex-col items-center justify-center gap-2"
action={"/api/auth/sign-up"}
method="post"
>
<p className="text-sm lg:text-base font-bold text-gray-700">
Don't have an account?
</p>
<Button onClick={signUp} className="font-semibold" variant={"secondary"}>
Sign up
</Button>
</form>- The API route will grab the
formData()from the request then call supabase route handler client'sauth.signInWithPassword()passing in the given email & password from the form data. - The response is redirected to the root.
- Also grabs the form data.
- ALSO utilizes
createRouteHandlerClient() - Calls
auth.signUp(), passing in the email, password, and email redirect callback.
// api/auth/sign-up
import { createRouteHandlerClient } from "@supabase/auth-helpers-nextjs";
import { cookies } from "next/handlers";
import { NextRequest, NextResponse } from "next/server";

export async function POST(req: NextRequest) {
  // ...
  const cookieStore = cookies();

  const supabase = createRouteHandlerClient({
    cookies: () => cookieStore,
  });

  try {
    await supabase.auth.signUp({
      email,
      password,
      options: {
        emailRedirectTo: `${url.origin}/api/auth/callback`,
      },
    });
  } catch (e) {
    // ...
  }

  return NextResponse.redirect(url.origin, {
    status: 301,
  });
}- Gets the code from the url search params and turns it into a session.
- Read about sessions with supabase.
const url = new URL(req.url);

const code = url.searchParams.get("code");

if (code) {
  const cookieStore = cookies();
  const supabase = createRouteHandlerClient({
    cookies: () => cookieStore,
  });

  await supabase.auth.exchangeCodeForSession(code);
}

return NextResponse.redirect(url.origin);In order to receive live updates, you must:
-
Create a table
-
Enable realtime
-
Create a channel to subscribe to realtime changes within a
useEffect()hook.useEffect(() => { const channel = supabase.channel("whatever you wanna call it") .on("postgres_changes", { event: "INSERT", // listen to whenever a new row is added schema: "public", table: "table-name" }, (payload) => { // handle the payload }).subscribe(); // subscribe to the channel /** * finally, return a callback function to unsubscribe when the component unmounts */ return () => { channel.unsubscribe(); } }, [])
Note: Make sure to mark the component with
"use client"


React hooks (such as useState() & useEffect()) can be utilized to create some custom hooks that will ease the usage of supabase within client components.
For instance, this live click counter

Rather than calling the supabase client directly in the component, here's how the hook is set up:
"use client"

export default function useClicks() {
  const [clicks, setClicks] = useState<{[key: number]: {
    id: number:
    created_at: string;
    userId: string;
  }}>();

  const getClicks = async () => {
    const { data, error } = await supabaseClient
      .from("clicks-table")
      .select("*");

    if (data) {
      setClicks(data);
    }

    // ...
  };

  return {
    getClicks,
    clicks,
    // ...
  }
}
Then, within a client component, deconstruct the getClicks() function from the hook, and call it to retreive all the clicks.
"use client"

export default function Component() {
  const { clicks, getClicks } = useClicks();
  // ...
}