Storage
Before configuring storage, you should already have installed and configured a Codalab server, either by running the AMI we pre-configured for you or starting from scratch.
At this stage, Codalab gives you the option of using either AWS or Azure as your storage of choice. Depending on the vendor you use, you must comment out the one you are not using in the .env file on your server.
The pre-configured AMI is configured for AWS storage, hence use AWS S3 storage.
Contents:
- AWS S3 (Tutorial)
- Azure (Advanced)
- Minio Storage (self-hosting storage)
- Google Cloud (TODO)
On AWS, storage spaces are called 'buckets'. In these instructions, to guide you through the configuration we will use 'competitionXXXX-public' or 'competitionXXXX-private' for the bucket names (where XXXX is some number so the name is unique on the whole AWS globally, e.g. 22), and 'orange' as a IAM username (via Identity and Access Management -- IAM). You will need to choose your own unique bucket names and your own IAM username and replace them in the configuration files.
If you don't already have a IAM username, you'll need to create it (see instructions below) and put those key/secret values into your .env under AWS_ACCESS_KEY_ID and AWS_SECRET_ACCESS_KEY. You also need to note your AWS ACCOUNT ID, eg. 5555-5555-5555. Save your number without hyphens, and replace 555555555555 in the config files.
Sign in or create an AWS account here. Open Information on IAM to get briefly familiar with IAM, then click the 'Get Started with AWS IAM' button. You can also access IAM from AWS dashboard > Services > IAM.
Follow these instructions to create a IAM user and get the keys:
Tutorial: How to create the 'orange' AWS user under IAM
Set the AWS_ACCESS_KEY_ID and AWS_SECRET_ACCESS_KEY fields in your .env file.
-
Sign into the AWS Management Console and open the Amazon S3 console, or type
S3into the Services Search bar, and navigate to the S3 console. -
Create 2 buckets, one named
"competitionXXXX-public"and another"competitionXXXX-private", following the instructions below:A -
Public bucket.-
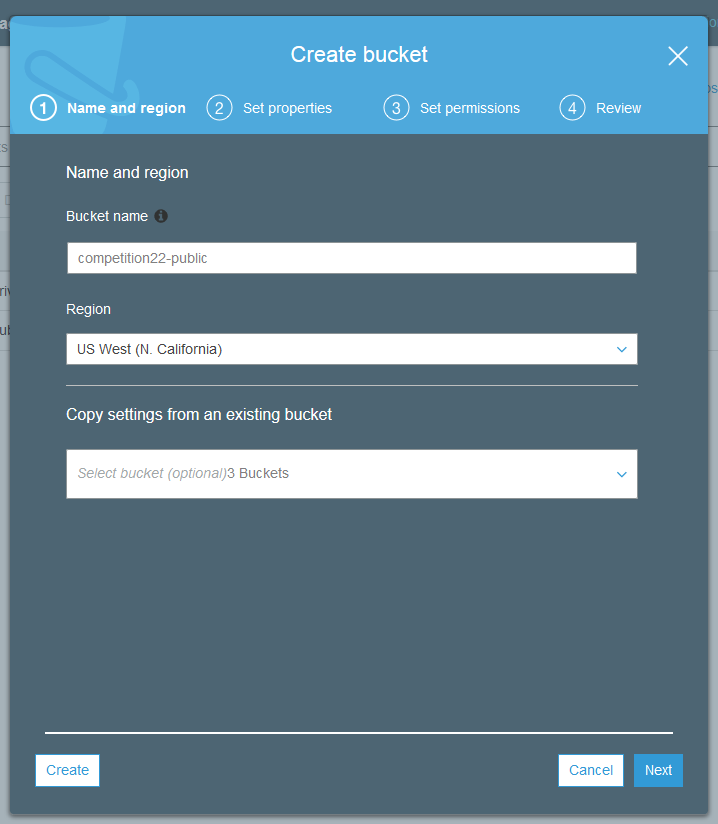
Click Create Bucket
-
In the Create a Bucket dialog box, in the Bucket Name box, enter a bucket name. You'll need two buckets, one public and one private. Let's create the public bucket first. Name it
competitionXXXX-public. -
In the Region box, choose 'US West (N. California)'. The CODE (important) of this region is: 'us-west- 1'. This is the region for the pre-configured AMI. If you use another region, see the codes of other AWS Regions.
-
Leave all other settings as they are by default and click 'Next' in subsequent screens.
-
Click Create.
B -
Private bucket- Click Create Bucket
- In the Create a Bucket dialog box, in the Bucket Name box, enter a bucket name for your private bucket. Something like
competitionXXXX-private. - Do similarly as for the
competitionXXXX-publicbucket.
-
-
Put these two bucket names in your
.envunderAWS_STORAGE_BUCKET_NAMEandAWS_STORAGE_PRIVATE_BUCKET_NAME -
Make sure the
DEFAULT_FILE_STORAGE.envoption is set tostorages.backends.s3boto.S3BotoStorage
Click your bucket, click Permissions, click CORS configuration.

In both buckets set CORS as follows (copy and paste):
<?xml version="1.0" encoding="UTF-8"?>
<CORSConfiguration xmlns="http://s3.amazonaws.com/doc/2006-03-01/">
    <CORSRule>
        <AllowedOrigin>*</AllowedOrigin>
        <AllowedMethod>PUT</AllowedMethod>
        <AllowedMethod>POST</AllowedMethod>
        <AllowedMethod>GET</AllowedMethod>
        <MaxAgeSeconds>3000</MaxAgeSeconds>
        <AllowedHeader>*</AllowedHeader>
    </CORSRule>
</CORSConfiguration>In the following policies, replace only the ID (555555555555) and competition-public / competition-private with your competitionXXXX name. Also replace the 'orange' username if you used a different username.
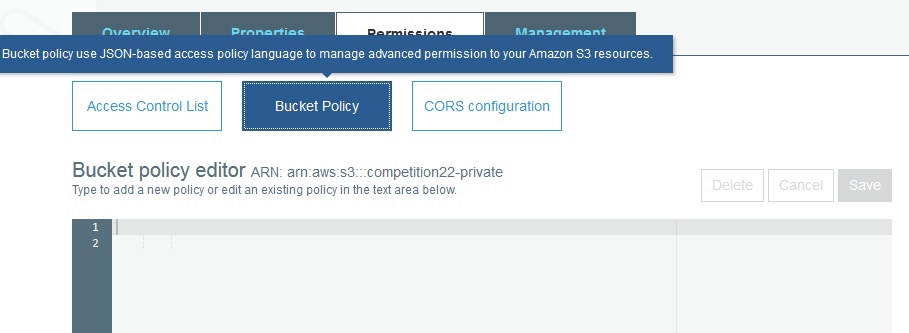
Public
The following policy will allow anyone to download this data, like competition logos.
{
    "Version": "2008-10-17",
    "Statement": [
        {
            "Sid": "PublicReadForGetBucketObjects",
            "Effect": "Allow",
            "Principal": {
                "AWS": "*"
            },
            "Action": "s3:GetObject",
            "Resource": "arn:aws:s3:::competition-public/*"
        },
        {
            "Sid": "",
            "Effect": "Allow",
            "Principal": {
                "AWS": "arn:aws:iam::555555555555:user/orange"
            },
            "Action": "s3:*",
            "Resource": [
                "arn:aws:s3:::competition-public",
                "arn:aws:s3:::competition-public/*"
            ]
        }
    ]
}
Private
The following policy will disallow people from downloading competitions and submission data, but will retain your access (root) and a separate IAM policy (user/orange):
{
    "Version": "2008-10-17",
    "Statement": [
        {
            "Sid": "DenyAllButMe",
            "Effect": "Allow",
            "Principal": {
                "AWS": [
                    "arn:aws:iam::555555555555:user/orange",
                    "arn:aws:iam::555555555555:root"
                ]
            },
            "Action": "s3:*",
            "Resource": [
                "arn:aws:s3:::competition-private",
                "arn:aws:s3:::competition-private/*"
            ]
        },
        {
            "Sid": "DenyAllButMe",
            "Effect": "Deny",
            "NotPrincipal": {
                "AWS": [
                    "arn:aws:iam::555555555555:user/orange",
                    "arn:aws:iam::555555555555:root"
                ]
            },
            "Action": "s3:*",
            "Resource": [
                "arn:aws:s3:::competition-private",
                "arn:aws:s3:::competition-private/*"
            ]
        }
    ]
}
For more details on Bucket Policy syntax and structure, refer to this guide.
Now you need to edit .env file. If you followed the instructions, you already set AWS_ACCESS_KEY_ID and AWS_SECRET_ACCESS_KEY. Now you only need to replace 'competition' with your competitionXXXX name.
If you chose other names, replace the names accordingly.
If you chose different region (not US West (N. California)), you need to change 'us-west-1' substring in the values of two fields (see below).
DEFAULT_FILE_STORAGE=storages.backends.s3boto.S3BotoStorage
AWS_ACCESS_KEY_ID=??????????????????????
AWS_SECRET_ACCESS_KEY=???????????????????????????????????
AWS_STORAGE_BUCKET_NAME=competitionXXXX-public
AWS_STORAGE_PRIVATE_BUCKET_NAME=competitionXXXX-private
AWS_S3_CALLING_FORMAT=boto.s3.connection.OrdinaryCallingFormat
AWS_S3_HOST=s3-us-west-1.amazonaws.com
AWS_QUERYSTRING_AUTH=False
S3DIRECT_REGION=us-west-1
# ^^Set the S3DIRECT_REGION to the AWS region of your storage buckets
Run again the docker compose command on your server:
docker-compose up -dEND OF AWS STORAGE TUTORIAL.
Your Codalab website should now run properly. You should be able to access the codalab website at your DNS, e.g.: http://ec2-54-193-41-242.us-west-1.compute.amazonaws.com.
Try to register and create a competition. If you could upload a competition bundle then the storage works.
Once all works properly you shall change the default passwords in the .env file.
If you got error 'cannot upload the file' there is a problem with storage configuration. What to check if not working?
- Ensure policies/CORS are as provided and were actually SAVED. Check all four configurations.
- Ensure you replaced each occurrence of the ID/competition/orange name.
- Ensure all the names are proper in the .env file, and after saving the .env file you each time ran docker-compose command
- Check if no characters are missing, check if there is '=' after each field name, no space before or after it.
- Check the names used in policies, check if you did not accidentally remove any character such as a colon. Go line by line and verify.
Once you have set up your Azure account, log on to the Azure Portal and follow the steps in this section.
- Log on to the Azure Portal.
- In the left pane, click Storage.
- Select your storage account.
- At the bottom of the dashboard, click Manage Access Keys. Copy your access keys, you'll need them later.
- At the top of the dashboard page, click Containers.
- At the bottom of the Containers page click Add.
- Create a new container named "bundles". Set the Access to "Private".
- Add another container named "public". Set the Access to "Public Blob".
- Install azure-cli
- From azure-cli
sb namespace create <name> <location>where<location>can be "West US" - Log on to the Azure Portal.
- In the left pane, click Service Bus.
- Select the service bus you just created.
- At the top of the screen click Queues.
- Click Create a new queue.
- Click Quick Create and create a new queue named "compute".
- Click Create A New Queue.
- At the bottom of the screen, click New, and create another queue named "response".
- In the left pane, click Service Bus.
- At the bottom of the page, click Connection Information.
- Copy the following connection information:
- Namespace name
- Default issuer
- Default key or
- Shared Access Key Name
- Shared Access Key Value
- Default key
-
Open your local configuration file (
local.py). If there is nolocal.py, save a copy oflocal_sample.pynamedlocal.pyin the same directory. -
In the
Azure storagesection, enter your Azure account details:DEFAULT_FILE_STORAGE = 'codalab.azure_storage.AzureStorage' AZURE_ACCOUNT_NAME = "<enter name>" AZURE_ACCOUNT_KEY = '<enter key>' AZURE_CONTAINER = '<public container name>' BUNDLE_AZURE_CONTAINER = "<private container name>" BUNDLE_AZURE_ACCOUNT_NAME = AZURE_ACCOUNT_NAME BUNDLE_AZURE_ACCOUNT_KEY = AZURE_ACCOUNT_KEY -
In the
Service Bussection, enter your service bus connection information:SBS_NAMESPACE = '<enter the name of your service bus>' SBS_ISSUER = 'owner' SBS_ACCOUNT_KEY = '<enter value for 'default key'>' SBS_SHARED_ACCESS_KEY_NAME = '<shared access key name>' Note:'RootManageSharedAccessKey' is usually the name SBS_SHARED_ACCESS_KEY_VALUE = '<shared access key value>'
Important: Do not change the values for DEFAULT_FILE_STORAGE and PRIVATE_FILE_STORAGE, as these parameters contain the name of the Python class which implements the Azure storage back-end for Django.
-
Open
codalab/codalab/codalabtools/compute/sample.config. -
Save a copy of
sample.confignamed.codalabconfigin the same directory. -
Open
.codalabconfig. -
In the
compute-workersection, enter the configuration settings for the storage account and the compute queue.compute-worker: azure-storage: account-name: "your account name" account-key: "your account key" azure-service-bus: namespace: "your namespace" key: "your secret key" shared-access-key-name: "shared access key name" Usually RootManageSharedAccessKey is the name shared-access-key-value: "shared access key value" issuer: "owner" listen-to: "compute" local-root: "D:\\Temp"
In order to work with competitions and bundles in your local development environment, you will need to manually enable Cross-origin resource sharing (CORS). CORS is a mechanism that allows many resources on a web page to be requested from another domain outside the domain the resource originated from. Web Browsers commonly apply same origin restriction policy to network requests. CORS relaxes these restrictions allowing domains to give each other permissions for accessing each other's resources.
- Click on your storage account and add the following under
CORSsection: - allowed origin = *
- methods = PUT
- headers = *
- max age = 1800 seconds
Note: these are policies for a dev env.