Home
This is the user manual of the ORLANDOviols consort box, or in short 'ovbox'. For installation instructions, see Installation on the Wiki pages.
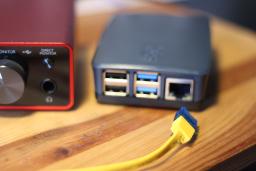
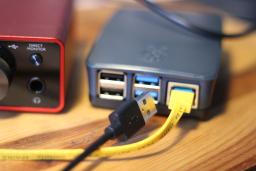
Before powering on the device you need to connect all components:
-
Connect the network cable. Attach one end to the network socket of the Raspberry Pi, and the other end to a LAN socket of your router or another active LAN socket in your room (see below for hints).
-
Connect the external sound card via USB cable. Any USB socket can be used.
-
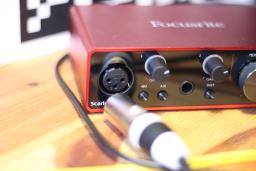
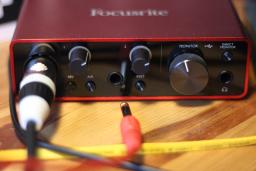
Connect a microphone with the microphone input of your sound card.
-
If you also use an electric output of the instrument (e.g., electric viol, bass or guitar), you may connect it with the second input.
-
Connect the headphones.
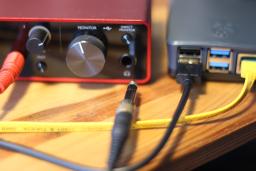
Some sound cards with USB power do not start properly if phantom power is turned on when the power is turned on. Always turn off phantom power before turning on the power. Also make sure that all cable connections are made before powering on - the ovbox software will not automatically detect the sound card if it is plugged in after the system starts. In addition, the network cable must be connected when the device is turned on.
To switch on the device, simply connect it with the power outlet. It takes about one minute to boot and connect to the service. Once the sound card is activated (the control light of the sound card is on), you may switch on the phantom power.
The correct way to power off the system depends on your device: The first generation contained a power off button to shut down the system. Shortly after pressing the button the LED of the sound card will switch off, and the green light on the Raspberry Pi will stop flashing. Now you can unplug the device. The later generation without a power button can be simply disconnected from the power outlet.
The device can be configured via the web portal box.orlandoviols.com. You can register for a free account. Please note that this is a completely non-commercial system, without any warranty and liability.
Please note that currently it should be avoided to log into the same account simultaneously from two different browser windows when using multiple devices in the same user account!
If you start your device for the first time, it needs to be linked with your account. To do so, log onto the web portal. Shortly after powering on your device it should be listed as an unclaimed device. You may need to reload the web page. You can click on the device ID (MAC address) to claim the device.
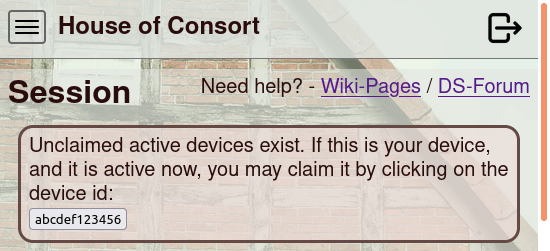
When your device does not appear as unclaimed device this may have several reasons. First check that your device is properly connected to the internet, and that your router allows outgoing network connections (http). You might need to reboot your device, and to reload the web portal page. If all this does not show your device, it might have been claimed by another user. In that case you can try to claim it manually using the form in the user profile, based on the MAC address of your device. You may find that information in the settings of your router. If you accidentally claimed a device which is not yours please click 'not my device' in the device settings dialog, so it can be claimed by the real owner.
Once the device is connected with your account, you will find it in the list of your devices.
Please note that devices can be claimed only in the first 10 minutes after starting. You can re-activate this phase by powering off your client for at least 30 seconds and restarting it.
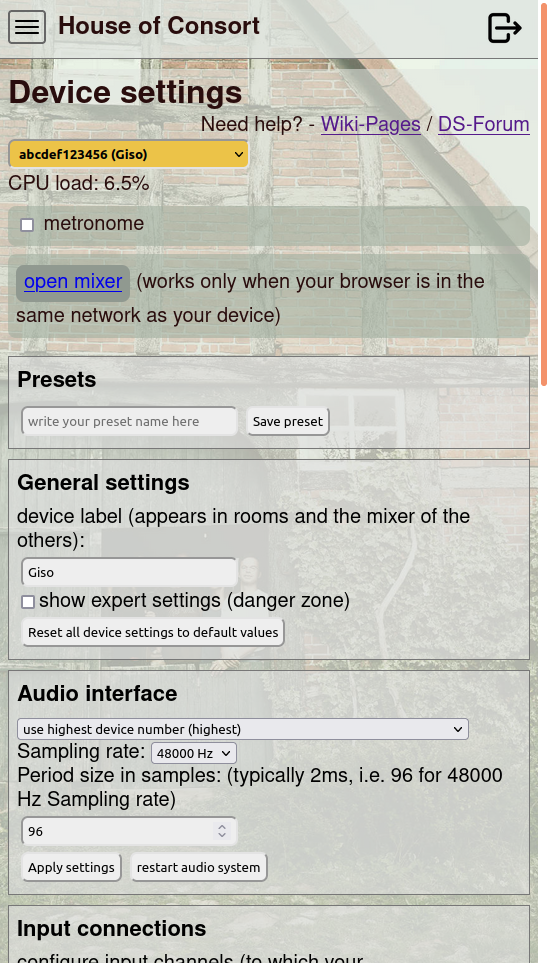
After selecting your device, you may change the device settings. In the device settings dialog you will find five sections: general settings - the human-readable label of your device and the sound card control. The device label will be visible to other users. In the audio settings you can change all parameters related to the audio rendering of your device, e.g., connections, gains, reverb rendering etc. In the network settings you will find parameters related to the network connection. In the device version section the current version information of your device is shown, if known by the system. With recent versions it is also possible to start a firmware update from here. Finally, the device ownership can be controlled: The device can be assigned to another existing owner, and accidentally claimed devices can be returned by pressing 'not my device'.
In the input port fields you may define to which sound card input
your microphone or instrument is connected. Typically you will have
your microphone connected to system:capture_1 (the first hardware
input) and your electric instrument to system:capture_2 (the second
hardware input). If you leave one of the fields empty, no connection
is made and no signal is transmitted for that channel. If both fields
are left empty, no signal is sent at all (see also section 'network
structure' below for information on the network load). To connect two
inputs, but send only one channel, you may set input port 1 to
system:capture_[12] (or any other regular expression for port
matching) and leave the second field empty.
The playback gain field controls the volume of your sound at the others and yourself - changing this value is equivalent to changing the input gain of your amplifier.
The master gain field controls the output volume, and affects only your own device. It corresponds to turning the knob of the headphone volume.
Please note that in general these values should be used only to fine-tune the volume settings - always try to control the input and output volume using your hardware knobs first.
The ego monitor gain field controls the level of your own channels in your own mix. This value does not affect the mix of the others. The 'ego monitor' can also be completely deactivated.
Here you can control the buffer length used to compensate for your network jitter. The delay in the field sender jitter is the value added to the buffer of all other users when receiving your signal. The delay in the receiver jitter field is added to your buffer. Both values are given in Milliseconds. The total delay will be network delay (half of the ping latency), the total buffer length (sum of your receiver jitter and the peers sender jitter), and the hardware delay of the sound cards (half of your roundtrip delay and half of your peers roundtrip delay). The peer-to-peer mode checkbox toggles between peer-to-peer mode (direct connection between your device and your peers) and the server mode (connection via the room relay server).
-
If you hear dropouts but not your peers, you should increase the receiver jitter.
-
If all your colleagues hear dropouts from you but not from the others, then you should increase the sender jitter.
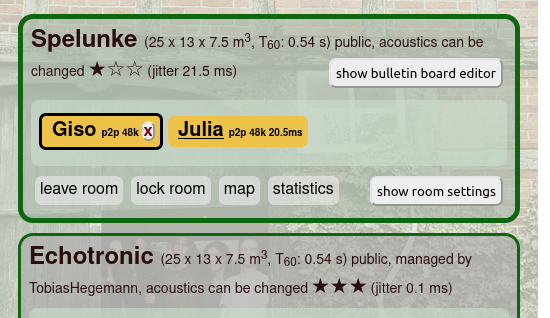
The available rooms are listed below the device selector. To enter a room, click on 'enter'. If you want to change your position in the virtual acoustic playback, you can click on the name of a peer to swap seats. It can take up to 15 seconds for the changes made on the web portal to be applied to your device.
Only publicly accessible rooms or rooms that belong to one of your groups will be displayed. If you own a room, you can also change the room acoustic parameters or the room name. Some rooms can be edited by everyone in the room.
Unmanaged rooms are cleaned when all devices in this room are inactive for one hour.
The rooms are hosted on relay servers. Depending on the responsiveness of the servers, the rooms are rated with one, two or three stars. Responsiveness is only relevant if one or more users in a session are unable to use peer-to-peer mode (see above).
★☆☆ best for peer-to-peer mode
★★☆ can be used in both modes, drop-outs may occur
★★★ high quality server
High-quality (dedicated) servers are very expensive to rent, thus we currently offer access only to donors of the ovbox system.
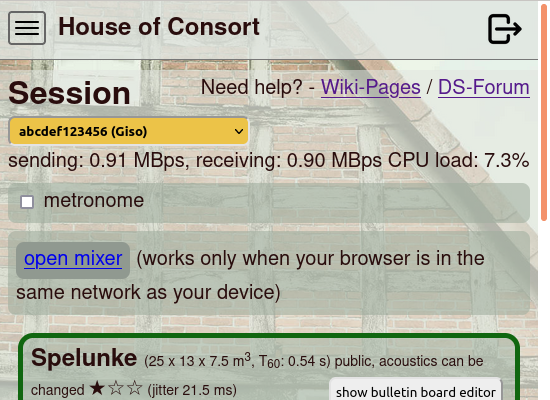
The levels of your own instrument, of the others and of the reverb can be controlled in a remote mixer. This mixer is provided by your Raspberry Pi device. When your browser is in the same network as your device, you can open it by clicking on the 'open mixer' link.
Please note that settings made in the remote mixer will be lost after any changes to the room selection, after altering the network or audio settings of your device or the device of your peers in the web portal, or after restart of your device.
The audio quality and latency between peers depends mostly on the quality of your internet. We highly recommend to connect your device directly to your router, or via ethernet technology only. This means no WiFi bridges or powerline ethernet! These technologies introduce a significantly higher amount of packet loss, jitter, and latency.
As a rough guide here are additional delays and jitter caused by local network distribution methods (experienced by us, values may differ at your location):
| additional delay | additional jitter | |
|---|---|---|
| network switch | < 1 ms | < 1 ms |
| powerline eth. | 5 ms | 10-15 ms |
| WiFi | 0-5 ms | 10-30 ms |
In the ORLANDOviols consort box system, three main components are involved: The box (your device and that of your peers), the web portal for configuration and room booking, and the room relay server. The audio connection is handled between the room relay server and your device.
In the peer-to-peer mode the room relay server is used for determining the peer's IP addresses and port numbers, and for establishing the peer-to-peer connection (mesh structure). Your device will send your audio signal(s) to all of your peers. For example, if you play with four musicians, your device will send four copies of your signal. This is approximately 1 MBit/s for each channel and peer, e.g., when sending two channels to three peers you will need an upload rate of at least 6 MBit/s. You will also receive a signal from each peer - if two are sending one channel and one other peer is sending two channels, this would result in approximately 4 MBit/s downstream bandwith.
In server mode all audio traffic is sent via the server. On the receiver side the amount of traffic is the same (just that all the traffic is received from the server and not from the peers directly). However, now the server creates the copies for the peers, and your device will send only one copy, which in the same situation as above would result in 2 MBit/s upload requirements. However, the delay might be larger because the ping time from your device to the server and from the server to the peer need to be summed. Furthermore, the peer may introduce some additional jitter which requires an increased buffer size. Therefore, typically the peer-to-peer mode should be preferred.
It is possible to have some devices in peer-to-peer mode and others in server mode within the same session.
Next to the optimised latency and audio bandwidth a main difference to network communication solutions such as Skype, jitsi or zoom is the spatial rendering of the sound: The sound of the ensemble is reproduced with virtual acoustics. You and the peers are virtually arranged in a circle with a diameter of 2.4 metres. This circle of musicians is in the middle of the room. Early and late reflections are simulated based on the room acoustic properties.
Documentation and images CC BY-SA 4.0.