Repository navigation
Deployment on Sherlock (Updated, with Virtual Environment)
Since the Sherlock system doesn't provide the latest version of PyTorch, and the older version of PyTorch leads to compatibility issues if a newer version of PyTorch-lightning or torch-scatter is installed, we encourage users to install PyTorch following this guide instead of using the one provided by Sherlock.
Because Sherlock only provides 15GiB disk space to each user, we would need to install things to the lab's shared disk on OAK. We will be creating a Python virtual environment on OAK and installing packages there.
For commands starting with a $ symbol, you should run it in the bash directly; of course, delete the $ symbol before running. For commands starting with >>> you should run them in the python terminal; of course, remove >>> before running.
See here for a complete list of modules provided by Sherlock.
I have created a virtual environment on Sherlock, in the lab's shared directory. All you need to do is:
-
$ ml python/3.9.0to load python3 on sherlock -
$ source /oak/stanford/groups/athey/tianyudu/torch-env/bin/activateYou should see a(torch-env)in your terminal like in the screenshot below:

You are ready to go now!
You can skip this if you chose to follow the deployment shortcut option, you need to repeat these two steps everytime you got a new computing node.
- Request a computing node, preferably with a GPU.
- Load python 3 on sherlock by running
$ ml python/3.9.0or a later version ofpythonmodule provided by Sherlock listed here. -
$ cd /oak/stanford/groups/athey/navigate to the lab's shared directory on OAK, make a subdirectory there by typing$ mkdir <YOUR_NAME>, for example, I have a directory there/oak/stanford/groups/athey/tianyudu. - Navigate to the directory you just made, for example,
$ cd /oak/stanford/groups/athey/tianyudu(replacetianyuduwith the name of directory you just created). - Create a virtual environment called
torch-envusing$ python3 -m venv torch-env. This command should create a directory called/oak/stanford/groups/athey/tianyudu/torch-env. - Activate the virtual environment by typing
$ source ./torch-env/bin/activate, you should see an additional(torch-env)in your terminal. See the screenshot below, the(torch-env)is at the left end, it means you are now in thetorch-envvirtual environment.

- Check
$ which pip3, you should get something like/oak/stanford/groups/athey/tianyudu/torch-env/bin/pip3, we want to make sure that thepip3installer is the one in the virtual environment because we will be installing packages into the virtual environment. - Run
$ nvidia-smito check the CUDA version, the screenshot below is an example output with CUDA version 11.7.
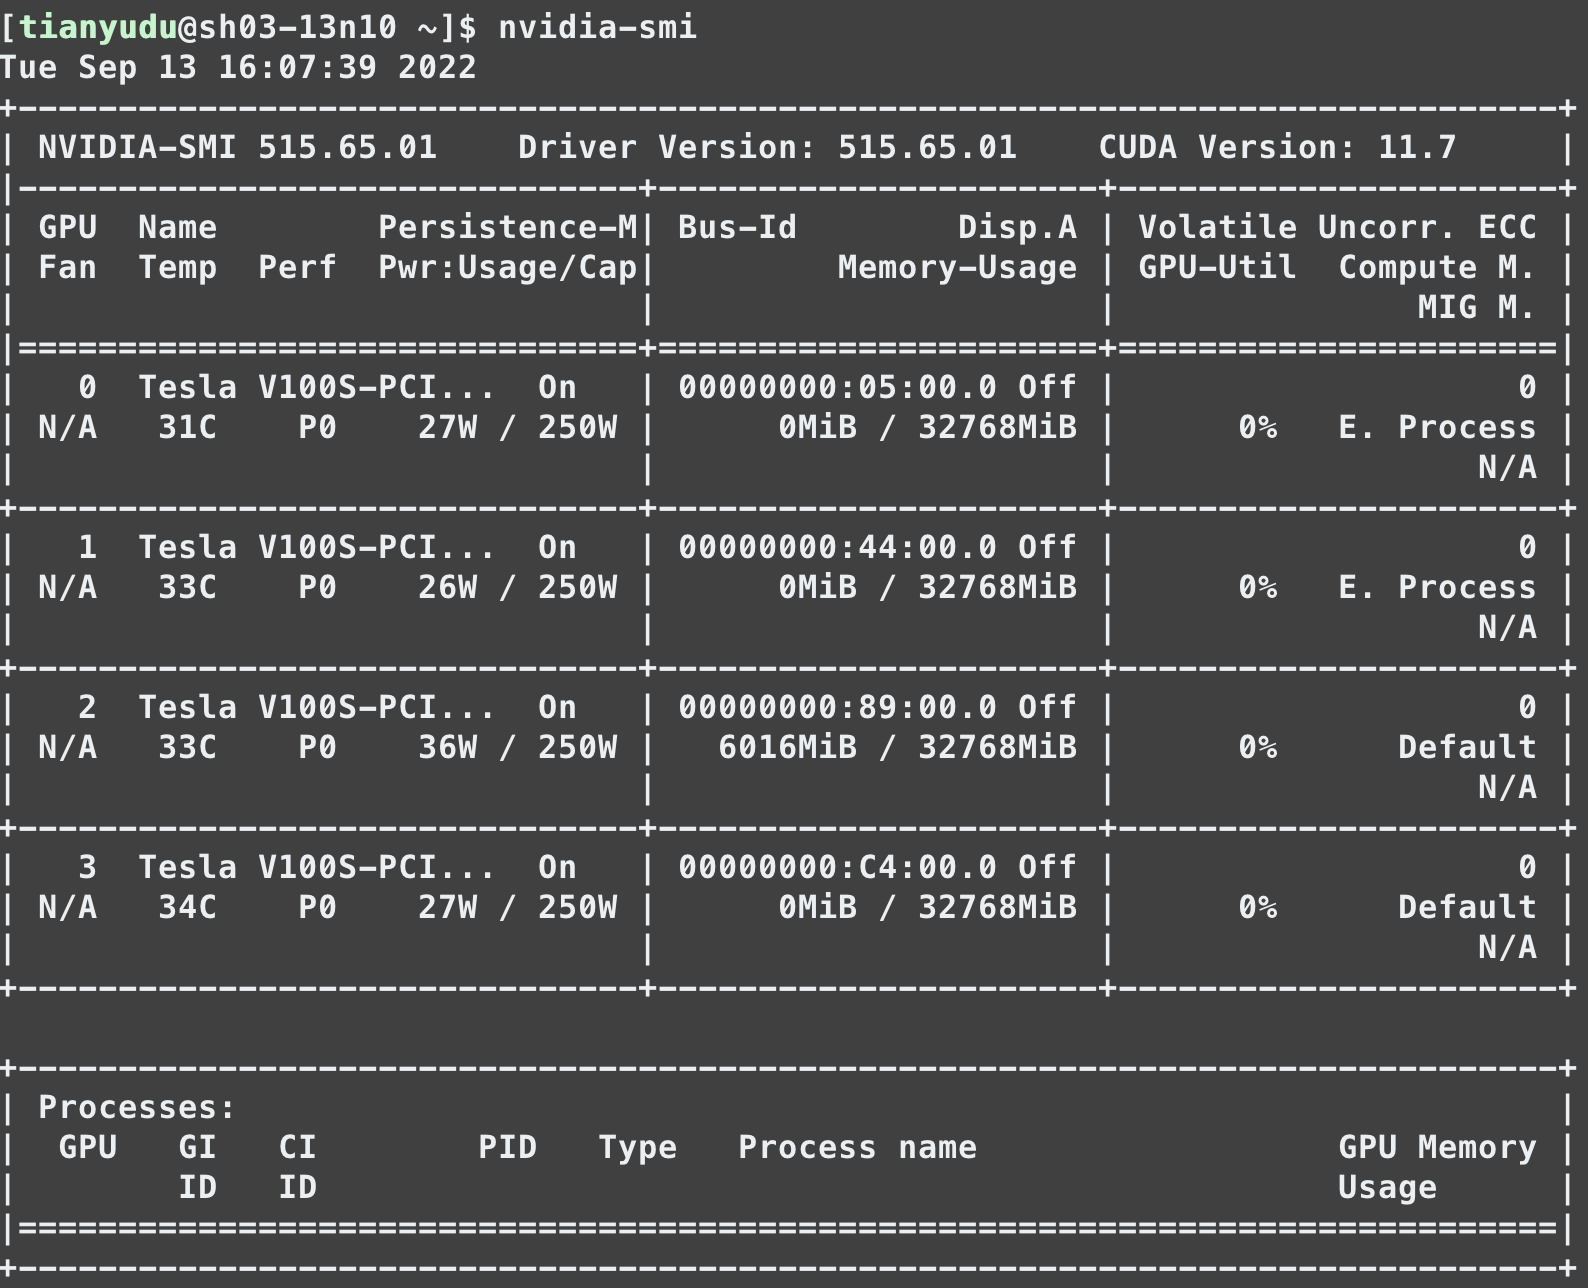 9. Install the latest version of PyTorch using `pip` following the instruction [here](https://pytorch.org/get-started/locally/). You want to choose PyTorch build=stable, OS=Linux, Package=pip, Language=Python, Compute Platform to be the latest CUDA version.
10. Open up a python terminal `$ python3`, and check the version of PyTorch installed by typing `>>> import torch; torch.__version__`, the example screenshot below indicates PyTorch version `1.12.1` with CUDA `11.6` has been installed (the dcemial is omitted).

- Quit the python terminal to bash by typing
>>> quit(). - Install the
torch-scatterfollowing the instruction here by typing$ pip install torch-scatter -f https://data.pyg.org/whl/torch-1.12.1+cu116.html, you should replace1.12.1andcu116with the version you seen in the previous step. Please note that there is decmal in PyTorch version (i.e.,1.12.1) but not in the CUDA version (i.e.,116). - Install other dependencies of our package by typing
$ pip3 install numpy termcolor scikit-learn pandas tabulate matplotlib seaborn pytorch-lightning --no-cache. - Lastly, install Torch-Choice and BEMB:
$ pip3 install torch-choiceand$ pip3 install bemb.
You are ready to run BEMB on sherlock!
You can run the following code snippet to verify the installation.
- Start an python terminal by typing
$ python3. - Copy-paste the following code to the python terminal and see if it runs:
import numpy as np
import pandas as pd
import torch
from torch_choice.data import ChoiceDataset
from bemb.model import LitBEMBFlex
from bemb.utils.run_helper import run
import matplotlib.pyplot as plt
import seaborn as sns

# simulate dataset
num_users = 1500
num_items = 50
data_size = 1000

user_index = torch.LongTensor(np.random.choice(num_users, size=data_size))
Us = np.arange(num_users)
Is = np.sin(np.arange(num_users) / num_users * 4 * np.pi)
Is = (Is + 1) / 2 * num_items
Is = Is.astype(int)

PREFERENCE = dict((u, i) for (u, i) in zip(Us, Is))

# construct users.
item_index = torch.LongTensor(np.random.choice(num_items, size=data_size))

for idx in range(data_size):
    if np.random.rand() <= 0.5:
        item_index[idx] = PREFERENCE[int(user_index[idx])]

user_obs = torch.zeros(num_users, num_items)
user_obs[torch.arange(num_users), Is] = 1

item_obs = torch.eye(num_items)

dataset = ChoiceDataset(user_index=user_index, item_index=item_index, user_obs=user_obs, item_obs=item_obs)

idx = np.random.permutation(len(dataset))
train_size = int(0.8 * len(dataset))
val_size = int(0.1 * len(dataset))
train_idx = idx[:train_size]
val_idx = idx[train_size: train_size + val_size]
test_idx = idx[train_size + val_size:]

dataset_list = [dataset[train_idx], dataset[val_idx], dataset[test_idx]]

bemb = LitBEMBFlex(
    learning_rate=0.03,  # set the learning rate, feel free to play with different levels.
    pred_item=True,  # let the model predict item_index, don't change this one.
    num_seeds=32,  # number of Monte Carlo samples for estimating the ELBO.
    utility_formula='theta_user * alpha_item',  # the utility formula.
    num_users=num_users,
    num_items=num_items,
    num_user_obs=dataset.user_obs.shape[1],
    num_item_obs=dataset.item_obs.shape[1],
    # whether to turn on obs2prior for each parameter.
    obs2prior_dict={'theta_user': True, 'alpha_item': True},
    # the dimension of latents, since the utility is an inner product of theta and alpha, they should have
    # the same dimension.
    coef_dim_dict={'theta_user': 10, 'alpha_item': 10}
)

bemb = bemb.to('cuda')

# use the provided run helper to train the model.
# we set batch size to be 5% of the data size, and train the model for 50 epochs.
# there would be 20*50=1,000 gradient update steps in total.
bemb = bemb.fit_model(dataset_list, batch_size=len(dataset) // 20, num_epochs=50)You don't need to go through these installation steps again next time! For the next time (e.g., after requesting a new computing node), all you need to do is
- Use
$ ml python/3.9.0to load Python3 (or a later version you chose in Step 2 above. - Activate the virtual environment you created, for example,
$ source activate /oak/stanford/groups/athey/tianyudu/torch-env/bin/activate, then you are ready to go.
- After a failed
pipinstallation (e.g., an incompatible version of the software was downloaded), you should use the--no-cacheflags to download a fresh copy from the Internet in the next attempt. For example, you should usepip3 install numpy --no-cache.