Repository navigation
User guide
This page mirrors
docs/USER_GUIDE.mdfrom the repository and is regenerated on every merge tomain. To correct it, edit that file; changes made here are overwritten.
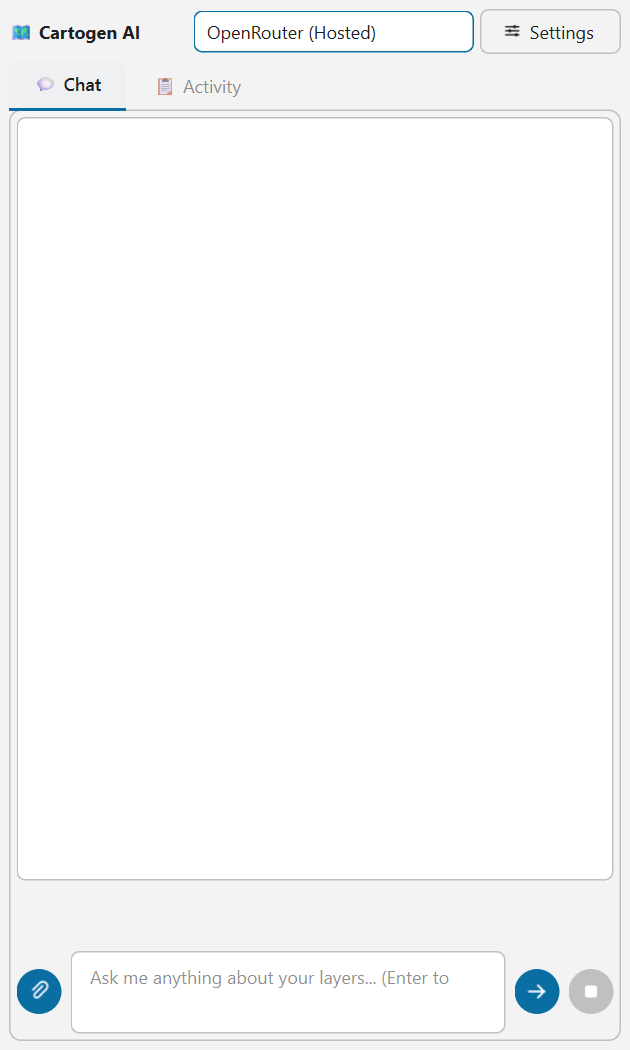
Open Cartogen AI from the toolbar icon or the Plugins menu. It's a dock
panel (drag it to float, or dock it left/right) — one continuous scroll, not
separate tabs: a sticky plan strip for any active multi-step task sits above
the chat thread itself, so you never have to switch views mid-conversation to see
what the agent is doing.
The header has two buttons alongside the provider dropdown:
- 🗂 Memory — opens the stored-memory dialog (project notes, learned preferences, export/clear controls — see "Project memory" below).
- ⚙ Settings — provider, API keys, and safety toggles.
Help lives in Plugins → Cartogen AI → Help on the QGIS menu bar rather than in the dock
itself — it opens a standalone window with the provider list, quick tips, and example
prompts (built from the same data as this guide so it can't drift out of sync), and shows
the installed version number at the top of its own content.
The very first time the plugin loads, a short welcome dialog appears asking your role/use
case, QGIS experience level, and preferred communication style — this takes a few seconds and
helps the agent tailor its tone and detail level (a beginner gets more explanation, an expert
gets less; a "concise" preference gets shorter answers). It's entirely optional — click Skip
for now and nothing changes. Answers are saved as a plain, human-readable user_profile.md
file in your QGIS profile folder, not a hidden settings blob — open and edit it directly anytime,
or revisit the same picker later from Settings → Edit My Profile…. The Help window (see
below) also opens automatically the first time, and again once after any future update, so
what's new/available stays easy to find without having to go looking for it.
- Open Plugins → Cartogen AI → Connections... (or press Connections… at the top of Settings). The window lists every connection on the left; the one you click shows its page on the right. Looking at a page changes nothing: press Use this connection to make it the one the assistant uses.
- Pick a connection: OpenRouter, Gemini or Ollama. (OpenAI and Claude were removed from the list in rc25 because they were never tested; a provider saved by an older version falls back to OpenRouter. The Cartogen API entry in Settings is a stub until a hosted gateway exists.)
- Paste an API key (for Ollama, enter your local server's endpoint URL instead — no
key needed). The key field auto-fetches that provider's live model list when you
tab out of it. Get a key from the provider you picked:
- OpenRouter (has a genuinely free tier covering many models — a good default if you don't already have a key with another provider): https://openrouter.ai/keys
- Google Gemini: https://aistudio.google.com/apikey
- Pick a model, or leave it on Auto — the agent then routes simple requests to a cheaper/faster model and complex multi-step requests to a stronger one automatically, based on the request's wording and length. (Ollama always uses whatever model you pick; local models aren't a cost concern the auto-router needs to optimize for.) When the window opens it also looks for the Claude Code, Codex and Antigravity (agy) programs on your computer and shows, under Found on this computer, which are installed and whether you are signed in. This asks no model anything. A signed-in one gets a Use button (after you tick the box under "Your own CLI login"); nothing is switched for you, because a CLI sends your conversation to that vendor.
- Press Use this connection and then OK. You can switch providers anytime from the small dropdown in the dock header without reopening the window. A mark beside each connection in the list shows whether it has a key or program set (●), has been checked this session (✓), or is empty (○).
Using your Claude Code, Codex or Antigravity login instead of an API key (experimental). Pick the CLI in the list; its page has one main button that is always the next step:
- Copy install command — the program was not found. Paste the command in a terminal, then press Detect again. If it works in your terminal but not here, hover the "looked in N folders" text, or press Browse... and pick the program yourself.
- Sign in... — opens the program's own sign-in (a terminal or your browser). Finish it there; the window notices by itself, tests the connection and starts using it.
- Connect — signed in; asks the program one short test question (a few tokens of your plan).
- Use this connection — tested and ready.
The first time, you are asked to agree: the conversation, including any layer or attribute data a tool surfaces, goes to the vendor's service (Anthropic for Claude Code, OpenAI for Codex, Google for Antigravity), so treat it as a cloud provider. Cartogen AI never sees or stores your login. The Gemini CLI is no longer offered: Google stopped serving personal Google accounts through it on 18 June 2026; the Antigravity CLI is Google's replacement, or use the Gemini API key connection.
Choosing the model on a CLI page. The Model (optional) box is a drop-down you can also type in.
Claude Code lists its three aliases (sonnet, opus, haiku), Codex lists two names from OpenAI's model page,
and Antigravity fills the list from its own agy models command once the program is found. Newer names
may exist that are not listed: type them in. Leave it on Auto to use the program's own default.
The Antigravity connection is new and has not been run against a real agy yet (the same "experimental"
label as the other two applies); if it fails, the message says which step.
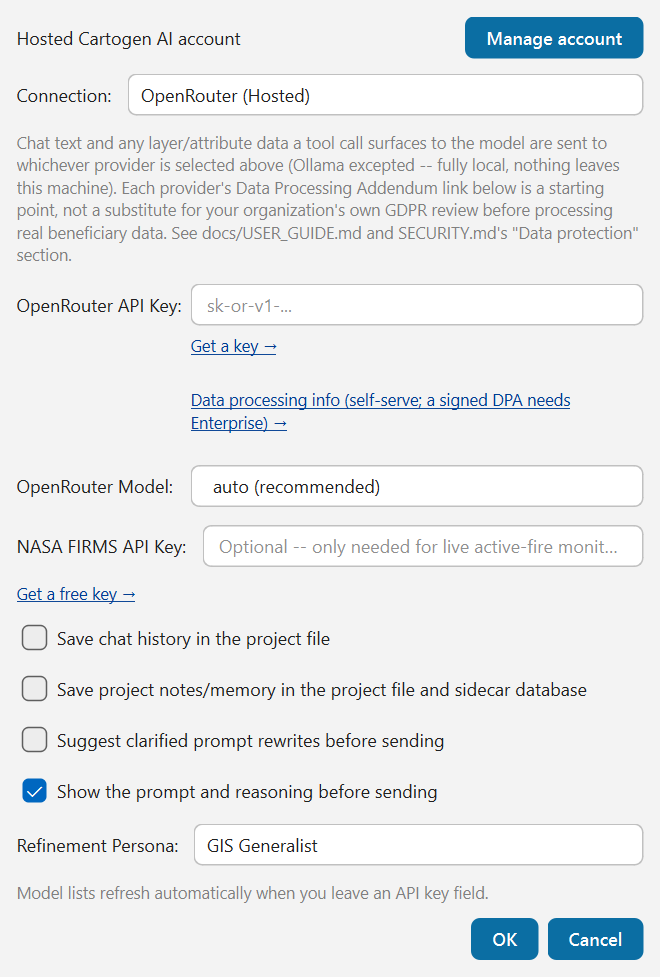
NASA FIRMS API Key (optional) — only needed for fetch_nasa_active_fires (live
satellite fire/thermal-anomaly monitoring, see "Live hazard monitoring" below). Every
other tool works without it. Get a free key at
firms.modaps.eosdis.nasa.gov/api/area
and paste it into this field — stored the same securely as any provider key.
If Settings needed to fall back to storing a key without encryption (rare — only happens if QGIS's own encrypted credential store isn't available on your system), you'll get a warning dialog saying so.
Settings also has a "Save the conversation in the project file" checkbox, on by
default (changed in 1.16.0-rc8; it used to be off). With it on, the full conversation
for a project is saved inside that project's .qgz file and kept for the life of the
project, so it is still there — and exportable with Export My Data — next time you open
it. Very long projects are bounded (the oldest messages are dropped first). A project file
is something you might share, email, or commit elsewhere, and the conversation travels
with it: turn this off for projects that discuss sensitive material. Turning it off
doesn't remove what was already saved; use Clear Saved Chat in the Memory window to
delete it (copies of the project file you already shared keep their own copy).
If you want to use the hosted Cartogen AI API rather than bring your own provider key:
- Open Plugins → Cartogen AI → Connections... and click Manage account.
- Enter the Cartogen account service URL supplied by your administrator.
- Use Create account for a new account, or Sign in for an existing one.
- If the service requires activation, follow its activation email before signing in.
- Paste the separately assigned Cartogen AI API key from the account portal.
- Select Cartogen AI (Hosted), press Use this connection and click OK.
The account session and hosted API key are stored separately in QGIS's encrypted credential store. The plugin never saves the password in QGIS settings, and the hosted API key is never shown in plain text after the dialog closes. Local/BYOK providers remain available and do not require a Cartogen account.
The account service URL must be an absolute http:// or https:// URL. Use HTTPS
for any non-local deployment. The current repository contains the client and UI
flow, but live account creation requires a deployed/configured Cartogen service.
Cartogen AI carries the Humanitarian Mapping Task Register — 857 mapping tasks grouped into 49 sections, each one describing what it needs, what tools it should use, and what you should end up with. When you type a request, it is matched against that register locally, on your machine. No API call is made to do the matching, and the register itself is never sent to the model.
Where it goes. Once matched, the request text -- and any layer/attribute data a tool call surfaces to the model -- is sent to whichever provider you selected in Settings (OpenRouter or Gemini), over that provider's own API, using your own key. Ollama is the exception: it runs entirely on your machine, so nothing leaves it. Settings shows each cloud provider's Data Processing Addendum link as a starting point, but confirming a lawful basis and transfer mechanism for the data you send is your organization's own responsibility, not something this plugin can determine for you -- see SECURITY.md's "Data protection" section before sending real beneficiary data.
If your deployment has completed a DPIA sign-off (see SECURITY.md's "DPIA determination and deployment constraints"), that determination may restrict which provider you're allowed to use for which kind of data -- e.g. requiring Ollama for anything touching protection, incident, or displacement attributes, and reserving cloud providers for anonymized or aggregated data only. Check with your organization's DPO/GIS lead before assuming cloud is approved for the specific data you're working with; the plugin itself does not enforce this restriction today.
What the match is used for:
Missing information. If the task cannot proceed without something — which hazard, which facility type, which sector — you are asked once, before anything is sent. There is no default for these, because guessing a hazard type produces a confidently wrong map. Things the plugin can work out for itself (the area of interest, from the layers you have open) are not asked about at all.
The prompt preview. Before the request goes anywhere, the assistant posts a normal chat message showing the exact text that will be sent, and why:
- which task matched, and how confident the match was
- what you will get back — a styled layer, a PDF layout, an HTML dashboard, a CSV, a written report
- any value assumed on your behalf, stated in full
- what each attached file will be read as
Reply like you would to anything else. Confirming (e.g. "yes", "send", "go ahead") sends what you saw in the preview. Typing anything else sends your own wording instead, with no enrichment at all — for when the matched task is simply wrong. Replying "cancel" (or "no", "stop") abandons it. You can turn the preview off in Settings; it is on by default, because it exists so that nothing is added to your message without you seeing it.
Attachments. A file you attach is classified and routed to the tool that can read it:
| You attach | It becomes |
|---|---|
| a PDF situation report | its tables, extracted (text as fallback) |
| a Word document | its tables, extracted |
| a plain text file | text read straight into the request |
| a photo or scanned map | segmented for features, or georeferenced |
| a CSV/Excel 3W file | organisational presence per admin unit |
| a CSV/Excel dataset | a layer, or a table to aggregate |
| a shapefile, GeoJSON, GeoPackage, GeoTIFF | a layer in your project |
The file is analysed when you attach it, and is also carried into your next message so it becomes part of the task rather than a separate question.
The output you were promised. After the answer comes back, the tools that actually ran are compared against what the task said you would get. If you were told you would get an HTML dashboard and the step that writes it never ran, the plugin says so and asks for it once — never in a loop. If it still does not appear, you are told that plainly rather than being handed a description of a file that was never written.
Type a request and press Enter (Shift+Enter for a new line) or click the send
button (the arrow, right of the input box). For example prompts, see
Plugins → Cartogen AI → Help.
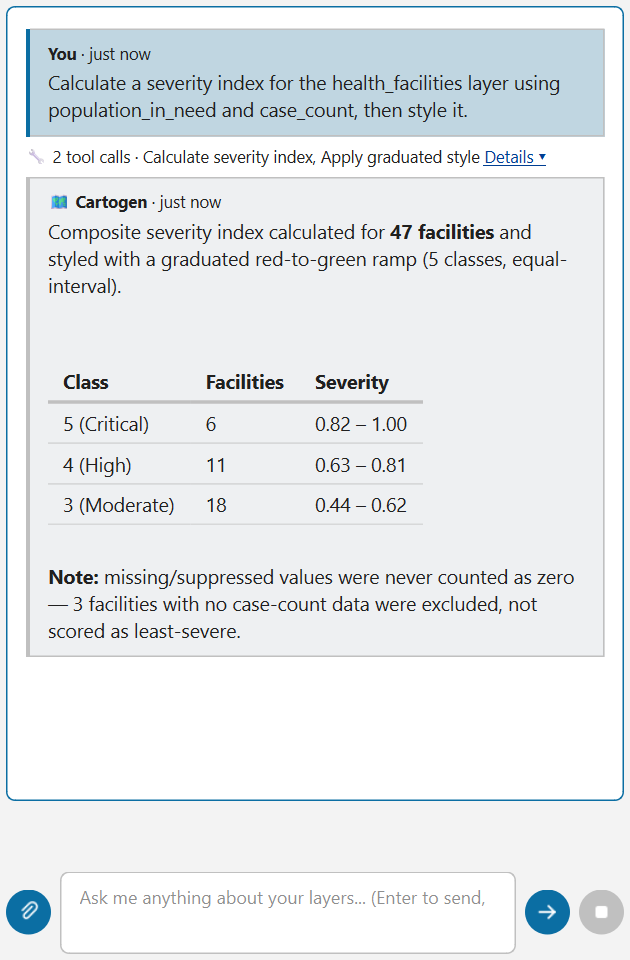
The reply itself is real Markdown — tables, bold text, lists, and code blocks all render formatted, not as raw text.
While a request is running:
- The status line shows what the agent is doing right now (e.g. "Thinking...", a specific tool name) — this updates in place rather than adding a new line each time, so a multi-step request doesn't fill the chat log with live progress chatter.
- Click the stop button (next to Send) to cancel it. This is cooperative, not instant — it stops the agent before its next step (another model call or tool call), not mid-flight, so there can be a short delay after clicking before it actually stops.
Once a turn that called any tools finishes, one compact line summarizes what ran (e.g. "🔧 3 tool calls · Calculate severity index, Apply graduated style, Export dashboard") — click Details ▾ to expand it into a per-step list, or leave it collapsed. If any step failed, its full error text always shows directly underneath regardless of whether the summary is expanded or collapsed — failures are never hidden behind a click.
Click the attach button (paperclip, left of the input box) to attach a PDF, Word document, image, CSV, or Excel file.

- PDF/Word: full text is extracted and given to the agent. If the data you actually need is in a table (a sitrep's "IDPs by district" table, a needs-assessment matrix), ask explicitly, e.g. "extract the tables from this PDF" -- the plain-text extraction flattens tables into hard-to-use text, but the agent can pull real structured rows/columns instead when asked.
- Images: sent directly to the model for visual analysis — this only works if your current provider/model supports vision (Claude and GPT-4o/GPT-5-class models do; many smaller/free models don't).
- CSV/Excel: the agent gets a short preview (column names, row count, a few sample rows) plus the real file path. If you want the full dataset actually loaded into the project rather than just described, ask for that explicitly, e.g. "load this as a layer" — the agent will use the full file, not the preview.
Optional file-parsing packages (PDF/Word/Excel support, plus PDF table extraction and chart generation) need to be installed via the qpip plugin dependency prompt, or manually — see the main README. If they're missing, attaching that file type gives a clear error telling you what to install rather than failing silently.
For anything involving several distinct steps, the agent creates a visible plan in the sticky strip above the chat thread: a progress bar (e.g. "3/4 steps complete", or "3/4 steps complete — 1 needs you" when a step is waiting on your decision) and a list of tasks, each showing TODO → IN PROGRESS → DONE (or FAILED). Click a task row to open its inspector — result, rationale, any code it ran, and action buttons for that task's current state:
-
✔ Confirm and Apply Edit — appears for a task in
PREVIEW_READYstate (see "Destructive actions" below); approves and executes it. -
✕ Cancel — cancels a
PREVIEW_READYtask instead of confirming it. -
🔁 Retry — re-runs a
FAILEDtask. - ✏️ Edit and Resend — pre-fills the input box with an editable prompt for that task's description so you can adjust it before resending (doesn't auto-send).
- 📋 Copy Snippet — copies the task's PyQGIS code (if any) to the clipboard.
The strip's own ✕ button clears the currently visible plan. The dropdown next to the plan title lets you browse plan history (the last 5 plans this session) without losing the live one — selecting an older plan is read-only browsing; sending a new message automatically snaps back to the live plan.
The agent can remember facts across the conversation (and across QGIS sessions, tied
to the current project file) via store_project_memory/store_global_memory. Click
🗂 Memory in the dock header to see what's stored, with a search box to filter it,
an Export My Data button, and 🗑 Clear Project Memory/🗑 Clear Global Memory
buttons.
By default, every loaded layer's schema (field names, geometry type, feature count) is
visible to the model so it can answer questions about your project without you having
to spell out every layer by name. Click the layers icon next to the input box to
choose which layers' schema Cartogen can actually see for a given question — each layer
defaults checked, except one you've already tagged RESTRICTED/SENSITIVE via
set_layer_sensitivity, which defaults unchecked. Cartogen sends only a schema and a
sample of rows for whatever's checked, never a whole table. This is opt-out, not
opt-in — if you never open it, nothing changes from today's behavior.
If a tool you run again produces a layer with the same name as its own earlier result (for example a second
buffer called "Buffered"), the earlier one is kept and renamed "Buffered (superseded)" (numbered if there are
several), and the new result takes the name. Nothing is deleted or moved, the earlier layer keeps its history and
protection settings, and the reply says what was renamed, so later requests by name reach the newest result.
A layer you made, another tool's output, and data you loaded yourself are never renamed. To switch this off, set
the QGIS setting cartogen_ai/mark_superseded to false. It applies to the tools run on the main path; the
network fetch tools are not covered yet.
Removing a layer or running a field calculator mutation always goes through a preview-then-confirm gate: the agent shows what it's about to do as a card right in the chat (layer, field, the code that will run) with Apply edit/Cancel links, and also waits for an explicit confirmation — clicking those links, replying "Confirm"/ "cancel" in chat, or using the task inspector's buttons all resolve the exact same way. It cannot skip this by itself, even if prompted to (the confirmation flag isn't something a tool call can set; only you approving it can).
Before mapping, exporting, or reporting on individually-identified sensitive locations
(GBV survivors, individual IDP households, named protection cases), use
obfuscate_sensitive_points first — a Do No Harm safeguard, and increasingly an explicit
donor/ECHO compliance requirement. Three methods, in your layer's own CRS units (not
meters — reproject first if a specific real-world distance matters, since a geographic
CRS would otherwise scatter points by hundreds of kilometers):
-
grid_snap— every point sharing a grid cell moves to that cell's center. The strongest protection: multiple true locations become genuinely indistinguishable, not just displaced. -
jitter— random displacement within a radius. Still a 1:1 point per input point. -
admin_unit_snap— moves each point to the centroid of the admin-boundary polygon it falls within (needs a separate polygon layer of those boundaries).
The agent won't apply this automatically — it's a judgment call about the data, and it'll ask which method you want when it looks relevant. Not every point layer needs it (facility locations, aggregate counts, and non-identifying incident logs don't).
geocode_batch and geocode_and_enrich send the place or address text to a public server (OpenStreetMap Nominatim). They therefore refuse text that comes from a layer tagged RESTRICTED or SENSITIVE (or derived from one), whatever AI provider you use, and say so before anything is sent. The check recognises the text by its values, so it does not depend on the agent saying where the text came from. To geocode those places anyway, use a copy you have tagged PUBLIC or INTERNAL (for example an aggregated or released copy), or change the layer's tag yourself in the Sensitivity dialog. A text you retyped or shortened is not recognised, so this is a safeguard against accidents, not a guarantee.
Ask "export this workflow as a file" after an analysis to save its steps as a .cgworkflow.json file (you see the whole file and confirm before it is written). A colleague opens it with Plugins > Cartogen AI > Open workflow file..., reads every step, picks their own layers for the roles and presses Run; the plugin then runs the steps itself through the usual checks. A file contains no data, no code and no file paths. See WORKFLOW_FILES.md for the details and the limits.
generate_html_dashboard exports one or more layers as a single interactive Leaflet map
(pan/zoom, layer toggles, click-a-feature popups) — the deliverable to send a fund-allocation
committee or donor who won't open QGIS themselves. It needs internet access to view, not
just to generate. The file itself is created offline, but opening it in a browser loads the
map library and basemap tiles from public CDNs each time — it is not a fully offline package,
despite being a single file with no server to run. If the actual audience has no reliable
connectivity, use a static export instead (print_map, create_print_layout,
generate_report) rather than this.
Popups show whatever field names the layer actually has, which are often technical
(food_insec_pct, wash_depriv_pct). If you want real language instead — e.g. "Food Insecurity
(IPC 3+) %" — ask for it explicitly (or the agent should offer it unprompted once it knows what
the fields mean): a field with no requested label falls back to a mechanical Title Case of its raw
name (food_insec_pct → Food Insec Pct), which is readable but not real language.
fetch_building_footprints pulls from Microsoft's Global ML Building Footprints dataset —
pre-computed polygons covering 225 countries/regions, good for baseline digitization where no
local footprint data exists (in-limit boundary work, population/exposure estimates). This is
not live extraction from a specific image, and it is not damage assessment. It's Microsoft's
own periodic dataset refresh, so it can lag the very latest imagery by months — a destroyed or
newly-built structure may not be reflected yet. For damage assessment against a specific
before/after image pair, use calculate_raster_change_detection instead; for road networks,
fetch_osm_features already covers that (key='highway') and isn't affected by this caveat.
When a request needs a road network — travel time, service areas, routing — and the project doesn't have a line layer that looks like roads, Cartogen asks once before sending anything to the model:
-
download: Cartogen finds the OpenStreetMap extract for the area your map is showing
(Geofabrik; Jordan is about 60 MB), downloads it in the background, and adds OSM Roads
() and, for health requests, Health Facilities (OSM, ). Health facilities
are hospitals, clinics, doctors and dentists, including hospitals mapped as building outlines
(about half of Jordan's), stored as points in a GeoPackage. Pharmacies are left out. Files are
saved in the project's
data/00_raw/osm/folder (or a folder in your QGIS profile if the project isn't saved yet), and a copy less than a week old is reused. If the extract is larger than 50 MB (adjustable in QGIS advanced settings), Cartogen tells you the size and asks again. Stop cancels the download and ends the request. - online: the request goes ahead as before, fetching data live from OpenStreetMap's Overpass server. Cartogen won't ask again for the rest of the session. Saying "online" in the request itself also skips the question.
Why: live Overpass requests fail often when the server is busy, each failure costs one of the agent's tool calls, and a live query only covers a small area. A country extract covers the whole area and includes road type, speed limit and one-way data.
The question also lists other sources that offer downloadable versions of the data, if you'd rather load your own:
| Data | Sources |
|---|---|
| Roads | Geofabrik (used for download), HOT OSM exports on HDX, HOT Export Tool, BBBike extracts, Overture Maps |
| Health facilities | Geofabrik (used for download), HOT OSM exports on HDX, healthsites.io |
| Population | WorldPop, GHSL (EU JRC) |
| Admin boundaries | geoBoundaries, HDX (OCHA COD-AB where available), GADM (non-commercial only) |
| Buildings | Microsoft Global ML Building Footprints, Google Open Buildings |
| Elevation | Copernicus DEM GLO-30 |
The map's location is used only on your machine, to choose which extract to download. It is not sent to the AI model. OpenStreetMap data is © OpenStreetMap contributors, ODbL.
Routing over a big road network is slow: QGIS builds a routing graph from every road in the layer before it can answer anything. On the full Jordan OpenStreetMap network (161,041 roads) one call took 5 to 10 minutes, at about 25 seconds for 39,000 roads, 60 for 68,000 and 125 for 108,000.
- QGIS stays responsive. Networks of about 2,000 roads or more are routed on a background thread, so you can keep working in QGIS while it runs. Smaller networks finish in a couple of seconds and run as before.
- You see progress. After a couple of seconds the status line shows what it is doing and for how long ("Service area: working on the road network... 40s (press Stop to cancel)").
- Stop works. Press Stop and the analysis ends within a moment; nothing is added to the project by a stopped run, and the request ends there.
- Service areas only route over roads they can reach. "What can this clinic reach within 3 km by road" no longer builds a graph from every road in the country: only roads within reach of the clinic are used, and the answer is identical to routing over the whole network (checked on the full Jordan network: 3 km in about 2 seconds instead of about 3 minutes; a one-hour reach in about 95 seconds instead of 5.5 minutes).
- Travel-time matrices and delivery routes are still slow on a whole country. A route between two points can detour outside any box around them, so these use the full network. For a quick answer, work with a smaller road layer covering just your area of interest.
- Footpaths, steps and cycleways are left out of the road layer that the download step adds, because a vehicle can't use them (about 4% of Jordan's roads).
-
If something misbehaves, set
cartogen_ai/network_analysis_in_backgroundtofalsein QGIS's advanced settings (Settings > Options > System > Advanced) to go back to running on the main thread.
Ask in plain language; the assistant picks the tool and asks you for any number that is a judgement call (a threshold, weights, a budget) instead of choosing one. The full list by workflow is in the plugin's Help dialog ("Humanitarian tools") and in HUMANITARIAN_TOOLS_CATALOGUE.md, which also says what each tool draws on the map. Added in 1.16.0-rc13 (tested in CI, not by hand):
-
Map looks.
apply_humanitarian_lookcolours a result field (severity, people in need, exposure, allocation, presence gap, rank); the analysis tools tell the assistant the exact call. -
Allocation envelope. "Split a budget of N across the districts by severity" --
calculate_allocation_envelope. You give the budget and any ceiling or floor; it shows the arithmetic and lists excluded areas. It is a calculation, not a recommendation of who should receive what. -
Importing IPC, INFORM and UNOSAT tables.
import_humanitarian_tablereads a CSV/Excel file you downloaded (for example from HDX), checks it, and can add the values to your admin layer by P-code after you confirm. Check the "mapping used" in the result against your file; invalid values are listed and left empty. -
Critical links. "Which roads do the routes to these sites depend on?" --
analyze_critical_linksdraws the road network graded by how many shortest routes use each segment. A screening, not a closure simulation; clip national road data to your area first.
Three tools pull live hazard data for a bounding box and load it straight into the project as a real layer:
| Tool | Source | Needs a key? |
|---|---|---|
fetch_nasa_active_fires |
NASA FIRMS (VIIRS satellite active-fire/thermal-anomaly detections) | Yes — free, see "First-time setup" above |
fetch_nasa_eonet_events |
NASA EONET (wildfires, storms, volcanoes, floods, and more) | No |
fetch_gdacs_disaster_alerts |
GDACS (UN-coordinated disaster alerts, Green/Orange/Red severity) | No |
Ask for one directly ("fetch active fires over this area"), or get all three at once
in a ready-to-view dashboard: "give me a hazard situation dashboard for this area"
calls generate_situation_dashboard, which fetches all three sources and exports them
as one interactive HTML map in a single step.
Re-running one of these on the same area replaces that layer's data with the latest fetch — it doesn't pile up duplicate layers — so re-fetching by hand (or asking the agent to re-run one) at any point is always safe.
Scheduling a recurring check. save_workflow_preset + schedule_recurring_workflow
exist for read-only analysis tools (e.g. calculate_severity_index, forecast_trend)
— save one as a named preset and schedule it (e.g. every 30 minutes), and each run is
automatically diffed against the previous one for a plain-language change summary. The
3 hazard-fetch tools above are not usable as a scheduled workflow step (a known
GUI-freeze risk under audit, 2026-09-13 — they do network I/O, and a scheduled run
executes synchronously on the QGIS main thread) — for an ongoing hazard watch, re-run one
manually or ask the agent to check again periodically, rather than scheduling it. This is
session-scoped either way: it only runs while QGIS stays open with the plugin loaded, not
a background service that keeps working after you close QGIS.
list_scheduled_workflows/stop_recurring_workflow show and cancel active schedules.
Freshness badges. Any layer fetched by these tools carries a stamped fetch time.
generate_html_dashboard/generate_temporal_dashboard show it as a small colored pill
next to that layer — green ("Fresh, 2m ago"), amber ("Stale, 3h ago"), or red ("Very
stale, 2d ago") — so you can tell at a glance whether the data on screen is current
without checking anywhere else. A layer that was never fetched from a live source
(most layers) shows no badge, which is correct, not a gap.
This is the wording that goes with maps and other outputs made with Cartogen AI. The same text is in the plugin's Help tab.
1. No Endorsement or Legal Determination: Boundaries, territorial depictions, place names, and administrative designations presented herein are illustrative and do not reflect any opinion, endorsement, or formal position by Cartogen AI or its third-party data providers concerning the legal status of any country, territory, city, or area, or concerning the delimitation of its frontiers or boundaries.
2. Disclaimer of Warranties & Limitation of Reliance: This visual output is provided on an "as is" and "as available" basis without warranties of any kind. Cartogen AI expressly disclaims all implied warranties of merchantability, fitness for a particular purpose, spatial accuracy, or timeliness. This map must not be relied upon for maritime or aerial navigation, property boundary delineation, or emergency response operations.
3. User Obligations & Third-Party Rights: Users are solely responsible for ensuring that the distribution, export, or publication of this map complies with all applicable privacy laws, data protection regulations, and proprietary data license agreements governing user-supplied or third-party datasets.
The footer of every print layout carries a shorter version of it, unless you enter your organisation's own wording in Settings (Layout disclaimer). The footer line reads:
Boundaries, names, and designations shown on this map are for informational and illustrative purposes only and do not imply any official endorsement, acceptance, or recognition of legal or sovereign status by Cartogen AI or its data licensors. Maps and geospatial outputs are provided "as is" without warranty of any kind, whether express or implied, including accuracy, completeness, or fitness for navigation or planning. Users remain solely responsible for verifying data licensing, confidentiality classifications, and source permissions prior to internal use or external distribution.
- "No API key configured" — open Settings and add a key for the active provider.
- A provider request fails — cloud providers automatically retry transient errors and fall back to an alternate model if the configured one is retired; if you still see an error, check the message text (invalid key, quota exceeded, and genuinely-down services all report distinctly).
- A request stops with "Reached the tool-call limit" — this usually means the request needed many individual actions (e.g. one call per item in a long list) — try rephrasing so it can be done in bulk ("create one layer with all of them"), or split it into smaller requests.
- Something claims success but doesn't look right — the agent cross-checks its own final answer against every tool call it actually made that turn (not just the last one) and appends a correction if any failure goes unacknowledged, but this only catches an unacknowledged mismatch, not every possible error — treat map/data outputs the way you would any automated tool, and verify anything consequential.
-
A CSV/Excel file loaded but has no location data, or points landed in the wrong
place —
load_tabular_data_as_layerauto-detects coordinate columns by name (latitude/lat/y,longitude/long/lon/lng/x, orwkt/geom/geometry). If your columns are named something else (e.g.Coord_N,POINT_X), it can't guess confidently and returnsFIELD_SUGGESTIONwith the real column names instead of guessing wrong — ask again naming the correct columns and it'll build the layer from those. If it does build a layer but every point is in the wrong place (or it refuses with a coordinate-range error), the most common cause isx_field/y_fieldpointing at the wrong columns, or data that isn't actually in WGS84 degrees (e.g. UTM meters) — pass the correctcrsif so.
See SECURITY.md for what's protected against and what's explicitly out of scope, and docs/TOOLS_REFERENCE.md for the full tool list.