Football game, a fork of discontinued GameplayFootball written by Bastiaan Konings Schuiling.
In 2019, Google Brain team picked up a game and created a Reinforcement Learning environment based on it - Google Research Football. They made some improvements to the game, updated the libraries, but threw away everything (e.g. menus, audio effects, etc.) that was not necessary for their task.
The goal of this repository is to update the existing code, based on Google Brain's changes (see google_brain branch) and other forks, and make it compiling and running on as many platforms as possible. PRs are always welcome.
Install required dependencies:
sudo apt-get install git cmake build-essential libgl1-mesa-dev libsdl2-dev \
libsdl2-image-dev libsdl2-ttf-dev libsdl2-gfx-dev libopenal-dev libboost-all-dev \
libdirectfb-dev libst-dev mesa-utils xvfb x11vnc python3-pip
Run the following commands:
# Clone the repository
git clone https://github.com/vi3itor/GameplayFootball.git
cd GameplayFootball

# Copy the contents of `data` directory into `build`
cp -R data/. build

# Go to `build` directory
cd build
# Generate Makefile
cmake ..
# Compile the game
make -j$(nproc)
Run the game:
./gameplayfootballImportant: Currently, the game can be compiled on Mac OS, but it is not running yet, because rendering must be done on the Main Thread.
To install required dependencies you need brew which can be installed in Terminal by running:
/bin/bash -c "$(curl -fsSL https://raw.githubusercontent.com/Homebrew/install/master/install.sh)"# Install dependencies
brew install git cmake sdl2 sdl2_image sdl2_ttf sdl2_gfx boost openal-soft
# Navigate to the directory where you want to put the repository
cd ~
# Clone the repository
git clone https://github.com/vi3itor/GameplayFootball.git
cd GameplayFootball
# Copy the contents of `data` directory into `build`
cp -R data/. build
# Go to `build` directory
cd build
# Generate Makefile
cmake ..
# Compile the game
make -j$(nproc)
# Run the game (Currently is not working)
./gameplayfootballDownload and install:
- Git,
- CMake (make sure to add it to the system PATH).
Install
vcpkgas explained in Quick Start Guide or simply: create a directory, e.g.C:\dev, open Command Prompt and run the following commands:
% Navigate to the created directory
cd C:\dev

% Clone vckpg
git clone https://github.com/microsoft/vcpkg

% Run installation script
.\vcpkg\bootstrap-vcpkg.bat

% Run integrate Vcpkg with Visual Studio
.\vcpkg\vcpkg integrate install

% Install required dependencies (all triplets **must be `x86-windows`**):
.\vcpkg\vcpkg install --triplet x86-windows boost:x86-windows sdl2 sdl2-image[libjpeg-turbo] sdl2-ttf sdl2-gfx opengl openal-soft
Clone project
% Navigate to the directory where you want to put the repository
cd C:\dev

% Clone repository
git clone https://github.com/vi3itor/GameplayFootball.git
cd GameplayFootball

% Switch to windows branch
git switch windows
Now we have 2 options:
Download and install:

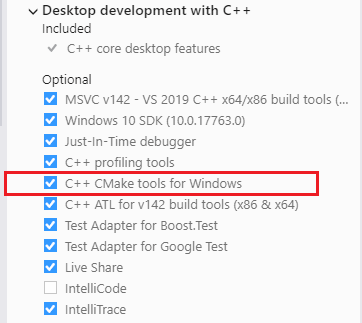
Build project
- Start
Visual Studio 2019, then clickFile > Open > Folder... - Navigate to the
GameplayFootballproject folder, and clickSelect Folder - Select
x86-Debugorx86-ReleaseDebugSymbolandx86-Releasemode in drop down menuManage Configurations...

- Click
gameplayfootball.exein menuSelect startup item...to start build game
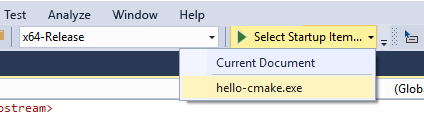
- After build success, game will start but it close immediately, because it missing data. Now go to step copy data to game
To copy data to game, switch back to Command Prompt window
% Copy the contents of `data` directory into `out\build\x86-Debug` or `out\build\x86-Release` or `out\build\x86-ReleaseDebugSymbol`
xcopy /e /i data out\build\x86-Debug
xcopy /e /i data out\build\x86-Release
xcopy /e /i data out\build\x86-ReleaseDebugSymbol
Now switch back Visual Studio, press F5, now project can start successful. You can add breakpoint or start profiling tools
NOTE:
- Release mode can NOT add breakpoint.
- Visual Studio 2019 support Release mode with Debug symbol, which mean the build is Release but you can add breakpoint. In project, this is
x86-ReleaseDebugSymbol

To copy data to game, switch to Command Prompt window
% Copy the contents of `data` directory into `build\Debug` or (and) `build\Release` or (and) `build\RelWithDebInfo`
xcopy /e /i data build\Debug
xcopy /e /i data build\Release
xcopy /e /i data build\RelWithDebInfo
Build project
- Add Vcpkg folder as
VCPKG_ROOTto system environment. e.g.C:\dev\vcpkg - Start
Visual Studio Code, then clickFile > Open Folder... - Navigate to the
GameplayFootballproject folder, and clickSelect Folder - Open
c_cpp_properties.jsonfile, addcompilerPathyour compiler path when you installed Build tool. For exampleC:/Program Files (x86)/Microsoft Visual Studio/2019/Buildtools/VC/Tools/MSVC/14.xx.xxxxx/bin/Hostx64/x86/cl.exewithxis yourBuild toolsversion. - Look at
status barbelow VS code window, we can see several button:- Current build variant
- The active kit
- Build selected target
- Launch the debugger
- Launch the selected target
- Click active kit button (select compiler installed on computer) choose Visual Studio 2019 build tools amd64-x86.
- Click build button.
- After build click play icon to start game
NOTE:
- Launch the debugger still have bug. If you need debugger, please switch to Visual Studio 2019.
If you have any problems please open an issue.
If you want to thank Bastiaan for his great work, consider a donation to his Bitcoin address 1JHnTe2QQj8RL281fXFiyvK9igj2VhPh2t