Repository navigation
Releases: pierrejochem/pikiosk
Releases · pierrejochem/pikiosk
Release list
pikiosk v0.3.0

Settings sections and Wi-Fi from the touchscreen.
Settings
- Network and Controls moved into Settings, which now has four sections behind a segmented control: Display, Network, Touch and System. The tab bar has three tabs: Home, Apps, Settings. The Home Network tile opens Settings > Network.
kiosk-ui --pagetakesdisplay,network,touchorsystem. - Wi-Fi from the touchscreen. Settings > Network lists the networks in range. Joining one uses an on-screen keyboard and the admin PIN; saved networks can be reconnected or forgotten, and hidden networks can be added. Networks are saved in
/data/store/wifi.jsonand merged into the WPA config at boot, so they survive reboots.WIFI_SSIDinkiosk.confis now optional: wpa_supplicant always runs, so the list works on an image with no WiFi configured. kioskd: new requestswifi_scan,wifi_status,wifi_connectandwifi_forget(the last two need the admin PIN), andkioskd wifi-conf, which prints the saved networks aswpa_supplicant.confblocks.kiosk-config.servicenow waits for the/datamount, andkioskdgiveswpa_clia socket directory outside its private/tmp. Both were found by testing on a Pi 3B.
Known limits
- Tested on a Pi 3B: scanning, a wrong password, a right password and the merge after a reboot. Hidden networks, Change password and Forget are covered by unit tests only. The Pi 4 and Pi 5 images are still built by CI and not run on hardware.
- A board with no WiFi chip would wait for
wlan0on boot, because wpa_supplicant now always starts.
Full Changelog: v0.2.0...v0.3.0
pikiosk v0.2.0

Full Changelog: v0.1.0...v0.2.0
pikiosk v0.1.0
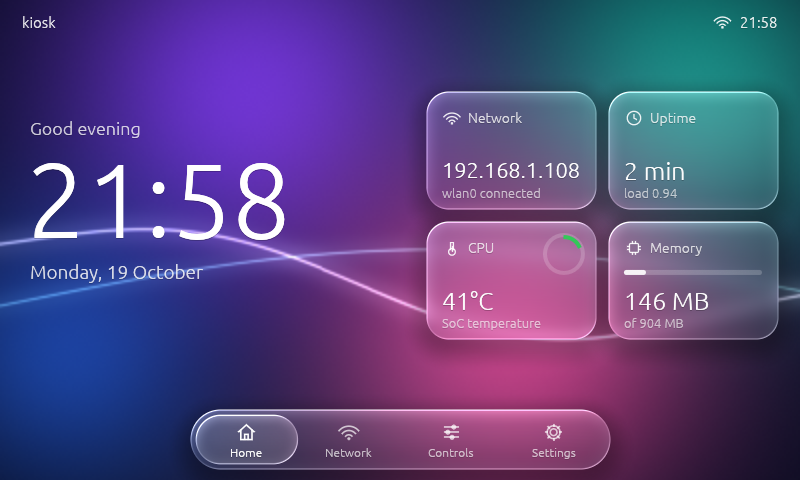
First release of pikiosk: a read-only Raspberry Pi 3B kiosk OS built with Buildroot 2026.08. It boots straight into kiosk-ui, a fullscreen Rust/egui touchscreen app with a liquid-glass interface, drawn through DRM/KMS and OpenGL ES 2. There's no X11 or Wayland.
Download and flash
- Download
pikiosk-v0.1.0-rpi3-sdcard.img.xz(46 MB, 404 MB unpacked). - Optional: check it with
sha256sum -c pikiosk-v0.1.0-rpi3-sdcard.img.xz.sha256. - Flash it with Raspberry Pi Imager ("Use custom", it reads
.img.xzdirectly), or with
xz -dc pikiosk-v0.1.0-rpi3-sdcard.img.xz | sudo dd of=/dev/sdX bs=4M conv=fsync. - Before the first boot, edit
kiosk.confon theKIOSKBOOTpartition to set WiFi, hostname and timezone. For SSH, add your public key asauthorized_keys. Without that file SSH stays off, and there are no passwords at all.
Hardware
- Raspberry Pi 3B (64-bit)
- Tested with the Waveshare 5inch HDMI LCD (B): 800×480 with resistive USB touch. The touch calibration for this panel ships in the image.
- Other HDMI displays work. kiosk-ui switches to a roomier layout from 1280×720 up.
What's included
- kiosk-ui with four pages:
- Home: clock, network, uptime, CPU temperature, memory
- Network
- Controls: glass look, wallpapers, brightness on panels that have a backlight
- Settings
- On-device touch calibration (Settings → Calibrate): tap five crosses, then check the result and keep it. Without Keep it reverts after 15 s. The calibration is saved on the data partition, so it survives re-flashing the root filesystem.
- Finger taps work on resistive panels: up to 20 px of wobble during a tap still counts as a click.
- Read-only root filesystem, logs in RAM, and a persistent
/datapartition that grows to fill the card. - Hardware watchdog, app auto-restart, reboot on a crash loop.
- Ethernet and WiFi (DHCP or static), NTP, mDNS (
kiosk.local).
Known limitations
- The Pi 3B has no RTC, so the clock is only correct after NTP sync.
- WPA3-only networks don't work (the WiFi chip has no SAE). WPA2 and WPA2/WPA3 mixed mode work.
- Glass refracts the wallpaper, not other UI elements underneath it.
Build it yourself with ./build.sh (Docker). See the README.