Creating a Kubernetes Cluster
Table of Contents
- Introduction
- Requirements
- Obtaining, Uploading, and Enabling the Kubernetes Image
- Creating a Tenant and a Project
- Creating Resources for Use in the Cluster
- Creating Resources for Containerized Applications
- Setting Up a Network for Use with the Cluster
- Creating the Kubernetes Cluster
- Checking the Cluster's Resources and Status
- Opening the Kubernetes Dashboard
- Deploying an nginx Web Server
- Troubleshooting Cluster Creation
- Related
Setting up a Kubernetes cluster to run a web application demonstrates the power of Kubernetes as a service. Photon Platform supports Kubernetes clusters with multiple masters, persistent volumes, and authentication. A Kubernetes cluster can use traditional networking or virtualized networking powered by VMware NSX.
Deploying a Kubernetes cluster involves two main steps: creating resources for a tenant and spinning them up into a cluster with the photon service create command. On Photon Controller, the following primitives are the building blocks of clusters:
- Images
- Virtual machines
- Disks
- Quotas
A Kubernetes cluster carries several requirements:
- A static IP address to assign as the master IP address of the cluster.
- A static IP address for the load balancer.
- At least one static IP address for an etcd node in the cluster. For high availability of etcd, you'll need three static IP addresses.
- The Kubernetes image for Photon Controller.
The instructions assume that you are using a Linux workstation with the Photon Controller CLI connected to a deployment of Photon Controller on ESXi without VMware NSX. You can also use a Mac or Windows workstation with the Photon Controller CLI installed, but you will have to adapt some of the commands to your operating system and environment.
For information about photon commands, subcommands, and options, see the help for the Photon Controller CLi on your Linux workstation; examples:
photon --help
photon tenant create --help
photon service create -h
The VMware NSX option: If you deployed Photon Platform with NSX, you can set up a Kubernetes cluster with a virtualized network; see Setting Up a Kubernetes Cluster with NSX.
Download the Kubernetes disk image for Photon Controller from the following URL to the workstation on which you are running the Photon Controller command-line utility:
https://github.com/vmware/photon-controller/releases
The Kubernetes image is packaged as an OVA; it has a file name that looks like this, though the version, build, and other numbers might be slightly different:
kubernetes-1.6.0-pc-1.2-5caa892.ova
Upload the the Kubernetes image to Photon Controller by running the following commands as the system administrator, replacing the variables with the IP address of the load balancer for the Photon Controller management plane:
photon target set https://mgmt-ip-address:443
photon image create kubernetes-1.6.0-pc-1.2-5caa892.ova -n kube1 -i EAGER
The upload takes a few minutes. When it finishes, enable the image by obtaining its ID with the photon image list command and using it to replace the variable in the enable-cluster-type command:
photon image list
photon deployment enable-cluster-type -k KUBERNETES -i <Kubernetes_image_ID>
As the Photon Controller system administrator, you typically need to enable a cluster type only once. Enabling the cluster type sets Photon Controller to use the given image to deploy each of your Kubernetes clusters. You should, however, disable the cluster type for a given image before you delete the image.
A tenant is a unit of administrative control allocated a quota for projects, such as a Kubernetes cluster. The following sequence of commands creates a tenant, sets a quota to give it a pool of resources, and creates a project that uses use all the resources in the pool.
photon tenant create plato
photon tenant quota set plato \
         --limits 'vm.count 100 COUNT, vm.memory 1000 GB, vm.cpu 500 COUNT'
photon project create --tenant "plato" --name "plato-prjt" \
    --limits "vm.memory 100 GB, vm.cpu 100 COUNT, vm 100 COUNT, \
    persistent-disk 100 COUNT, persistent-disk.capacity 200 GB, \
    ephemeral-disk 100 COUNT, ephemeral-disk.capacity 200 GB"
photon tenant set "plato"
photon project set "plato-prjt"
The following command creates a flavor for a small VM that you'll use when you create the Kubernetes cluster.
photon flavor create --name cluster-small -k vm \
--cost "vm 1 COUNT, vm.cpu 1 COUNT, vm.memory 2 GB"
If you are setting up a Kubernetes cluster for production purposes in an environment without memory constraints, you can omit this command because Photon Controller includes the following default flavors for clusters:
- cluster-master-vm. Photon Controller supplies this flavor as the default for a Kubernetes master node.
- cluster-other-vm. This flavor is for etcd nodes and Kubernetes workers.
- cluster-vm-disk. This flavor is the default ephemeral disk for a Kubernetes cluster.
When you create a Kubernetes cluster, Photon Controller uses the default flavors unless you specify other flavors.
The following sequence of commands provisions some resources for applications. You can skip these commands if you want, but the resources they create might come in handy later when you deploy applications. For more information, see Flavors.
photon -n flavor create --name "vm-basic" --kind "vm" \
       --cost "vm 1 COUNT, vm.cpu 2 COUNT, vm.memory 2 GB" \
photon -n flavor create --name "disk-eph" --kind "ephemeral-disk" \
       --cost "ephemeral-disk 1 COUNT"
photon -n flavor create --name "disk-persist" --kind "persistent-disk" \
       --cost "persistent-disk 1 COUNT"
Finally, make a network for the cluster and set it as the default:
photon subnet create --name "vm-network" --portgroups "VM Network"
From the output of the photon subnet create command, note the network ID and then use it to set the default network in the following command:
photon subnet set-default <network_ID>
You are now ready to create a Kubernetes cluster by running the following command. Replace the example IP addresses with those from your ESXi and network environments. The IP address for the master-ip option should contain the static IP address that you want to assign to the Kubernetes cluster. The etcd option should also contain a static IP address.
photon service create -n kube-socrates -k KUBERNETES --master-ip 203.0.113.208 \
	--load-balancer-ip 203.0.113.207
    --etcd1 203.0.113.209 --container-network 10.2.0.0/16 --dns 203.0.113.1 \
    --gateway 203.0.113.253 --netmask 255.255.0.0 -c 1 --vm_flavor cluster-small
The service create command prompts you for several inputs. You can press Enter to accept the defaults and type 1 to for a worker node, or you can specify the options that you want.
The photon service create --help command shows descriptions of the options' values. Here's the output of its help:
photon service create -h
NAME:
   photon service create - Create a new service
USAGE:
   photon service create [command options]
DESCRIPTION:
   Create a new Kubernetes service or Harbor Docker registry.
   Example:
   photon service create -n k8-service -k KUBERNETES --dns 10.0.0.1 \
     --gateway 192.0.2.1 --netmask 255.255.255.0 --master-ip 192.0.2.20 \
     --container-network 10.2.0.0/16 --etcd1 192.0.2.21 \
     -c 1 -v cluster-vm -d small-disk --ssh-key ~/.ssh/id_dsa.pub
OPTIONS:
   --tenant value, -t value            Tenant name
   --project value, -p value           Project name
   --name value, -n value              Service name
   --type value, -k value              Service type (KUBERNETES or HARBOR)
   --vm_flavor value, -v value         VM flavor name for master and worker
   --master-vm-flavor value, -m value  Override master VM flavor
   --worker-vm-flavor value, -W value  Override worker VM flavor
   --disk_flavor value, -d value       Disk flavor name
   --subnet_id value, -w value         VM subnet ID
   --image-id value, -i value          Image ID
   --worker_count value, -c value      Worker count (default: 0)
   --dns value                         VM network DNS server IP address
   --gateway value                     VM network gateway IP address
   --netmask value                     VM network netmask
   --number-of-masters value           Number of Kubernetes masters
     (required for Kubernetes services with virtual networking) (default: 0)
   --master-ip value                   Kubernetes master IP address
     (required for Kubernetes services with physical networking)
   --master-ip2 value                  Static IP address with which
                                       to create Kubernetes node 2
   --load-balancer-ip value            Kubernetes load balancer IP address
     (required for Kubernetes services with physical networking)
   --container-network value           CIDR representation of the container network,
     e.g. '10.2.0.0/16' (required for Kubernetes services)
   --number-of-etcds value             Number of Etcd instances for Kubernetes
     (required for Kubernetes services with virtual networking) (default: 0)
   --etcd1 value                       Static IP address with which to create etcd node 1
     (required for Kubernetes services with physical networking)
   --etcd2 value                       Static IP address with which to create etcd node 2
   --etcd3 value                       Static IP address with which to create etcd node 3
   --ssh-key value                     The file path of the SSH key
   --registry-ca-cert value            The file path of the file containing the CA
     certificate for a docker registry (optional)
   --admin-password value              The Harbor registry admin password (optional).
     The password needs to have at least 7 characters with 1 lowercase letter, 1 capital
     letter and 1 numeric character. If not specified, the default user name is admin
     and the password is Harbor12345
   --batchSize value                   Batch size for expanding worker nodes (default: 0)
   --wait-for-ready                    Wait synchronously for the service to become
                                       ready and expanded fully
After provisioning the cluster and its resources, you can log in to the Photon Controller web interface to check them out:
https://<ip-address-of-photon-load-balancer>:4343
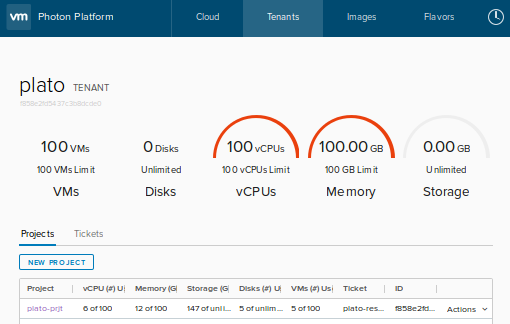
Take a few moments to click through the web UI. Examine the tenant who owns the project running Kubernetes:
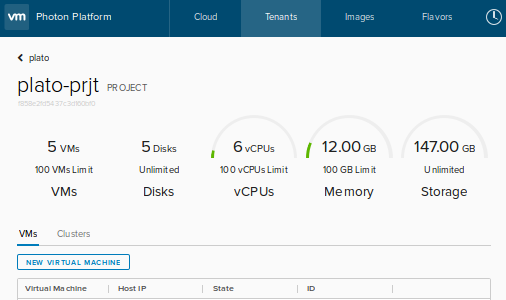
In the list of the tenant's projects, you can click a project to view information about it:
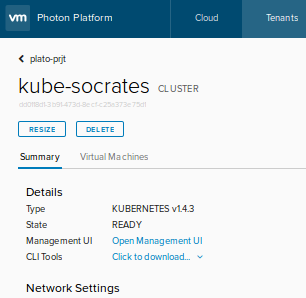
And once you've reached the project, you can click Clusters and then click the name of a cluster to see its settings:
To open the Kubernetes web interface in a browser, you first must obtain information about authentication for the Kubernetes cluster from Photon Controller and then you must add it to your kubectl configuration file. Here's how:
First, get the kubectl authentication information from Photon Controller by running the following command on your workstation. Replace the username and password with your Photon Controller username and password:
photon service get-kubectl-auth -u <username> -p <password> <service-id>
Here's and example:
photon service get-kubectl-auth -u administrator@example.com \
         -p 'MySecret1!' 446c5839-992c-456a-b271-bc2aa48e88fc
Second, copy the command's output and add it to the following command to insert it into the kubectl configuration. Here's an example with sample output:
kubectl config set-credentials administrator@example.com \
--auth-provider=oidc \
--auth-provider-arg=idp-issuer-url=https://198.51.100.3/openidconnect/example.com \
--auth-provider-arg=client-id=fc50e7cd-7166-4025-907b-c2af210fb902 \
--auth-provider-arg=client-secret=fc50e7cd-7166-4025-907b-c2af210fb902 \
--auth-provider-arg=refresh-token=eyJhbGciOiJSUzI1NiJ9.eyJzdWIi ... \
--auth-provider-arg=id-token=eyJhbGciOiJSUzI1NiJ9.eyJzdWIiOiJhZ ... \
--auth-provider-arg=idp-certificate-authority=/tmp/lw-ca-cert-FNKP.pem
Next, set the cluster and server:
kubectl config set-cluster <cluster-name> \
--server <k8s-load-balancer-address> \
--insecure-skip-tls-verify=true
Example:
kubectl config set-cluster default-cluster \
--server https://198.51.100.166:6443 \
--insecure-skip-tls-verify=true
Next, set the context in the kubectl config:
kubectl config set-context <context-name> \
--cluster <cluster-name> \
--user <username>
Example:
kubectl config set-context default-system \
--cluster default-cluster \
--user administrator@example.com
Now make the context the current context:
kubectl config use-context <context-name>
Example:
kubectl config use-context default-system
Verify that you set it up correctly and that it works:
kubectl get pods --all-namespaces
Finally, launch the Kubernetes user interface and go to it by entering the following URL in your web browser:
kubectl proxy
http://localhost:8001/ui
Now you're ready to load and run an application in your Kubernetes cluster.
Now that you've got a Kubernetes cluster up and running on Photon Controller, you can run a application as a service. This example deploys an nginx web server to demonstrate how to launch an application.
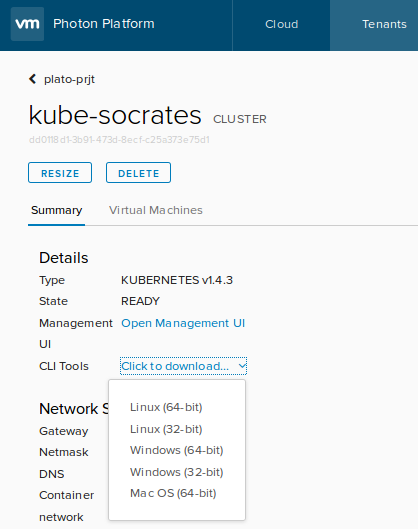
You'll need the Kubernetes command-line interface, kubectl, which you can quickly download through the Photon Platform web interface, as the following image illustrates:
Or you can download the version of kubectl for a 64-bit Linux machine from the Kubernetes web site; see the Kubernetes user guide for instructions on how to download versions for other operating systems.
After you download kubectl, install it by changing its mode bits so that it is executable and then moving it to /usr/local/bin. Here's an example:
cd ~/Downloads/
chmod +x kubectl
sudo mv kubectl /usr/local/bin
Now you can check your nodes' status, and you can omit the server option in the commands because the default is set:
kubectl get nodes
NAME            STATUS    AGE
198.51.36.6     Ready     25d
198.51.45.117   Ready     25d
You're now ready to deploy the nginx web server as a service. Copy the following block of code into a file named nginx.yml. The code block contains the configuration for running the nginx web server on Kubernetes.
By setting the type field to NodePort, this YAML file instructs the Kubernetes master to allocate a port from the default node port range of 30000 to 32767. Each node proxies the same port to your service. A node port exposes a node's IP address; for more information, see the Kubernetes documentation.
apiVersion: v1
kind: Service
metadata:
  name: nginx-demo-service
  labels:
    app: nginx-demo
spec:
  type: NodePort
  ports:
  - port: 80
    protocol: TCP
    name: http
  selector:
    app: nginx-demo
---
apiVersion: v1
kind: ReplicationController
metadata:
  name: nginx-demo
spec:
  replicas: 3
  template:
    metadata:
      labels:
        app: nginx-demo
    spec:
      containers:
      - name: nginx-demo
        image: nginx
        ports:
        - containerPort: 80
Run the following command to create the nginx service on the Kubernetes cluster; you might need to modify the path the YAML file if it's not in your current working directory:
kubectl create -f nginx.yml

service "nginx-demo-service" created
replicationcontroller "nginx-demo" created
Now view the services running on the cluster:
kubectl get svc
NAME                 CLUSTER-IP   EXTERNAL-IP   PORT(S)     AGE
kubernetes           10.0.0.1     <none>        443/TCP     3d
nginx-demo-service   10.0.0.202   <nodes>       80/TCP      5h
Finally, run the following command to obtain the NodePort on which the nginx web service is exposed as a service:
kubectl describe svc nginx-demo-service

Name:			nginx-demo-service
Namespace:		default
Labels:			app=nginx-demo
Selector:		app=nginx-demo
Type:			NodePort
IP:			10.0.0.202
Port:			http	80/TCP
NodePort:		http	30786/TCP
Endpoints:		10.2.100.7:80,10.2.100.8:80,10.2.100.9:80 + 3 more...
Session Affinity:	None
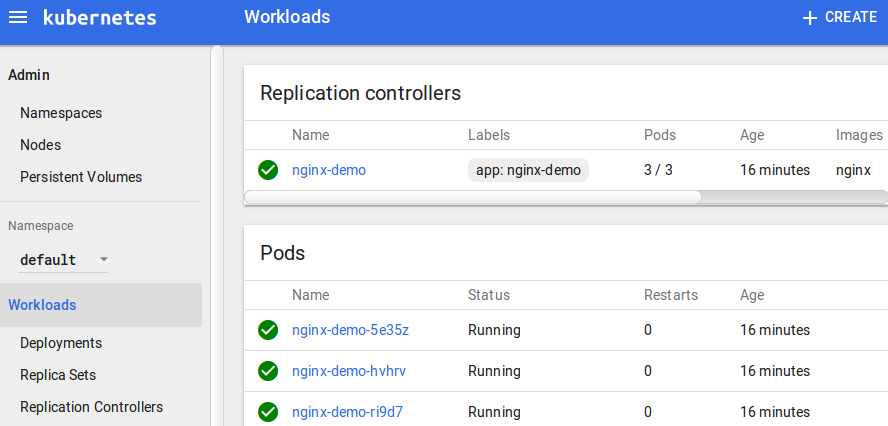
You can also see the nginx workload running in the Kubernetes web interface:
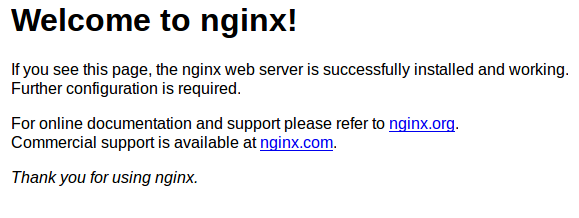
That's it. Now you can connect to the nginx web server by launching a web browser and pointing it at the IP address of the Kubernetes master plus the NodePort on which the service is running, which is 30786 in this case:
http://203.0.113.208:30786
You should see the nginx welcome screen:
You can upgrade to a new version of Kubernetes by running the photon service change-version command. Here's the help output for the command:
photon service change-version -h
NAME:
   photon service change-version - Configure the service
   to use specified image id
USAGE:
   photon service change-version [command options] service-id
DESCRIPTION:
   Example: photon service change-version \
   9b159e92-9495-49a4-af58-53ad4764f616 \
   -i 2aeaf034-3b02-4873-a6fc-f92615dca849
OPTIONS:
   --image-id value, -i value  Image ID
   --wait-for-ready            Wait synchronously for the
   service to become ready and fully upgraded
If the creation of the Kubernetes cluster failed, run the following photon command to clean up clusters that might be in an error state.
Keep in mind that this command deletes all your clusters, so you should run it only if you are trying to deploy your first one:
photon -n service list | awk '{print $1}' | xargs -n 1 photon -n service delete
Another troubleshooting method is to log into the VMs that Photon Controller creates for the Kubernetes master and the etcd nodes. The default password for the root account is changeme. You should change it the first time you log in.
After logging in, examine the system's status and logs as well as the Docker networking configuration.
You can get the ID of the cluster with the following the photon service list command; example:
photon service list
ID                                    Name           Type        State  Worker Count
dd0118d1-3b91-473d-8ecf-c25a373e75d1  kube-socrates  KUBERNETES  READY  1
Total: 1
READY: 1
And then you can view more information about the cluster by running adding the ID to the photon service show command; example with abridged output:
photon -n service show dd0118d1-3b91-473d-8ecf-c25a373e75d1
dd0118d1-3b91-473d-8ecf-c25a373e75d1	kube-socrates	READY	KUBERNETES	1
dns:10.118.98.1
container_network:10.2.0.0/16
netmask:255.255.0.0
cluster_version:v1.6.0 g
ateway:10.118.101.253
cluster_ui_url:http://10.118.101.208:8080/ui
etcd_ips:10.118.101.209
master_ip:10.118.101.208
master-7a0c629b-52dc-49c9-b58f-f37100948487	10.118.101.208
etcd-96cae740-3c65-4ac8-96e9-c6b170990934	10.118.101.209
If you mistakenly deleted Photon's default flavors for Kubernetes clusters, you can restore them by running the following commands as the system administrator:
photon -n flavor create --name "cluster-master-vm" --kind "vm" \
                        --cost "vm 1 COUNT, vm.cpu 4 COUNT, vm.memory 4 GB"
photon -n flavor create --name "cluster-other-vm" --kind "vm" \
                        --cost "vm 1 COUNT, vm.cpu 1 COUNT, vm.memory 2 GB"
photon -n flavor create --name "cluster-vm-disk" --kind "ephemeral-disk" \
                        --cost "ephemeral-disk 1 COUNT"
The default flavors for a Kubernetes cluster show you how much memory a default Kubernetes cluster requires:
- A master node requires 4 CPUs and 4 GB of RAM.
- Each worker node that's running as its own VM takes 1 CPU and 2 GB of RAM.
- Each etcd node that's running as its own VM takes 1 CPU and 2 GB or RAM.
So, if you were to use the default flavors to build a Kubernetes cluster with a master, three workers, and three etcd nodes all running on their own VMs, the total memory requirement would be 10 CPUs and 16 GB of RAM.
If you're not tracking the memory usage of the ESXi machines in your Photon Controller, you might get an error code saying "NotEnoughMemoryResource." There are several ways to address the error:
- Reduce the size of the cluster you are trying to create.
- Free up resources by deleting unused virtual machines.
- Add additional memory or ESXi machines to the cluster.
- Delete unused Kubernetes clusters.
Another alternative for working in an environment with memory constraints is to make a small flavor and use it when you build a cluster, as this article did earlier when it demonstrated how to create a cluster.
To delete a cluster to free up space for a new cluster in an environment with memory constraints, run this command:
photon service delete <cluster_ID>
If you want to wipe out the Kubernetes image for some reason, such as recovering the storage space for an image that's old or no longer in use, you can delete it, You should, however, make sure that it's disabled as the cluster type before you delete it:
photon deployment disable-cluster-type -k KUBERNETES -i <Kubernetes_image_ID>
photon image delete <kubernetes_image_filename>