Let's get started with our first application.

yarn create react-app my-first-app
gives us a preconfigured React application with react, react-dom, babel, webpack, ... so we can start coding directly.
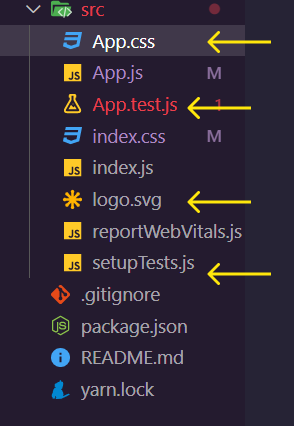
Delete App.css, App.test.js, logo.svg and setupTests.js inside the src directory.
go to public/index.html and change
<title>React App</title>to
<title>My First Application</title>go to src/App.js and remove everything else than
function App() {
  return <div></div>;
}

export default App;
go to src/index.css and remove everything then add the following
* {
  margin: 0;
  padding: 0;
  box-sizing: border-box;
  font-family: -apple-system, BlinkMacSystemFont, "Segoe UI", "Roboto",
    "Oxygen", "Ubuntu", "Cantarell", "Fira Sans", "Droid Sans",
    "Helvetica Neue", sans-serif;
  -webkit-font-smoothing: antialiased;
  -moz-osx-font-smoothing: grayscale;
}
Congratulations 🥳, we are ready to start coding our first application.
From now on, we will be working relatively to the src/App.js file.
Let's add some text to the src/App.js file.
function App() {
  return (
    <div>
      <h1>Hello CODE</h1>
    </div>
  );
}

export default App;
To add CSS styles, we can use the style attribute in each tag we want to style.
<h1
  style={{
    color: "red",
    fontSize: "50px",
    textAlign: "center",
  }}>
  Hello CODE
</h1>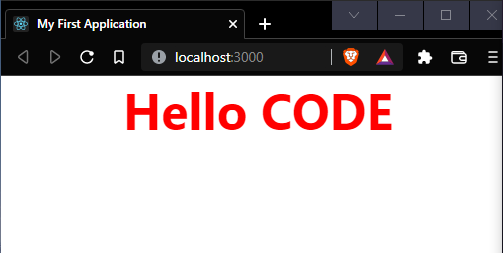
But more often, we use CSS files then import them in our js files. Add a styles/home.css inside the src directory.
📦src
 ┣ 📂styles
 ┃ ┗ 📜home.css
 ┣ 📜App.js
 ┣ 📜index.css
 ┣ 📜index.js
 ┗ 📜reportWebVitals.js
then let's create a styles class inside src/styles/home.css like this:
.top_navbar {
  width: 100%;
  padding-top: 15px;
  padding-bottom: 15px;
  background-color: #000;
  display: flex;
  flex-direction: row;
  align-items: center;
  justify-content: center;
  /* this will style the color of any text inside this styling class*/
  color: #fff;
  font-size: 14px;
}
let's import this style file into our App.js file and add the styling class:
import "./styles/home.css"; // Import CSS

function App() {
  return (
    <div className="top_navbar">
      <h1>Hello CODE</h1>
    </div>
  );
}

export default App;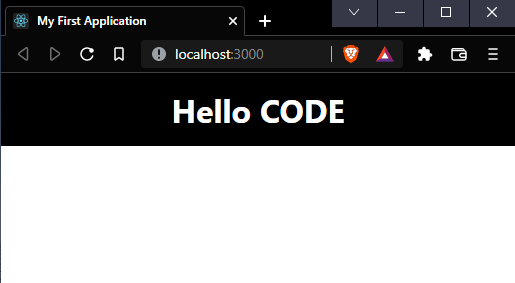
Let's create an assets folder inside the src directory and add a logo.png file inside it.
📦src
 ┣ 📂assets
 ┃ ┗ 📜logo.png
 ┣ 📂styles
 ┃ ┗ 📜home.css
 ┣ 📜App.js
 ┣ 📜index.css
 ┣ 📜index.js
 ┗ 📜reportWebVitals.js
Let's display our logo inside the src/App.js file:
import "./styles/home.css"; // Import CSS
// Import image, you can choose any name for the logo name
import logo from "./assets/logo.png";

function App() {
  return (
    <div className="top_navbar">
      <img src={logo} alt="logo" />
      <h1>Hello CODE</h1>
    </div>
  );
}

export default App;
Great! let's add some styling to our img tag inside the styles/home.css file:
.logo {
  width: 100px;
  height: 100px;
  margin-right: 20px;
}
then let's add className attribute to our img tag:
<div className="top_navbar">
  <img className="logo" src={logo} alt="logo" />
  <h1>Hello CODE</h1>
</div>
Congratulations 🥳, now we know how to use styles and images in our React JS project.
React is Composable, that mean; you can compose many reusable components together to create a bigger one.
In our example we can take the div tag with className top_navbar and make it as a separate component.
Let's create a TopNavbar component inside a src/components directory.
📦src
 ┣ 📂assets
 ┃ ┗ 📜logo.png
 ┣ 📂components
 ┃ ┗ 📜TopNavbar.js
 ┣ 📂styles
 ┃ ┗ 📜home.css
 ┣ 📜App.js
 ┣ 📜index.css
 ┣ 📜index.js
 ┗ 📜reportWebVitals.js
then let's add this code inside it:
function TopNavbar() {
  return <div></div>;
}
export default TopNavbar;
Replace the <div></div> with the div tag in our src/App.js file.
import "../styles/home.css"; // use ../ to go back to the parent directory
import logo from "../assets/logo.png"; // use ../ to go back to the parent directory

function TopNavbar() {
  return (
    <div className="top_navbar">
      <img className="logo" src={logo} alt="logo" />
      <h1>Hello CODE</h1>
    </div>
  );
}
export default TopNavbar;
Now, we will take this TopNavbar component and add it to our src/App.js file:
import TopNavbar from "./components/TopNavbar";

function App() {
  return <TopNavbar />;
}

export default App;
So this is our result:

Let's test something now, let's add TopNavbar component to our src/App.js file more than one time:
import TopNavbar from "./components/TopNavbar";

function App() {
  return (
   <TopNavbar />
   <TopNavbar />
   <TopNavbar />
   <TopNavbar />
   <TopNavbar />
   )
  ;
}

export default App;
This code will generate an error, because we need always our code inside a function to be wrapped inside a container component. We can use <></> to avoid this error.
import TopNavbar from "./components/TopNavbar";

function App() {
  return (
    <>
      <TopNavbar />
      <TopNavbar />
      <TopNavbar />
      <TopNavbar />
      <TopNavbar />
    </>
  );
}

export default App;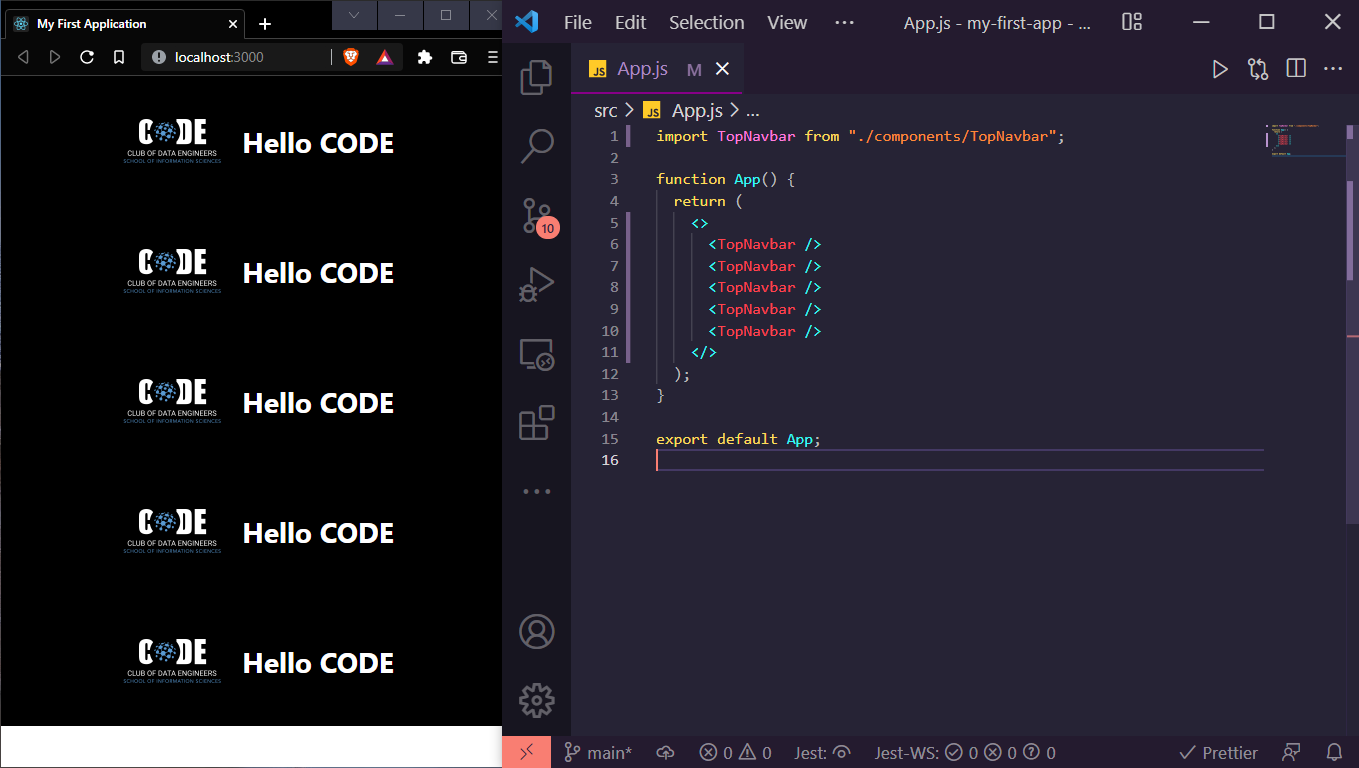
Now after feeling the power of Declarative syntax with react, we can feel now the power of Composable & Reusable components.
Let's create this page using what we learned until now.

📦src
 ┣ 📂assets
 ┃ ┣ 📜linkedin.png
 ┃ ┣ 📜logo.png
 ┃ ┣ 📜me.jpg
 ┃ ┗ 📜outlook.png
 ┣ 📂components
 ┃ ┣ 📜Footer.js
 ┃ ┣ 📜Home.js
 ┃ ┗ 📜TopNavbar.js
 ┣ 📂styles
 ┃ ┗ 📜home.css
 ┣ 📜App.js
 ┣ 📜index.css
 ┣ 📜index.js
 ┗ 📜reportWebVitals.js
function Home() {
  return <div>Home</div>;
}

export default Home;
function Footer() {
return <div>Footer</div>;
}
export default Footer;Modify the src/TopNavbar.js:
import logo from "../assets/logo.png";

function TopNavbar() {
  return (
    <div className="top_navbar">
      <img className="logo" src={logo} alt="logo" />
      <h1>Hello CODE</h1>
    </div>
  );
}
export default TopNavbar;
Let's import those components inside our src/App.js file:
import "./styles/home.css"; // styles will be available in our entire our code
import Footer from "./components/Footer";
import Home from "./components/Home";
import TopNavbar from "./components/TopNavbar";

function App() {
  return (
    <div>
      <TopNavbar />
      <Home />
      <Footer />
    </div>
  );
}

export default App;
And add this style to styles/home.css:
/* App */
.main-container {
  background-color: black;
  color: white;
  min-height: 100vh;
  display: flex;
  flex-direction: column;
}
Great 😃! let's develop our Home and Footer components.
In Home component, we need 3 images:
- profile picture
- linkedin logo
- outlook logo
Let's import them inside our src/Home.js file:
import meImage from "../assets/me.jpg";
import outlookImage from "../assets/outlook.png";
import linkedInImage from "../assets/linkedin.png";
Let's add the img tags in our code:
<div className="container">
  {/* profile picture */}
  <img src={meImage} alt="me" className="me-img" />
  {/* my name */}
  <h1 className="my-name">Ahmed Bargady</h1>
  {/* container for our icons */}
  <div className="icon-container">
    {/* outlook icon */}
    <a
      href="mailto:ahmed.bargady@outlook.com"
      rel="noopener noreferrer"
      target="_blank">
      <img src={outlookImage} alt="outlook" className="icon-img" />
    </a>
    {/* linkedin icon */}
    <a
      href="https://www.linkedin.com/in/ahmed-bargady/"
      rel="noopener noreferrer"
      target="_blank">
      <img src={linkedInImage} alt="linkedIn" className="icon-img" />
    </a>
  </div>
</div>
Great! Now let's add the styles to our styles/home.css file:
/* Home */
.me-img {
  width: 200px;
  height: 200px;
  border-radius: 50%;
}
.container {
  width: 100%;
  display: flex;
  flex-direction: column;
  align-items: center;
  justify-content: center;
  background-color: #141624;
  flex: 1;
}
.my-name {
  font-size: 24px;
  margin-top: 8px;
}
.icon-container {
  display: flex;
  flex-direction: row;
  align-items: center;
  justify-content: space-around;
  margin-top: 12px;
  width: 40%;
}
.icon-container a {
  padding: 8px;
  border-radius: 50%;
  display: flex;
  flex-direction: column;
  border: 1px solid transparent;
}
.icon-container a:hover {
  border: 1px solid white;
}
.icon-img {
  width: 30px;
  height: 30px;
  cursor: pointer;
}
Amazing 👌!let's see what we did until now:

function Footer() {
  return (
    <div className="footer">
      <p>Created with ❤️ By:</p>
      <a
        href="https://ahmedbargady.me"
        target="_blank"
        rel="noopener noreferrer">
        Ahmed Bargady
      </a>
    </div>
  );
}

export default Footer;
Add styling to styles/home.css:
/* Footer */
.footer {
  width: 100%;
  padding-block: 20px;
  display: flex;
  flex-direction: column;
  align-items: center;
  justify-content: center;
}
.footer p {
  font-size: 16px;
}
.footer a {
  color: rgb(0, 98, 255);
  text-decoration: none;
}
Result:

Congratulations! You have successfully created your first React App!