This Arduino Distance Measurement using Ultrasonic Sensor project demonstrates how to build a precise distance measurement system using the HC-SR04 ultrasonic sensor and Arduino. The system can accurately measure distances from 2cm to 400cm with ±3mm accuracy, making it perfect for various applications, including obstacle detection, liquid level monitoring, and robotics navigation.
The project uses the principle of ECHO - sound waves are transmitted and the time taken for the echo to return after hitting an obstacle is calculated to determine distance using the formula: Distance = (Time × Speed of Sound) / 2
- High Accuracy: Measures distances from 2cm to 400cm with ±3mm precision
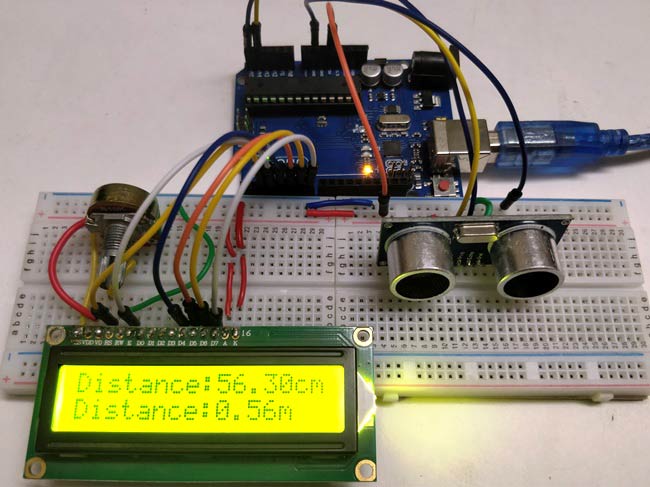
- Real-time Display: Shows distance measurements on a 16x2 LCD display
- Dual Units: Displays measurements in both centimeters and meters
- Cost-effective: Uses affordable and readily available components
- Versatile Applications: Suitable for parking systems, liquid level monitoring, robotics, and more
| Component | Quantity | Description |
|---|---|---|
| Arduino Uno/Pro Mini | 1 | Main microcontroller board |
| HC-SR04 Ultrasonic Sensor | 1 | Distance measurement sensor |
| 16x2 LCD Display | 1 | For displaying measurements |
| Breadboard | 1 | For circuit connections |
| 9V Battery | 1 | Power supply |
| Connecting Wires | As needed | For circuit connections |
| Scale/Ruler | 1 | For calibration and testing |
| HC-SR04 Pin | Arduino Pin | Function |
|---|---|---|
| VCC | 5V | Power Supply |
| GND | GND | Ground Connection |
| Trig | A4 (Pin 18) | Trigger Signal Output |
| Echo | A5 (Pin 19) | Echo Signal Input |
| LCD Pin | Arduino Pin | Description |
|---|---|---|
| VSS | GND | Ground |
| VDD | 5V | Power Supply |
| RS | Pin 2 | Register Select |
| EN | Pin 3 | Enable Pin |
| D4-D7 | Pin 4-7 | Data Pins (4-bit mode) |
- Trigger Phase: Arduino sends a 10μs high-level signal to the trigger pin
- Transmission: HC-SR04 automatically sends eight 40kHz ultrasonic pulses
- Echo Detection: Sensor detects the reflected sound waves
- Time Calculation: Arduino measures the time between transmission and reception
- Distance Calculation: Using the formula:
Distance = (Time × 340m/s) / 2 - Display: Results are shown on LCD in both cm and meters
#include <LiquidCrystal.h>
#define trigger 18
#define echo 19

LiquidCrystal lcd(2,3,4,5,6,7);
float time=0,distance=0;

void setup()
{
  lcd.begin(16,2);
  pinMode(trigger,OUTPUT);
  pinMode(echo,INPUT);
  lcd.print(" Ultra sonic");
  lcd.setCursor(0,1);
  lcd.print("Distance Meter");
  delay(2000);
  lcd.clear();
  lcd.print(" Circuit Digest");
  delay(2000);
}

void loop()
{
  lcd.clear();
  digitalWrite(trigger,LOW);
  delayMicroseconds(2);
  digitalWrite(trigger,HIGH);
  delayMicroseconds(10);
  digitalWrite(trigger,LOW);
  delayMicroseconds(2);

  time=pulseIn(echo,HIGH);
  distance=time*340/20000;

  lcd.clear();
  lcd.print("Distance:");
  lcd.print(distance);
  lcd.print("cm");
  lcd.setCursor(0,1);
  lcd.print("Distance:");
  lcd.print(distance/100);
  lcd.print("m");
  delay(1000);
}-
Hardware Assembly:
- Connect the HC-SR04 sensor to Arduino as per the connection table
- Wire the 16x2 LCD display in 4-bit mode
- Ensure all power and ground connections are secure
-
Software Setup:
- Install Arduino IDE if not already installed
- Copy the provided code into Arduino IDE
- Select the correct board and port
- Upload the code to Arduino
-
Testing:
- Power on the system
- Place objects at various distances from the sensor
- Verify readings against actual measurements
- Automated Parking Systems: Vehicle detection and monitoring
- Liquid Level Monitoring: Tank measurement in industrial plants
- Conveyor Belt Control: Object detection and counting
- Robot Navigation: Obstacle avoidance and mapping
- Smart Home Automation: Automatic lighting and security systems
- DIY Projects: Distance-based alarms and notifications
- Educational Projects: Learning sensor interfacing and programming
| Problem | Possible Cause | Solution |
|---|---|---|
| Inconsistent readings | Poor power supply | Use stable 5V power source |
| No display on LCD | Wrong connections | Check LCD wiring and contrast |
| Inaccurate measurements | Sensor misalignment | Ensure sensor faces target perpendicularly |
| Temperature effects | Environmental factors | Implement temperature compensation |
- Ensure stable power supply (5V regulated)
- Keep sensor clean and free from obstacles
- Use flat, perpendicular surfaces for best results
- Consider temperature compensation for precision applications
- Avoid electromagnetic interference near the sensor
- Operating Voltage: 5V DC
- Operating Current: 15mA
- Operating Frequency: 40kHz
- Range: 2cm - 400cm
- Accuracy: ±3mm
- Measuring Angle: 15 degrees
- Trigger Input: 10μs TTL pulse
- Echo Output: TTL level signal, proportional to range
- Add buzzer for audio alerts at specific distances
- Implement data logging to SD card
- Add wireless connectivity (WiFi/Bluetooth) for remote monitoring
- Include multiple sensors for 360-degree detection
- Integrate with mobile app for smartphone display
- Temperature compensation for higher accuracy
- Moving average filter for stable readings
- Calibration routine for custom applications
- Multiple unit display options (inches, feet, etc.)
- Ensure proper voltage levels (5V) to avoid component damage
- Use appropriate gauge wires for connections
- Avoid short circuits by double-checking connections
- Keep the circuit away from moisture and extreme temperatures
- Original Tutorial: Arduino Ultrasonic Sensor Distance Measurement
- Arduino Official Documentation: Arduino.cc
- HC-SR04 Datasheet: Available from manufacturer
- LCD Display Guide: 16x2 LCD interfacing tutorials
Explore these related ultrasonic sensor projects:
This project is open-source and available for educational and commercial use. Please credit the source when using or modifying the code.
For technical support and questions:
- Visit the Circuit Digest Forum
- Check Arduino community forums
- Refer to component datasheets for detailed specifications
Project Difficulty: Beginner to Intermediate
Estimated Build Time: 2-3 hours
Cost: $15-25 USD (approximate)
Happy Building! 🚀