The first Apple
On the 16th November 2013 an Apple 1 computer, serial number 46 went under the hammer in Cologne, Germany. It sold for $330,000. An earlier auction of a similar machine in May raised $660,000.
These machines are extremely rare, only 200 were actually made, but they catapulted Steve Jobs and Steve Wozniak (not to mention the rest of the world) on a lifelong adventure.

Steve Wozniak's unique idea was to combine the functions of processor, keyboard and display into one product, vastly simplifying computer design and reducing the cost. It was the beginning of the revolution we have witnessed over the past 40 years.
Apple 1, number 46 was expected to raise up to half a million Euros, maybe the next one will smash the previous record. However, you can experience the excitement of those early days for FREE using just your Raspberry Pi.
Starting from a clean new install of Raspbian, here's how to get started:
Get the java RXTX serial library
sudo apt-get install librxtx-java
For some reason, the Apple 1 emulator expects the RXTX library to have a different name than the one apt-get installs. We fix this with a symbolic link.
sudo ln -s /usr/lib/jni/librxtxSerial.so /usr/lib/jni/rxtxSerial.so
Now download Ken Wessens excellent Apple 1 emulator from here. The download link you want is The Krusader Toolkit. You may also want to grab the user manual while you are there.
Unpack the zip file somewhere convenient.
Change directory into the unpacked folder:
cd ktk
Now you can run the emulator:
java -cp ktk.jar:/usr/share/java/RXTXcomm.jar -Djava.library.path=/usr/lib/jni krusader.editor.KrusaderEditor
The emulator starts:
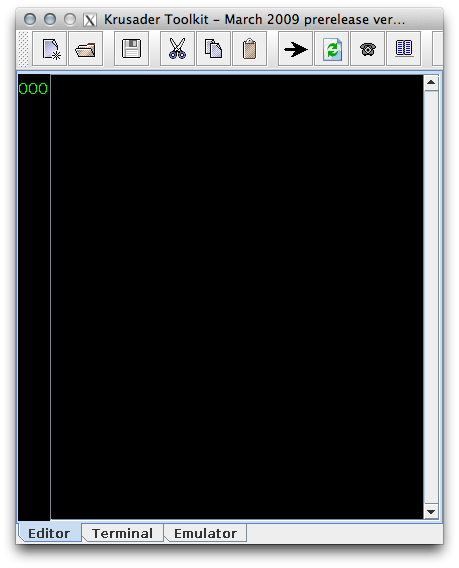
The program has three functions, corresponding to the three tabs at the bottom of the window.
- The Editor allows you to create programs locally on your Pi and send them to the target machine when they're ready.
- The Terminal tab allows you to type commands and get output from an Apple 1 if you have one.
- Finally, the Emulator tab takes you to the Apple 1 emulator itself
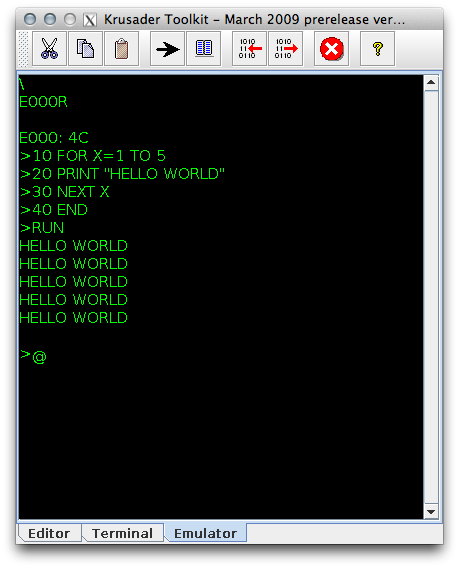
Go ahead and click the Emulator tab. Everything you type now will be as if you are typing on a real Apple 1. The monitor program displays a flashing '@' symbol, to show it is ready for input. The monitor program (the Apple 1's equivalent of its Operating System) uses only 256 bytes of memory. That's not data area, that's how big the whole program is! You will notice that the Apple 1 displays only upper case characters. This was to keep the parts cost to a minimum. Saves you having to use the shift key too.
The emulator is set up as if the Apple 1 had a ROM with some utilities in it. One of these utilities is a BASIC interpreter. To enter it type:
E000R
followed by the return key.
E000 is the hexadecimal address of the BASIC interpreter entry point. The 'R' tells the Apple 1 monitor to begin running the opcodes at that address. The BASIC interpreter prompt is a '>'. Now enter a small program:
Slow? You bet, so is the Real Thing! Actually the 6502 processor in the Apple 1 is a lot faster than it looks, except when it is writing to the Apple 1 screen. This was very slow, again in order to minimise the cost of the parts. Just be glad you can experience computing on a Raspberry Pi. Your Pi cost $35, the Apple 1 cost $666 back in the mid 1970's! It didn't come with a keyboard, file storage or a monitor either. It had 4k of RAM compared to 512m on the Pi. Storage was on magnetic tape, and the interface for that was an optional add on.
Other utilities built into the emulator are a 6502 assembler, disassembler and debugger. Refer to the Emulator user manual to discover how start them.
By clicking the Editor tab, you can load some ready made programs supplied with the emulator. These are found under the folder "sample programs". Refer to the Emulator user manual to discover how to use the assembler to build and run them.
So does the Terminal tab have any function? Well, you could use it to talk to a real Apple 1 if you had half a million Euros to spend on one, but you can also buy Apple 1 replicas if you want to have a little bit of computing history and the terminal tab will work with those. There are some beautiful replicas which are hard to tell apart from the originals, using only the exact components that were used to build the original. These kinds are quite expensive because it is now quite difficult to find the original parts. Other replicas use modern components, but keep the original microprocessor devices which can still be bought today. These are a bit cheaper, but still cost over 100 Euros. To find out more about these, type Apple 1 into Wikipedia.
The one thing you can't do with the emulator is experiment with any Apple 1 hardware. Like your Raspberry Pi, the Apple 1 had Input/Output signals that could be used for experimentation.
If there is enough interest, it might be fun to design a low cost, open hardware Apple 1 replica that shares some of the Raspberry Pi resources, such as power, storage, keyboard and display. That way, owning an Apple 1 replica could be made much less of an investment. If you'd like that, please add a comment to issue #19 (click on the (!) in a circle at the top right of this page).
Of course, you don't need any Apple 1 clone to experiment with interfacing to electronics! Your Raspberry Pi already has its own GPIO connector for that. If this article has inspired you to give the fascinating world of electronics a try, have a look at our own Guzunty programmable IO add-on. It adds extra input output and helps protect your Pi from accidental exposure to higher voltages. It won't break the bank like an original Apple 1 would either.
G.