Repository navigation
DNS
The DNS page is a dedicated feature in the Harden System Security app. It turns your computer into a DNS server for the other devices on your network, such as phones, tablets, TVs, consoles and so on, and it offers 3 different servers, each in its own tab:
- Smart DNS: Lets other devices use your computer's Internet connection (for example its VPN connection) only by changing their DNS server.
- DNS over HTTPS: An encrypted DNS over HTTPS (DoH) server.
- DNS: A regular DNS server.
Every server can optionally send its traffic through the Tor network for increased anonymity and security. Only one server runs at a time.
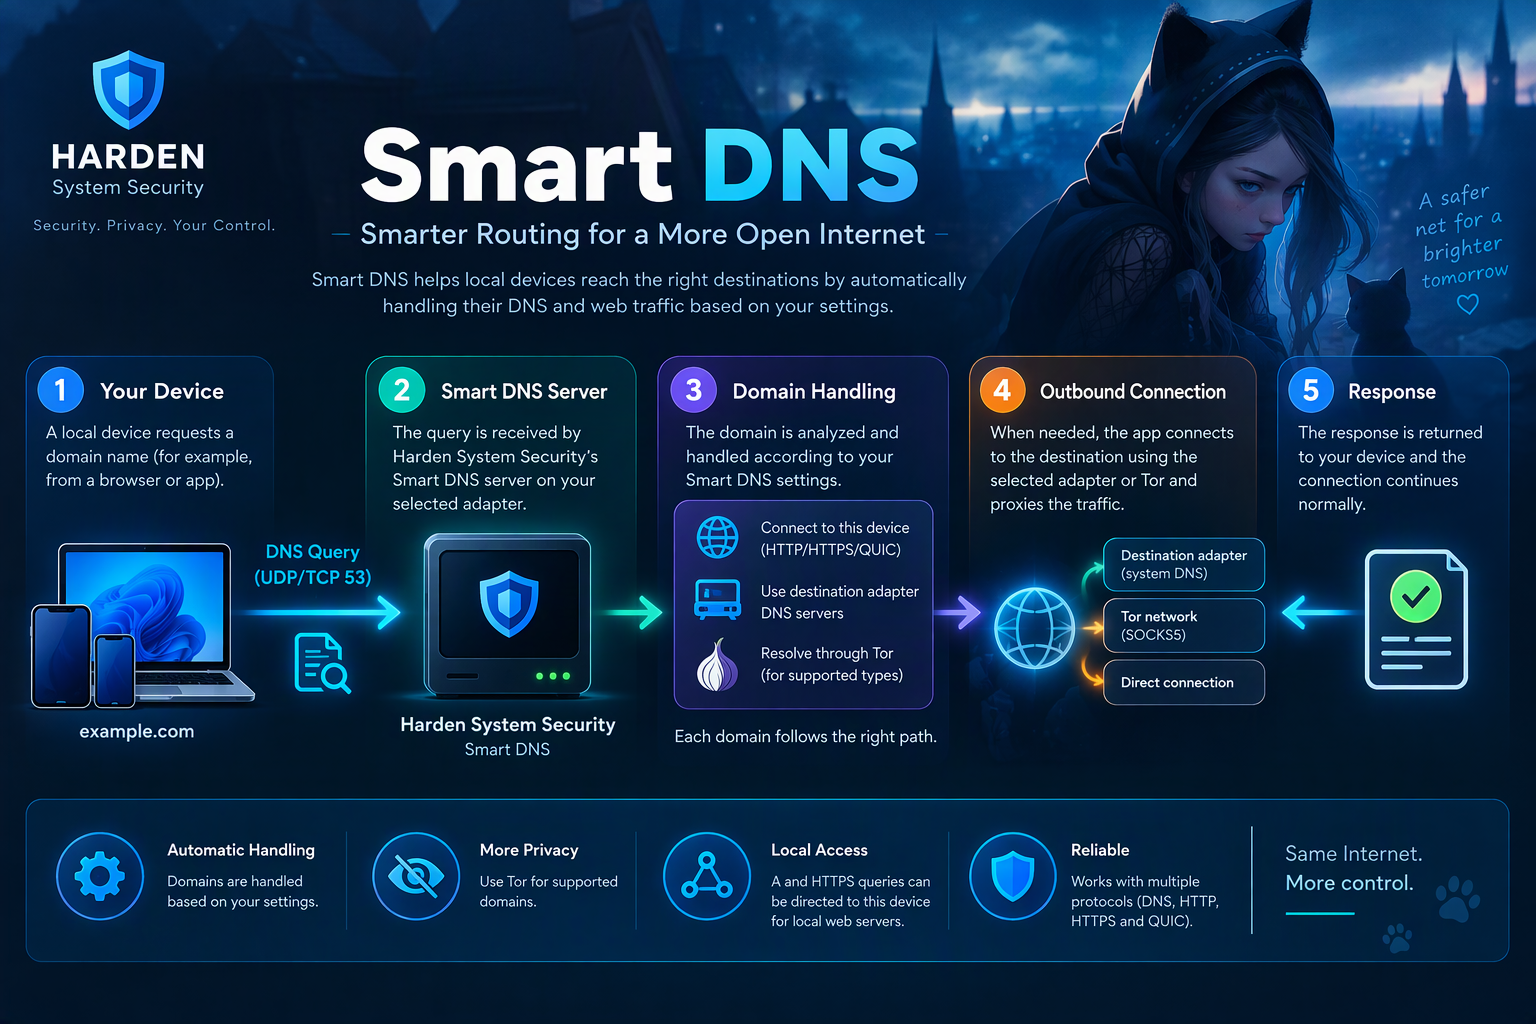
Choose this when you want to change the path a device takes to websites and to share your secure VPN connection with other devices Your computer becomes the server where all other devices can connect to in order to use your VPN connection without having to install any app on other devices.
It's not a replacement for a full-device VPN. A game, calling app or other service that uses different ports than the ones documented here can still connect directly to the Internet. Game consoles such as Xbox do not support VPN apps or VPN configurations so you can set the DNS server on them to use your Smart DNS instead to secure their connections.
The Smart DNS answers the DNS queries of the devices on the source adapter's network with your computer's own address. The devices then connect to your computer instead of the real servers, and the engine relays their connections to the real destinations through the destination adapter.
This means a device that cannot run a VPN app, or that you do not want to install one on, can still use the VPN connection of your computer. Nothing needs to be installed on the device and none of its traffic is decrypted: the engine only reads the server name at the start of each connection to find out where it must go, and the device still verifies the real server's certificate itself.
- Select the source adapter. It is the network adapter that your other devices can reach, typically a physical Wi-Fi or Ethernet adapter.
- Select the destination adapter. It is the adapter that the traffic leaves through, typically your VPN adapter or if not using a VPN, the same physical Wi-Fi or Ethernet adapter as the source adapter.
- Press Start.
- On the other device, set the DNS server to the IP address of the source adapter. It must be the only DNS server of that device.
| Traffic | Protocol and Port |
|---|---|
| DNS | UDP and TCP 53 |
| HTTP | TCP 80 |
| HTTPS / TLS | TCP 443 |
| QUIC / HTTP3 | UDP 443 |
Allow these inbound ports for your computer in the firewall. Traffic to other ports is not relayed.
When this option is on, QUIC (HTTP/3) connections are relayed too, so inbound UDP 443 must also be allowed.
A QUIC connection is only relayed when it is safe to do so. Browsers and apps reuse one QUIC connection for every website that the server's certificate covers. Since all websites resolve to your computer's address, a device could send a request for one website over a connection that leads to a different website's server. The engine prevents this by checking the certificate of each destination, and it refuses QUIC for hosts whose certificate also covers hosts that live on other servers. Those hosts automatically use TCP instead, which the device's browser or app does on its own.
Note
A refused or closed QUIC connection is reported to the device right away, so it switches to TCP without waiting for a timeout.
When a server does not answer QUIC, the engine remembers it for 10 minutes. During that time, the devices are told that the host only supports HTTP/2, so they use TCP right away instead of waiting for QUIC first.
While the engine is running, the page displays the live upload and download speeds, the number of active connections and the total amount of relayed data.

Choose this when you want the requests that help apps find websites to travel in sealed envelopes rather than readable messages. This protects those requests from being read or changed by someone watching the connection. Devices configured to use your server can keep the same local address when you change the selected DNS providers on your computer.
The protection has a specific job: it covers address lookups, not everything you do online. Your computer and the provider answering a lookup still handle the requested name, and the website connection does not pass through this server. This is a privacy improvement for DNS, not a promise of anonymous browsing or a substitute for Smart DNS connection sharing.
It runs a DNS over HTTPS (DoH) server on the listener adapter. Every query it receives is forwarded to the upstream DoH resolvers that you select, so the queries are encrypted on both sides: between the device and your computer, and between your computer and the resolver.
- Listener adapter: The network adapter that your other devices can reach.
- DoH certificate hostname or IP address: The name or the IP address that the devices use to reach the server. The certificate is issued for it.
- Generate and trust certificate: Creates a certificate for the hostname or IP address above, stores it in the Local Machine's Personal store and trusts it on your computer.
- DoH server certificate: Selects the certificate that the server presents. Certificates in the Personal stores that have a private key and are valid for server authentication are listed.
- DoH port: The port the server listens on. Allow it as inbound TCP in the firewall, and also as inbound UDP so the devices can use HTTP/3.
- Upstream DoH resolvers: Select one or more resolvers. Cloudflare, Google and Quad9 resolvers are included, and you can add your own with the Add resolver button.
- DNS over HTTPS template: The address of the server to enter on the devices, for example in the DNS over HTTPS settings of Windows, Edge browser and so on.
Important
Devices only accept a DoH server whose certificate they trust. If you use a generated certificate, it must also be installed as a trusted root certificate on every device that uses the server.
The server accepts HTTP/1.1 and HTTP/2 over TCP and HTTP/3 over UDP on the same port, and every response tells the devices that HTTP/3 is available. Each device decides on its own which version it uses:
- Chromium-based browsers, such as Microsoft Edge and Google Chrome, only use HTTP/3 with servers whose certificate comes from a publicly trusted certificate authority. With a generated or a privately trusted certificate they keep using HTTP/2, which is just as secure and works normally. The logs show the HTTP version of every query.
- Browsers send several queries at the same time and cancel the ones they no longer need, so a few canceled queries in the logs are normal.
Towards the upstream resolvers, the server starts with HTTP/2 and switches to HTTP/3 once a resolver advertises it, as Cloudflare and Google do. If HTTP/3 fails, for example because the network blocks UDP 443, that resolver is reached over HTTP/2 for the rest of the run. HTTP/3 is never used with Tor, because Tor only carries TCP.
Both the DNS over HTTPS server and the DNS server cache the answers for as long as their records allow, so repeated queries are answered right away. Answers for names that do not exist are only kept briefly, and no answer is kept for more than an hour.
While a server is running, its tab displays the number of queries served, how many of them were answered from the cache, the failed queries and the number of clients that sent queries. The counts start from zero every time the server starts.
Tip
Improve your DNS privacy by combining DNS over HTTPS (DoH), Tor, and multiple upstream resolvers. Your device sends encrypted DNS queries to the local DoH server in Harden System Security. The app then randomly selects an upstream resolver and forwards the query through Tor, returning the response to your device over the encrypted DoH connection. Adding more upstream resolvers increases the variety of resolvers used.

Choose this when a device offers only a basic DNS address setting and you want more control without needing encrypted-DNS support. Your computer acts as a shared address-help desk: devices ask it where to find a service, while you decide which outside DNS servers supply the answers. Once the devices point to your computer, changing that choice does not require editing each device again.
Unlike Smart DNS, this help desk does not carry the website or app connection that follows. Sending a lookup through your computer's VPN does not put the device's browsing through that VPN. It is the simpler option for managing address lookups, but the messages between the device and your computer remain readable on the local network, even when Tor is enabled.
It runs a regular, unencrypted DNS server on the listener adapter, on UDP and TCP port 53.
-
Without Tor: Every query is forwarded as is to the upstream DNS servers. All query types are supported. Select the source of the upstream DNS servers:
- DNS servers of the destination adapter (default): The queries are sent to the DNS servers of the selected destination adapter, through that adapter. Select your VPN's adapter when a VPN is connected.
- Custom DNS servers: The queries are sent to the upstream DNS servers that you enter, separated by commas, through the system's routing.
-
With Tor: The names are resolved through the Tor network. Tor supports
A,AAAAandPTRqueries. Other query types get an empty answer.
To use it, set the DNS server of your devices to the IP address of the listener adapter and allow inbound UDP and TCP 53 in the firewall.
Important
Some VPN apps block DNS traffic on port 53 to every server except their own, to prevent DNS leaks. Custom DNS servers such as 1.1.1.1 then never answer, and every query fails. Use the DNS servers of the destination adapter with the VPN's adapter selected instead. When no upstream server answers, the logs display a hint about this.
Each tab has a Use Tor switch. When it is on, the Tor settings appear and the server uses the Tor network:
- Smart DNS: The connections of the devices and the name resolution go through Tor instead of the destination adapter. Tor only carries TCP, so QUIC is not relayed and the devices use TCP.
- DNS over HTTPS: The queries are sent to the upstream DoH resolvers through Tor, so the resolvers cannot see your IP address.
- DNS: The names are resolved by the Tor network itself.
-
Use the Download the Tor Expert Bundle link to download the bundle from the Tor Project's website, and extract it.
-
Select the extracted folder as the Tor Expert Bundle folder. It must contain
tor\tor.exe,data\geoipanddata\geoip6. The app remembers the folder so you only have to do this once. -
Select the Tor connection method:
- Direct: Connects to the Tor network directly.
- Obfs4, Snowflake and Meek: Bridges that disguise the connection, for networks where Tor is blocked.
-
Press Start. Tor is initialized automatically, which can take a few minutes the first time. You can also initialize it ahead of time with the Initialize Tor button.
The same Tor session is shared by all 3 tabs, so it is only initialized once. Use the Stop Tor button to end it. While Tor is initializing or running, the Use Tor switches are locked. Press Stop Tor first to change them.
The DNS over HTTPS and DNS tabs can save the domain names that are queried through them. Turn the Domain log on with its switch and select a JSON file in its Log file setting. Selecting a file turns the log on as well.
The file contains every queried domain name along with the number of times it was queried:
{
  "example.com": 12,
  "Microsoft.com": 3
}
An existing file is continued, so the counts keep growing across runs.
Turn on Root domains only to count every name under its root domain instead of the full name. For example, azure.homefront.microsoft.com is then counted as microsoft.com. Names under common second-level domains of country code domains, such as co.uk, keep one more label, so www.bbc.co.uk is counted as bbc.co.uk.
Tip
The domain log is useful for finding out which domains a device or an app contacts, for example to build a block list or an allow list.
The Logs button next to the tabs opens the logs pane, which shows what the running server is doing, such as the queries it answered and the connections it relayed. Drag the left edge of the pane to resize it, and use its Copy and Clear buttons to copy or clear the logs. Click anywhere outside the pane to close it.
-
The device must only use your computer as its DNS server. If the device has a secondary DNS server, or receives an IPv6 DNS server from the router, some of its queries bypass your computer.
-
Disable Private DNS / Secure DNS on the device. A device or browser that uses its own DNS over TLS or DNS over HTTPS resolver does not ask your computer.
-
Android 17 and later require the local network permission. The Smart DNS answers with your computer's local address, and Android only lets an app connect to local addresses when the app has the Local network (Nearby devices) permission. An app without it can still resolve names, but it cannot connect, so it fails to load anything while other apps work. For example, Microsoft Edge shows
ERR_TOO_MANY_RETRIESand Google Play fails to load. To fix it, open Settings > Apps > the app > Permissions > Nearby devices and select Allow, then restart the app. Older Android versions do not have this restriction. -
Allow the ports in the firewall. A device that cannot reach the ports listed above gets no answer.
-
The DNS server answers every query with an error. The upstream DNS servers cannot be reached. This happens when a VPN blocks DNS traffic to other servers. Use the DNS servers of the destination adapter and select the VPN's adapter, as explained in the DNS section.
-
Ports that are already in use. If another program on your computer already uses port 53, 80 or 443 on the selected adapter, the server cannot start and the reason is displayed.



- Home
- Create AppControl Policy
- Create Supplemental Policy
- System Information
- Configure Policy Rule Options
- Policy Editor
- Simulation
- Allow New Apps
- Build New Certificate
- Create Policy From Event Logs
- Create Policy From MDE Advanced Hunting
- Create Deny Policy
- Merge App Control Policies
- Deploy App Control Policy
- Get Code Integrity Hashes
- Get Secure Policy Settings
- Update
- Sidebar
- Validate Policies
- View File Certificates
- Microsoft Graph
- Firewall Sentinel
- Data Analysis in AppControl Manager
- Compare Policies

- Home
- TopBar
- Protect
- Microsoft Security Baselines
- Microsoft Security Baselines Overrides
- Microsoft 365 Apps Security Baseline
- Microsoft Defender
- Attack Surface Reduction
- Bitlocker
- Device Guard
- TLS Security
- Lock Screen
- User Account Control
- Windows Firewall
- Optional Windows Features
- Windows Networking
- Miscellaneous Configurations
- Windows Update
- Edge Browser
- Certificate Checking
- Country IP Blocking
- Non Admin Measures
- Group Policy Editor
- Manage Installed Apps
- File Reputation
- Audit Policies
- Cryptographic Bill of Materials
- Intune
- Configuration Service Provider (CSP)
- Service Manager
- Exploit Mitigations
- Sandbox Maker
- WinGet Management
- Tweaks
- Secure Vault
- Duplicate Photos Finder
- EXIF Manager
- Download Manager
- Bootable Drive Maker
- DNS

- Introduction
- How To Generate Audit Logs via App Control Policies
- How To Create an App Control Supplemental Policy
- The Strength of Signed App Control Policies
- How To Upload App Control Policies To Intune Using AppControl Manager
- How To Create and Maintain Strict Kernel‐Mode App Control Policy
- How to Create an App Control Deny Policy
- App Control Notes
- How to use Windows Server to Create App Control Code Signing Certificate
- Fast and Automatic Microsoft Recommended Driver Block Rules updates
- App Control policy for BYOVD Kernel mode only protection
- EKUs in App Control for Business Policies
- App Control Rule Levels Comparison and Guide
- Script Enforcement and PowerShell Constrained Language Mode in App Control Policies
- How to Use Microsoft Defender for Endpoint Advanced Hunting With App Control
- App Control Frequently Asked Questions (FAQs)
- System Integrity Policy Transformations | XML to CIP and Back
- About Code Integrity Policy Signing

- How To Install Microsoft Store Apps Completely Offline
- Create Bootable USB flash drive with no 3rd party tools
- Event Viewer
- Group Policy
- How to compact your OS and free up extra space
- Hyper V
- Git GitHub Desktop and Mandatory ASLR
- Signed and Verified commits with GitHub desktop
- About TLS, DNS, Encryption and OPSEC concepts
- Things to do when clean installing Windows
- Comparison of security benchmarks
- BitLocker, TPM and Pluton | What Are They and How Do They Work
- How to Detect Changes in User and Local Machine Certificate Stores in Real Time Using PowerShell
- Cloning Personal and Enterprise Repositories Using GitHub Desktop
- Only a Small Portion of The Windows OS Security Apparatus
- Rethinking Trust: Advanced Security Measures for High‐Stakes Systems

- Clean Source principle, Azure and Privileged Access Workstations
- How to Securely Connect to Azure VMs and Use RDP

- Basic PowerShell tricks and notes
- Basic PowerShell tricks and notes Part 2
- Basic PowerShell tricks and notes Part 3
- Basic PowerShell tricks and notes Part 4
- Basic PowerShell tricks and notes Part 5
- How To Access All Stream Outputs From Thread Jobs In PowerShell In Real Time
- PowerShell Best Practices To Follow When Coding
- How To Asynchronously Access All Stream Outputs From Background Jobs In PowerShell
- Powershell Dynamic Parameters and How to Add Them to the Get‐Help Syntax
- RunSpaces In PowerShell
- How To Use Reflection And Prevent Using Internal & Private C# Methods in PowerShell