Setting up ja JP
はじめての方、ようこそ! 私たちのプロジェクトに興味を持ってくださる方がまた一人増えたことをとても嬉しく思います。能力に努力はつきものだ、もしあなたが** ASF の使用方法を充分学んだのなら**、ASFはSteamに関連した様々なことを行うことができます。 ここには急な学習曲線がありますので、この点に関してはwikiを読んでいただくことを期待しています。
あなたがまだここにいるということは、上記のテキストに耐えてくれたということですね。嬉しい。 これをサボっていたら、すぐに嫌な思いをすることになりますよ… Anyway, ASF is a console app, which means that the program itself doesn't have a friendly GUI that you're in general used to, at least out of the box. ASF は主にサーバ上で実行されることを想定していたので、デスクトップアプリではなくサービス(デーモン)として動作します。
しかし、これはあなたの PC で使用できなかったり、使用することが通常よりも複雑だったりすることを意味するものではありません。 ASF はインストールを必要としないスタンドアロンのプログラムで、OOTB(箱から出してすぐに動作します)が、使えるようにするには設定が必要です。 設定とは、ASF を起動した後に何をさせるかを指示することです。 設定なしで起動しても 、ASF は何もしません。
訳注(用語説明):
・.NET Core の要件・依存関係 (.NET Core prerequisites)、.NET Coreアプリが作動する環境。
・OS固有バリアント・OS固有パッケージ(OS-specific variant/OS-specific package)、コードをOSが実行できるよう予め作られたやつ、ユーザーがダウンロードするやつ。
(もっといい訳し方を知っている方はぜひ拙訳を直していただきたい。)
一般的には、次のようにします。
- Install .NET prerequisites.
- 最新の ASF リリースを適切な OS 固有バリアントでダウンロードします。
- Extract the archive into new location.
- ASF を設定します
- ASF を起動し、奇跡の瞬間を目に焼き付けなさい。
簡単っしょ? では、早速やってみましょう。
まずは、お使いの OS で ASF が正しく起動できるかを確認して下さい。 ASF is written in C#, based on .NET platform and may require native libraries that are not available on your platform yet. Depending on whether you use Windows, Linux or macOS, you will have different requirements, although all of them are listed in .NET prerequisites document that you should follow. これはマイクロソフトによる公式的な説明ですが、簡単にするために、必要なものを以下にも書きますので、リンク先の全文を読まなくて結構です。
ASF が依存するソフトが、他のソフトによってすでに一部または全てインストールされていることが普通です。 それでも、ASFが確実に作動するために、依存関係を再度インストールすることが必要とされることもある。
Keep in mind that you don't need to do anything else for OS-specific builds, especially installing .NET SDK or even runtime, since OS-specific package includes all of that already. You need only .NET prerequisites (dependencies) to run .NET runtime included in ASF.
- Microsoft Visual C++ Redistributable Update (x64 for 64-bit, x86 for 32-bit or arm64 for 64-bit ARM)
- すべてのWindowsアップデートがすでにインストールされていることを確認することを強くお勧めします。 If you don't have them enabled, then at the very least you need KB2533623 and KB2999226, but more updates may be needed. You don't need to install them if your Windows is up-to-date.
パッケージ名は使用している Linux ディストリビューションに依存しますが、ここでは最も一般的なものをリストアップしました。 あなたの OS のネイティブのパッケージマネージャ(例えば Debian なら apt、CentOS なら yum)を使っても、これらをインストールすることが可能です。
-
ca-certificates(standard trusted SSL certificates to make HTTPS connections) -
libc6(libc) -
libgcc-s1(libgcc1,libgcc) -
libicu(icu-libs, latest version for your distribution, for examplelibicu72) -
libgssapi-krb5-2(libkrb5-3,krb5-libs) -
libssl3(libssl,openssl-libs, latest version for your distribution, at least1.1.X) -
libstdc++6(libstdc++, in version5.0or higher) -
zlib1g(zlib)
At least a majority of those should be already natively available on your system. The minimal installation of Debian stable required only libicu72.
- None for now, but you should have latest version of macOS installed, at least 12.0+
前の節で必要な依存関係はすべて揃っているはずので、本節では最新の ASF リリースをダウンロードします。 ASF には多くの種類がありますが、ご利用の OS やアーキテクチャに合うパッケージを選んで下さい。 例えば、64 ビット Windows を使用している場合、ASF-win-x64 パッケージをダウンロードして下さい。 利用可能なバリアントの詳細については、互換性セクションを参照してください。 ASFは 32ビットWindows のような、我々がOS固有パッケージを提供していないOSでも動作することができます。詳しくは、汎用設定を参照して下さい。

ダウンロードしたら、まずは zip ファイルをお好きなフォルダに解凍して下さい。 If you require specific tool for that, 7-zip will do it, but all standard utilities like unzip from Linux/macOS should work without problems as well.
ASF をほかに何も入っていないディレクトリに解凍することをお勧めします。ASF の自動更新機能はアップグレード時に古いファイルや関係のないファイルをすべて削除するようになっているので、ASF ディレクトリにある関係のないファイルが削除される可能性があります。 ASFで使用するほかのスクリプトやファイルは、親ディレクトリに入れてください。
構造はこんな感じ。
C:\ASF(ご自身のものを置く場所、例)
    ├── ASFのショートカット.lnk(例)
    ├── 設定のショートカット.lnk(例)
    ├── コマンドの下書き.txt(例)
    ├── 自分が書いたスクリプト.bat(例)
    ├── (...)(任意のほかのファイル)
    └── Core(ASF専用のディレクトリ、圧縮ファイルが解凍される場所)
         ├── ArchiSteamFarm(.exe)
         ├── config
         ├── logs
         ├── plugins
         └──(...)
これで残ったのは配置することだけだ。 このステップが結構面倒くて、新しい点も多いから、ここでは分かりやすく、例を交えて説明しますね。
まず、設定ページでこれに関する全てが書かれているが、あまりにも情報量が莫大で、今はまだ読まなくていい。 代わりに、実際に必要な情報を得る方法を教えよう。
ASF configuration can be done in at least three ways - through our web config generator, ASF-ui or manually. この部分も設定ページで詳しく書かれている、詳しく知りたい方はそちらを。 We'll use web config generator as a starting point.
ブラウザでウェブ設定生成器のページにアクセスして下さい。javascript を手動で無効化していたら有効にして下さい。 Chrome か Firefox を使うことをお勧めしますが、他のブラウザでも問題ないはず。
ページを開いたら、「Bot」タブに切り替えて下さい。 下のようなページが表示されているはずです。

もしダウンロードした ASF のバージョンがウェブ設定生成器のデフォルトのバージョンよりも古い場合は、ドロップダウンメニューからお使いの ASF のバージョンを選択してください。 これは、設定生成器は、まだ安定していないプレリリース版の ASF の設定も生成できるからである。 安定版 ASF は検証済みなので、そちらをダウンロードして下さい。
まずは赤くハイライトされた入力欄にボットの名前を入力する。 ニックネーム、ユーザー名、数字、何でもよくて、お好きなように名前を付けて下さい。 但し、ASF とだけは名付けてはいけません。 その他にも、ASFはこれを無視するので、ボット名を「.」(点)で始まる名前にしてはいけません。 また、スペースの使用も避けたほうがいいと思われます。スペースの代わりに _ を使って下さい。
名前が決まったら、Enabled スイッチをオンにしてください。このスイッチは、ASF 起動後に自動的にこのボットを起動するかどうかを定義するものです。
ここで、下の 2 つの中のどれにするか決めて下さい。
- Steamのアカウント名とパスワードをそれぞれ
SteamLoginとSteamPassword欄に入力する。 - これらを空白のままにする。
前者を選んだ場合、ASFは起動時に自動的にあなたのアカウント認証情報を使用し、毎回毎回手動で入力する必要はありません。 後者なら、アカウント情報は保存されませんので、ASFが起動するたびに手動でこれらを入力する手間が掛かる。
ASF には Steam クライアントの独自の実装が含まれているため、Steam 公式アプリと同じくログイン認証情報を必要とします。 ログイン認証情報はユーザーの PC にある ASF の下の config ディレクトリ内にのみ保存されます。ウェブ設定生成器はクライアント・ベースで、ブラウザ上でローカルにコードを実行します。ユーザーの認証情報はどこにも送られませんので、ユーザー情報が知られる心配はありません。 それでも、何らかの理由で認証情報をそこに書きたくない場合は(うん、わかる)、後で生成されたファイルに手動で書き入れるか、あるいは完全に省略して、起動するたんびに ASF コマンド・プロンプトに手動で入力することもできます。 セキュリティに関する詳細は**設定**ページを参照して下さい。
また、SteamPassword のように 1 つだけを空欄にするのも可能だ。その場合、ASF は自動的にログインしようとするが、Steam アプリと同様にパスワードを要求してきます。 ファミリービュー(保護者による制限)が有効化されたアカウントなら、SteamParentalCode 欄にそれに必要な コード を入力して下さい。
必要な操作をすべて完了させたら、Webページは以下のようになります。

「ダウンロード」ボタンを押すと、ボットの名前に基づいて新しい json ファイルが生成されます。 このファイルを前に解凍したフォルダにある config ディレクトリに保存して下さい。
config ディレクトリはこのようになります。

ヨシッ! これで ASF ボットの基本的な設定が完了しました。 このあとで詳しく説明するが、今のところこれで大丈夫です。
これでプログラムを初めて起動する準備ができました。 ASF ディレクトリ内の ArchiSteamFarm バイナリをダブルクリックして下さい。 You can also start it from the console.
最初のステップで必要な依存関係をすべてインストールしていたら、正常なら ASF は起動します。生成された設定を config ディレクトリに置くのを忘れていなければ、最初のボットを検出し、ASF はログインしようとします。

SteamLogin と SteamPassword を記入していたら、ASF は設定により Steamガード(メール、2ファクタ認証若しくはなし)だけを要求してくる。 それを記入していない場合、パスワードも要求してきます。
Now would be a good time to review our remote communication section if you're concerned about stuff ASF is programmed to do, including actions it'll take in your name, such as joining our Steam group.
After passing through initial login gate, assuming your details are correct, you'll successfully log in, and ASF will start farming using default settings that you didn't change as of now:

つまり、ASF はあなたのアカウントを使って、正常に動作していることを意味します。プログラムを最小化にして他のことをしてもいいってわけね。 十分な時間(パフォーマンスによる)が経過すると、Steam トレーディングカードがドロップしてきます。 Of course, for that to happen you must have valid games to farm, showing as "you can get X more card drops from playing this game" on your badges page - if there are no games to farm, then ASF will state that there is nothing to do, as stated in our FAQ.
基本的な初期設定はここまでだ。 ASF の設定をさらにいじるのもよし、デフォルト設定のままでも使えます。 ここからはより高度的な設定になりますが、ASF を完全にマスターしたいなら、Wiki のほかのページもご覧下さい(まだ訳していないけど)。
ASF supports farming more than one account at a time, which is its primary function. You can add more accounts to ASF by generating more bot config files, in exactly the same way as you've generated your first one just a few minutes ago. You need to ensure only two things:
- Unique bot name, if you already have your first bot named "MainAccount", you can't have another one with the same name.
- Valid login details, such as
SteamLogin,SteamPasswordandSteamParentalCode(if using Steam parental settings)
In other words, simply jump to configuration again and do exactly the same, just for your second or third account. Remember to use unique names for all of your bots.
You change existing settings in exactly the same way - by generating a new config file. If you didn't close our web config generator yet, click on "toggle advanced settings" and see what is there for you to discover. For this tutorial we'll change CustomGamePlayedWhileFarming setting, which allows you to set custom name being displayed when ASF is farming, instead of showing actual game.
So let's do that, if you run ASF and start farming, in default settings you'll see that your Steam account is in-game now:

Let's change that then. Toggle advanced settings in web config generator and find CustomGamePlayedWhileFarming. Once you do that, put your own custom text there that you want to display, such as "Idling cards":

Now download the new config file in exactly the same way, then overwrite your old config file with new one. You can also delete your old config file and put new one in its place of course.
Once you do that and start ASF again, you'll notice that ASF now displays your custom text in previous place:

This confirms that you've successfully edited your config. In exactly the same way you can change global ASF properties, by switching from bot tab to "ASF" tab, downloading generated ASF.json config file and putting it in your config directory.
Editing your ASF configs can be done much easier by using our ASF-ui frontend, which will be explained further below.
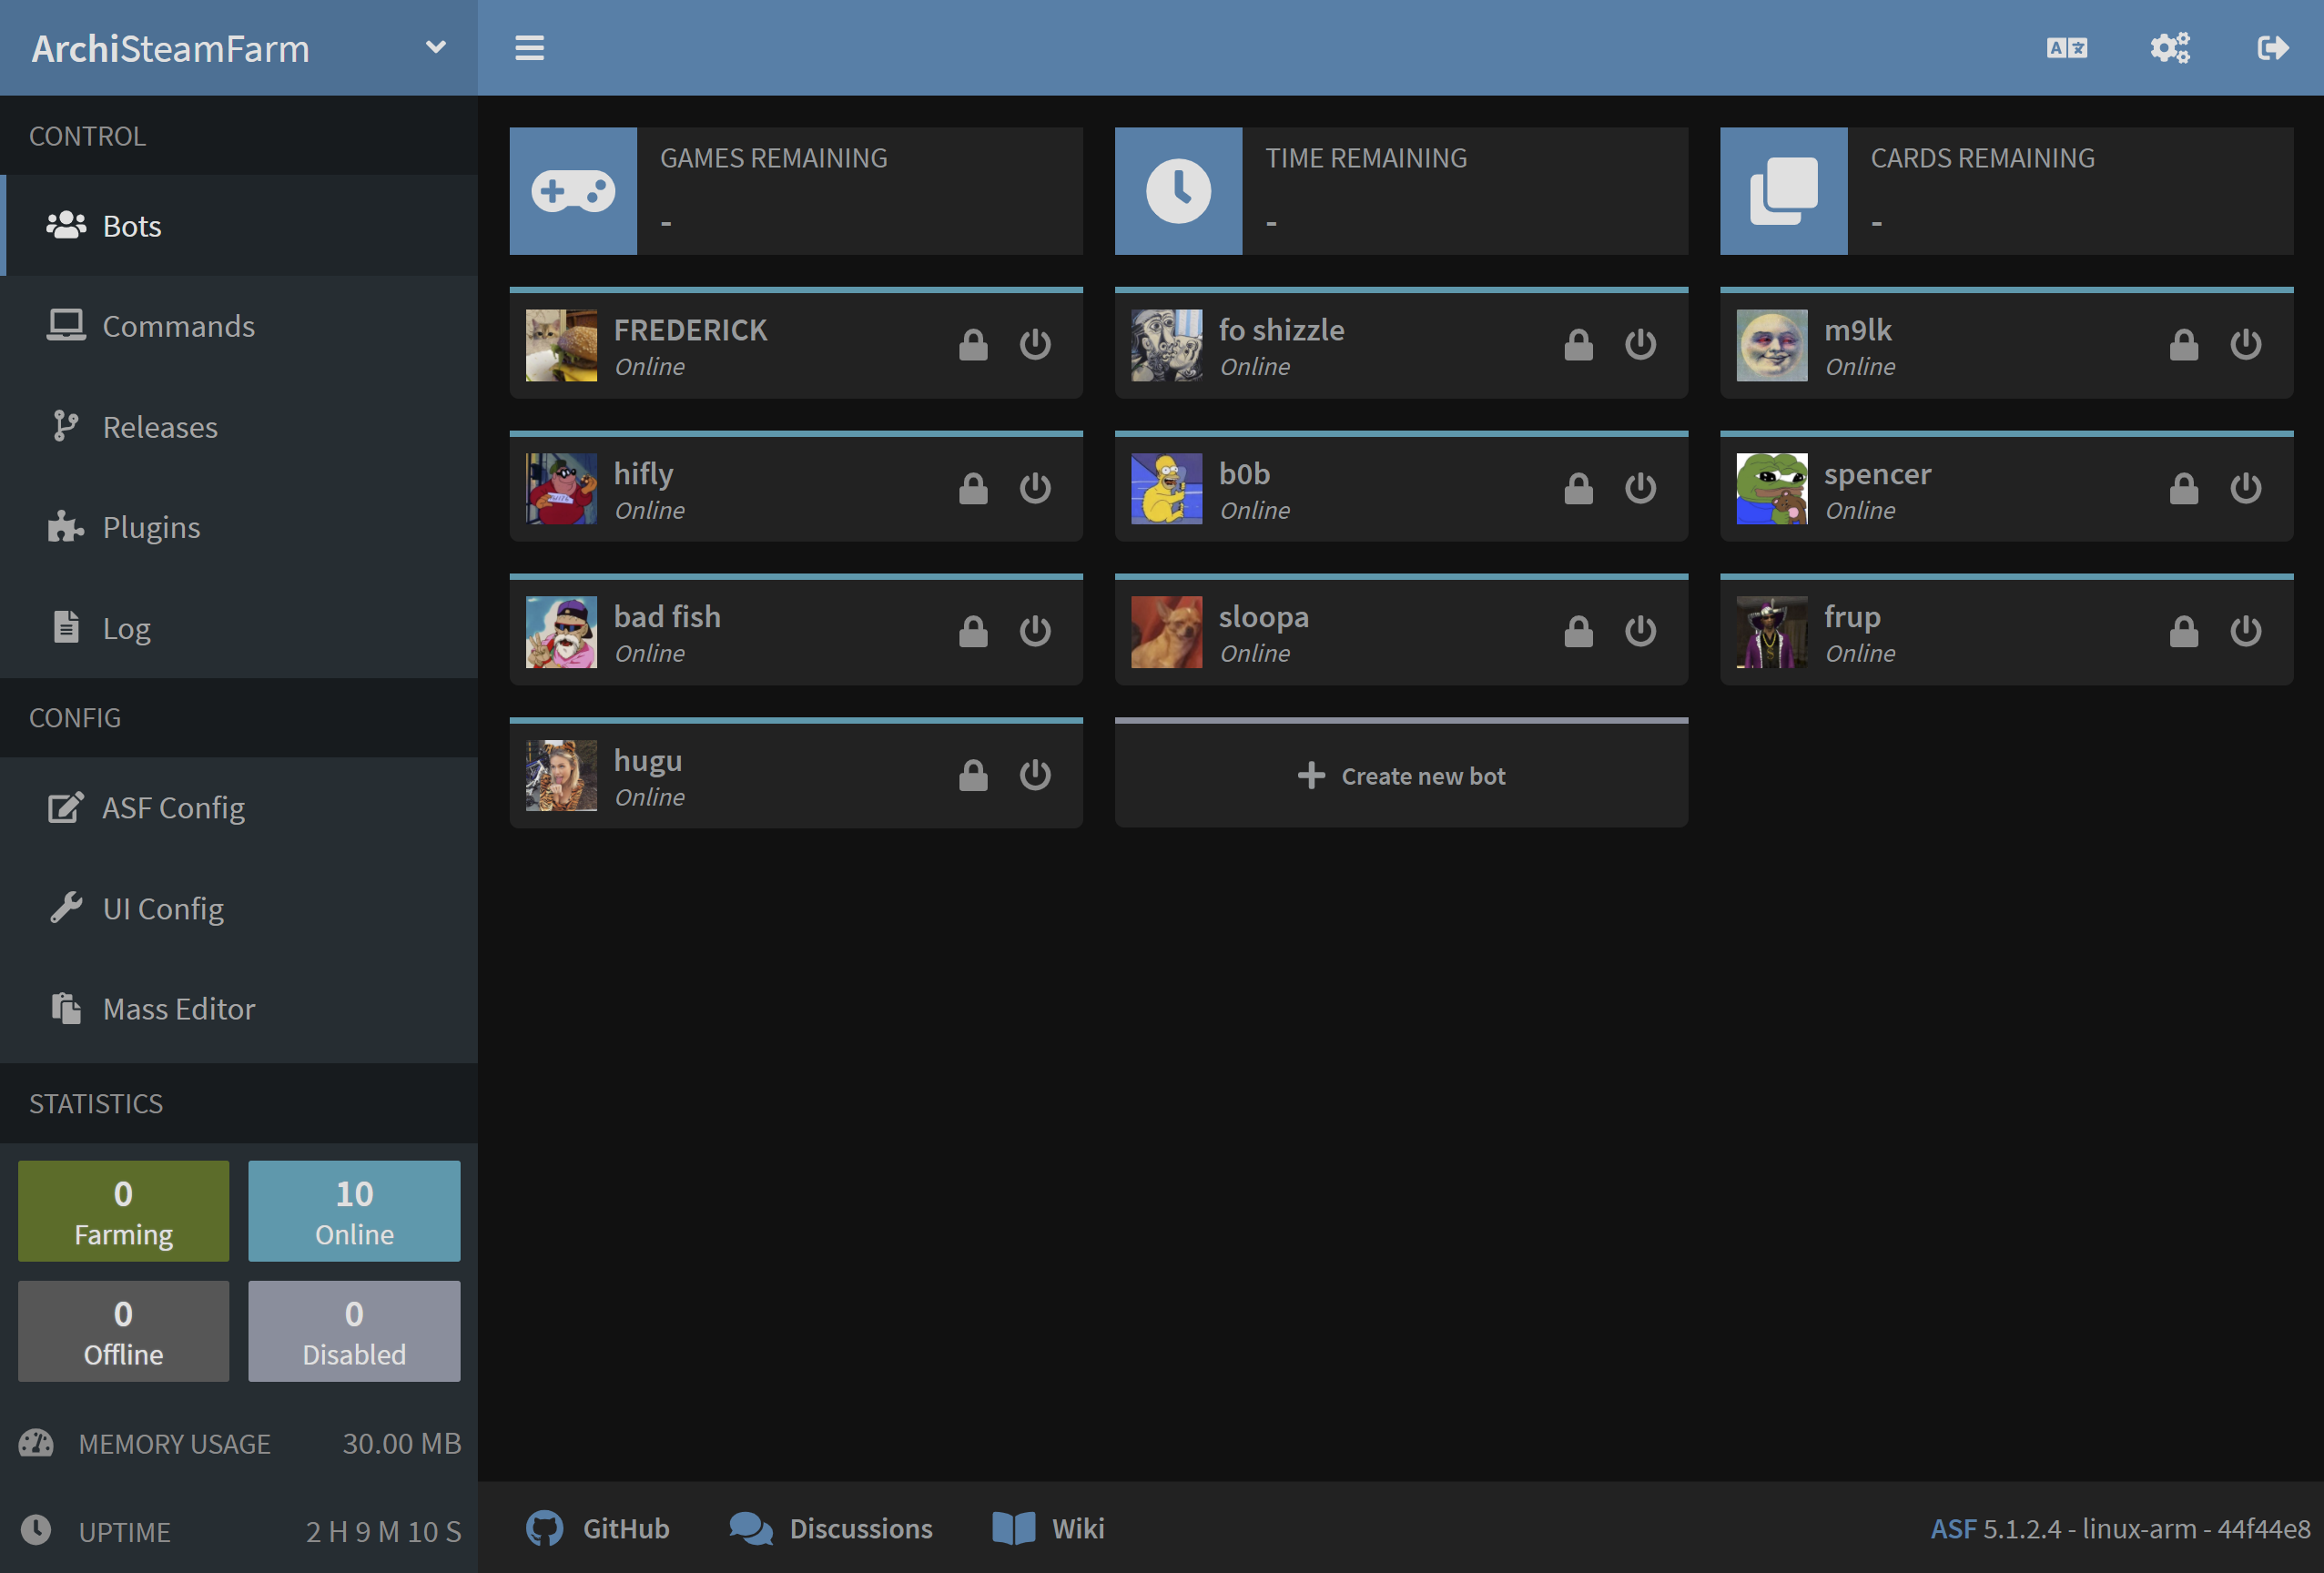
ASF is a console app and doesn't include a graphical user interface. However, we're actively working on ASF-ui frontend to our IPC interface, which can be a very decent and user-friendly way to access various ASF features.
In order to use ASF-ui, you need to have IPC enabled, which is the default option. Once you launch ASF, you should be able to confirm that it properly started the IPC interface automatically:

You can access ASF's IPC interface under this link, as long as ASF is running, from the same machine. You can use ASF-ui for various purposes, e.g. editing the config files in-place or sending commands. Feel free to take a look around in order to find out all ASF-ui functionalities.
You've successfully set up ASF to use your Steam accounts and you've already customized it to your liking a little. If you followed our entire guide, then you also managed to tweak ASF through our ASF-ui interface and found out that ASF actually has a GUI of some sort. Now is a good time to read our entire configuration section in order to learn what all those different settings you've seen actually do, and what ASF has to offer. If you've stumbled upon some issue or you have some generic question, read our FAQ instead which should cover all, or at least a vast majority of questions that you may have. If you want to learn everything about ASF and how it can make your life easier, head over to the rest of our wiki. If you found out our program to be useful for you and you appreciate the massive amount of work that was put into it, you can also consider a donation to our cause. In any case, have fun!
This setup is for advanced users that want to set up ASF to run in generic variant. While being more troublesome in usage than OS-specific variants, they also come with additional benefits.
You want to use generic variant mainly in those situations (but of course you can use it regardless):
- When you're using OS that we don't build OS-specific package for (such as 32-bit Windows)
- When you already have .NET Runtime/SDK, or want to install and use one
- When you want to minimize ASF structure size and memory footprint by handling runtime requirements yourself
- When you want to use a custom plugin which requires a
genericsetup of ASF to run properly (due to missing native dependencies)
However, keep in mind that you're in charge of .NET runtime in this case. This means that if your .NET SDK (runtime) is unavailable, outdated or broken, ASF won't work. This is why we don't recommend this setup for casual users, since you now need to ensure that your .NET SDK (runtime) matches ASF requirements and can run ASF, as opposed to us ensuring that our .NET runtime bundled with ASF can do so.
For generic package, you can follow entire OS-specific guide above, with two small changes. In addition to installing .NET prerequisites, you also want to install .NET SDK, and instead of having OS-specific ArchiSteamFarm(.exe) executable file, you now have a generic ArchiSteamFarm.dll binary only. Everything else is exactly the same.
With extra steps:
- Install .NET prerequisites.
- Install .NET SDK (or at least ASP.NET Core runtime) appropriate for your OS. You most likely want to use an installer. Refer to runtime requirements if you're not sure which version to install.
- Download latest ASF release in
genericvariant. - Extract the archive into new location.
- ASF を設定します
- Launch ASF by either using a helper script or executing
dotnet /path/to/ArchiSteamFarm.dllmanually from your favourite shell.
Helper scripts (such as ArchiSteamFarm.cmd for Windows and ArchiSteamFarm.sh for Linux/macOS) are located next to ArchiSteamFarm.dll binary - those are included in generic variant only. You can use them if you don't want to execute dotnet command manually. Obviously helper scripts won't work if you didn't install .NET SDK and you don't have dotnet executable available in your PATH. Helper scripts are entirely optional to use, you can always dotnet /path/to/ArchiSteamFarm.dll manually.
 |
 |
 |
 |
|---|---|---|---|
 |
 |
 |
 |
|---|---|---|---|
- 🏡 Home
- 🔧 Configuration
- 💬 FAQ
- ⚙️ Setting up (start here)
- 👥 ゲームのバックグラウンド有効化
- 📢 Commands
- 🛠️ Compatibility
- 🧩 ItemsMatcherPlugin
- 📋 Management
- ⏱️ Performance
- 📡 Remote communication
- 👪 Steam ファミリーシェアリング
- 🔄 Trading