Cheatsheet | Collaboration Workflow
This describes all the basic steps required to collaborate on a feature for this project. This assumes that the user already has access to a cloned repository and the virtual environment.
The process of collaborating on a feature is broken down into the following high-level steps:
- Organize a group of collaborators and identify a lead
- The lead creates a base reference branch for the feature
- If the feature is being created from scratch the lead initializes a new application for the feature
- If a pre-existing feature is being enhanced, no new application is created
- The lead pushes the feature branch up to the remote repository
- All other collaborators checkout the remote branch from remote repository
- All collaborators now work on the feature in parallel, committing file changes together on the same branch and pulling each others changes from the remote repository and pushing their own changes to the remote repository
- Collaborators test the feature
- The lead finishes the feature branch and merges their new feature back into the develop branch
All of the above steps are described in the following sections. We will be using a subset of the git-flow commands and some Django commands to support this workflow.
Week-to-week we will form feature/collaboration clusters. These are teams of several individuals working together to complete a feature. The list of collaborators must be posted by one of the team members within the slack chat each week. They will define requirements, goals and expected completion timelines. Furthermore, these teams will select a point-person who will own the issue associated with the feature. Issues are displayed on the issues page:
Each cluster team will deliver the following:
- Slack | A list of the collaborators' GitHub IDs indicating the lead's ID first
- Slack | Feature branch name and associated issue
- GitHub | Created feature branch available on remote until feature finished
The team lead creates the feature, <feature_name>, by executing the following:
git checkout develop
git flow feature start <feature_name>
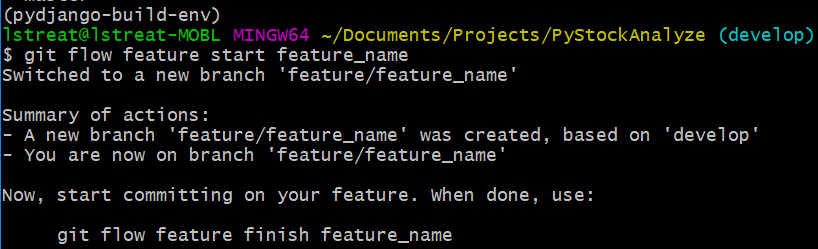
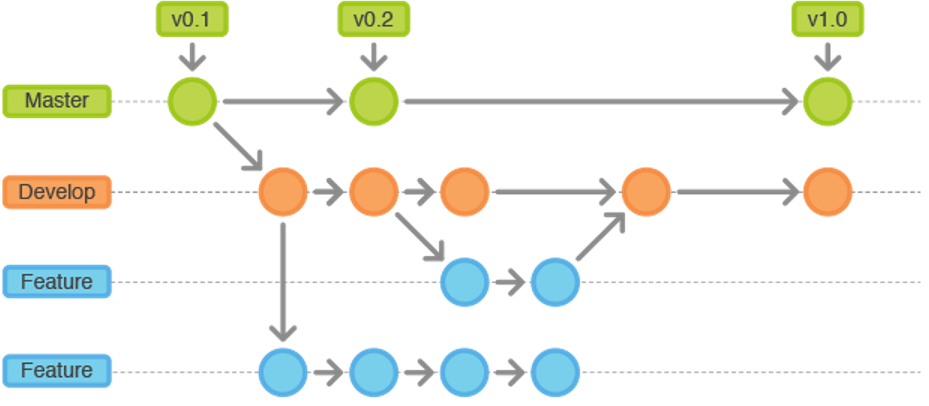
These commands creates a new branch, <feature_name>, that is based on the develop branch and begins working on it (checks it out). Never work directly on the develop branch or master branch--always branch features off of the develop branch and then merge them back into the develop branch when they are completed. To view the current branch you are working on:
git branch

Applications are created by running the following from within the src/pysdjango/ folder:
manage startapp <app_name>

Note that a new folder is created called app_name. A description of what is all contained in an application is described here:
Next the files must be committed to the branch so that they can start being tracked by git:
git add <app_name>/
Commit the files so that they are a part of the local git history for the new feature branch
git commit -m "<message to describe what new feature is being added>"
Once the feature lead creates the branch, they must share it with the team. This is done by publishing the branch to the remote repository:
git push -u origin feature/<feature_name>
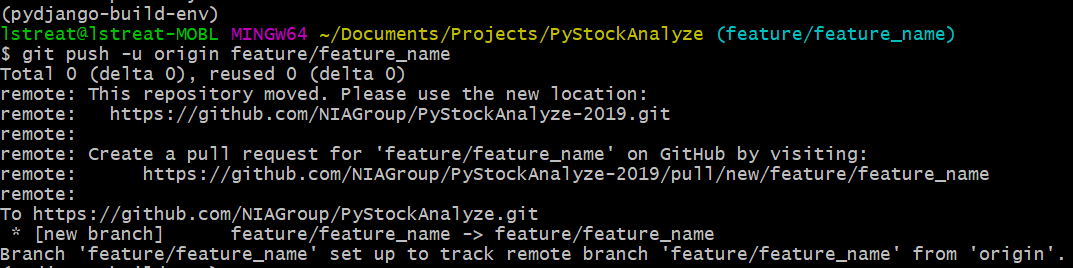
As a result of this command, the branch is now available on GitHub for others in the collaboration team to pull. Branches may be viewed by navigating to the repository's code tab and then selecting the branches option. This will display:

Collaborators can begin working on a feature by checking it out from the remote repository:
git pull
git checkout feature/<feature_name>

GitHub is a powerful version management system that can be somewhat daunting to use at times. However, most productive work can be done by using a very small subset of the commands available in git. We've listed some of those key commands here (along with comments describing the commands):
# Check current repository status (list committed vs uncommitted files, etc):
git status

# Stage file(s) to be added into next commit
git add <file>
git add <folder/*>
git add *

# Remove file from staging for commit
git reset <file>

# Remove file from repository history
git rm <file>

# Grab history updates from remote repository
git fetch

# Grabs history updates from remote repository and merge them
git pull

# Submit branch_1's changes to remote
git checkout branch_1
git push

# List all available local branches
git branch

# List all branches, including remote branches
git branch -r

# Merge updates from branch_1 into branch_2
git checkout branch_2
git merge branch_1
There are no strict testing requirements for this project, but this will always be an item that is tracked for each milestone. Users interested in working on unit testing can begin learning how to do so here: https://docs.djangoproject.com/en/2.2/topics/testing/
Users can create unit test enablement feature branches to add unit tests to existing features and even go as far as adding continuous integration support.