Repository navigation
Screen Reference
Every tab, panel, button and dialog on the printer's touchscreen, in one place.
This is the reference, not the tutorial. If you want to be walked through a task, start from Home - Printing, Filament, Calibration guide and the rest explain the common jobs step by step. Come here when you want to know what a specific control does.
Screenshots are real captures of the application at screen commit 36490ed, taken at the
printer's own 480x272 resolution. A few screens have no picture yet; where that is so, the page
says it rather than showing you something else.
The complete list is generated from the source - 50 panels in all - so nothing is quietly left out. Panels marked detail below are described on this page; the others are covered by the task pages linked, or are internal screens you do not navigate to directly.
| Panel | Where it is documented | Screenshot |
|---|---|---|
axis_twist_panel |
Axis twist - detail below | yes |
bedmesh_panel |
detail below | yes |
boot_logo_panel |
Resetting | not yet |
calibration_menu_panel |
Calibration guide | yes |
camera_panel |
Camera | yes |
connections_panel |
Connecting to Wi-Fi | yes |
console_panel |
detail below | yes |
display_panel |
detail below | yes |
exclude_object_panel |
Printing - detail below | not yet |
extruder_panel |
Filament - detail below | yes |
fan_panel |
detail below | yes |
filament_runout_panel |
Filament | not yet |
file_panel |
Printing - detail below | yes |
finetune_panel |
Printing - detail below | yes |
firmware_retraction_panel |
detail below | yes |
guided_calibration_panel |
Calibration guide | yes |
homing_panel |
detail below | yes |
hostname_panel |
Opening Mainsail | yes |
image_panel |
Updating NebulaOS | yes |
init_panel |
shown while the printer starts up | not yet |
led_panel |
detail below | yes |
limits_panel |
detail below | yes |
logs_panel |
detail below | not yet |
macros_panel |
detail below | yes |
main_panel |
Home tab - detail below | yes |
mcu_panel |
detail below | yes |
network_detail_panel |
Connecting to Wi-Fi | not yet |
pid_calibration_panel |
Calibration guide | yes |
power_panel |
detail below | yes |
print_panel |
not yet documented | yes |
print_status_panel |
Printing - detail below | yes |
printer_select_panel |
detail below | not yet |
printer_settings_panel |
detail below | yes |
printertune_panel |
Tune tab - detail below | yes |
prompt_panel |
shown by the printer when it needs an answer | not yet |
report_panel |
detail below | not yet |
reset_panel |
Resetting | yes |
setting_panel |
Settings - detail below | yes |
skew_correction_panel |
Skew correction - detail below | yes |
spoolman_panel |
Filament | not yet |
spoolman_server_panel |
Filament | yes |
static_ip_panel |
Connecting to Wi-Fi | not yet |
statistics_panel |
detail below | yes |
storage_panel |
Resetting | not yet |
system_panel |
detail below | yes |
tmc_status_panel |
detail below | yes |
tmc_tune_panel |
TMC Autotune - detail below | not yet |
updates_panel |
Updating NebulaOS | needs a real printer |
wifi_panel |
Connecting to Wi-Fi | yes |
zoffset_panel |
Printing - detail below | yes |
A column of icon buttons runs down the left edge of the screen. Tap one to switch. Tapping the already-active tab resets it (Macros jumps back to favourites, Console clears the input).
| Tab | What's here |
|---|---|
| 🏠 Home | Temperatures, graph, and the buttons you use every day |
| Macros | Your Klipper gcode macros |
| Console | Type gcode directly or browse commands |
| Tune | Grid of calibration tool launchers |
| Settings | Grid of system panel launchers |
Both Tune and Settings work the same way: each is a grid of large icon buttons. Tapping one opens a full-screen sub-panel. Nothing is adjusted or configured inline on these tabs themselves.
Your everyday screen. Inline content — no launcher grid.

Shows live read-outs with target values for whichever sensors are configured in nebulascreen.json
(monitored_sensors) — by default nozzle, bed, and MCU. A chamber sensor also appears here,
but only if one is set up in your printer's config with the display name "Chamber" — it is not shown
by default on a stock KE.
-
Tap any temperature to set a target (preheat). A numpad opens. The reading shows current/target
— e.g.
45 / 210means currently 45 °C, heating toward 210 °C. - There are no material presets (no PLA/PETG/ABS quick-select buttons) — type the exact temperature you want on the numpad.
- Tap the target to clear it (set to 0 — cool down / off).
- Chamber and MCU are display-only (no heater to control).
A rolling line chart of all monitored temperatures, colour-coded. Useful for watching whether a heater is stable at target or still swinging.
Five icon buttons below the temperatures. Each opens a floating panel over the current screen:
| Button | Opens |
|---|---|
| Homing | Movement panel (jog + home axes) |
| Extrude | Filament panel (load/unload + manual extrude) |
| Fans | Fan speed controls |
| LED | Case light controls |
| File browser |
Opens from the Home tab Homing button.
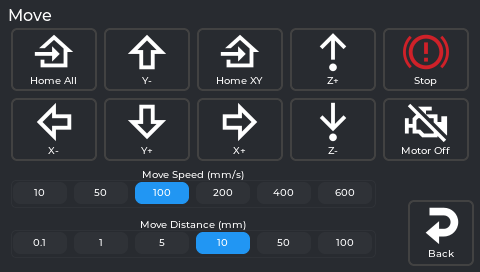
- Move Distance selector: 0.1 mm / 1 mm / 5 mm / 10 mm / 50 mm / 100 mm — how far each direction tap moves.
- Move Speed selector: 10 / 50 / 100 / 200 / 400 / 600 mm/s — how fast that move happens.
- X−/X+, Y−/Y+, Z−/Z+ — move the toolhead by the selected distance, at the selected speed. On the KE (bed-slinger), Y moves the bed.
- There is no live position readout on this panel — the app tracks position internally (to stop you jogging past the axis limits) but doesn't display X/Y/Z coordinates anywhere on screen.
⚠️ The printer doesn't know where it is until it homes. Moving before homing can crash the toolhead. Use the Home buttons below first.
| Button | What it does |
|---|---|
| Home All | G28 — homes X, Y, and Z |
| Home XY | Homes X and Y only, leaving Z where it is |
| Stop | Emergency stop — asks "Do you want to emergency stop?" first, then cuts power to motors/heaters immediately if confirmed. Same underlying action as the print-status screen's Emergency Stop. |
There is no button to home a single axis (X, Y, or Z) by itself — only the two combined options above.
Disables stepper motors so you can move the toolhead and bed by hand. They re-engage on the next move command or home.
If Y or Z moves the opposite way to what you expect, swap the arrow labels in Settings → Printer → Invert Y arrows / Invert Z arrows.

Opens from the Home tab Extrude button. Six buttons in total — Load, Unload, Cooldown on the left; Spoolman, Extrude, Retract, Back on the right — plus three preset selectors in the middle: Hotend target (°C), Extrude/Retract length (mm), and Extrude/Retract speed (mm/s).
Note: the hotend target here is a fixed list (180 / 200 / 220 / 240 / 260 / 280 / 300 °C), not the free-entry numpad you get by tapping the temperature on the Home tab. If you want an exact value like 215 °C, set it from the Home tab instead — this selector only offers those 7 presets.
Heats the nozzle to the selected target, feeds filament forward. If Spoolman is active, a "Use this filament?" confirmation appears first. While it's running, there's no separate Stop button — the on-screen message tells you to "Tap Cooldown to stop", and Cooldown stays active for exactly that while every other button is disabled. After loading finishes, the nozzle auto-cools.
Start Load when your filament is already inserted into the extruder throat. Tap Cooldown once plastic coming out the nozzle runs clean and consistent.
Heats the nozzle, retracts filament fully out of the bowden/throat, then auto-cools. Remove the filament from the top of the extruder manually after.
Immediately sets the hotend target to 0. Also doubles as the way to interrupt an in-progress Load (see above) and stays tappable while the hotend is heating toward a pending Extrude/Retract, so you can cancel that too.
Opens the Spoolman panel (the spool list). The server is set in Settings → Connections → Spoolman.
For precise manual movement once the nozzle is already hot:
- Extrude/Retract length (mm) — how far each press moves: 5 / 10 / 15 / 20 / 25 / 30 / 35
- Extrude/Retract speed (mm/s) — how fast: 1 / 2 / 5 / 10 / 25 / 35 / 50
- Extrude / Retract buttons — each press moves that amount once, at that speed
The nozzle must be at temperature (Klipper enforces this) — tapping Extrude/Retract while cold heats it first, then runs the move once it's up to temperature. Also auto-cools after each operation.
Opens from the Home tab Fans button.

There are two kinds of row here:
-
Fans you can drive get an Off button, a 0–100% slider and a Max button. Changes apply
immediately and override whatever the G-code was sending. If
nebulascreen.json'sfanslist names fans, exactly those are shown this way; if it names none (the NebulaOS default), the part-cooling fan, generic fans and PWM fan pins are. -
Fans Klipper manages itself (
heater_fan,controller_fan, and fan pins that are not editable rows) are read-only rows: the name and the current state, no slider.
See Configuration for the fans list.
Opens from the Home tab LED button.

Each LED/light Klipper reports appears as a row with Off, a brightness slider, and Max — unless
it's a simple on/off light (no PWM dimming), in which case the slider is hidden and you get Off/On
only. If your printer.cfg has no [led]/[neopixel]/output-pin light section at all, this screen
only says "No LEDs or lights are set up in Klipper."
This is common: not every KE has a case light wired into Klipper, so don't be surprised if yours is empty.
Opens from the Home tab Print button.

- Lists
.gcodefiles from internal storage and any plugged-in USB stick. A..row at the top lets you go up a folder. - Three buttons above the list: Reload (re-fetches the file list from the printer — also resets the sort, see below), Modified, and A-Z (the two sort options).
- Tap a file to preview it on the right: thumbnail (if the slicer generated one), file name, Filament Weight, Print Time, Size, and Modified (date/time).
- Three buttons below the preview: Status (jumps straight to the full print-status screen — only enabled while a print is actually running or paused), Print (starts this file), and Back.
- Files sort by date (newest first) by default. Tapping a sort button changes it for that visit, but it resets back to date/newest-first every time you re-open the file browser — it is not remembered between opens.
- USB files load full metadata (print time, filament weight) via a metascan on first access.
Appears automatically (pops to the front) the moment a print starts, no matter which tab you're on. If you navigate away from it back to the Home tab while printing, a compact progress widget appears there in place of the usual action buttons — tap it to bring the full print status screen back. This shortcut only appears on the Home tab, not on Macros/Console/Tune/Settings.

Thumbnail, file name, and a progress bar sit on the left. On the right is a fixed 5-row × 2-column grid, in this exact order:
| Row | Left column | Right column |
|---|---|---|
| 1 |
Extruder temp — current, or current / target while a target is set |
Bed temp — same current/target format |
| 2 | Chamber temp — same format. Always shown here, even if you don't have a "Chamber" sensor configured (unlike the Home tab, which hides it in that case) | Speed — current print speed in mm/s |
| 3 | Z-offset — tap this one specifically to open the baby-stepping panel right here | Flow — volumetric flow rate in mm³/s (not the same thing as the Fine Tune panel's flow percentage) |
| 4 |
Layers — always current / total
|
Elapsed time |
| 5 | Fan speed(s) — if more than one fan is relevant, shown comma-separated | Time left (estimate) |
Pressure Advance and total filament used are not shown on this screen. Pressure Advance can be adjusted live from the Tune tab → Fine Tune panel while a print is running; filament used is tracked internally to estimate the time remaining, but there's no on-screen readout for it.
Tap the Z-offset readout to get step buttons (±0.001, ±0.005, ±0.01, ±0.025, ±0.05 mm). Nudge while watching the first layer:
- Lines not fusing / gaps: too high — lower (−)
- Lines translucent or completely flat: too low — raise (+)
- Squished together and fused, no gaps: correct
Six buttons in total: Fine Tune, Objects, Pause (becomes Resume once paused), Cancel, Stop, Back.
| Button | What it does |
|---|---|
| Fine Tune | Shortcut straight to the Fine Tune panel — same one reachable from the Tune tab. |
| Objects | Opens the Exclude Object screen below. |
| Pause / Resume | Parks the toolhead, holds temperatures. Resume brings it back and continues. |
| Cancel | Cancels the print. Shows a red Confirm dialog. For the very last remaining object (Exclude Object), shows a "Cancel print?" confirmation. |
| Stop | The button's actual label is just "Stop", not "Emergency Stop" — but it is the same emergency-stop action as everywhere else in the app. Cuts all movement and heaters immediately. Use only if something is going wrong physically. Requires a power-cycle or FIRMWARE_RESTART to recover. |
No current screenshot of this screen yet - the simulator's capture tour does not reach it. Tracked in the screenshot inventory.
Opens from the print status screen's Objects button — only useful for gcode files sliced with object labels (the same "Label Objects" slicer setting adaptive meshing relies on). Shows each object as a shape you can tap: green means "Printing now", plain means "Tap to exclude", red means "Excluded". Skipping an object stops printing it partway through without cancelling the whole job — useful if one part of a multi-part print has failed but the rest is still going well. A counter below the legend reads exactly "N object(s), N excluded".
All your Klipper gcode macros, accessible from the screen. Inline content — no launcher grid.
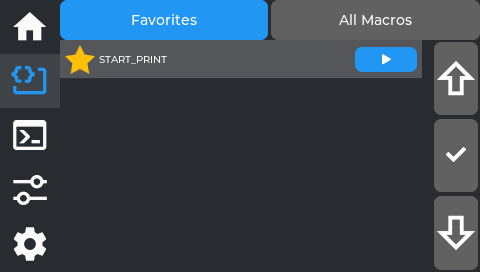
- Favorites / All Macros — a segmented toggle at the top switches between the two views. Favorites (the default) shows only macros you've pinned; if you have none yet, it says "No favorites yet. Open All Macros and tap the star to add." Tapping the Macros tab again while already on it jumps back to Favorites.
- All Macros is a flat, alphabetical list — not grouped by category. Each row has a ☆ star (tap to pin/unpin as a favorite) and a green ▶ button that runs that macro immediately.
- Up / ✓ / Down column on the right — this is a separate navigation aid, not a scrollbar: Up/ Down move a highlight cursor through the list one row at a time, and ✓ expands (or collapses) the currently highlighted macro's parameter inputs, scrolling it into view. You can also just tap a macro's row directly with your finger to expand it — the ✓ column is an alternative for precise selection, not the only way in.
- Parameters — once expanded (by tapping the row or via ✓), fill in the parameter inputs before running, or leave defaults as-is.
Direct gcode access. Inline content — no launcher grid. Opens on the terminal view by default — tapping the Console tab again while already on it resets back to this terminal view too.
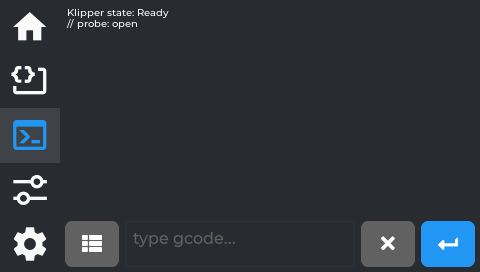
Type any gcode command directly, same as the Mainsail terminal.
-
History — last 100 entries. Temperature-spam lines (
T:210 B:60 …) are filtered so they don't flood the history. Tap a history entry to re-run it. - The small list icon to the left of the text field (not a separate tab) is how you get to the Command Browser described below.
Reached by tapping the list icon next to the text field on the terminal view — it isn't a separate tab of its own.
No current screenshot of this screen yet - the simulator's capture tour does not reach it. Tracked in the screenshot inventory.
The category list always starts with Favorites and Recent, followed by keyword-based groups (Bed Mesh/Leveling, Probe/Calibration, Motion, Temperature/Fans, Extruder/Filament, and more), each showing a command count. Two things worth knowing about the first two:
- Favorites here are separate from the Macros tab's favorites — this is its own star list, specific to gcode commands in this browser, with its own empty-state message ("No favorites yet. Star commands in any list.").
- Recent is shared history with Fluidd — it's not tracking only what you've run from this screen; it reflects command history from other interfaces too, if you use them.
The same Up / ✓ / Down navigation column from the Macros tab appears here too (see Macros tab for what it does).
Drill-down interface: tap a category → see commands in it. There is no third "detail" level with a description and its own Run button — tapping a command inserts its name straight into the terminal's input field and switches you back to the terminal view, keyboard already open, cursor at the end so you can type any parameters yourself:
No current screenshot of this screen yet - the simulator's capture tour does not reach it. Tracked in the screenshot inventory.
Press the green ↵ button on the terminal to actually run it. This is really a fast way to look up and insert a command name without typing it from memory, not a guided form. If tapping a command doesn't seem to do anything, try again with a firm, clean tap — the resistive touchscreen occasionally misses a light tap.
No current screenshot of this screen yet - the simulator's capture tour does not reach it. Tracked in the screenshot inventory.
Inside a category, a filter box appears at the bottom (only at this level, not on the category list itself) — type to narrow the list live. Each command here also has its own ☆ star, same favoriting behavior as the category list.
An 8-tile grid of icon buttons (4 columns × 2 rows). Tapping a button opens its sub-panel full-screen. Nothing is adjusted inline on this tab itself.

| Row | Col 1 | Col 2 | Col 3 | Col 4 |
|---|---|---|---|---|
| 1 | Fine Tune | Z Offset | Retraction | Limits |
| 2 | Bed Mesh | Power Settings | TMC Metrics | Calibration |

Not sliders — this panel is entirely + / − buttons, each with a matching Reset button, usable during a print or any time. There are two step-size selectors that control how much each button tap changes: one shared between Z-offset and Pressure Advance (0.01 / 0.05 / 0.10), and one for Speed and Flow together (the "Multiplier Step" — 1 / 5 / 10 / 25%).
| Control | Buttons | What it does |
|---|---|---|
| Speed | Speed+ / Speed− / Speed Reset | Global speed multiplier. 100% = follow slicer speeds exactly. |
| Flow | Flow+ / Flow− / Flow Reset | Extrusion multiplier. Under-extruding → raise. Over-extruding → lower. |
| Pressure Advance (PA) | PA+ / PA− / Reset PA | Compensates for nozzle pressure lag at speed. Fixes corner bulges and blobs. |
| Z-offset | Z+ / Z− / Reset Z | A third place to baby-step Z-offset, alongside the print-status readout and the separate Z Offset panel below — all three adjust the same underlying value. |
Firmware Retraction is not part of this panel — it's the separate Retraction tile on the Tune tab grid, described below.

First-layer baby-stepping. Same as tapping Z on the print-status screen, but also usable outside a print.
- Raise (farther from bed) / Lower (closer to bed) buttons, plus a Reset button that sets the offset to exactly 0.
- Step size buttons: 0.001 / 0.005 / 0.01 / 0.025 / 0.05 mm
- Current value shown at top
- There is no separate Save button — every tap (including Reset) applies the change at once and
NebulaOS saves it (
NEBULAOS_Z_ADJUST DELTA=…/RESET=1). The saved adjustment is applied again after every Klipper restart or reboot, and set back to 0 when the Z-offset calibration saves a new Z offset. The panel shows "Z offset adjustment: 0.050 mm, saved". - With older NebulaOS extensions (no
nebulaos_z_adjust), the panel sendsSET_GCODE_OFFSET Z_ADJUST=… MOVE=1instead: the change is kept only until Klipper restarts, and the panel does not say "saved". The Fine Tune panel's Z buttons work the same way. - The printer must be homed first. If it isn't, you'll get a homing prompt instead of the adjustment going through. An unhomed adjustment would change the live offset (so the on-screen number would move) but fail to move the toolhead, which would leave the displayed value out of sync with the nozzle. Homing first avoids that.

There are two separate requirements here, and both have to be true for this to actually do anything to your prints:
-
Your Klipper config needs a
[firmware_retraction]section. This is what decides whether this panel shows controls at all — if it's missing, the panel shows an empty state instead, and there's nothing to accidentally break. -
The gcode file you're printing needs to have been sliced with Firmware Retraction turned on (in
OrcaSlicer/PrusaSlicer etc., the retraction type setting —
G10/G11commands, not the slicer's default direct-E-axis retraction). This is a per-file slicer setting, completely separate from #1. Even with[firmware_retraction]configured and this panel showing live values, if the specific file you're printing wasn't sliced with Firmware Retraction selected, none of these values are used — the print just uses whatever retraction the slicer itself wrote into the gcode instead.
If both are true, you get 4 rows — Retract length (mm), Retract speed (mm/s), Unretract
extra (mm), Unretract speed (mm/s) — each with −/+ buttons, plus a Length step (mm) selector
(0.05/0.10/0.25) and a Speed step (mm/s) selector (1/5/10), and a single Reset all button.
Changes apply immediately (live, via SET_RETRACTION) and are runtime-only — like the Limits
panel, nothing here is saved to printer.cfg, so a Klipper restart reverts everything to your config
file's values.
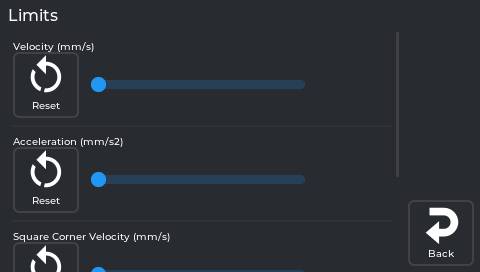
Hard caps on machine speed and acceleration, each shown as a slider with its own Reset button
(resets that one value back to what's set in printer.cfg, not a fixed factory number):
| Setting (exact on-screen label) | What it is |
|---|---|
| Velocity (mm/s) | Hard cap on axis speed |
| Acceleration (mm/s2) | Hard cap on acceleration |
| Acceleration to Deceleration (mm/s2) | A separate Klipper acceleration cap used specifically when the toolhead needs to slow down; distinct from the general Acceleration above |
| Square Corner Velocity (mm/s) | How fast the toolhead turns a sharp corner without fully decelerating |
Dragging any slider (or tapping its Reset) sends the change to Klipper immediately — there's no
separate "apply" step. These are runtime-only: nothing here is written to printer.cfg, so a
Klipper restart puts every value back to whatever printer.cfg says, undoing anything you changed here.
Raising these doesn't automatically make prints faster — the slicer's own speeds must also be raised. Going beyond what the machine can handle causes ringing artifacts.

Opens showing a table of raw Z values at each probe point by default (colour-shaded — blue is low, red is high) plus an info panel (Algorithm, Tension, and the X/Y probe range — min, max, count, points per segment). There's no on/off toggle for mesh compensation; see Clear Profile below for how that actually works.
- 3D View button — switches to a colour surface you can rotate/zoom instead of the table. Tap again to switch back.
-
Calibrate — runs
BED_MESH_CALIBRATE(auto-homing first if the printer isn't already homed), maps the whole bed fresh (~2–3 min). - Save Profile — saves the current mesh permanently under a name you choose, so you can switch between multiple saved meshes later.
-
Clear Profile — runs
BED_MESH_CLEAR, which turns mesh compensation off (this is the closest thing to an "off switch" — there's no separate toggle). Calibrating again, or loading a saved profile, turns it back on. - Saved profiles list — each saved profile is a row with its name; tap the row to load it as active, or tap the ✕ on that row to delete it permanently.
-
No active mesh — Klipper does not load a saved mesh after a restart, so after Auto Calibration
usually none is active. The page then shows the saved one (
defaultfirst) with Saved mesh 'default' - each print measures its own mesh at the start; it is not loaded. Without any saved mesh: No bed mesh yet - run Calibration > Auto Calibration.
No current screenshot of this screen yet - the simulator's capture tour does not reach it. Tracked in the screenshot inventory.
-
Drag anywhere on the mesh to rotate it — the angle readout in the top-left (
View: X=... Y=... Z=...) updates live as you drag. - The colour scale on the left maps colour to height (red = high, blue = low); the exact range and the mesh size (e.g. "Mesh: 5x5") are shown with it.
-
The +/− buttons on the right have two different jobs depending on how you press them — this is
the only place in the app where that's true:
- Short tap zooms the whole view in/out (like moving the camera closer/further).
- Press and hold instead exaggerates or flattens the height of the surface — makes bumps look taller (hold +) or flatter (hold −) — without changing how sensitive the colours are. It keeps changing for as long as you hold it.
- Back here returns you to the Table view, not out of Bed Mesh entirely — tap it again from the table to actually leave the panel.
| Section | What it does |
|---|---|
| Power devices | On/off buttons for smart plugs or relays configured in Moonraker's [power] section. NebulaOS ships none, so this section is normally not shown. |
| Power Loss Recovery | Shows the state of NebulaOS power-loss recovery (the Klipper object nebulaos_power_loss_recovery). After a power cut the screen asks by itself: "A print was interrupted by a power loss... Resume?" with Later and Resume (Mainsail shows the same question). Resume heats, homes X and Y, lifts, primes and continues; Later keeps the record for this screen. While a print runs it says the print is being recorded. After a power cut it shows the interrupted file and, when the printer allows a physical resume, a Resume Print button (asks to confirm); Discard drops the record. If the record cannot be resumed (file or printer configuration changed), it says why and offers only Discard. |

Live TMC driver metrics, refreshed every second. The switch at the top starts and stops polling the
drivers (TMCSTATUS ENABLE=1 / ENABLE=0); it is off when the screen starts. NebulaOS always loads the
[tmcstatus] module, so no config edit or restart is needed.
sg_result, i_rms in mA, and two other computed values — the panel doesn't explain what these mean
beyond their names; the app's own advice is "refer to the TMC driver datasheet") plus four adjustable
values: toff (0–15), tbl (0–3), hstrt (0–7), hend (0–15) — these are raw TMC chopper-timing
register names. Tapping +/- on any of them sends the change to the driver immediately, live — it is
not a preview you confirm afterward. There's no indication these persist across a restart on their own.
These are low-level hardware timing values: don't adjust them unless you specifically know what you're doing (per the driver datasheet) — this isn't needed for normal printing or normal troubleshooting. If you suspect a driver issue, TMC Autotune (inside the Calibration hub below) is the supported way to tune your drivers.
One menu for every calibration routine, reached from the Calibration tile. It is a scrollable list: the numbered IN ORDER steps are the order a new printer needs them (just do 1, 2, 3, ...; short version: Calibration guide), then an OTHER section. Up / ✓ / Down on the right move through the list; Back is the tile in the bottom-right corner, like on every page.
| # | Row | Opens |
|---|---|---|
| 1 | Bed Tramming | Guided four-corner tramming (Bed tramming) |
| 2 | Heaters (PID) | PID tuning: Bed 65 C and Hotend 230 C, each saved with one Klipper restart |
| 3 | Axis Twist | Axis Twist Compensation wizard; its Save also removes the saved bed mesh |
| 4 | Auto Calibration | Load cell check, nozzle clean, Z offset, bed mesh - about 7 min, no tools needed |
| 5 | Input Shaper | Guided resonance measurement |
| 6 | E-Steps | Guided mark-extrude-measure calibration |
| 7 | Skew Correction | Skew Correction (needs a printed test part) |
| — | Load Cell Calibration (Other) | Automatic re-check or manual with a bottle (Load cell calibration) |
| — | TMC Autotune (Other, optional) | TMC Autotune - quieter motors |
| — | Bed Mesh (Other) | The same Bed Mesh panel as the Tune-tab tile — view or measure |
Under every row a status line: Done 24 Oct - (green) when it has run, a one-line description with the time it takes when not, or Redo: (orange, with a bar on the left) when something changed since - for example Redo: Axis Twist changed on Auto Calibration after Axis Twist was saved, or Redo: a shim was added at front left after tramming the load-cell corner. Older NebulaOS versions without a calibration history show the descriptions only.
Every row except Bed Mesh is locked while a print is running. Axis Twist and Skew Correction
show a message instead of opening when their Klipper section ([axis_twist_compensation],
[skew_correction]) is missing; NebulaOS ships both. TMC Autotune is greyed out when Klipper has
no motor_database.cfg.
These run NebulaOS calibration workflows in Klipper (NEBULAOS_* macros). Each screen shows a short
description, a Start button (asks to confirm) and, while the workflow runs, its live state, the
buttons for the current step and Cancel. Auto Calibration, Input Shaper and E-Steps show every
step with check marks (Step 7 of 10, the current step in large type with its live detail:
temperatures, touch 2 of 3, point 41 of 81), a notice while Klipper restarts to save (the
screen reconnects by itself), and at the end either Done with the new values or
Failed: with why and what to do. What each one does:
- Bed Tramming — measures the four bed corners and tells you which one to correct, one at a time: a printed shim on rigid spacers, or a screw turn on rubber or spring mounts. The printer homes and probes; the bed must be empty.
- Auto Calibration (formerly Z-Offset & Bed Mesh) — load cell check, nozzle clean, Z offset and bed mesh, saved with one Klipper restart; resets the Z adjustment to 0. About 7 minutes; the bed must be empty. Full walkthrough: Calibration walkthrough.
- Input Shaper — measures resonances with the accelerometer, first mounted on the toolhead (X), then on the bed (Y), and saves the result with one Klipper restart.
- E-Steps — the hotend heats; you mark the filament at the extruder entry, the printer extrudes a fixed length, and you type in how far the mark moved. The corrected value is applied for you.
- Load Cell Calibration — Automatic (default: a sensor check, no bottle; after a pass Ready - Automatic needs no weight calibration; Auto Calibration uses it.) or Manual (a 1.5 L water bottle and a kitchen scale, about 2 minutes; nothing moves or heats).

A 5-point paper test across X (AXIS_TWIST_COMPENSATION_CALIBRATE SAMPLE_COUNT=5). Fixes first
layers that are uneven left to right despite re-meshing. Full guide:
Axis Twist Compensation.

Corrects parts that come out as slight parallelograms instead of squares.
- Enter three caliper measurements from a printed test square: AC diagonal, BD diagonal, AD side.
- Tap Apply & Save — this sends the correction and runs
SAVE_CONFIG(Klipper restarts).
Full guide: Skew Correction.
No current screenshot of this screen yet - the simulator's capture tour does not reach it. Tracked in the screenshot inventory.
Quieter, cooler steppers. For each stepper pick a Motor and a Tuning Goal (auto, silent,
performance, autoswitch), then tap Save/Restart. Steppers without a saved choice are
pre-selected with the KE's stock motors. Full guide: TMC Autotune.
A grid of six tiles. Each opens its own page; Back returns to the grid.
| Tile | What's there |
|---|---|
| Connections | Wi-Fi, address, printer name, Mainsail / Moonraker / Spoolman |
| Display | Brightness, sleep, theme, touch beep, boot logo, camera |
| Printer | Jog and temperature defaults, print statistics, Klipper and MCU restarts, MCU firmware |
| System | Version info, report a problem, storage, logs, restart / reboot / shut down |
| Updates | App updates and system image install (USB, upload, online) |
| Reset | GUI settings, touch calibration, clean reset, boot slot swap |
Shows the current Wi-Fi network, Address, printer Name (with Change), and the Mainsail, Moonraker and Spoolman addresses (Spoolman says "not configured" when Moonraker has no Spoolman). Buttons:
- Wi-Fi networks — see Wi-Fi panel.
- Printers — see Printers panel.
-
Spoolman — the Spoolman server the printer uses. On the right, In use shows the current
server (address and port); its ✕ stops using Spoolman. On the left, type a new address (IP or
name) and port (Spoolman's default is 7912) and tap Use: NebulaOS writes it into
moonraker.conf([spoolman] server) and restarts Moonraker; the screen reconnects after a few seconds. The keyboard's keyboard key hides it; tap a field to bring it back. The spool list itself is in the Filament panel (Spoolman panel).
Change (printer name) sets the network name: the printer is then reachable as <name>.local.
Invalid names are flagged while you type; saving asks to confirm first.
| Setting | What it does |
|---|---|
| Brightness | Backlight level. The levels come from NebulaOS. |
| Sleep after | Never / 30 seconds / 1 minute / 5 minutes / 10 minutes / 30 minutes / 1 hour. Touch to wake. |
| Theme colour | Blue, Red, Green, Purple, Pink, Yellow. Applies immediately. |
| Touch beep | A short click through the buzzer on every tap. A test beep plays when you turn it on. |
| Boot logo | Choose the boot screen and power-on logo of this boot slot: the NebulaOS logo, an image added from a USB stick or uploaded in Mainsail (PNG, BMP or JPEG, max 4 MB), or Restore Creality logo. |
| Camera | Creality Nebula Camera settings: night mode, anti-flicker, white balance, exposure, picture sliders, Defaults, Restart camera. See Camera. |
| Setting | What it does |
|---|---|
| Default extruder temp | 180–300 °C. Used by Load/Unload when no target is set. |
| Ask before emergency stop | On: Stop asks "Do you want to emergency stop?" first. Off: acts immediately. Default on. |
| Invert Y arrows / Invert Z arrows | Swap the jog arrows in the Homing panel. |
| Statistics | What this printer has printed, over its whole life — see Statistics panel. |
| Restart Klipper | Restarts Klipper. Asks first if a print is running (the print stops). |
| Restart MCU | Restarts the printer board's firmware, then Klipper (FIRMWARE_RESTART). Asks first if a print is running. |
| MCU firmware | Installs a new mainboard (MCU) firmware. |
An info block with the NebulaScreen version, the NebulaOS build, boot slot, kernel, host name and storage. Buttons:
| Button | What it does |
|---|---|
| Report a problem | Three steps: set the Log level (Info / Warning / Debug; Debug switches back to Info after 24 hours), Save logs to USB, and report on GitHub (QR code and address on screen). |
| Storage | Disk usage, Free up space and Clean up Creality files — see Resetting. Neither removes the figures behind Statistics. |
| Logs | Read log files on the screen, including the Wi-Fi lines of system.log. |
| Restart GUI | Restarts NebulaScreen only. Klipper keeps running. |
| Reboot / Shut down | Ask first. After shutting down, switch the printer off at the power switch. |
Lists what Moonraker's update manager knows (Klipper, Moonraker, Mainsail, NebulaOS extensions, ...) with version and state. Check now refreshes the list, Update all installs every available update, and each row has its own Update button. Klipper stops while Klipper or the extensions update.
System image installs a NebulaOS (or Creality) .img from a USB stick or from
config/uploads/system-image into the boot slot that is not running, then restarts into it.
Online asks GitHub for a newer NebulaOS release and downloads it (checked against the
release); it then shows in the list as Downloaded and installs the same way. After a NebulaOS
image, the new slot gets a trial start: if Klipper and the screen do not come up, NebulaOS goes
back to the previous slot. See Updating NebulaOS.
See Resetting.
Opens from Settings → Printer → Statistics. It shows what this printer has printed, over its whole life — including the time before NebulaOS was installed. Nothing on this page changes the printer; it only reads.
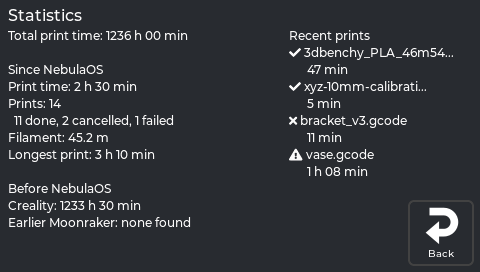
The figures in the picture are the simulator's example data, not a real printer.
| Line | What it means |
|---|---|
| Total print time | The printer's whole life: what it printed before NebulaOS plus what it has printed since. |
| Since NebulaOS — Print time | Time spent printing since NebulaOS was installed. |
| Prints | How many print jobs, then the split: done, cancelled, failed. |
| Filament | Filament used since NebulaOS, in metres. |
| Longest print | The longest single job since NebulaOS. |
| Before NebulaOS — Creality | Creality's own lifetime counter, and how many prints Creality still lists. |
| Before NebulaOS — Earlier Moonraker | An earlier Moonraker's history, if this printer ran one (OpenKE or the community helper script). |
Each Before NebulaOS line says none found when that system never ran here, or could not be read when the file exists but could not be understood.
The right column lists the four most recent jobs, newest first, each with its print time and a mark:
| Mark | Meaning |
|---|---|
| ✔ | finished |
| ✘ | cancelled |
| ▶ | running now |
| ⚠ | failed |
File names longer than 20 characters are shortened with .... For the full list, open
Mainsail and use its History page.
Worth knowing, because two of these surprise people.
Print time is printing time. It is Klipper's print duration: from the first extrusion to the end of the job, not counting heating up or time spent paused. So it is always less than the wall-clock time you waited.
The total is not the sum of everything. The Before NebulaOS figure is the larger of the
two sources, never their sum. On a printer that ran OpenKE, Creality's counter and Moonraker's
history were both running and both counted the same prints; adding them would double the
printer's life. (combine_stats in the NebulaOS Moonraker component, firmware 70ad0b0.)
Where each figure comes from:
- Since NebulaOS is Moonraker's own print history — the same database Mainsail's History page reads. That is why Mainsail's History lists only prints made under NebulaOS.
-
Before NebulaOS is read once from the printer's data drive and then remembered, in
/usr/data/nebulaos/system/stats-baseline.json. Creality's lifetime counter and print list come from Creality's own files; the earlier-Moonraker figures come from the old Moonraker database. All three are read and never written. - A source that is missing or unreadable is looked at again next time, so installing NebulaOS before the import has anything to find is not a problem.
These figures survive a cleanup. Clean up Creality files keeps
Creality's two statistics files and the old Moonraker database on purpose, so your printer's
history is not lost with the rest of the Creality system (firmware 70ad0b0,
cleanup.STATISTICS_KEEP).
What does erase them: a clean NebulaOS reset removes everything NebulaOS keeps,
including its print history and the remembered Before NebulaOS figures. The before figures
are simply imported again at the next look, because the files they come from — Creality's and the
old Moonraker database — live outside the NebulaOS folder and a clean reset does not touch them
(firmware 70ad0b0, nebulaos-clean-reset). The prints made under NebulaOS are gone for good.
| What you see | What it means |
|---|---|
| Adding up... | Still waiting for the printer. It is normal for a moment. |
| The printer could not read the statistics. | Moonraker answered with an error. Check that Klipper and Moonraker are running — Troubleshooting. |
| No answer from the printer. | The screen has no Moonraker connection. See Connecting to Wi-Fi. |
| Recent prints — None yet. | No print has been recorded under NebulaOS yet. |
Behind the page: GET /machine/nebulaos/stats (JSON-RPC machine.nebulaos.stats). Screen source
src/statistics_panel.cpp at 36490ed; the import is nebulaos-osconfig stats baseline at
firmware 70ad0b0.
Opens from Settings → Connections → Wi-Fi networks. Wi-Fi is managed through NebulaOS.
Networks are grouped into KNOWN NETWORKS (saved) and OTHER NETWORKS IN RANGE, each row with signal bars. Other network (hidden)... at the end connects to a network that does not broadcast its name.
| Row type | Tapping the row | Extra |
|---|---|---|
| Connected network | Opens Network Details | A chevron (›) as a hint |
| Known, not connected | Reconnects to it | A separate ✕ to forget it (asks first) |
| Not known | Asks for the password (empty for an open network) | — |
The password field has an eye button to show or hide what you type.
Reached by tapping the connected network's row in the Wi-Fi panel.
An info card (Signal, Security, IP address) plus two buttons:
- Configure Static IP — opens the Static IP panel.
- Forget This Network (red outline) — removes the saved network.
Reached from Network Details → Configure Static IP. Titled "Static IP (all Wi-Fi networks)": the setting is global for the Wi-Fi interface, not per network.
DHCP / Manual switches the view. Manual has four address rows — IP, Netmask, Gateway, DNS — each as four octet boxes; a value outside 0–255 is flagged red at once. ✓ Save stays visible outside the scrolling area. With a static address set, Revert to DHCP appears (asks first).
NebulaOS checks a new setting (static: the gateway answers; DHCP: a lease) and reverts it by itself when it does not work. This can take a couple of minutes.
Opens from Settings → Connections → Printers. Manages Moonraker connections.
No current screenshot of this screen yet - the simulator's capture tour does not reach it. Tracked in the screenshot inventory.
Each configured printer is a card with its name, IP and port, plus:
- Switch — connects NebulaScreen to that printer
- ✕ — removes it from the config (asks Confirm / Cancel first)
Add a printer: fill in Printer Name, the Moonraker IP address and the port (pre-filled with
7125), then tap the green + Printer button.
No current screenshot of this screen yet - the simulator's capture tour does not reach it. Tracked in the screenshot inventory.
Opens from the Filament panel. Requires a Spoolman server,
set in Settings → Connections → Spoolman (or by hand in moonraker.conf).
| Feature | What it does |
|---|---|
| Spool list | A table with columns ID, Name, MAT (material), Remain Weight, Remain Length, plus a colour swatch per spool. |
| Set active | Each non-archived, non-active row has a ▶ icon — tap it to make that spool active. The active row shows "(active)". The active spool's filament use is deducted as you print. |
| Archive | A non-active, non-archived spool has an archive icon; an archived spool has an icon to bring it back. You can't archive the active spool. Show Archived (below the table) toggles whether archived spools are listed. |
| Reload | Re-fetches the spool list. |
| Wrong-filament check | Before a print starts (and before a manual Load), a "Use this filament?" popup shows the active spool. |