Weapons
There is two options
- Menu->F-16->Payload Presets
- Menu->Equipment->Fuel and Payload
When MP damage is enabled you cannot load stores in air.
Use Mastermode buttons or key w. You can also select weapon on MFD WPN page top button on right side.
It has 3 settings
- OFF - Weapons will not work.
- ARM - Weapons armed and ready if selected.
- SIM - Weapons simulate, they will not fire. But the aiming will be active.
The keyboard shortcut is m.
The older models of F-16 have SNAP instead of EEGS, block 60 only have EEGS and the rest have both.
Once you have selected cannon and master-arm switch is ON and the MFD WPN page is set to EEGS, a timer will start and after around two seconds you will get the Enhanced Envelope Gun Sight (EEGS) funnel on the HUD. Keep you targets wingtips so that they touch the sides of the funnel, and keep your aircraft attitude movement stable for around one second, then fire a burst. This will give you the best chance of hitting. The sides of the funnel is computed for a 35 ft wingspan, so if you are aiming at a larger or smaller aircraft you need to compensate for that. The 35 ft wingspan can be changed on the MAN page in the DED. With radar lock, and at in-range distance there will also be an aimpoint in the funnel.

Once you have selected cannon and master-arm switch is ON and the MFD WPN page is set to SNAP, a timer will start and after around two seconds you will get the Snapshoot line on the HUD. The line represent the path the gun shells will take. With radar lock, and at in-range distance there will also be an aimpoint on the line.
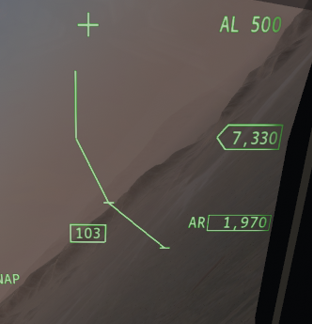
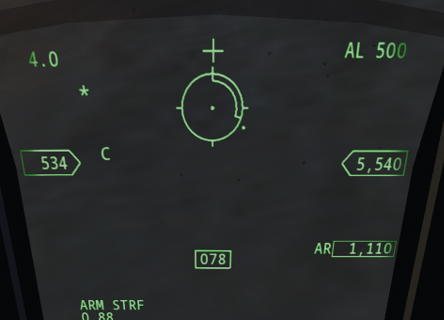
Once you have selected cannon and master-arm switch is ON and the MFD WPN page is set to STRF, fly near ground to get a pipper aim on the HUD, for prediction of where your rounds will hit. When there is a horizontal line above the pipper circle it means you are in range.

Once you have selected cannon and master-arm switch is ON and the MFD WPN page is set to STRF, fly near ground to get a pipper aim on the HUD, for prediction of where your rounds will hit. When there is an inner arc in the circle you are in range.
First, mount some armament. Secondly, make sure master arm (key 'm') is enabled. Thirdly select the arm (use 'w' key or click buttons 'A-A' or 'A-G' under the HUD). Fourthly make sure a target is designated, unless you want to use unguided bombs in CCIP mode, then a target is not needed. For guided weapons, an internal battery needs to be powered on before being able to operate them. This can be done in the WPN page for each store. Start-up times and lasting times vary for each store. Once the battery runs out of charge, the weapon will not be able to guide itself anymore to the target, therefore manage your time wisely.
- For GBU-12 and GBU-24 make sure the laser is armed.
- Release mode can be set with WPN page, options are CCIP and CCRP.
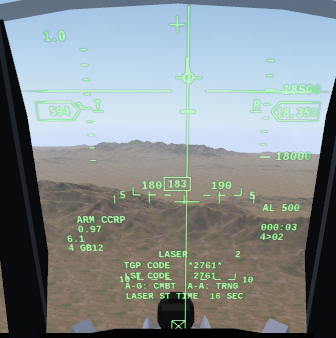
- CCRP: When getting close to target a vertical line will appear in the HUD. Align flight path indicator on the line, then hold in trigger (key 'e' or 'trigger'), when a small horizontal line on that line starts dropping down and reaches another line then it will release and you can let go of trigger. See more details in section below.
- CCIP: A line from FPM to a round pipper is displayed when close enough to the ground, maneuver the pipper to be over the target and release (key 'e' or 'trigger'). See more details in section below.
- SGL or PAIR mode can be set on WPN MFD page.
- SGL: single release.
- PAIR: double release.
- RP (ripple release) can be set on WPN MFD page.
- The number is how many subsequent releases should be done.
- If RP is greater than 1, then you can also in same MFD page set distance in feet between releases.
- AD (arming delay) can be set on WPN MFD page.
- The number is delay in seconds, and when changed will be applied to all loaded bombs of same type as currently selected.
- GPS or GPS-LASR can be toggled on GBU-54 WPN page. Remember to arm laser if you choose that option.

You need a lock, either with ground radar or TGP to use CCRP. On MFD WPN page switch to CCRP.
If it is laser guided bombs, such as GBU-12/24 then laser must be armed also. Same applies for GBU-54 if you on WPN page has set it to GPS-LASR. Notice, if you fly too high then the laser wont arm, best is to be no higher than 15000 ft barometric.
Also on WPN page, make sure it say RDY next to the bomb type. If not, check that master-arm is armed and not in SIM or OFF.
In the right lower side of the HUD, when the bomb drop line shows, there will be a number. For example 000:27 means there is 27 seconds till release. When there is about 10 seconds, start to press trigger and keep it pressed till after FPM starts blinking.
You hold the trigger too late if the flight path marker blinks when you hold it.
You should hold till after FPM starts blinking. And make sure FPM is on the vertical line until it starts blinking, keep adjusting to make that happen, then continue to hold it till all the ordnance you programmed it to drop has been released.
No need to dive onto target, like often done in CCIP, just fly level above it.
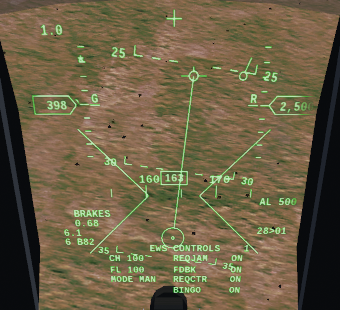
On MFD WPN page switch to CCIP after selecting your bombs. Dive down on the target, no need to have anything locked, a shallow dive is often the best.
When you are close enough a round circle will appear below the FPM with a line going to the FPM. The circle is called a pipper.
Aim the pipper onto the target and release. If it displays LOW next to the FPM, it means the bomb(s) wont have time to arm themselves.
If that happens, then either drop higher or change the arm delay (AD setting on WPN page). It can also help to fly slower, so you have more time to aim, before getting too low. Just beware that changing the arm delay can risk the bomb hitting yourself.
- Long range anti-ship, sea-skimming missile. It can be fired up to 120 NM distance from a locked target.
- Requires 30 seconds from being selected on the MFD to being ready to fire.
- To lock something set FCR mode to SEA to search for maritime targets and use the cursor to lock it up. Once Betty declares LOCK, the Harpoon can be fired.
- Optimal launch altitudes are between 500ft and 5000ft AGL. Ensure there aren't any significant terrain obstacles along the missile's flight path (hills, mountains, high islands). If flying really low towards a ship or frigate, a pull-up prior to firing is recommended to make sure the missile has proper room to cruise to the destination and can maintain a lock throughout the flight.
- Long-range guided glide bomb. Can be launched by either inputting GPS coordinates in the "Program Target" dialog for a desired spot, or against a TOO (Target Of Opportunity) with a targeting pod (TGP) lock. Operational range varies from 70 NM max with GPS to about 34 NM max with TGP lock. Optimal release envelopes are as follows:
- GPS lock: Release at or above FL420 with speed at or above M1.6 (70 NM and closer).
- TGP lock (TOO): Release at or above FL340 with speed at or above M1.3 (34 NM and closer).
- Long-range guided cruise missile. Can be launched by inputting GPS coordinates in the "Program Target" dialog for the desired target. Max operational range is 200NM. Optimal release envelope: at or above FL220 and speed not exceeding M0.9.
See HAS page.
These are AIM-7 (Fox 1), AIM-120 (Fox 3) and AIM-9L, AIM-9M, AIM-9X (Fox 2).
When a target is in or nearly in maximum range a DLZ indicator will show up on the FCR and HUD. The number with the > symbol is the closing rate in kt. The triangle is the maximum range. The DLZ is below that divided into zones. From the triangle down to the first horizontal line is the zone is there is almost no chance the missile will hit. From that line and down to the rectangle you have a chance especially if the target do not evade. The rectangle is the zone where even if target evades there is a good chance it can hit. Below the rectangle is the minimum zone, where the target is too close for the weapon.
The Fox 1 AIM-7 require you to keep the target locked (STT) during its entire flight.
The AIM-120 if fired without a lock (MADDOG mode), will lock onto anyone it sees in its flightpath.
AIM-9 is fire and forget its whole flight. It can also be launched visually in BORE mode when radar is off. Just place the target within the big cross on the HUD and it will get an IR lock or look at the target with HMCS.
AIM-9 has greater range if it is cooled, that can be done on the MFD WPN page. Coolant fluid don't last for longer than 1:30 hours though, so do this some minutes before you expect a "Within Visual Range" fight.
On the WPN page, SPOT can be toggled to SCAN. It will then perform a circular SEAM scan around where its seekerhead is directed to look until its uncaged. Note that SEAM Scan will reduce the seekerheads range.
Uncaging is normally automatic when it gets a solid track on the target, but it can be switched to manual by toggling TD to BP.
See TGP