HUD
The HUD image is made up of symbology and optionally a FLIR image.
The symbology consists of scales and text. Much of this can be controlled from the HUD control panel right of the flightstick.
The HUD only works if the power for the up-front controls is switched on and the Symbology Intensity thumb wheel on top left hand side of the ICP is turned upwards.
Pitch Ladder and Flight Path Marker. With the gear commanded down an AoA bracket is shown as well.
This is the heading indication. Once the gear is commanded up, this horizontal scale moves below the left and right side scales.
The speed in the HUD is calibrated airspeed per default, and always when gear is commanded down.
The altitude either from the altimeter, or the radar altimeter.
- Current G force.
-
*symbol, meaning the HUD is sensor of interest (SOI).
- 'NAV' or 'ARM' depending on masterarm. But 'BRAKES' if parking brakes are on, and 'F 20 G' if --- gear is deployed, 'F' for flaps, '20' for 20 deg extended and 'G' for gears down.
- Mach number.
- Max G-Force number achieved. Can be reset using WARN RESET switch located on the ICP (center control panel with the number buttons on it).
- Selected weapon.
- Blinking FUEL if bingo fuel.
- Direction and distance to you from bullseye.
- AR XXXXX is the CARA radar altimeter altitude above ground.
- CARA ALOW. TA XX if masterarm on, XX stand for 1000s ft of target altitude, if TA is there ALOW will be moved to above the altitude tape.
- B XX.X is slant range to steerpoint. F034.2 if masterarm on means 34.2 NM in slant range to designated target.
- When there is 3 digits like 000:05 it means 0 minutes and 5 seconds to either optimal release of weapon or till weapon impact. When 2 digits like 02:08 its ETA hr:min to next steerpoint.
- 023>2 means 23 NM to next steerpoint number 2.
- Callsign and type of target if master-arm on.
- LIMIT if Vne exceeded. Be careful, exceeding Vne has high chance of damaging the aircraft.
- NO RAD if the aircraft radar is off.
- FLY UP if collision with terrain is eminent.
- FUEL if bingo. This can be clicked away using WARN RESET switch located on the ICP (center control panel with the number buttons on it).
- WARN if a serious flight control issue is detected. This can be clicked away using WARN RESET switch located on the ICP (center control panel with the number buttons on it).
- Here DED DATA will be shown, if enabled. Or PFLD if that has been selected.
- HSI: To enable localizer in HUD turn the mode knob on centerpanel left of the HSI.
- EHSI: To enable localizer in HUD click the 'M' knob on centerpanel EHSI to get to a PLS mode.
- It can show both glidepath and ILS, with vertical and horizontal lines.
- If a line is centered on the FPM and segmented it means it's invalid.
- If a line is not centered but segmented it means it's invalid but in range. (the aircraft is not in the localizer cone)
- If a line is not segmented, it's in range and valid.
- Keep the lines centered on the FPM to aim for the localizer beams.

If you have trouble seeing the HUD and the colors are faint and not clear, you probably have a graphics card not compatible with the glass effect.
To solve this, go into Menu -> F-16 -> Configuration -> Enable Intel compatible HUD
These are located on right cockpit panel (HUD Remote Control Panel), except DRIFT C/O and Symbology Intensity which are on the ICP (below the HUD).
- OFF: Switch the HUD Velocity, Altitude and Heading scales off, the digital readouts will remain though.
- VAH: Show the scales.
- VV/VAH: Show the bank angle indicator and vertical speed scale.
Can switch off the ATTitude lines and/or the Flight Path Marker.
- OFF: No FPM or Attitude lines.
- FPM: No Attitude lines.
- ATT/FPM: Both FPM and Attitude lines.
- DED DATA: Will show the DED display content onto the HUD.
- PFL: Will copy the Pilot Fault List Display onto the HUD.
- OFF: Neither of them.
Can switch the HUD scale to show true airspeed or ground speed instead of calibrated airspeed.
- GND SPD: Ground speed.
- CAS: Calibrated airspeed.
- TAS: True airspeed.
- RDR: sets the altimeter scale to CARA whenever that is available.
- BARO: sets the altimeter scale to barometric.
- AUTO: sets the altimeter scale to thermometer CARA at low AGL and barometric at higher AGL.
- DAY: Full symbology brightness range available.
- AUTO: Environment light adjusted symbology brightness range available.
- NIGHT: Half symbology brightness range available.
Drift cutoff will force flight path marker and pitch ladder to stay in the middle of the HUD.
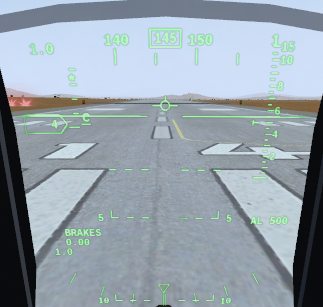
On right side the thermometer radar altitude scale is shown, it is only shown at low altitudes. It is currently around 0 ft, the T symbol at 500 ft is the CARA ALOW setting.
At top it is seen the magnetic heading is 145. The upper-left * means the HUD is Sensor of Interest, so you will need to switch SOI to move the radar cursor on the MFD. The horizon line is on the runway, that means the runway not level, but going upwards from us.
On left side the speed tape shows 4, that means 4 kt of wind since we are stationary. Upper left shown 1.0 G currently and mid-left 0.00 Mach and 1.0 G force maximum pulled. BRAKES tells us the parking brakes are on.
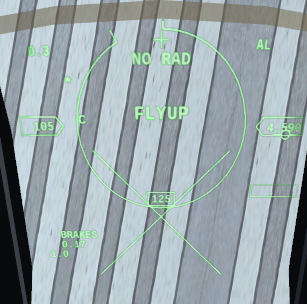
The big X and FLYUP text means we are about to hit the ground. The orange peel is showing, meaning we are in dogfight (DGFT) mode. NO RAD means our radar is in standby mode. On the right side the empty rectangle means the CARA radar altimeter cannot measure our altitude due to our attitude. Our mach speed is 0.17 and current G is 0.3. The little C next to the speed scale means its calibrated airspeed its currently showing (default setting).
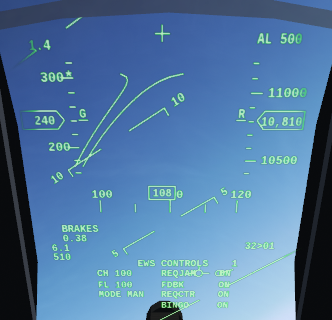
This time the rectangle has a number in it and AR, this means the CARA system, gives us a radar altitude of 11900 ft. There is also a small symbol in upper right side, that is the great circle steering cue, often shortened to the tadpole. It shows the direction to current steerpoint and follows the FPM up and down in the HUD. The FPM is located approx 3 degrees below the bore-cross, that is estimated by looking at the pitch ladder, so this means we are flying with 3 degs angle of attack (AoA or alpha).
On right lower side we see B 34.9, that's the slant (direct through the air, ignoring earth curvature) distance to the steerpoint in NM. 0.04 means we will be there in 4 minutes if we fly straight towards it at current speed. 34>1 means 34 NM to steerpoint number 1 (along the earths curvature). BRAKES means the parking brakes has been activated while in air, not so well done.

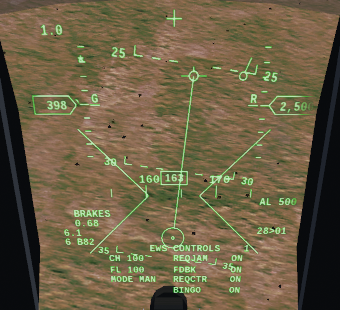
Here we have activated master-arm and cannon is selected. The funnel is called EEGS, read more about that in Weapons. Notice there is an R next to altitude tape, that denotes that I have set it to show radar altitude instead of barometric. At the bottom the data from the DED panel is showing, as I have set it to show on the HUD. 510 means 510 rounds left on cannon.
Here CCIP bombing aim is showing, when I release the bomb(s) they will hit where the round pipper is on the surface. Look at speed tape, is has a little G which means its in groundspeed. The ground collision X is forming too, so its soon time to pull up. DED data is still showing but on a different page. 2 B82 means 2 MK-84 bombs is selected.
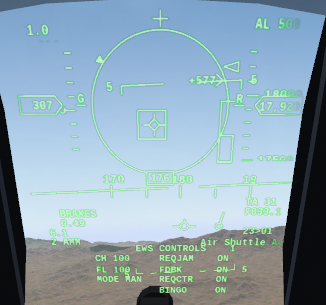
The big circle is called ASEC, its shown when AIM-120 or AIM-7 is armed. There is a little arrow on it, that the targets aspect, its about 10 o'clock on the ASEC meaning he is flying towards our 4 o'clock. The square is the radar designation on the target. The diamond with the spikes is where the missiles seeker head is looking. The Air Shuttle.. is the callsign of the target, only shown when master arm is in SIM or ARM. 2 AMM means 2 advanced medium range missiles is selected (2 AIM-120).
Just left of the altitude tape there a Dynamic Launch Zone indicator (DLZ) that guides you to when to shoot, read more about that in Weapons.
At the bore-cross it says 18 and a line points to somewhere outside the HUD. The line is the locater line, it shows the direction to designated radar target when its not in the HUD area, and 18 degrees is the distance from the bore-cross. TA 18 means the target is at angels 18 (18000 ft). F030.1 means the slant distance to target is 30.1 NM. 2 SRM means 2 short range missiles selected (AIM-9).
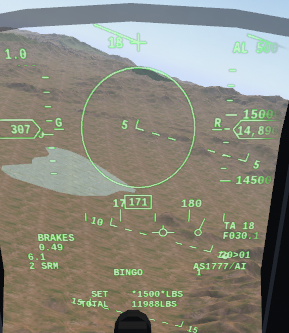
The T next to the speed tape means its showing in true airspeed. The little crossed out square is the direction to the TGP lock since its not the HUD area.
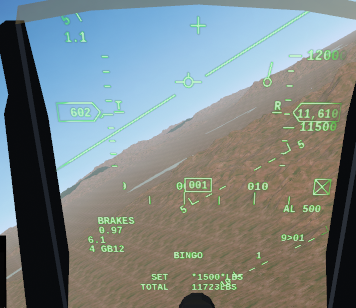
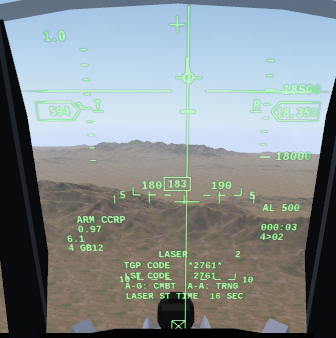
The vertical line in the middle is the CCRP bomb fall line. There is two small horizontal lines on it, when its nearly time to release the weapons the upper line will fall down and almost touch the bottom line, that when it release when trigger is held. GB12 means GBU-12 bombs. Read more in Weapons.
000.03 means 3 second till optimal release time.