Setting/#6 에셋 및 탭바 세팅 #7
Merged
Conversation
This file contains hidden or bidirectional Unicode text that may be interpreted or compiled differently than what appears below. To review, open the file in an editor that reveals hidden Unicode characters.
Learn more about bidirectional Unicode characters
Sign up for free
to join this conversation on GitHub.
Already have an account?
Sign in to comment
3 participants
Add this suggestion to a batch that can be applied as a single commit.
This suggestion is invalid because no changes were made to the code.
Suggestions cannot be applied while the pull request is closed.
Suggestions cannot be applied while viewing a subset of changes.
Only one suggestion per line can be applied in a batch.
Add this suggestion to a batch that can be applied as a single commit.
Applying suggestions on deleted lines is not supported.
You must change the existing code in this line in order to create a valid suggestion.
Outdated suggestions cannot be applied.
This suggestion has been applied or marked resolved.
Suggestions cannot be applied from pending reviews.
Suggestions cannot be applied on multi-line comments.
Suggestions cannot be applied while the pull request is queued to merge.
Suggestion cannot be applied right now. Please check back later.
🌱 작업한 내용
🌱 PR Point
따라서 추후 에셋이 수정될 가능성이 있습니다. 일단은 이대로 작업을 하고 나중에 한번에 바뀐 에셋으로 다시 수정하겠습니다~!
ColorLiterals 사용법 예시
ImageLiterals 사용법 예시
FontLiterals 사용법 예시
네비게이션바를 구현하였습니다. 현재 피그마에 있는 모든 네비바를 분기처리하여 구현하였기 때문에 바로 사용하시면 됩니다!
뒤로가기 버튼을 누르면 화면이 pop 되게 구현했습니다.
CustomNavigationBar 사용법 예시
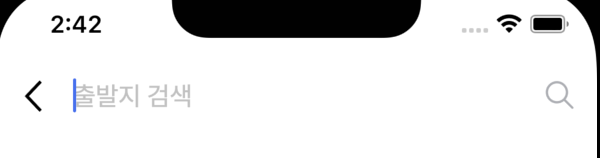
(showKeybard()를 넣으면 해당 뷰가 보이는 동시에 키보드가 올라옵니다. <- 기획 쪽 의도 사항) VC에서 네비바의 우측 검색 버튼을 눌렀을 때 사용자가 입력한 text를 가져오고 싶다면 delegate 패턴을 통해 가져 올 수 있습니다.CustomButton 사용 예시
다음과 같이 추가하여 사용하면 됩니다! (물론 버튼의 색상을 바꿀 수 있습니다. CustomButton.swift에 주석으로 함수 사용법이 있습니다.)
레이아웃은 기존의 UIButton의 레이아웃 잡듯이 잡으면 됩니다.
📸 스크린샷
📮 관련 이슈