Setup and Configuration
This section provides details on setting up a scenario folder. Due to privacy concerns (mgra land-use file) and large file sizes (networks) not all model inputs are available on the GitHub repository. In addition, a scenario folder structure is different than the folder structure on the repository. To automate the process, SANDAG built a tool that creates a scenario folder with necessary directory structure by assembling files from a locally cloned GitHub repository and in-house input database. Note that scenario tool can be used only on a SANDAG machine.
Follow the steps below to create a model scenario folder using SANDAG’s tool:
- Check for an open server using the DOS tool mascot-abm.
- Log into server
- Using the show hidden icons arrow on the task bar, click the INRO Software Manager to check if EMME license is operating. If it's not, log into license server on Mustang by typing in the Host box:
mustang.sandag.org:5170 (automatic) - Using the server’s Windows Explorer, navigate to
T:\ABM\release\ABM\version_14_2_1\dist - Double click on
createStudyAndScenario.exeand click Run. - On pop-up, enter fields in Create an ABM scenario. Make sure to enter the correct ABM version, EMME version, year, and know your Scenario Folder (where you will run the model from; typically
study area/abm_runs) and your Network Folder (input networks). Browse to an existing folder or copy (ctrl + c) and paste (ctrl + v) paths to minimize chance of typos. After fields are entered, click Create.
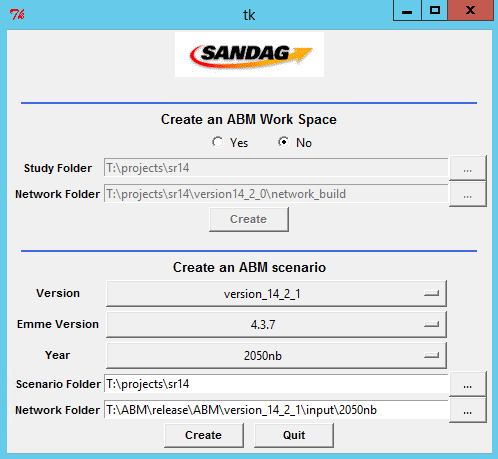
- A DOS window will open and necessary files will be copied. If you have a server with a valid license, it will pause for about 30-45 seconds on init emme folder. You will get a pop-up window that says you have successfully created the scenario. Click Quit. Exit the GUI by clicking on Quit.
- Go to your newly created abm_run folder and double check on input files/date stamps to verify they match expected date stamps. Make any modifications to input files (ie
parametersByYears.csvfor adjusting auto operating costs,filesByYears.csvfor specifying year-specific files, ormgra_based_inputXXX.csvfile for adjusting parking costs). Refer to confluence page to know how and where to make changes.
Follow the steps below to create a new network:
- Navigate to
T:\ABM\release\version_14xxxx\distand click oncreateStudyAndScenario.exe - Click Yes and fill in the new study location and where to copy initial networks from.
- Click Create.
- If you want the latest TCOV, run
copytcovnew 14in your new covs directory from an arcinfo server (if you will be making changes to networks that you want carried forth for all future modeling, editmaster tcovfirst and runpostarc). - If there are any base AT network changes, please see Data Solutions (DS) group to scope out the edits needed.
- Make any necessary changes to highway and transit network in local
tcov,hwyproj.prn,hwyproj.col,headwaysfiles, etc. - Address any unique tolling, capacity, transit fare policies, etc that can be done pre-network generation (ie.
Special_fares.txt,timexferfiles). - Run
tchcandtctramls (or specialty amls) to build highway and transit networks. - Address any unique tolling, capacity, transit frequencies, transit fare policies, etc that have to be done post-network generation (ie.
trrt.csv) - Timed Transfer files must match transit network for routes, configurations, and time periods. If any of those changed for Coaster or routes connecting to Coaster, the time
xferfiles must be changed too. -
Special_fares.txtmust be updated if Coaster configuration changed. Change configuration IDs and, if necessary, the station names at the mid-point (usually around Sorrento Valley station). - Check networks, emphasizing any areas that have changed.
- If base AT network changed, wait for DS group to finish changes and add to local
AT_files/bike_editing_sr14.gdband re-create centroid connectors. If any TAPs were added, deleted, or changed locations from the time the last AT shapefiles were created, re-create the AT network by following steps outlined in the Active Transportation Network Quick Guide. - If highway, transit, and AT networks and supporting files are built and look good proceed to running the model steps.
If Maven was set up correctly, users do not need to edit any of the files mentioned in this subsection.
To execute a model run, the files controlling the CT-RAMP and JPPF services must be configured. The Household Manager and Matrix Manager section provides a broad overview of these services. When executing the travel model, the user first executes the bin/runMtxMgr.cmd file which sets the project drive, directory, kills existing java processes, and specifies the location of the conf directory and the sandag_abm.jar file. The runDriver.cmd file sets the java driver properties.
The StartHHandNodes.cmd file kills all java processes currently running, starts the household manager (runHHMgr.cmd) and specifies the nodes to be used for the model run (runSandag01.cmd, runSandag02.cmd, runSandag03.cmd). The sandag_abm.properties file specifies the location of all the inputs, outputs, UEC files, and other tokens that need to be set. It also specifies which model components to run.
The CTRampEnv.bat file sets the ports, the machine names, IP addresses, drive letters to be used for machines, account settings (user name and password), and location of JAVA used for the model run. Variables in CTRampEnv.bat are described in the table below, with the SANDAG setup provided as an example.
| Statement | Purpose |
|---|---|
| set MATRIX_MANAGER_PORT = 1191 set HH_MANAGER_PORT = 1129 |
Ports for matrix manager and household manager. Usually the same across machines, so do not change. |
| set SNODE = yes set MAIN = localhost set NODE1 = localhost set NODE3 = ${node.2.name} set NODE3 = ${node.3.name} |
Single setup settings. Do not change unless multi node setup. |
| set MAIN_IP = 127.0.0.1 set HHMGR_IP = 127.0.0.1 |
Main IP addresses. Usually the same on every machine for a single machine setup |
| set MEMORY_MTXMGR_MIN = 60000m set MEMORY_MTXMGR_MAX = 70000m set MEMORY_HHMGR_MIN = 1000m set MEMORY_HHMGR_MAX = 30000m set MEMORY_CLIENT_MIN = 30000m set MEMORY_CLIENT_MAX = 90000m set MEMORY_SPMARKET_MIN = 30000m set MEMORY_SPMARKET_MAX = 150000m set MEMORY_BIKELOGSUM_MIN = 20000m set MEMORY_BIKELOGSUM_MAX = 30000m set MEMORY_WALKLOGSUM_MIN = 20000m set MEMORY_WALKLOGSUM_MAX = 30000m set MEMORY_BIKEROUTE_MIN = 20000m set MEMORY_BIKEROUTE_MAX = 30000m set MEMORY_DATAEXPORT_MIN = 30000m set MEMORY_DATAEXPORT_MAX = 140000m set MEMORY_EMFAC_MIN = 10000m set MEMORY_EMFAC_MAX = 15000m set MEMORY_VALIDATE_MIN = 10000m set MEMORY_VALIDATE_MAX = 15000m |
JVM allocations. Do not change. |
| set PROPERTIES_NAME = sandag_abm | Main property file name |
| set MAPDRIVE = T: | all nodes need to map the scenario drive, currently mapped as T: |
| set MAPDRIVEFOLDER = \\sandag.org\transdata | MAPDRIVEFOLDER |
| set USERNAME = XX set PASSWORD = XX |
Account for remote access using psexec |
| set MAPANDRUN = mapAndRun.bat | Location of mapAndRun.bat on remote machines |
| set JAVA_64_PATH = C:\Progra~1\Java\jre1.8.0_162 | 64-bit Java path. Make sure the machine has the path. |
After preparing the computing environment by setting paths, runDriver.cmd, runHhMgr.cmd, and runMtxMgr.cmd then start up three separate Java programs, which need to be initiated prior to the travel model being executed. These three programs are called using the following commands:
| Statement | Purpose |
|---|---|
start %JAVA_64_PATH%\bin\java -server -Xmx16m -cp "%CLASSPATH%" -Dlog4j.configuration=log4j-driver.properties -Djppf.config=jppf-driver.properties org.jppf.server.DriverLauncher |
Starts the Java DriverLauncher class using a Java virtual machine with no more than 16 MB of memory (Xmx16m); using the log4j logging service as configured by log4j-driver.properties; using the JPPF configuration file jppf-driver.properties. This program starts up the JPPF manager, as described in System Design. |
start %JAVA_64_PATH%/bin/java -server -Xms%MEMORY_HHMGR_MIN% -Xmx%MEMORY_HHMGR_MAX% -cp "%CLASSPATH%" -Dlog4j.configuration=log4j_hh.xml org.sandag.abm.application.SandagHouseholdDataManager2 -hostname %HOST_IP_ADDRESS% -port %HOST_PORT% |
Starts the Java SANDAGHouseholdDataManager class using a Java virtual machine using the log4j logging service as configured by log4j_hh.xml; defining the host as the machine with the IP address in HOST_IP. This program starts up the Household manager, as described in System Design. |
start %JAVA_64_PATH%\bin\java -server -Xms%MEMORY_MTXMGR_MIN% -Xmx%MEMORY_MTXMGR_MAX% -Dlog4j.configuration=log4j_mtx.xml -Djava.library.path=%JAR_LOCATION% org.sandag.abm.ctramp.MatrixDataServer -hostname %HOST_IP_ADDRESS% -port %MATRIX_MANAGER_PORT% -ram 1500 -label "SANDAG Matrix Server" |
Starts the Java MatrixDataServer class using a Java virtual machine using the log4j logging service as configured by log4j_mtx.xml. |
After preparing the computing environment by setting paths, the runSandagXX.cmd (where XX is 01, 02, 03, or 04 in SANDAG’s application) instructions then start up a Java program, which needs to be initiated prior to the travel model being executed. Note that these scripts need to be called from each machine on the cluster individually. The following command is used to start the CT-RAMP nodes:
| Statement | Purpose |
|---|---|
start %JAVA_64_PATH%\bin\java -server -Xms16m -Xmx16m -cp "%CLASSPATH%" -Dlog4j.configuration=log4j-sandag{X}.properties -Djppf.config=jppf-sandag{X}.properties org.jppf.node.NodeLauncher |
Starts the psExec program that starts the node on machine {X}, where {X} is 01, 02, 03, or 04 in SANDAG’s application. |
Most of the JPPF-related configuration parameters have been optimized for the SANDAG travel model application and, as such, need not be modified. There are, however, a handful of parameters described in the table below that may need to be modified to meet the specifications of the computing environment upon which the model is being executed. Each of the files listed below can be found in the conf directory.
| File Name | File Function | Statement | Purpose |
|---|---|---|---|
jppf-clientDistributed.properties |
JPPF Client Driver Control file | driver1.jppf.server.host = 172.16.34.40 |
IP address of the main computer (MUSTANG, CHARGER, AZTEC, or GAUCHO) |
jppf-driver.properties |
JPPF Driver Control file | jppf.server.host = 172.16.34.40 |
IP address of the main computer (MUSTANG, CHARGER, AZTEC, or GAUCHO) |
jppf-node{x}.properties |
Remote JPPF Node Control file | jppf.server.host = 172.16.34.40 |
IP address of the main computer (MUSTANG, CHARGER, AZTEC, or GAUCHO) |
processing.threads = 18 |
Number of computing cores on node {X} | ||
other.jvm.options = -Xms45000m -Xmx50000m -Dlog4j.configuration=log4j-sandag{X}.xml -Dnode.name=sandag02 |
Maximum amount of memory, in MB, to allocate to node {X} |
The final configuration file that needs to be edited prior to executing a model run is the sandag_abm.properties file located in conf. This file serves as the general control module for the entire model application. Descriptions of the properties can be found in Properties File.