Tutorial 02 03 Enabling OData Support
![]()
Before you can start really implementing your RESTful API by choosing to add various types of endpoints, etc., you must first get various pieces of "scaffolding" code in place to support a basic OData environment.

Data-centric Harmony Core OData services rely heavily on the automatic generation of code, and that code generation is based on three things:
- Information about your data structures and files, which is obtained from your repository.
- Information about how to do certain things, which is predefined in various CodeGen template files.
- Information on your goals and objectives for the service, which is specified using Harmony Core settings (set with the Harmony Core CLI tool).
When designing Harmony Core, we defined various options you can pick and choose from to produce a RESTful web service that meets your needs. Assuming that a suitable repository is in place, you must provide two types of information:
- Which repository (data) structures are to be exposed by the RESTful web service
- Which Harmony Core options are to be used
You provide this information by setting options with the Harmony Core CLI tool.
-
At a Windows command prompt, move to the directory that contains the solution file (.sln) for your Harmony Core solution and enter the following command:
harmonycore guiAfter briefly displaying a
Loading Solutionmessage, the GUI for the Harmony Core CLI tool opens with five labels for its five tab-like screens:Solution,OData,Structures,Traditional Bridge, andInterfaces. (Note that if you aren't in a directory that contains a solution, you will get a load error.) -
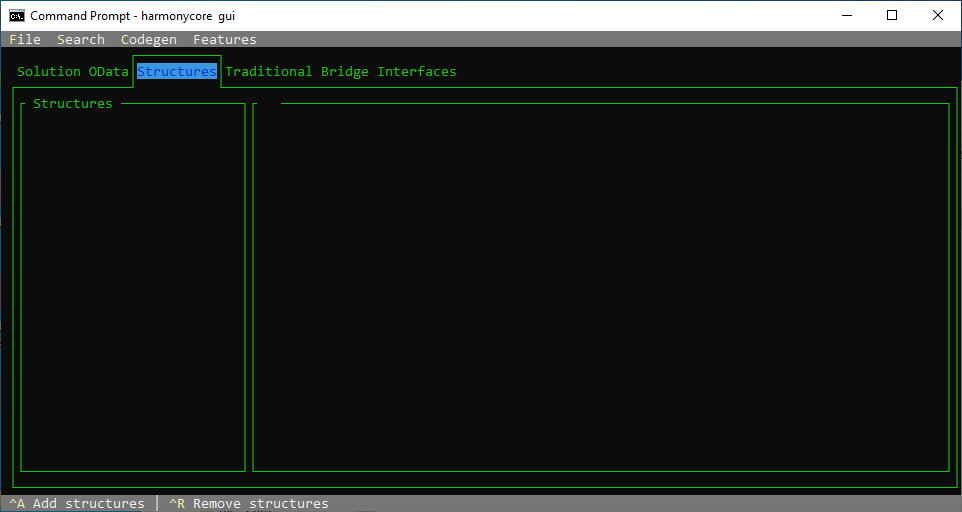
Click
Structures. This is where you specify the names of the repository structures associated with the data that you want your RESTful web services to expose.
-
Click
Add structuresat the bottom of the screen (or press CTRL+A), which opens the "Add structures" screen. Then highlight a structure you want to include and click OK, or press ENTER to add it. Repeat the process until the following structures have been added:- CUSTOMERS
- ITEMS
- ORDERS
- ORDER_ITEMS
- VENDORS
Note that Harmony Core is making several assumptions about the state of the repository:
-
It assumes your data structures have meaningful names—in other words, names that make sense to use in the URLs of a RESTful web service. For example, the name CUSTOMERS will probably work reasonably well because it is relatively obvious what the name refers to, whereas CTMMST is not so obvious.
-
It assumes that each structure is assigned to exactly one file definition and that the name of that file definition is the same as the name of the structure.
If these assumptions are correct, as indeed they are for the Harmony Core sample repository, all you need to do is add the structures as instructed above.
The Harmony Core CLI tool includes various OData options that determine which source files are generated, which CodeGen templates they are generated from, and in some cases what code is generated within those files. Some of these options are on the OData screen (you'll need to scroll down to see all the options available on this screen):

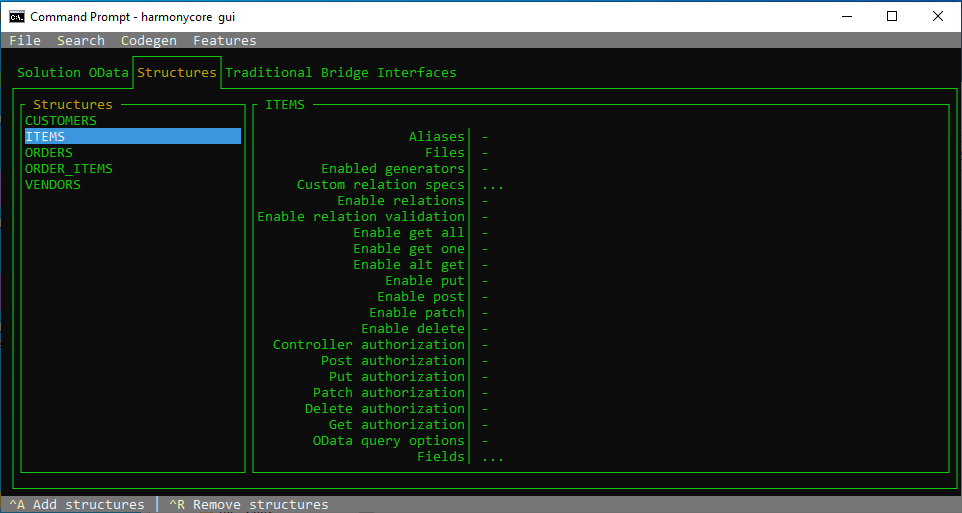
Other options are specific to a structure. These can be accessed by selecting a structure on this screen. For example, in the following, the options in the right-hand pane are for the ITEMS structure, which is selected in the left-hand pane:
To create the basic files needed for our web service, we'll need to enable code generation for models, controls, and some files needed to run the service and access data:
-
On the Structures screen, select CUSTOMERS in the left pane and then double-click the
Enabled generatorsoption in the right-hand pane. A screen will open listing the available generators. Select the following:- ODataGenerator
- ModelGenerator
- EFCoreGenerator
The screen should look like this when these are selected (enabled generators have checkmarks):

-
Click OK to accept the settings on this screen.
-
Do the same for the other structures—i.e., add the ODataGenerator, ModelGenerator, and EFCore Generator for ITEMS, ORDERS, ORDER_ITEMS, and VENDORS.
-
Save the settings you made by selecting
File > Savefrom the menu. -
Then select
CodeGen > Regenfrom the menu to generate code based on your settings.
When code generation is finished, you'll see a message like the following indicating which source files were generated:
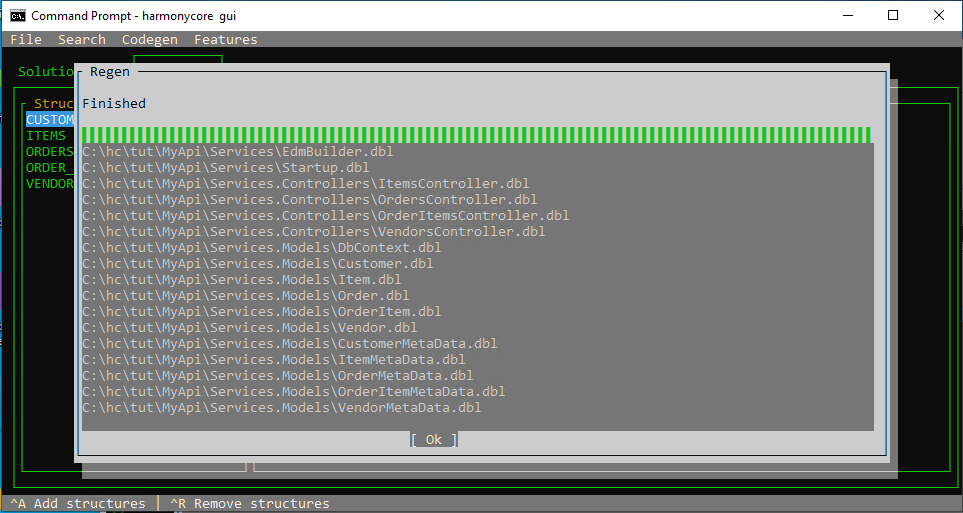
Code generation just generated 20 source files into four different locations:
- Services.Models
- Services.Controllers
- Services
- Services.Host
Five model classes were generated in this folder. These classes are used to "wrap" an instance of a Synergy record in an OO way. One model class is produced for each of the repository structures selected for processing:
- Customer.dbl
- Item.dbl
- Order.dbl
- OrderItem.dbl
- Vendor.dbl
Five metadata classes were generated in this folder. These classes provide additional information about the model classes, as well as items such as keys and relationships to the Harmony Core environment. One metadata class is produced for each of the repository structures selected for processing:
- CustomerMetaData.dbl
- ItemMetaData.dbl
- OrderMetaData.dbl
- OrderItemMetaData.dbl
- VendorMetaData.dbl
Additionally, a DbContext class was generated in this folder. This class represents the available data and is used by code elsewhere in the service to access data at runtime.
- DbContext.dbl
Five controller classes were generated in the Services.Controllers folder. These web service controllers expose endpoints to consumers of the service. Initially these controllers will not have any functionality because no endpoint types have been selected yet. One controller class is produced for each of the repository structures selected for processing:
- CustomersController.dbl
- ItemsController.dbl
- OrdersController.dbl
- OrderItemsController.dbl
- VendorsController.dbl
An EDM builder class was generated in this folder. This class builds an Entity Data Model for use by the Synergy EF Core provider that is used to access the data.
- EdmBuilder.dbl
A Startup class was generated in this folder. This class contains code to configure the ASP.NET, OData, and EF Core environments at service startup.
- Startup.dbl
Two classes were generated in this folder. These classes contain code for the self-hosting program:
- SelfHost.dbl
- SelfHostEnvironment.dbl
We won't do anything with these two files in this tutorial, but in the next tutorial, Configuring Self Hosting, we'll add this code to the Services.Host project.
The next step is to add the source files that were just generated to the various Visual Studio projects:
-
In Solution Explorer, right-click on the Services project and select
Add > Existing Item. Then, in the "Add Existing Items" window, navigate to the Services project folder, select theEdmBuilder.dblandStartup.dblsource files, and click theAddbutton. -
Repeat the process for the Services.Controllers project, adding the five new source files, the names of which all end with
Controller.dbl. -
Repeat the process for the Services.Models project, adding eleven new source files--i.e., all the .dbl files except
AppSettings.dbl, which is already in the project.
At this point, it would be a good idea to take a few minutes to review the code that was just added and start to become familiar with it.
You don't have a fully working solution yet, but to check that things are in good shape, you can attempt to build the service.
-
From the Visual Studio menu, select
Build > Rebuild Solution. -
Check the Output window, where you should see something like this:
1>------ Rebuild All started: Project: Repository, Configuration: Debug Any CPU ------
Restored C:\hc\tut\MyApi\Services\Services.synproj (in 430 ms).
Restored C:\hc\tut\MyApi\Services.Host\Services.Host.synproj (in 430 ms).
Restored C:\hc\tut\MyApi\Services.Isolated\Services.Isolated.synproj (in 430 ms).
Restored C:\hc\tut\MyApi\Services.Controllers\Services.Controllers.synproj (in 425 ms).
Restored C:\hc\tut\MyApi\Services.Models\Services.Models.synproj (in 27 ms).
2>------ Rebuild All started: Project: Services.Models, Configuration: Debug Any CPU ------
3>------ Rebuild All started: Project: Services.Controllers, Configuration: Debug Any CPU ------
4>------ Rebuild All started: Project: Services.Isolated, Configuration: Debug Any CPU ------
5>------ Rebuild All started: Project: Services, Configuration: Debug Any CPU ------
6>------ Rebuild All started: Project: Services.Host, Configuration: Debug Any CPU ------
6>	bin\Debug\net6.0\(0,0): Error DBL-F-NULPR: %DBL-F-NULPR, No primary files specified
6>Done building project "Services.Host.synproj" -- FAILED.
========== Rebuild All: 5 succeeded, 1 failed, 0 skipped ==========
========== Elapsed 00:55.144 ==========
All the code that was just generated should compile, but the Services.Host project will currently fail. The reason for the failure is that the project does not currently contain any self-hosting code.
Next topic: Configuring Self Hosting