Tutorial 02 15 Adding Create Endpoints
![]()
Create operations cause a new entity to be created and are invoked when a client sends an HTTP POST request to the main collection endpoint of an entity. The primary key value for the new entity will be automatically assigned by custom code that you must provide.

When performing an HTTP POST, there are several requirements that the client must comply with in order for a new entity to be created:
-
The body of the HTTP request must include JSON data for the new entity. This must exclude primary key information but include valid data for any other required fields.
-
The HTTP request must have a header named
Content-Typethat identifies the type of data being sent in the request body asapplication/json. -
The HTTP request must have a header named
Content-Lengththat specifies the length of the data (in bytes) being sent in the request body. Note that some client tools, including Postman, will automatically add this header based on the data you pass.
If you need to create a new entity, but the client provides the primary key value for the new entity, use an upsert operation instead.
IMPORTANT: Before enabling create endpoints, you MUST have completed the steps in both Postman Tests and Adding a Primary Key Factory.
To generate endpoints that allow clients to create new entities via POST operations, you must set the Enable POST endpoints option in the Harmony Core CLI tool:
-
At a Windows prompt, move to the directory with your Harmony Core solution, and type
harmonycore gui. Then, when the GUI for the Harmony Core CLI tool opens, go to the OData screen, scroll down to theEnable POST endpointsoption, and double-click it. -
In the "Enter new value" screen, click the diamond icon to the right of
Enable POST endpoints. (The diamond will change to a checkmark.) Then click OK.
-
Save the settings you made by selecting
File > Savefrom the menu. -
Generate code for your solution by selecting
Codegen > Regenfrom the menu. When code generation is finished, a message lists the files that were generated. Click OK to close the message.
Setting the Enable POST endpoints option causes an additional endpoint method to be added to each of the generated OData controller classes. The new method, with most of the code removed from the procedure division, looks like this:
{Produces("application/json")}
{ProducesResponseType(^typeof(Customer),StatusCodes.Status200OK)}
{ProducesResponseType(StatusCodes.Status400BadRequest)}
{HttpPost("Customers")}
;;; <summary>
;;; Create a new customer (automatically assigned primary key).
;;; </summary>
;;; <returns>Returns an IActionResult indicating the status of the operation and containing any data that was returned.</returns>
public method PostCustomer, @IActionResult
    {FromBody}
    required in aCustomer, @Customer
proc
    ;;Remove the primary key fields from ModelState
    ModelState.Remove("CustomerNumber")


endmethod
The sample code above was taken from CustomersController.dbl. As you can see, the code accepts a single Customer object that contains the data for the customer to be created. Notice that the aCustomer parameter is decorated with an attribute {FromBody}, indicating that the data must be provided via the body of the HTTP request.
The one line of code that was not removed from the procedure division in the above example—ModelState.Remove("CustomerNumber")—ensures that any primary key value provided by the client is removed. Remember that with POST operations, the primary key will be provided by the custom primary key factory class.
You will find similar new code in the other controllers.
If you are generating Postman tests, a new POST request is added to the folder for each entity type, but you will need to import the newly generated tests into Postman. You'll do this in a subsequent step.
-
In Visual Studio, select
Build > Rebuild Solutionfrom the menu. -
Check the Output window. You should see something like this:
1>------ Rebuild All started: Project: Repository, Configuration: Debug Any CPU ------
2>------ Rebuild All started: Project: Services.Models, Configuration: Debug Any CPU ------
3>------ Rebuild All started: Project: Services.Controllers, Configuration: Debug Any CPU ------
4>------ Rebuild All started: Project: Services.Isolated, Configuration: Debug Any CPU ------
5>------ Rebuild All started: Project: Services, Configuration: Debug Any CPU ------
6>------ Rebuild All started: Project: Services.Host, Configuration: Debug Any CPU ------
========== Rebuild All: 6 succeeded, 0 failed, 0 skipped ==========
- In Visual Studio, press F5 (
Start Debugging) to start the self-hosting application. Once again, you should see the console window appear with a message confirming that your service is running.
It is not possible to test the functionality of the new endpoints using a web browser because the functionality to be tested involves issuing an HTTP POST request. Browsers can issue POST requests, but only via the use of an HTML form or some client-side JavaScript code. So you will need to use some other tool, and our tool of choice is Postman.
-
Start Postman and close any request tabs that may be open.
-
Select
File > Importfrom the Postman menu or click theImportbutton. -
In the Import dialog, click the
Choose Filesbutton, which opens the Open dialog. -
Browse to your main solution folder, select the
PostManTests.postman_collection.jsonfile, and then click theOpenbutton. -
On the Import Elements tab, click the
Importbutton. -
In the COLLECTION EXISTS dialog, click the
Replacebutton.
Postman will now reload the tests in the "Harmony Core Sample API" collection. Notice that the total number of tests increases.
- Open the Customer Tests folder and select the
POST Create customer (auto assign key)request.
Notice the following:
- The HTTP method is set to POST.
- The URL is set to
{{ServerBaseUri}}/{{ODataPath}}/v{{ApiVersion}}/Customers. - If you click on the
Headerstab, you will see that theContent-Typeheader is set toapplication/json. - If you click on the
Bodytab, you will see that the request contains JSON data for a sample customer.
The JSON data includes a CustomerNumber property, but as mentioned earlier, this value will be discarded and replaced with a server-generated value. Remove the property from the data if you wish.
- Click the blue
Sendbutton.
Postman will execute the request and then wait for a response, parse the response, and display the details of the response in the UI. The response body should look something like this:
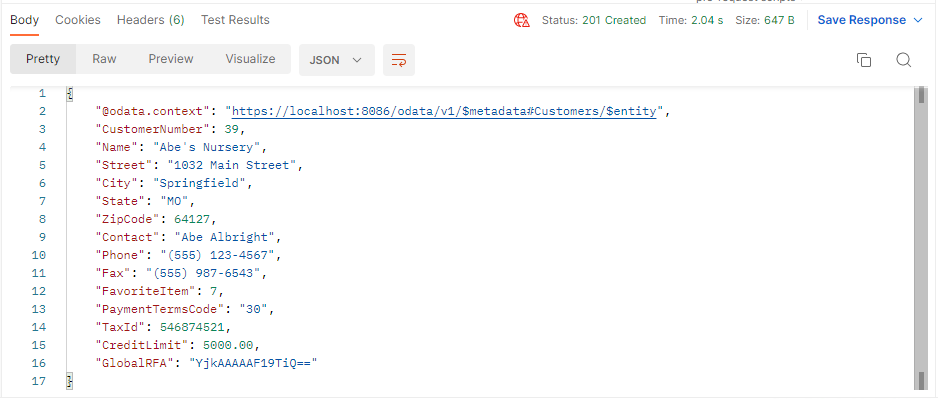
Notice that the primary key of the entity created was set on the server side, likely to a value of 39. Remember that the data in the sample environment is reset to a known state each time you start the service, which you just did.
- In the response tab set, click on the
Headerstab. You should see something like this:
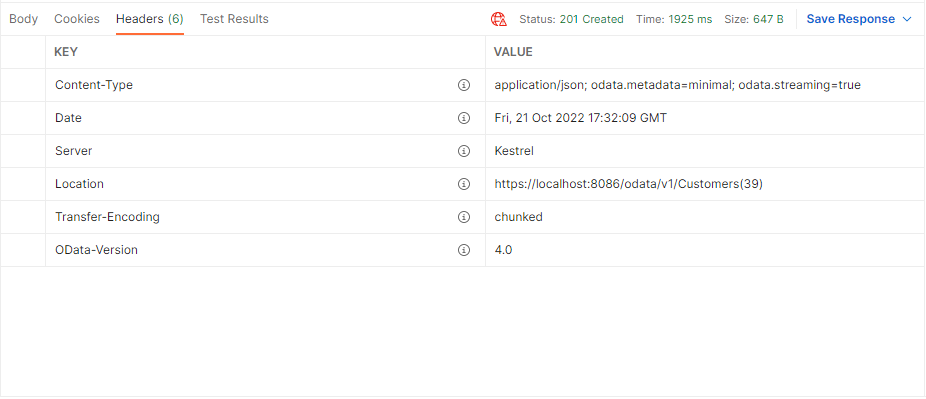
Notice that amongst the various HTTP headers that were returned by the service is a header named Location, the value of which is the URL that can be used to retrieve the newly created entity. This behavior is defined as part of the REST pattern.
- Click the blue
Sendbutton again.
You just created another new customer. Notice that the customer number was incremented again.
- Click the
GET Read Customerrequest and change the parameter value in the URL to a value of 39. Then click the blueSendbutton.
You should see that the GET endpoint was able to retrieve the entity you just created.
- When you are done testing, stop the self-hosting application.
Enabling create endpoints adds endpoints to all your code-generated OData Controllers, but it is possible to prevent the generation of these endpoints for certain structures. This capability is documented in Structure-Specific Endpoint Control.
Next topic: Adding Upsert Endpoints