Tutorial 03 01 Authentication via Custom Code
![]()
Custom authentication is useful when you need to completely control the user authentication process within the context of your Harmony Core service. It is particularly appropriate if you user authentication information is already managed by custom code in your application.
Custom authentication for Harmony Core does not use an OAuth 2.0 server to issue JSON web tokens (JWTs), but that is the only way in which it differs from an OAuth 2.0 solution. With custom authentication, JWTs are issued by code you write, are passed between the client and server, and are used in the same way they would be used with an OAuth 2.0 solution. Custom authentication works well for many existing application infrastructures, and it is no less secure than an OAuth 2.0 solution—as long as you take appropriate steps to protect user data in your backend environment.
IMPORTANT: Before starting this tutorial, you must have created a complete and working Harmony Core service by completing either the Creating a Demo Service tutorial or the Building a Service From Scratch tutorial.
-
Open a Windows command prompt and navigate to the directory with the
.slnfile for your Harmony Core solution. -
Enter the following command to open the Harmony Core GUI tool:
harmonycore guiA message will briefly display indicating that the solution is being loaded.
-
When the "Loading solution" message disappears, select
ODatato open the OData screen, scroll down to theEnable authenticationoption, and double-click it. -
In the
Enter new valuewindow, change the diamond next toEnable authenticationto a checkmark by clicking it. Then clickOk. -
Scroll down to the
Enable custom authoption, and do the same for it (i.e., change its setting to a checkmark.Yesshould now appear next toEnable authenticationandEnable custom auth: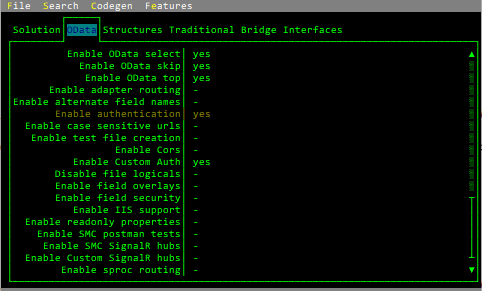
-
Select
File > Savefrom the menu to save the new settings. -
Select
Codegen > Regenfrom the menu to generate code for the solution. When the "Finished" message appears at the top of the Regen window, clickOK.
Setting Enable authentication and Enable custom auth causes the following changes in generated code:
-
A new source file named
AuthenticationModels.dblis generated into the root folder of theServices.Modelsproject. -
Two new source files,
AuthenticationController.dblandAuthenticationTools.dbl, are generated into the root folder of theServices.Controllersproject. -
An additional namespace,
Microsoft.AspNetCore.Authorization, is imported into all controller classes. -
All controller classes are decorated with an
{Authorize}attribute, meaning that the operations in the class can only be accessed by authenticated users. (The exception isAuthenticationController, as discussed in AuthenticationController.dbl below.) -
If xfServerPlus migration is used, similar changes are made in all
InterfaceControllerclasses. -
If Postman tests are generated, the Postman tests file will have an example operation for obtaining tokens.
-
Three additional namespaces
Microsoft.AspNetCore.Authorization,Microsoft.AspNetCore.Authentication.JwtBearerandMicrosoft.IdentityModel.Tokensare imported into theStartupclass in theServicesproject. -
Additional code is generated into the
ConfigureServicesandConfiguremethods in theServicesclass.
As mentioned above, activating custom authentication causes three new files to be generated into two existing project directories (Services.Models and Services.Controllers). You need to add those files to your Visual Studio projects.
-
Add the newly generated file
AuthenticationModels.dblto the Services.Models project. -
Add the two newly generated files
AuthenticationControllerandAuthenticationTools.dblto the Services.Controllers project.
Note that these three source files provide a basic working example of how to implement custom authentication in your Harmony Core environment, but it is likely that you will need to alter the code to meet your exact requirements. For that reason, these files are generated only if they do not exist. If the files exist, they will not be overwritten when code is generated.
Before proceeding with the tutorial, let's look at the three new source files.
This source file is a simple model class that defines properties named Username and Password. The model defines the data that clients must provide to the authentication endpoint to prove the identity of the represented user.
namespace Services.Models

    public class GetTokenRequest

        public readwrite property Username, string

        public readwrite property Password, string

    endclass

endnamespace
If your application uses simple username/password authentication, this model provides exactly what you need.
The properties of this class determine the shape of the JSON data that clients must pass in the body of the POST request to the GetToken endpoint. So, to pass a username and password, a client might pass JSON like this:
{
    "Username": "username",
    "Password": "password"
}
Other applications may require additional information from the client to process a login, in which case you will need to alter the properties of the model class as necessary. For example, your application may require that a numeric "Warehouse ID" be provided, in which case you would add an additional property for that to the model class.
Don't worry about the fact that this JSON data is in plain text. All communication with a Harmony Core service is encrypted because Harmony Core enforces the use of HTTPS.
This code is somewhat complicated, but what it does is quite simple. It exposes a public method named GetToken that, by default, accepts a username and a timeout value. The method then constructs and returns a JWT containing the username as a claim named "token" with an expiration date based on the timeout value provided.
namespace Services.Controllers

    public static class AuthenticationTools

        public static method GetIssuer, string
        proc
            ;Set the name of the "issuer" of the JWT. This is frequently the name of an organization.
            mreturn "<CUSTOM_JWT_ISSUER>"
        endmethod

        public static method GetAudience, string
        proc
            ;Set the name of the "audience" of the JWT. This is frequently the name of an API or service.
            mreturn "<CUSTOM_JWT_AUDIENCE>"
        endmethod

        public static method GetKey, [#]Byte
        proc
            ;TODO: Obtain the private encryption key. PLEASE don't do it this way in production environments.
            mreturn Encoding.UTF8.Getbytes("This is the secret value or password that is used as the encryption key. In production environments you should use something far more complex and random and should not embed the value in source code like this. We recommend using some secure key storage mechanism such as Azure KeyVault. E995CAFA-A47E-4D39-8142-5AA201A7E19E")
        endmethod

        private static ourKey, @SymmetricSecurityKey, new SymmetricSecurityKey(GetKey())

        public static method GetToken  ,string
            aUser,          string
            aTokenDuration, int
            ;;Could add other parameters to pass in custom claims to be added to the JWT.

            record
                logical,    a40
                loglen,     i4
                tokdur,     d8

        proc

            ;;Token duration in hours
            data tokenDuration, int ,0

            if (aTokenDuration > 0) then
                tokenDuration = aTokenDuration
            else
            begin
                xcall getlog('HARMONY_TOKEN_DURATION',logical,loglen)
                if (loglen) then
                begin
                    tokdur = ^d(logical(1:loglen))
                    tokenDuration = tokdur
                    if (tokenDuration > 8767)
                        tokenDuration = 8767 ;max is 1 year
                end
                else
                    tokenDuration = 0
                if(tokenDuration < 1)
                begin
                    using aTokenDuration select
                    (-2),
                        tokenDuration = 12 ;;Login()
                    (),
                        tokenDuration = 1 ;;LoginAs()
                    endusing
                end
            end

            ;;  Create Security key using private key above.
            ;;  Note that the latest version of JWT uses Microsoft namespace instead of System.
            ;;  Also note that ourKey length should be >256b.
            ;;  You have to make sure that your private key has a proper length

            data credentials, @Microsoft.IdentityModel.Tokens.SigningCredentials, new SigningCredentials(ourKey, SecurityAlgorithms.HmacSha256Signature, SecurityAlgorithms.Sha256Digest)
            data handler = new JwtSecurityTokenHandler()
            data ident = new ClaimsIdentity()

            ident.AddClaim(new Claim("token", %atrimtostring(aUser)))

            ;Add custom claims as necessary
            ;ident.AddClaim(new Claim("name1", "value1"))
            ;ident.AddClaim(new Claim("name2", "value2"))
            ;ident.AddClaim(new Claim("name3", "value3"))

            data theFuture, DateTime, DateTime.Now.AddHours(tokenDuration)
            data current,   DateTime, DateTime.Now.AddHours(-1)

            data betterToken = handler.CreateJwtSecurityToken(AuthenticationTools.GetIssuer(), AuthenticationTools.GetAudience(), ident, new Nullable<DateTime>(current),new Nullable<DateTime>(theFuture), new Nullable<DateTime>(DateTime.Now), credentials, ^null)

            ;;  Token to String so you can use it in your client
            data tokenString = handler.WriteToken(betterToken)

            ;data validatedToken, @SecurityToken
            ;handler.ValidateToken(tokenString, new TokenValidationParameters() { IssuerSigningKey = securityKey }, validatedToken)

            mreturn tokenString

        endmethod

    endclass

endnamespace
In the code, you will see comments that tell you whether you need to build additional "claims" into the JWT that is produced. You can modify the GetToken method by adding additional parameters and then add more ident.AddClaim calls to store the information passed via those new parameters in the JWT that is constructed.
This file defines a web service controller that is accessible at the URL /Authentication, and the controller exposes an endpoint named GetToken that is accessible via an HTTP POST operation:
namespace Services.Controllers

    {Route("Authentication")}
    public class AuthenticationController extends ControllerBase

        {AllowAnonymous}
        {Route("GetToken")}
        ;;; <summary>
        ;;;
        ;;; </summary>
        ;;; <returns></returns>
        public async method Post_GetToken, @Task<ActionResult>
            {FromBody}
            required in aRequest, @GetTokenRequest
        proc
            if (!ModelState.IsValid)
            begin
                mreturn BadRequest()
            end

            ;TODO: Authenticate the user login. For now, we'll hard code some valid credentials
            if (aRequest.Username.ToUpper().Equals("USERNAME") && aRequest.Password.Equals("password")) then
            begin
                data tokenValidHours, int, 24
                ;;To add custom claims to the JWT, add parameters to GetToken and pass values here!
                data accessToken, string, AuthenticationTools.GetToken(aRequest.username,tokenValidHours)
                mreturn ok(accessToken)
            end
            else
            begin
                mreturn Unauthorized()
            end
        endmethod

    endclass

endnamespace
Notice that the method is decorated with an {AllowAnanymous} attribute. That's important, as it ensures a valid token is NOT required to access the endpoint used to obtain a token!
Notice also that the method accepts a single parameter:
{FromBody}
required in aRequest, @GetTokenRequest
This means that clients must pass data that represents a GetTokenRequest object via the body of the HTTP request. Of course, as was discussed earlier, that data is passed in JSON format.
The code in the method includes some hard-coded logic to verify that the username is "USERNAME" (not case sensitive) and the password is "password" (case sensitive), and if so, it calls the AuthenticationTools.GetToken method that you just looked at to obtain a JWT containing the authenticated user's username. The JWT is then returned to the client via the return value of the method.
-
Rebuild the solution and start the self-hosting application.
-
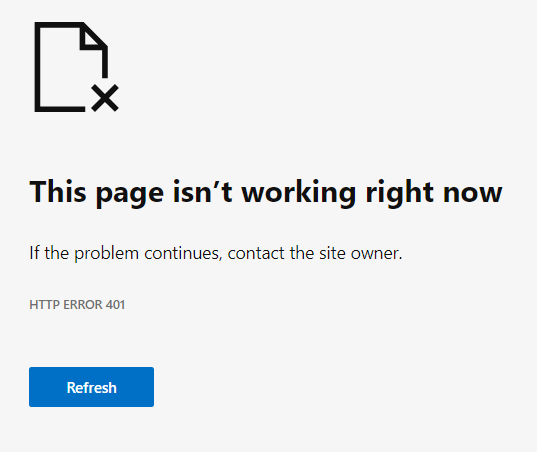
Attempt to access any code-generated OData endpoint of your service, either using a browser or Postman. For example, if your service is based on the Harmony Core sample data, try to retrieve all customers:
https://localhost:8086/odata/v1/Customers
If you used a web browser, you will most likely see a response that looks something like this:
And in Postman you will see a response like this:
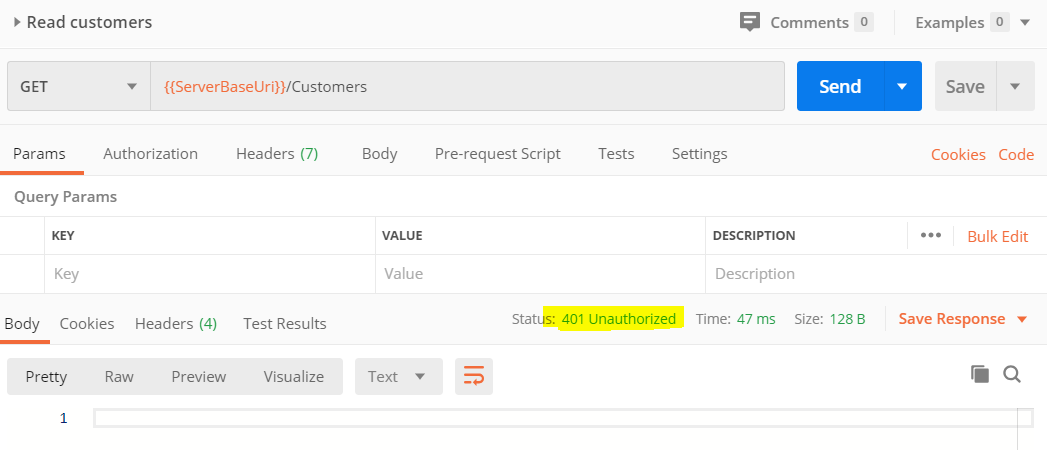
Either way, what you are seeing is an HTTP 401 Unauthorized response.
When you add the ENABLE_AUTHENTICATION option, an {Authorize} attribute is added to all code-generated controller classes, requiring a verifiable and valid JWT to be presented in order to access all endpoints exposed by the controllers.
If you add custom controllers to your service, you can similarly protect those operations simply by adding the {Authorize} attribute to your controller classes.
To access your service with authentication enabled, you must first access the new Authorization/GetToken endpoint via a POST request and include an AuthorizationRequest object (in JSON format) in the request body. As you saw earlier, the authentication code is currently hard-coded to look for a username of "username" and a password of "password". So your request body needs to look like this:
{
    "Username": "username",
    "Password": "password"
}
From now on, whenever you need to interact with your service, you will need to first POST user credentials to the new GetToken endpoint to obtain a JWT. And you will need to send that token to the server in an HTTP header every time you attempt to interact with any protected parts of the service. This means that because you need to issue a POST request to obtain a JWT and customize the HTTP headers for all requests, you will no longer be able to use a simple web browser to interact with your service. Instead, you will need to use Postman (or a similar tool) or custom code.
Here is the process for setting up a new "Get Token" request in Postman:
-
In Visual Studio, start your Harmony Core service and check the console window to ensure it is running.
-
Start Postman and make sure you have disabled
SSL Certificate Verification. This is necessary because you are currently using a "self-signed" SSL certificate that Postman will not by default trust. To make sure this setting is disabled, go toFile > Settings, look on theGeneraltab, and check that the switch control next toSSL Certificate Verificationis set to theOFFposition.
A Postman collection is simply a way of grouping tests together, think of it as a folder. If you already have a collection that you want to use, that's OK. If not, create a new one:
-
In the top left corner, click the
Newbutton/drop-down, selectCollection, and enter a name for the collection, maybeMy Custom Tests.You should see the new collection appear on the left side of the UI.
-
Click the ellipsis icon to the right of the collection name, and select the
Add Requestoption from the menu that opens. -
Enter a name for the request: type
Get Token. -
Below the collection, click on the new test. It will currently say
GET Get Token. in the main pane of Postman, you should see a new tab that looks something like this: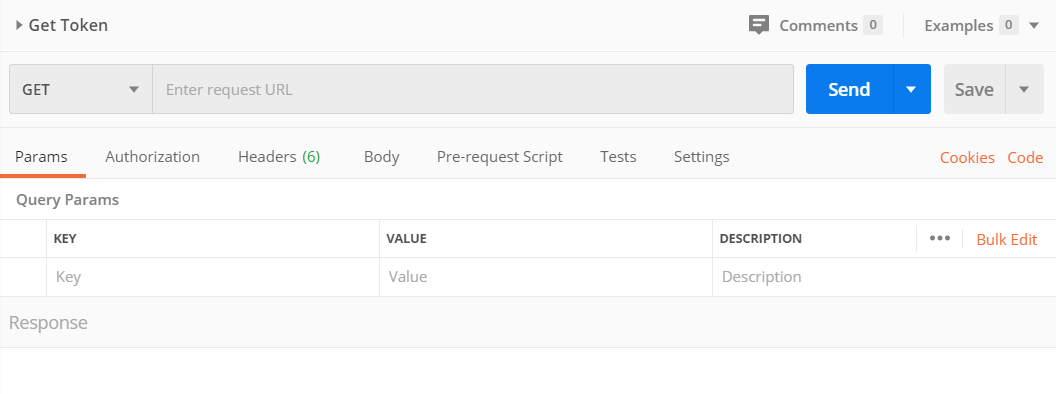
-
The first thing you need to do is change the request from a GET request to a POST request. Do this via the drop-down to the right of
GET. -
Then in the field that says
Enter URL or paste text, enter the folloowing URL:https://localhost:8086/Authentication/GetToken
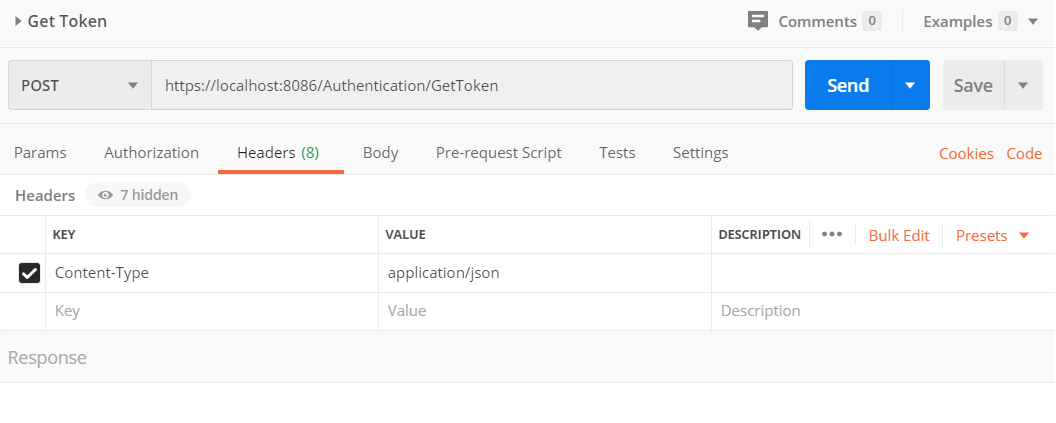
Next, you need to add a Content-Type header to tell the service that you are sending JSON formatted data in the body of the request:
- Immediately below where you entered the URL, click on the
Headerstab, and then click in theKeyfield and enterContent-Type. (You should get IntelliSense-style assistance.) Then click in theValuefield in the same row and enter the MIME typeapplication/json. (Again, you should get IntelliSense-style assistance.)
Your window should now look something like this:
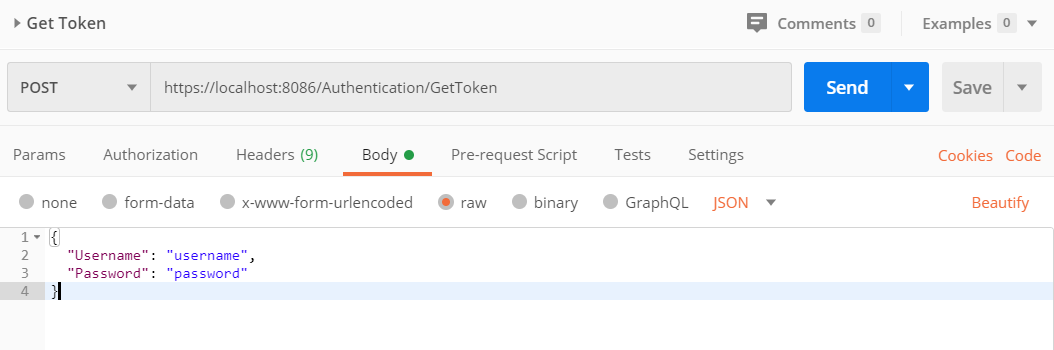
The final thing you need to do is to provide the data for the new customer record that you want to create.
- Copy this JSON data to your clipboard:
{
  "Username": "username",
  "Password": "password"
}
- Back in Postman, click on the
Bodytab, just to the right of theHeaderstab. Then select therawradio button that appears just below theBodytab label, and paste the JSON customer data into the text control below therawselection.
Your window should now look something like this:
-
Click the
Sendbutton to issue the POST request to your service. You should see a response like this: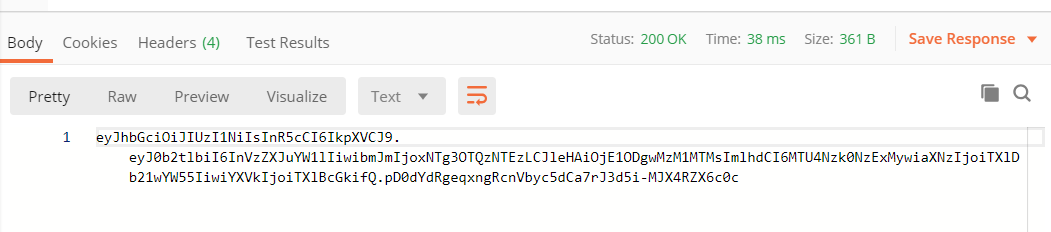
Notice that the response status is a normal HTTP 200 (OK) response, and notice the data in the response body. It looks garbled, but that's because it is encoded. That garbled data is your JWT.
-
Click somewhere in the middle of the JWT data, and then press Ctrl+A to select all of the token text. Then press Ctrl+C to copy the token to your clipboard.
By default, in the sample generated environment, the token that you just generated is valid for 24 hours and can be used over and over until that time period expires.
Now that you have a valid JWT, you can use that token to access any protected endpoints within your service. To do so, you must pass the token as a "Bearer Token" via an HTTP Authorization header that looks like this:
Authorization: Bearer <JWT_goes_here>
In Postman, you can specify authorization details at the individual request level by using the Authorization tab in the request tab set. Or, a better solution is to specify the details once, at the collection level. By default, all operations in a collection will inherit authorization information from the collection.
To configure authentication at the collection level:
-
Click the ellipsis icon to the right of your Postman collection and select
Edit. -
In the tab that opens for the collection, select the
Authorizationtab. -
From the drop-down under the
Typelabel, selectBearer Token. -
Paste your JWT into the
Tokenfield below theBearer Tokenselection. -
Click the ellipsis icon in the upper right corner of the tab and select
Saveto save your changes to the collection. Then close the tab for the collection.
You should now be able to access all the protected endpoints of your service. Bear in mind that JWTs have a limited lifetime that is determined by your own code. In the sample code used in this tutorial, JWT's are valid for a period of 24 hours. After that time, you will once again be unable to access your service until you re-visit the GetToken endpoint, obtain a new token, and update the authorization data in your Postman collection with that new token.