Tutorial 04 02 Add Traditional Bridge Project
![]()
Adding Traditional Bridge to a Harmony Core solution typically involves adding a new traditional Synergy project that includes traditional Synergy routines (the routines you want to expose via endpoints), dispatchers, model classes and other components needed to create the endpoints, along with a simple console application (DBR) that we refer to as the "Traditional Bridge host program". This is the kind of project we'll create in this tutorial. You can, however, organize and deploy some of this code via additional ELB projects. It really depends on how complex your environment is.
For this tutorial, the Traditional Bridge host program will
- listen for request messages from Harmony Core, sent via
standard in(TT:). - decode requests to determine which routine is to be called and to determine values for any inbound parameters.
- execute subroutines and functions as directed, passing needed parameters.
- construct response messages based on return values and the values of any out parameters.
- send responses back to Harmony Core via
standard out(TT:).
The format of the request and response messages is defined by a standard protocol called JSON RPC 2.0. This mechanism is described in more detail in the Dynamic Call Protocol topic.
In this tutorial, the Traditional Bridge environment will be implemented on Windows and in the same solution as the Harmony Core services. But keep in mind that this is not a requirement. Traditional Bridge code can be built and run on Windows, UNIX, Linux, or OpenVMS.
-
Open a Windows command prompt and navigate to the directory with the
.slnfile for your Harmony Core solution. -
Enter the following command to open the Harmony Core GUI tool:
harmonycore guiA message will briefly display indicating that the solution is being loaded.
-
When the "Loading solution" message disappears, select
Features > Add Traditional Bridgefrom the menu. (Do not select theAdd Traditional Bridge and SMCmenu entry. We'll specify an SMC and set up xfServerPlus migration in subsequent steps.)A message will briefly display, indicating that Traditional Bridge is being added to the solution.
-
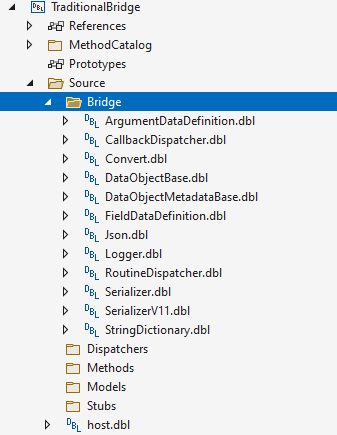
Open your Harmony Core solution in Visual Studio (and Solution Explorer), and notice that there is now a TraditionalBridge project with subfolders:

Also notice that in the Source folder of this project there is a Bridge folder that has several files. These files contain Traditional Bridge library code, which is pre-written helper code to help with JSON data, JSON-RPC messages, and more.
Unless you have changed the .NET projects in your Harmony Core solution since you followed the steps in Building a Service from Scratch, these projects will be set to build for Any CPU by default. However, the TraditionalBridge project that you just added defaults to x86 (32-bit). We'll make sure the environment builds the code for x64 (64-bit):
-
In
Solution Explorer, right-click the solution node (the topmost node) and selectConfiguration Manager. Configuration Manager will open: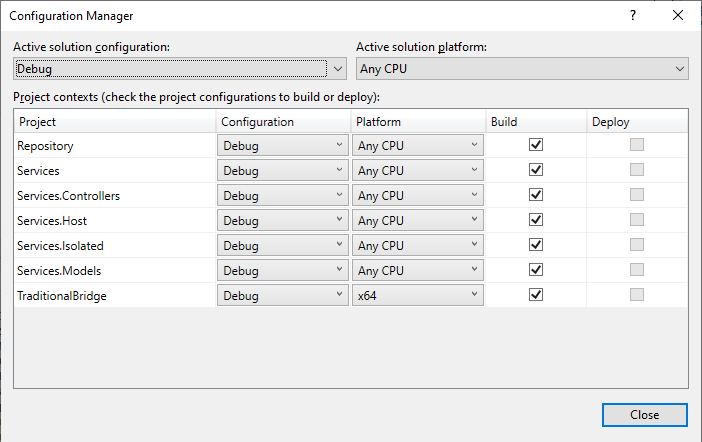
-
Make sure
Active solution configurationis set toDebug. Then set thePlatformfor TraditionalBridge tox64, and make sure the checkbox in theBuildcolumn is selected for TraditionalBridge. -
Change
Active solution configurationtoRelease. Then once again make surePlatformfor TraditionalBridge is set tox64and checkbox in theBuildcolumn is selected for TraditionalBridge. -
Click the
Closebutton to save your changes and close the dialog. -
Next, right-click the TraditionalBridge project node in Solution Explorer and select
Propertiesfrom the context menu.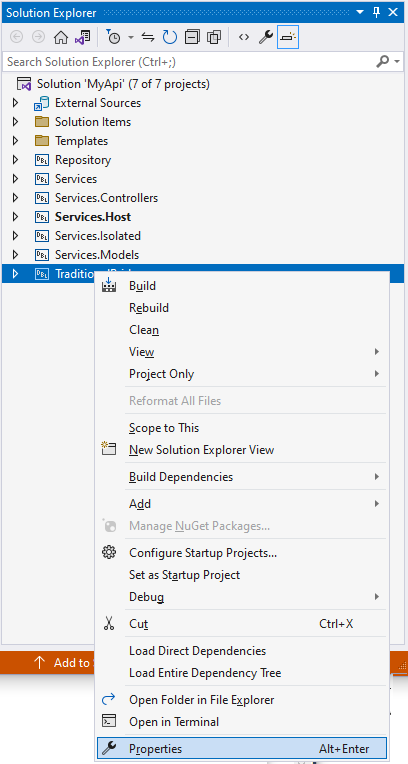
-
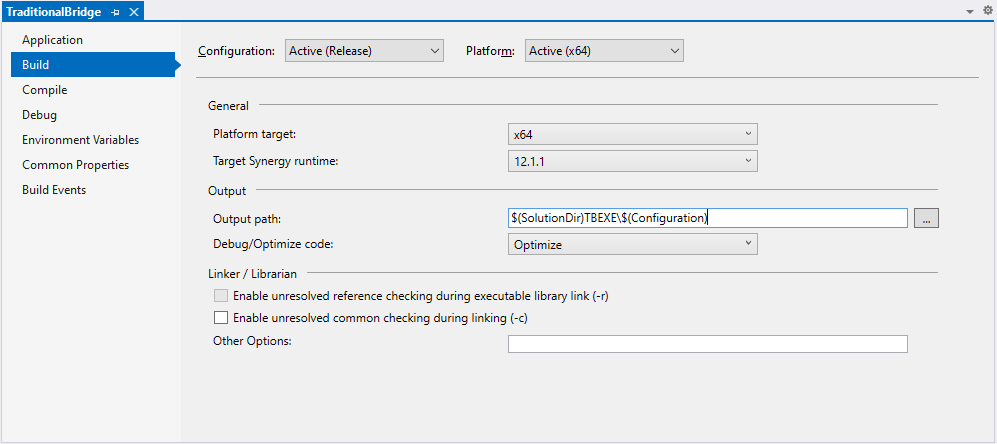
The TraditionalBridge project properties dialog will open. Select the
Buildtab and set theOutput pathfield to the following:$(SolutionDir)TBEXE\$(Configuration)The Build screen should look like this:
-
Save your changes to the Build screen and then select the
Common Propertiestab. Notice that theEXEDIRsetting matches the path you just setOutput pathto. (You'll see EXEDIR again later in this tutorial in Determine the Traditional Bridge Directory.)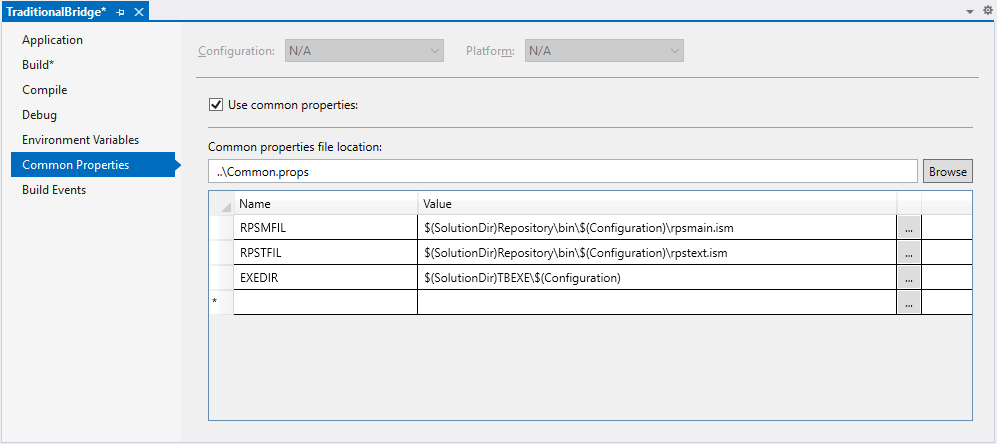
Your Harmony Core solution now has the basic scaffolding for Traditional Bridge. Next, you'll use some functionality that enables code generation to do much of the work needed to fill in your Traditional Bridge implementation.
In the following steps, you'll set up xfServerPlus migration, which generates Traditional Bridge components from interface definitions in a Synergy method catalog (SMC). We'll start by creating a sample SMC with an interface that defines three methods.
-
In Solution Explorer, right-click the MethodCatalog folder (in the TraditionalBridge project) and select
Add > Class. Then, in the Add New Item dialog, selectXML File, name the fileMethodDefinitions.xml, and clickAdd. This will create aMethodDefinitions.xmlfile in the MethodCatalog folder. If you are prompted to overwrite the file, clickYes. -
Copy the following code and paste it into the file you just made, replacing the default code for the file.
 <?xml version='1.0'?>
 <component name="MethodDefinitions" repository="D:\HarmonyCoreProjectTemplates\ProjectTemplates\dotnet-new-harmonydemo-synergy\Repository\bin\Debug" smc="D:\HarmonyCoreProjectTemplates\ProjectTemplates\dotnet-new-harmonydemo-synergy\TraditionalBridge\MethodCatalog" smcrev="5">
   <interface name="BridgeMethods">
      <method name="AddTwoNumbers" id="AddTwoNumbers" routine="AddTwoNumbers" elb="EXE:BridgeMethods">
         <comment>
            <line1>Add two numbers</line1>
         </comment>
         <param name="number1" type="decimal" size="28" precision="10">
            <comment>
               <line1>First number</line1>
            </comment>
         </param>
         <param name="number2" type="decimal" size="28" precision="2">
            <comment>
               <line1>Second number</line1>
            </comment>
         </param>
         <param name="result" type="decimal" size="28" precision="10" dir="out">
            <comment>
               <line1>Resulting number</line1>
            </comment>
         </param>
      </method>
      <method name="GetEnvironment" id="GetEnvironment" routine="GetEnvironment" elb="EXE:BridgeMethods">
         <comment>
            <line1>Get environment string</line1>
         </comment>
         <methodresult type="string" size="0">
            <comment>
               <line1>Returned environment string</line1>
            </comment>
         </methodresult>
      </method>
      <method name="GetLogicalName" id="GetLogicalName" routine="GetLogicalName" elb="EXE:BridgeMethods">
         <comment>
            <line1>Get a logical name's value</line1>
         </comment>
         <methodresult type="string" size="0"/>
         <param name="aLogicalName" type="string" size="0">
            <comment>
               <line1>Logical name</line1>
            </comment>
         </param>
      </method>
   </interface>
</component>
-
Save the file.
-
In the Harmony Core GUI tool, select
Features > Enable SMC Importfrom the menu. -
In the "Load SMC" dialog, navigate to the MethodCatalog folder (i.e., go to the lower pane of the dialog, double-click
/TraditionalBridge, and then double-click/MethodCatalog). Then select the SMC you just created (MethodDefinitions.xml) and clickOpen. -
A message will be displayed, indicating that the SMC has been selected. Click
OKto close the message, and then selectFile > Saveto save the changes. -
Now select
Traditional Bridgeto switch to the Traditional Bridge screen of the Harmony Core CLI tool: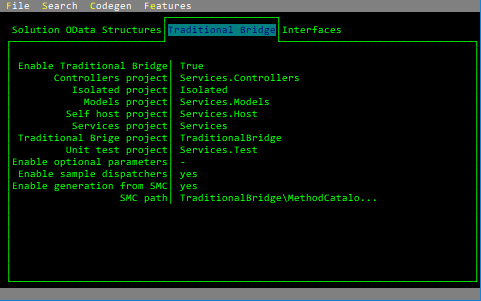
Notice the following settings, which have been set automatically by the features we've used in this section of the tutorial:
-
Enable Traditional Bridgeis set toTrue. -
Enable sample dispatchersis set toYes. (We'll see the sample dispatchers later in this tutorial.) -
Enable generation from SMCis set toYes. -
SMC pathis set to the path for the SMC file we selected.
-
Next topic: Updating Traditional Bridge