1.) Goal - Create student portal using OpenStack Swift.
- Technologies Used - OpenStack based SWIFT API, OpenStack based Keystone API, Django Web Framework, Curl Commands, REST API
2.) Project flow- 6 instances are instantiated both manually and using Python in the OpenStack UI.
- Instances/Nodes - Professor Node(1 instance), Student Node(3 instances), Proxy Server (1 instance), Object Server (1 instance)
- Containers/Subjects - Student nodes can access objects in their own container only whereas the admin node can access the objects in all containers or subjects of students.
- Objects/Files - A combination of REST API call-methods and curl commands are used to perform object actions such as file upload or file download.
3.) Edit the proxy configuration file - Student account - Admin privileges (create, delete, modify objects in its container) Professor account - Reseller admin privileges (provides admin privileges to non-admin privileges in OpenStack Swift)
4.) Process -
- Professor node instantiates the containers and publishes these containers to the student nodes that are enrolled in the course. The professor node has been assigned reseller admin privileges, thus giving the professor node privileges to generate and assign containers to other student nodes. The student nodes have been assigned admin privileges, hence, on creation of a container in the student's account selected by the professor node from the list of accounts, the student can access that container due to the assigned admin privileges.
- Student and professor nodes upload/delete/view objects from containers using REST API methods as described in point 1. To avoid ambiguity in file names, append file name with account_user_names.
- Authentication - HTTP requests are authenticated in OpenStack API with a feature 'TempAuth' that generates a unique key for every session.
- Publishing containers into account involves CURL commands and REST API 'PUT' method, every HTTP request and reply to and from the container is authenticated using 'TempAuth', generating a unique session key which can be found in the created OpenStack containers. Two important steps in container publication - a.) Subprocess.popen → The underlying process creation and management in the subprocess module is handled by Popen class. b.) Subprocess.pipe → It is a special value that is used as stdout (in our project, it is stdout. It can also be used as stdin, stderr) to Popen. It indicates that the pipe to the standard stream should be opened. It is most useful with Popen.communicate(). The popen.communicate() interacts with the process. It sends data to stdin.
5.) Functionality created in the containerization process.
- List files in the local directory
- Download a specific file to the repository
- Upload a specific file to the repository
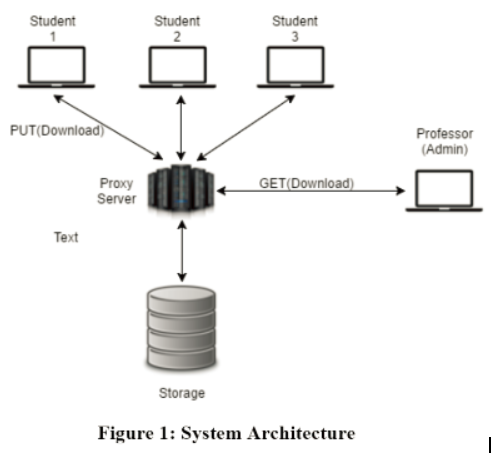
A diagram of how everything works.