This project is part of "Full Stack open 2021" course, where final task is to create our own project from scratch. This project is using React Native's framework. Also for the project I made backend ("Biostack-backend" repository), which is using combination of Node, Mongoose and GraphQL.
Biostack's project idea was to connect my own studies (Bioeconomy engineering) and connect with things I have learned this year from Full Stack Open 2021 course and make app with circular economy on mind. On the app users are able to sell or buy second hand clothes from other users. During the project I focused mainly on two different things: having clean and responsive design and making sure that user experience during app usage is smooth as possible.
With the hours I spend (around 175 hours in total) on the project, I am happy overall how project on this current version turned out to be. Having said that, I will most likely continue this project at some point near in the future, so be make sure bookmark this repository!
You are able to login and register to the app, which will store the data into database (using Mongodb). User has also an option to "register faster" and use Facebook's option to login to the app. Once user is logged in, different view will be rendered, which has navigation on the bottom with different pages to be redirected.
User can add own items and check what other items are being sold from different users and buy the item from them. As of right now (version 0.9v) does not have a option to add own images to the app, so current code will handle the images by generating random image to the user. Big thanks for IKONO @ https://ikono.fi/ for providing the images! <3
If user decides to buy some cloth from different user, then app will render component (Checkout) where user can decide which delivery or payment method user wants to choose from. Once those are decided and current product has been purchased, then user will be redirected and shown of confirmation of that order. Copy of that order will be also sent to the users current email, this feature was implemented by using EmailJS library, more information about it can be found @ https://www.emailjs.com/. It is free to use, but only downside of using that service is that only 200 emails in total can be sent from app to the user.
Users can also give rating to each other (to the buyer and seller of that product which has been traded) at component, which shows each transactions to the current logged user on the app. User can give rating between 1 or 3 and once rating has been given, user can not give rating again on that specific transaction anymore. App will notify about if user has already given rating and show that rating was given back to the user.
From purchasing and selling, what if user wants to delete current listed items from the app? We got that covered aswell, so user has an option to either delete each product manually or all of them same time. Also there is option for the user to edit either current email or name, which will then update values into database and render updated values back to the user.
Project has 4 different .env variables defined:
APOLLO_URI = your_backend_url/graphql

EMAIL_SERVICE_ID = your_emailjs_service_id
EMAIL_TEMPLATE_ID = your_emailjs_template_id
EMAIL_USER_ID = your_emailjs_user_id

FACEBOOK_APP_ID = your_facebook_app_idnpm run start // Script, which will start Biostack on Expo.Yeah you can @ https://expo.dev/@aarnipavlidi/Biostack, might release Biostack on Google Play near future! :)


On these components user is able to login or register into Biostack. User has an also option to login into app via using "Facebook login". If user wants to register without using "Facebook" then user can press the "SIGN UP" button, which will redirect "RegistrationScreen" component back to the user. Registration form has the validation, which uses combination of "Formik" and "Yup". Validation is making sure that all the required input fields are filled and the password matches. Once registration has been successfully executed, then "Snackbar" component will be rendered and user will be redirected into "LoginScreen", so user can login into app with previously made account.
// Define "initialValues" variable, which will get inside of {...}
// objects values as default (''). Which means, if user wants to
// submit form without changing any input fields, these objects
// will get those default values and passed to database. But
// because we have validation setupped, that won't be possible! :)
const initialValues = {
  name: '',
  username: '',
  password: '',
  passwordConfirm: '',
  email: ''
};

// Define "registrationFormValidationSchema" variable, which will execute
// validation via "yup" variable, when user wants to create new user to
// the app. If some of the input fields don't match with required condition,
// then function will return "error message" under of that current input field.
const registrationFormValidationSchema = yup.object().shape({
  name: yup
    .string()
    .required('Name is required.'),
  username: yup
    .string()
    .min(5, 'Username has to be minimum of 5 characters.')
    .required('Username is required.'),
  password: yup
    .string()
    .required('Password is required.'),
  passwordConfirm: yup
    .string()
    .oneOf([yup.ref('password'), null], 'Passwords do not match.')
    .required('Confirmation for password is required.'),
  email: yup
    .string()
    .email('Invalid email format.')
    .required('Email is required.')
});

This component is the first component which will be rendered to the user once user has successfully logged in to the Biostack. This component shows all the current listed products from different users. User has an option to scroll down to see more options, which will force query to fetch more values from the database and show those new ones back to the user. With scrolling, there is also an option to search some specific product from the "Searchbar" component @ https://callstack.github.io/react-native-paper/searchbar.html.
Component is also using multiple "useSubscription()" hooks, and their purpose is "listen" if other users are buying, adding or deleting products from the app. This way we make sure that current logged user has always the newest data rendered. For example what if user would go on specific product via "Dashboard" component and that product would not exist anymore on database, app would most likely crash.
Example of one subscription, which listen if other user has added new product to the app. So if other user has added new product, then for other users their current active querys (CURRENT_LOGGED_USER and SHOW_ALL_PRODUCTS) will be refetched.
  const client = useApolloClient();

  const productAddedCache = async (response) => {
    console.log(response);
    await client.refetchQueries({
      include: "active",
    });
  };

  useSubscription(PRODUCT_ADDED, {
    onSubscriptionData: ({ subscriptionData }) => {
      const response = subscriptionData.data.productAdded
      productAddedCache(response)
    },
  });
Component is using "FlatList" component to render each product via using "ProductRenderAll" component. If user presses some specific product, then user will be redirected to the different view and "CurrentProduct" component will rendered back to the user. So as we can see from bottom code example, that we are able to redirect user into right product by using "item" variable, which has "_id" object included.
const ProductRenderAll = ({ item }) => {

  const history = useHistory(); // Define "history" variable, which will execute => "useHistory(...)" function.

  return (
    <Card style={productContainer.cardContainer}>
      <Pressable onPress={() => history.push(`/dashboard/${item._id}`)}>


This component will be rendered, if user chooses to go on some specific product. User will see related data to current item (type, size and price) and also seller information that who is selling this current item on the app. Seller's name and rating (does not work at this moment) will be shown back and also avatar. By default avatar will show first letters of firstname and lastname, but if user has registered to the app via using facebook, then app will show it's facebook profile image on the avatar's place.
const CurrentUserAvatar = ({ checkUserAvatar, currentUserName }) => {

  if (checkUserAvatar) {
    return (
      <Image style={{ width: 75, height: 75, borderRadius: 75 / 2 }} source={{ uri: checkUserAvatar }} />
    )
  } else {
    return (
      <TextAvatar backgroundColor={styling.colors.Asphalt} textColor={styling.colors.VistaWhite} size={75} type={'circle'}>
        {currentUserName}
      </TextAvatar>
    );
  };
};
On each product two different buttons on the bottom will always be shown, so if current logged user is the owner of that specific product, then "EDIT PRODUCT" and "DELETE PRODUCT" buttons will be rendered. Keep in mind that as of right now editing products has not been implemented, but deleting product works. If current logged user is not the owner, then app will render "CHECKOUT" and "BOOKMARK" (bookmarking feature not implemented) buttoks back to the user. Component called "ButtonOptions" handles this logic and here is the small snippet of that component:
if (getCurrentProduct.owner._id === currentUserData._id) {
return (
<View style={buttonContainer.productButtonContainer}>
<Pressable style={buttonContainer.productButton}>
<Text style={buttonContainer.productButtonText}>EDIT PRODUCT</Text>
<FontAwesome name="edit" size={18} color={styling.colors.VistaWhite} />
</Pressable>
<Pressable style={buttonContainer.productButton} onPress={confirmProductDelete}>
<Text style={buttonContainer.productButtonText}>DELETE PRODUCT</Text>
<MaterialCommunityIcons name="delete-outline" size={18} color={styling.colors.VistaWhite} />
</Pressable>
</View>
);
} else {
return (
<View style={buttonContainer.productButtonContainer}>
<Pressable style={buttonContainer.productButton} onPress={showModal}>
<Text style={buttonContainer.productButtonText}>CHECKOUT</Text>
<Fontisto name="shopping-basket-add" size={18} color={styling.colors.VistaWhite} />
</Pressable>
<Pressable style={buttonContainer.productButton}>
<Text style={buttonContainer.productButtonText}>BOOKMARK</Text>
<Ionicons name="bookmarks" size={18} color={styling.colors.VistaWhite} />
</Pressable>
</View>
);
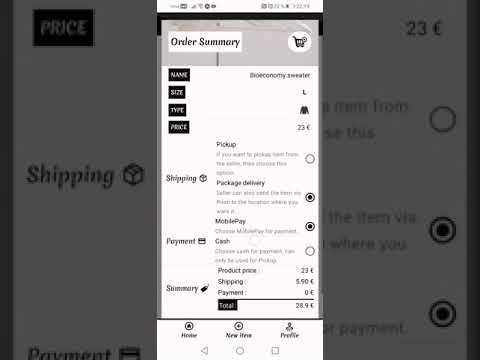
};If user decides to buy current product from the app via pressing "CHECKOUT" button, then component "Checkout" (modal) will be rendered back to the user. So basically we are still on "CurrentProduct" route, but "Checkout" component has been rendered on top of earlier component. So idea was that, if user is uncertain of something or wants to go back to "Dashboard" to see other products, then user has just an option to close the modal and go back.


On the "Checkout" component, app will use "Modal" component from https://callstack.github.io/react-native-paper/modal.html, which has all the information related to the chosen product, which user wants to buy from the app. Once user has has chosen all the required options (for shipping and payment), app will show total price of that order and user is now able to buy the item via pressing "BUY AN ITEM" button. Here is the code of the logic, which handles the buying an item and redirecting the user if buying an item is successful:
    // These 3x variables are being used/needed, so that app is able to send email
    // confirmation to the buyer if purchasing the item is successful.
    const emailService = Constants.manifest.extra.email_service_id;
    const emailTemplate = Constants.manifest.extra.email_template_id;
    const emailUser = Constants.manifest.extra.email_user_id;

    // When this function is being referenced, then we wil execute "try" section first,
    // if something goes wrong during this section then we will pass into "catch" section.
    try {
      // We will be using "useCreateNewTransaction(...)" hook, which has "submitNewTransaction(...)"
      // function. Once function has been executed, then data will be under "response" variable,
      // which lets us access the query data => "data.createTransaction".
      const response = await submitNewTransaction({ getOrderData });
      const confirmationData = response.data.createTransaction; // Define "confirmationData" variable, which is equal to "response.data.createTransaction".

      // Define "emailOrderConfirmation" variable, which will get access
      // inside of {...} different object values.
      const emailOrderConfirmation = {
        to_name: currentUserData.name,
        to_email: currentUserData.email,
        reply_to: "me@aarnipavlidi.fi",
        orderID: confirmationData._id,
        orderName: confirmationData.productTitle,
        orderSize: confirmationData.productSize,
        orderType: confirmationData.productType,
        orderImage: confirmationData.productImage,
        orderShipping: confirmationData.shippingMethod,
        orderPayment: confirmationData.paymentMethod,
        orderTotal: confirmationData.paymentTotal,
        sellerName: confirmationData.sellerName,
        contactEmail: confirmationData.sellerEmail,
      };
      // If earlier function (submitNewTransaction) is successful, then user will be redirected to the
      // different view and "OrderConfirmation" component will be rendered back to the user, which will
      // show data, which uses "confirmationData" via => "state: { detail: order_data_here }":
      history.push({
        pathname: '/dashboard/order-confirmation',
        state: { detail: confirmationData }
      });
      // Then app will make copy of that order confirmation and send confirmation to the users current
      // email, which will use those 3x different variables which we defined earlier.
      await emailjs.send(emailService, emailTemplate, emailOrderConfirmation, emailUser);
    } catch (error) { // If there are any problems during "try" section, then we will execute "catch" section.
      console.log(error) // Console.log the "error" variable data back to the terminal.
    };
  };

This component will be rendered to the user, after purchasing the item is successful. Component will show all the data regarding that order, which gets the data from previous "history.push" function. Also 2x different buttons will be rendered back, 1) "BUY MORE" button which will redirect user back to home "Dashboard" component and 2) "CONTACT SELLER" button, which will redirect user to this orders own page => "CurrentTransaction" component. There user is able to give rating and contact the seller/buyer.
  const location = useLocation(); // Define "location" variable, which will execute => "useLocation(...)" function.
  const history = useHistory(); // Define "history" variable, which will execute => "useHistory(...)" function.

  // Define "getOrderData" variable, which is equal to "location.state.detail". So after user
  // has purchased the product successfully, then that order data goes into "location.state.detail"
  // and user will be redirected to this component (OrderConfirmation), which will show that data back.
  const getOrderData = location.state.detail;
  const orderNumber = `#${getOrderData._id}`;


<View style={buttonContainer.productButtonContainer}>
	<Pressable style={buttonContainer.productButton} onPress={() => history.push('/dashboard')}>
		<Text style={buttonContainer.productButtonText}>BUY MORE</Text>
	</Pressable>
        <Pressable style={buttonContainer.productButton} onPress={() => history.push(`/dashboard/profile/transactions/${getOrderData._id}`)}>
        	<Text style={buttonContainer.productButtonText}>CONTACT SELLER</Text>
        </Pressable>
</View>
![]()
![]()
![]()
![]()
![]()
Component "CurrentTransaction" will show current transaction based on the "id" value of that transaction. User is able to go specific transaction either from "OrderHistory" component, which shows all of users transactions on the app or after user has bought the item, which the button which lets user to redirect the user to current order. On our "Main" component has the router logic, which renders then this component "CurrentTransaction"
<Route exact path="/dashboard/profile/transactions/:transactionID">
	{currentToken ? <CurrentTransaction currentUserData={currentUserData} loading={loading} showSnackBar={showSnackBar} /> : <Redirect to="/" />}
</Route>
// Define "useCurrentTransaction(...)" hook, then get access into "getCurrentTransaction"
// and "loadingTransaction" variables. When user goes into specific transaction, app will
// execute hook and show current data back into "getCurrentTransaction" variable. If the
// data is loading, which means "loadingTransaction" is === "true", then component will
// render back "loading spinner" untill data has been completely loaded.
const { getCurrentTransaction, loadingTransaction } = useCurrentTransaction();And the hook which this component is using, will be using "useParams()" function, so after user is pressing on specific transaction then the router will know that this "id" value is this, which lets execute query with right variable and render back the data to the user.
// This project has been commented by Aarni Pavlidi, if you have any questions or suggestions with the code,
// then please contact me by sending email at me@aarnipavlidi.fi <3
import React from 'react'; // Import "react" library's content for this hooks usage.
import { useParams } from 'react-router-native'; // Import following components from "react-router-native" library's content for this component usage.
import { useQuery } from '@apollo/client'; // Import following functions from "@apollo/client" library for this hook usage.
import { SHOW_CURRENT_TRANSACTION } from '../graphql/queries'; // Import following queries from "queries.js" file for this hook usage.
const useCurrentTransaction = () => {
const { transactionID } = useParams();
const { loading, error, data } = useQuery(SHOW_CURRENT_TRANSACTION, {
fetchPolicy: 'cache-and-network',
variables: {
getTransactionID: transactionID
},
});
// Return variables inside of {...} to be used with this hook.
return {
getCurrentTransaction: data?.showCurrentTransaction,
loadingTransaction: loading,
};
};
// Export "useCurrentTransaction" hook, so other components like "App.js" are able to use this hooks's content.
export default useCurrentTransaction;When user is at current transaction view, then user has an option to give rating to the user (to both product buyer and seller). User can give rating only once and from values between 1 or 3. Once rating has been given successfully to the user, then app will render "Snackbar" component, which will notify that rating has been given. After that if user comes back to that current transaction, then user won't be able to give rating again and app will render the rating which was given earlier.
  // Define "useCurrentTransaction(...)" hook, then get access into "getCurrentTransaction"
  // and "loadingTransaction" variables. When user goes into specific transaction, app will
  // execute hook and show current data back into "getCurrentTransaction" variable. If the
  // data is loading, which means "loadingTransaction" is === "true", then component will
  // render back "loading spinner" untill data has been completely loaded.
  const { getCurrentTransaction, loadingTransaction } = useCurrentTransaction();
// Define "useCreateNewRating()" hook, then get access into "submitNewRating" function
// and "loadingRating" variable. When user wants to give rating to the current transaction
// buyer/seller, then component will execute "submitNewRating" function. When executing
// function, we will be using 3x different parameters, "getCurrentTransaction._id",
// "currentRating.value" and "getCurrentTransaction.type".
const [submitNewRating, { loadingRating }] = useCreateNewRating(); // Define "submitNewRating" variable from => "useCreateNewRating(...)" hook.
// Define "currentRating" into state, which will get in default two (2) object values
// => "status" === "false" and "value" == "null". If we want to change "currentRating"
// state, we will be using "setCurrentRating" function.
const [currentRating, setCurrentRating] = useState({ status: false, value: null });
const [visible, setVisible] = useState(false);
const showModal = () => setVisible(true);
const hideModal = () => setVisible(false);
// Define "submitRating" variable which will execute everything inside of {...} when
// being referenced. Function executes "submitNewRating" function with given parameter
// values and once the function returns data, we will be using that data into rendering
// "Snackbar" component via using "showSnackBar" function, which will notify user of
// giving successful rating value to the products buyer/seller.
const submitRating = async () => {
try { // We will try execute first "try" section, if there are any problems then we will execute "catch" section.
const { data } = await submitNewRating(getCurrentTransaction._id, currentRating.value, getCurrentTransaction.type);
showSnackBar(data.giveRatingUser.response); // Execute "showSnackBar" function, with given parameter value.
} catch (error) { // If there any problems during executing the function then we will do "catch" section.
console.log(error.message) // Console.log "error.message" variable back to the terminal.
};
};
// Define "confirmSubmitRating" function, which will execute everything inside of {...}, when being referenced.
// So when user has chosen the given rating value (1, 2 or 3) and user pressed the "submit" button, then user
// will asked to confirm of giving the rating. Once user has decided to confirm, then we will execute the
// "submitRating" function and execute the "submitNewRating" function (hook).
const confirmSubmitRating = () => {
Alert.alert(
"Biostack",
`You are giving rating value of ${currentRating.value} to the user. Are you sure and want to proceed?`,
[
{
text: "CANCEL",
style: "cancel"
},
{
text: "OK",
onPress: () => submitRating(),
}
]
)
};

This component (Modal) will be rendered top of "CurrentTransaction" component, when user wants to contact the product buyer/seller. This modal will render back data, which consist of buyers/sellers => name, email, number (set as default 123 123 123 to every user) and city. Then user can contact the user via email by pressing the "SEND EMAIL" button. For this feature we are using "Linking" component with "openURL" function and give to this function parameter values.
  const getTransactionID = getCurrentTransaction._id;
  const getPersonName = getCurrentTransaction.buyerName ? getCurrentTransaction.buyerName : getCurrentTransaction.sellerName;
  const getPersonEmail = getCurrentTransaction.buyerEmail ? getCurrentTransaction.buyerEmail : getCurrentTransaction.sellerEmail;
  const getPersonLocation = getCurrentTransaction.location.city;

  const sendEmailPerson = () => {
    Linking.openURL(`mailto:${getPersonEmail}?subject=#${getTransactionID} | Biostack&body=Hey ${getPersonName}, contacting you regarding this order! <3`);
  };

This component shows to the user all of the transactions, which have been made by the user. Any purchases or selling clothes will be shown at this component. Component shows 4x different things on each row, which are transaction date, product type, product size and the payment total of that transaction. Then user has an option to check more data on each transaction by pressing the button ("chevron-right" icon) on the end. Pressing the button will redirect user on that pressed transaction and render "CurrentTransaction" component back.
const UserOrders = ({ item }) => {

  const history = useHistory(); // Define "history" variable, which will execute => "useHistory(...)" function.

  return (
    <View>
      <DataTable.Row>
        <DataTable.Cell>{item.date}</DataTable.Cell>
        <DataTable.Cell numeric={true}>
          <ItemTypeCheck currentItemType={item.productType} />
          <ItemSizeCheck currentItemSize={item.productSize} />
        </DataTable.Cell>
        <DataTable.Cell style={{ justifyContent: 'center' }}>{item.type}</DataTable.Cell>
        <DataTable.Cell numeric={true}>{item.paymentTotal} €</DataTable.Cell>
        <DataTable.Cell style={{ justifyContent: 'center' }} onPress={() => history.push(`/dashboard/profile/transactions/${item._id}`)}>
          <Entypo name="chevron-right" size={20} color={styling.colors.Asphalt} />
        </DataTable.Cell>
      </DataTable.Row>
    </View>
  );
};

This component will be rendered, when user is pressing the "New item" button on the "NavigationBottom" component. Once user has been redirected, then user has an option to add new product to the app. User will be asked to fill required input fields (type, size, title, description and price). If these fields are not filled, then user won't be able to submit new product to the app. We are using "Formik" and "Yup" library's combination to execute validation into those input fields.
// Define "initialValues" variable, which will get inside of {...}
// objects values as default (''). Which means, if user wants to
// submit form without changing any input fields, these objects
// will get those default values and passed to database. But
// because we have validation setupped, that won't be possible! :)
const initialValues = {
  productTitle: '',
  productDescription: '',
  productSize: '',
  productPrice: '',
};

// Define "createProductFormValidationSchema" variable, which will execute
// validation via "yup" variable, when user wants to create new product to
// the app. If some of the input fields don't match with required condition,
// then function will return "error message" under of that current input field.
const createProductFormValidationSchema = yup.object().shape({
  productTitle: yup
    .string()
    .min(5, 'Title has to be minimum of 5 characters.')
    .max(25, 'Title can be only maximum of 25 characters.')
    .required('Title for your item is required.'),
  productDescription: yup
    .string()
    .min(5, 'Description has to be minimum of 5 characters.')
    .max(100, 'Description can be only maximum of 100 characters.')
    .required('Description for your item is required.'),
  productPrice: yup
    .string()
    .matches(/^[0-9]+$/, 'Only rounded numbers can be used on pricing the item.')
    .max(3, 'Price can be only maximum of 3 characters.')
    .required('Price for your product is required.'),
});
Also on the button, which lets the user submit the product on the app has "text" based on the current state and also button has "props" value called "disabled", which has default value "true" which gets the value from "preventSubmit" variable. If condition are met, which means products type and size has been chosen then the variable is equal to "false" and user is able to press the button and submit data into database.
// Define "preventSubmit" variable, which will be equal to either "false" or
// "true" value. Variable idea is to prevent the user press "Create an item"
// button, if the user has not chosen "item type" or "size" option. So once
// user has chosen both options, then "preventSubmit" will be equal to "false" value,
// which means button will be "pressable" to the user.
const preventSubmit = currentItemType && currentItemSize ? false : true;

// Define "buttonText" variable, which will execute everything inside of {...},
// and return text into button => based on if user has selected both payment
// and delivery option or not. If user (by default) has not chosen any option
// values, then function will return "Choose shipping & payment" text and
// otherwise will return "Buy an item" text.
const buttonText = () => {
  if (currentItemType && currentItemSize) {
    return (
      <Text style={{ color: styling.colors.VistaWhite, fontFamily: styling.fonts.buttonContent, fontSize: 12 }}>Create an item</Text>
    )
  } else {
    return (
      <Text style={{ color: styling.colors.VistaWhite, fontFamily: styling.fonts.buttonContent, fontSize: 12 }}>Choose item type & size</Text>
    )
  };
};
Once user has submitted the new product into database, then user will be redirected into that products view, which means "CurrentProduct" component will be rendered. In order to be able submit the item into backend, we have defined "useCreateNewProduct()" hook and we get access into "submitNewProduct" function.
// Define "useCreateNewProduct(...)" hook and get access into "submitNewProduct" function and
// "loading" variable. With function "submitNewProduct" we are able to save the users new
// product into database with given parameter values. When function has been executed and
// data is "loading" then the button, which user earlier pressed will get "loading spinner"
// untill query has been finished. After that user will be redirected into added product
// own view => "CurrentProduct" component will be rendered.
const [submitNewProduct, { loading }] = useCreateNewProduct(); // Define "submitNewProduct" variable from => "useCreateNewProduct(...)" hook.
const history = useHistory(); // Define "history" variable, which will execute => "useHistory(...)" function.

// Define variable "onSubmit", which will execute everything inside of {...},
// when function is being referenced. When user is trying to add new product
// to the app, function will try execute mutation via "submitNewProduct(...)"
// function and if adding new item failed (error) then we will let the user
// know about it via "Alert" component and render "error" variable message.
const onSubmit = async (values) => {

  const { productTitle, productDescription, productPrice } = values; // Define variables inside of {...}, which are equal to "values" variable.

  const owner = currentUserData._id; // Define variable "owner", which is equal to "currentUserData._id" variable.
  const productType = value; // Define variable "productType", which is equal to "value" variable.
  const productImageValue = value === 'sweater'
    ? Math.floor((Math.random() * 6) + 1)
    : Math.floor((Math.random() * 4) + 1);

  const productSize = currentSize; // Define variable "productSize", which is equal to "currentSize" variable.

  try {
    const response = await submitNewProduct({ productTitle, productDescription, productSize, productPrice, productType, productImageValue, owner })
    history.push(`/dashboard/${response.data.createProduct._id}`); // Redirect user to "/dashboard" after adding new product successfully.
  } catch (error) { // If there is a problem at "try" section, then "Alert" component will be rendered.
    Alert.alert(
      "Biostack",
      `${error}`,
      [
        {
          text: "BACK",
          style: "cancel"
        },
      ]
    );
  };
};

When user has pressed the "Profile" link ("NavigationBottom" component), then this will component will be rendered back to the user. This component renders back overview of your account and different links where user can go to. Overview of user acccount has following data: username, current rating, name and email.
Component has 4 different links (3 of them work, "Bookmarks" has not been implemented yet), "Clothes" link will redirect user into "UserClothes" component, which will show all the listed products user has currently on the app. "Transactions" link will redirect user into "OrderHistory" component and "Edit Account" link will redirect user into "EditAccount" component. User has also an option to logout from the app and reset the session ("authStorage.removeAccessToken" function).
  const client = useApolloClient(); // Define "client" variable, which is equal to "useApolloClient(...)" function.
  const authStorage = useAuthStorage(); // Define "authStorage" variable, which is equal to "useAuthStorage(...)" function.

  const logoutUserToken = async () => {
    try {
      await authStorage.removeAccessToken();
      client.clearStore();
      setCurrentToken(null);
    } catch (error) {
      console.log(error.message);
    };
  };

  const confirmUserLogout = () => {
    Alert.alert(
      "Biostack",
      "Are you sure you want to logout from the app?",
      [
        {
          text: "CANCEL",
          onPress: () => console.log('User has cancelled logout process!'),
          style: "cancel"
        },
        {
          text: "OK",
          onPress: () => logoutUserToken(),
        }
      ]
    )
  };

This component uses "FlatList" component, which renders each item which has been listed by the user into own row. User has an option also to delete specific product manually, which will then render "Snackbar" component back to the user. Component gets the data from the "currentUserData" which is equal to "CURRENT_LOGGED_USER" query. Query has an "products" object, which we use for "FlatList" component to render each item back to the user visible.
// Define "UserClothes" component, which will execute everything inside of {...}
// and render back either "loading spinner" or current logged user data.
const UserClothes = ({ currentUserData, loading, showSnackBar }) => {

  const getUserListedProducts = currentUserData
    ? currentUserData.products.map(results => results)
    : [];

  // If "me" querys data => "currentUserData" is still loading from the dabase, component
  // will render everything inside of (...) (loading spinner) untill data has loaded.
  if (loading) {
    return (
      <View style={loadingContainer.container}>
        <ActivityIndicator size="large" color={styling.colors.Asphalt} />
      </View>
    );
  };

  // Otherwise component will render everything inside of (...) back to the user.
  return (
    <FlatList
      data={getUserListedProducts}
      keyExtractor={(item, index) => item._id}
      renderItem={({ item }) => <UserListedClothes item={item} showSnackBar={showSnackBar} />}
      ListHeaderComponent={<UserClothesHeader />}
    />
  );
};


On this component user is able to delete his own account from the app, delete all listed products or edit current name/email values into new ones. On all of these functions app will also render "Snackbar" component after successful execution. Here is the small snippet of code, where user if confirms the account deletion then we will execute the function (provided by the hook) and then user will be redirected back to the "LoginScreen" after deleting the acccount has been successful.
// Define "useDeleteUser()" hook and get access into "deleteUserFromDatabase" function and
// "loadingDeleteUser" variable. When user wants to delete his account from the app, then
// "deleteUserFromDatabase" function will be executed and while the data is "loading", which
// means "loadingDeleteUser" is equal to "true" => "loading spinner" will be rendered on the
// submit button untill function has been finished and then user will be redirected back into
// "loginScreen" component.
const [deleteUserFromDatabase, { loadingDeleteUser }] = useDeleteUser(); // Define "deleteUserFromDatabase" variable from => "useDeleteUser(...)" hook.

const client = useApolloClient(); // Define "client" variable, which is equal to "useApolloClient(...)" function.
const authStorage = useAuthStorage(); // Define "authStorage" variable, which is equal to "useAuthStorage(...)" function.

// Define "removeUserToken" function, which will execute everything inside of {...},
// so if user wants to delete his account and confirms deletion via "Alert" method,
// then this function will be executed. If account deletion is successful, then
// user will be redirected back to login screen and else if there is a problem
// with deletion then "error.message" variable will be returned back to the user.
const removeUserToken = async () => {
  try { // First we will execute "try" section, if there will be a problem => "catch" section.
    const response = await deleteUserFromDatabase(currentUserData._id);
    await authStorage.removeAccessToken(); // Remove token value from "authStorage" after account deletion.
    //client.resetStore(); // Clear mutation from "active" and refetch all other active queries again.
    // App was getting errors after account deletion and changing "resetStore()" into
    // "clearStore()" function solved the issue. Need to find out later what caused
    // the original problem when deleting account and going back to login screen.
    client.clearStore(); // Does same thing as upper function "client.resetStore()", but won't refetch all other active queries again.
    setCurrentToken(null); // Change "currentToken" variable state into original value => "null".
    showSnackBar(response.deleteUser.response);
  } catch (error) {
    console.log(error.message); // Console.log "error.message" variable data back to the user.
  }
};

// Define "confirmUserDelete" function, which will execute everything inside of
// {...}, so if user presses button to delete his/her account => "Alert" component
// will be rendered back to the user and user has to confirm that he/she wants to
// delete account from database. If user chooses to confirm, then "removeUserToken()"
// function will be executed and app will try delete account from the database.
const confirmUserDelete = () => {
  Alert.alert(
    "Biostack",
    "Are you sure you want to delete your account from the app?",
    [
      {
        text: "CANCEL",
        onPress: () => console.log('User has cancelled account deletion process!'),
        style: "cancel"
      },
      {
        text: "OK",
        onPress: () => removeUserToken(),
      }
    ]
  )
};
Other functions (deleting products and updating user values) have the same logic behind, first we confirm that user wants to really delete account/products or update values and once that has been confirmed, we will execute function provided by the hook and then render the "loading spinner" untill that function has been finished. Then once function has been executed successfully, app will render "Snackbar" and notify the user that function has been executed successfully.