FAQ
1.1 Connect USB2RS232 (male) cable to NeuroQ (NeuroQ-1)
 Figure 1
1.2 Use 3-pin wire connect to pin2 (RxD), pin3 (TxD) and pin5 (Gnd) of USB2RS232 (male) DB9 connector
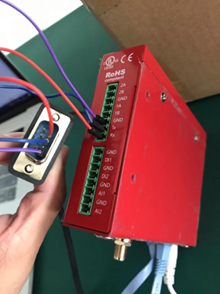 Figure 2
1.3 Connect pin2 (RxD) to Rx, pin3 (TxD) to Tx and pin5 (Gnd) to GND on another NeuroQ's (NeuroQ-2) terminal block connectors.
1.4 SSH into both boxes, launch microcom (use microcom -h to learn about how to use microcom) to test your communication.
On the NeuroQ-1, use command:
microcom -s 9600 /dev/ttyUSB0
On the NeuroQ-2, use command:
microcom -s 9600 /dev/ttyHS0
Once microcom started, type in "test" on one box and you will see it on the other box.
To disable configuration edit of agent from NeuroQ local UI, add the following line into <BasicInfo> element in file /opt/sdmwebs/web/conf/AnyLink.xml (or using API /v2/remoteAgent/sendAnylinkXML )
<DriverConfigUI>0</DriverConfigUI>
Here’s an example:
<AnyLink>
    <WebServer>ON</WebServer>
    <BasicInfo>
        <DriverConfigUI>0</DriverConfigUI>

...
<AnyLink>
/system/anylink/agent/ModuleConfig.xml
Open configure file /system/anylink/agent/AgentConfig.xml and change the following from
<Debug>100</Debug>
to
<Debug>400</Debug>
and restart the box.
CR1220
/PageFile/AeLog-xxx.log