Template Editor
The Template Editor is where you write and manage your Crodox grammar definitions.

To edit a template:
- Go to the Templates tab from the sidebar
- Find your template in the list (e.g.,
my_first_template) - Click on the template name or row to open it
- The Template Editor will open with your grammar code
In the template list, you can see for each template:
-
Template Name - The name you created (e.g.,
my_first_template) - Owner - Who created the template (e.g., your username)
- Repository - The GitHub repository linked to test the template (optional)
- Test Repository - The specific repository used for validation
-
Source - Where the template came from (e.g.,
GITHUB) - Template ID - Unique identifier for the template

The Template menu (top-left of the editor) provides the following actions:
| Action | Description |
|---|---|
| Save Template | Save your current grammar (Ctrl+S / Strg+S) |
| Export Template to Local File | Download the template as a local file |
| Export Text-Only Local File | Download a plain-text version |
| Export Template to Repository | Push the template to a GitHub repository |
| Import Template from Local File | Load a grammar from a file on your machine |
| Import Template from Repository | Load a grammar from a GitHub repository's .crodox.json
|
When you select Import Template from Repository, a panel opens where you can:
- Choose a source repository from the dropdown (e.g.,
material_template (github),myCRM (github)) - Click Import to load that repository's
.crodox.jsoninto the editor
This overwrites the current grammar with the imported content. It is the recommended starting point for new templates.
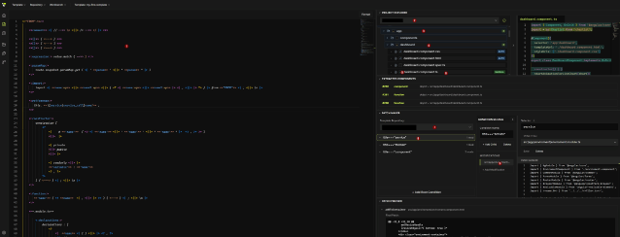
The template editor displays five sections arranged left to right:
- Grammar Editor (left) - Text area where you write and edit your Crodox grammar syntax
- Project Explorer (center-left) - Select repositories and folders for test extraction and slicing
- Trial Extraction Field (center) - View extracted components identified by your grammar
- Patch Maker (center-right) - View and manage patches generated from your template
- Preview Window (right) - Real-time preview of extracted results and patch applications
- Tabs - Navigation between Template, Repository, Workbench sections
- Format Button - Auto-format your grammar code
-
GitHub Link - Shows the linked GitHub repository (e.g.,
github/myCRM) - Select a folder - Load files from your repository for testing
- Navigate the folder tree to drill into subdirectories (e.g.,
app→dashboard) - Click a file to load it into the editor and run the grammar against it
- Lists every component the grammar successfully extracted from the selected file
- Each entry shows the component type (e.g.,
component,function), its ID, and its source path - "No components extracted yet" until a file is selected and the grammar matches
-
Template Repository - Dropdown to select the template repository that defines patch conditions (e.g.,
github/material_template) - Conditions appear as rows (e.g.,
title==="service"*,title==="module"*) - Each condition shows how many modifications apply (
1 mod,2 mods) - Click + Add Root Condition to define a new patch rule
When you click on a condition, the Condition Details panel opens on the right:
-
Condition Name - The condition expression (e.g.,
title==="service") -
Selector - CSS/path selector targeting the component in the source (e.g.,
service) -
Target File - The file path where the patch will be written (e.g.,
src/app/environment/environment.module.ts) - + Add Child / Delete - Extend or remove the condition
- + Add Modification - Add a transformation step to this condition
-
Modifications - List of code changes to apply (e.g.,
src/app/env...)
- Shows the final diff output for the selected condition and file
- Displays line-by-line additions and removals (
@@unified diff format) - Updates live as you select different conditions and modifications
The following walkthrough shows how to validate a grammar against a real repository before building a Workbench:
Import the grammar from your template repository via Template > Import Template from Repository. Select the repository containing your .crodox.json (e.g., material_template). The grammar loads into the Grammar Editor on the left.
In the Project Explorer, open the repository dropdown and select your trial repository (e.g., github/myCRM). This is the repo you want to test the grammar against.
Drill into the file tree:
- Click app to expand the folder
- Click dashboard to expand the subfolder
- Click a component file (e.g.,
dashboard.component.ts) to select it
The file opens in the right-hand preview panel, and the grammar runs against it automatically.
The Extracted Components section updates to show every object the grammar matched in that file. For example:
-
#262 component- object atsrc/app/dashboard/dashboard.component.ts -
#261 function- object atsrc/app/dashboard/dashboard.component.ts -
#260 function- object atsrc/app/dashboard/dashboard.component.ts
If this section is empty, the grammar did not match the file. Review your grammar syntax or try a different file.
In the Patch Maker, open the Template Repository dropdown and select the repository that holds your patch definitions (e.g., github/material_template). The patch conditions load below.
Click on a condition row (e.g., title==="service"*) to open the Condition Details panel. Then click on a modification entry to see:
- The Selector used to target the component
- The Target File the patch writes to
- The full Patch Content diff in the Preview window
If the selector and file path match your expectations, the template is correctly configured.
Once the extracted components and patch preview look correct, you are ready to run this template at scale. Go to Creating a Workbench to analyze your repositories and generate patches across the codebase.
In the left editor area, write your grammar using Crodox syntax:
<~ file.py ~>
<: import :> <<name>>
<: class :> <<name>> <- function, variable ->
  <: function :> <<name>> <- variable ->
    <: parameter :> <<name>>
Key Elements:
-
<~ file.xy ~>- File type definition -
<: name :>- Visible object -
<<name>>- Variable reference -
<- type1, type2 ->- Allowed children (sub-body) -
<? ... ?>- Optional/repeat blocks -
<* name *>- Hidden objects
- Write or edit your grammar in the editor
- Click Save
- Crodox validates the grammar syntax
- If valid - Template is saved and ready to use
- If error - Check the error message and fix your grammar
Tip: See Syntax Overview for complete grammar reference.
From the template list, you can:
- Click to Edit - Open the template in the editor
-
Export - Download the template as a
.crodoxfile - Delete - Remove the template permanently (cannot be undone)
- More Options - Access additional template actions (three dots menu)
- Write your grammar definition in the editor
- Click Save to validate and store it
- Create a Workbench to test your template against a repository
See also: App-Template - Full template documentation · Syntax Overview - Grammar syntax reference · Creating Your First Template - Step-by-step guide