Implementations of common algorithms and data structures used for competitive programming.
The algorithms and data structures can easily be pasted into a document using the included Vim plugin.

Use vim-plug or any Vim plugin manager of your choice. The plugin fzf is a requirement.
With vim-plug:
Plug 'junegunn/fzf', { 'dir': '~/.fzf', 'do': './install --all' }
Plug 'jakobkogler/Algorithm-DataStructures'The plugin defines a single command AlgDS.
It can be mapped like this:
nmap <leader>alg :AlgDS<CR>There are some pretty printer for GDB.
You can activate them by putting the following in your ~/.gdbinit:
source ~/.vim/plugged/Algorithm-DataStructures/prettyprint.pyWTFPL

Make your Vim/Neovim as smart as VSCode.


True snippet and additional text editing support

- 🚀 Fast: instant increment completion, increment buffer sync using buffer update events.
- 💎 Reliable: typed language, tested with CI.
- 🌟 Featured: full LSP support
- ❤️ Flexible: configured like VSCode, extensions work like in VSCode
Install nodejs >= 10.12:
curl -sL install-node.now.sh/lts | bashFor vim-plug users:
" Use release branch (recommend)
Plug 'neoclide/coc.nvim', {'branch': 'release'}

" Or build from source code by using yarn: https://yarnpkg.com
Plug 'neoclide/coc.nvim', {'branch': 'master', 'do': 'yarn install --frozen-lockfile'}
in your .vimrc or init.vim, then restart Vim and run :PlugInstall.
Checkout Install coc.nvim for more info.
You have to install coc extension or configure language servers for LSP support.
Install extensions like:
:CocInstall coc-json coc-tsserver
Or configure language server in coc-settings.json opened by
:CocConfig, like:
{
  "languageserver": {
    "go": {
      "command": "gopls",
      "rootPatterns": ["go.mod"],
      "trace.server": "verbose",
      "filetypes": ["go"]
    }
  }
}
Checkout wiki for more details:
- Completion with sources
- Using the configuration file
- Using coc extensions
- Configure language servers
- F.A.Q
Checkout :h coc-nvim for vim interface.
Configuration is required to make coc.nvim easier to work with, since it doesn't change your key-mappings or Vim options. This is done as much as possible to avoid conflict with your other plugins.
❗️Important: Some Vim plugins could change key mappings. Please use
:verbose imap <tab> to make sure that your keymap has taken effect.
" Set internal encoding of vim, not needed on neovim, since coc.nvim using some
" unicode characters in the file autoload/float.vim
set encoding=utf-8

" TextEdit might fail if hidden is not set.
set hidden

" Some servers have issues with backup files, see #649.
set nobackup
set nowritebackup

" Give more space for displaying messages.
set cmdheight=2

" Having longer updatetime (default is 4000 ms = 4 s) leads to noticeable
" delays and poor user experience.
set updatetime=300

" Don't pass messages to |ins-completion-menu|.
set shortmess+=c

" Always show the signcolumn, otherwise it would shift the text each time
" diagnostics appear/become resolved.
if has("patch-8.1.1564")
  " Recently vim can merge signcolumn and number column into one
  set signcolumn=number
else
  set signcolumn=yes
endif

" Use tab for trigger completion with characters ahead and navigate.
" NOTE: Use command ':verbose imap <tab>' to make sure tab is not mapped by
" other plugin before putting this into your config.
inoremap <silent><expr> <TAB>
      \ pumvisible() ? "\<C-n>" :
      \ <SID>check_back_space() ? "\<TAB>" :
      \ coc#refresh()
inoremap <expr><S-TAB> pumvisible() ? "\<C-p>" : "\<C-h>"

function! s:check_back_space() abort
  let col = col('.') - 1
  return !col || getline('.')[col - 1]  =~# '\s'
endfunction

" Use <c-space> to trigger completion.
if has('nvim')
  inoremap <silent><expr> <c-space> coc#refresh()
else
  inoremap <silent><expr> <c-@> coc#refresh()
endif

" Make <CR> auto-select the first completion item and notify coc.nvim to
" format on enter, <cr> could be remapped by other vim plugin
inoremap <silent><expr> <cr> pumvisible() ? coc#_select_confirm()
                              \: "\<C-g>u\<CR>\<c-r>=coc#on_enter()\<CR>"

" Use `[g` and `]g` to navigate diagnostics
" Use `:CocDiagnostics` to get all diagnostics of current buffer in location list.
nmap <silent> [g <Plug>(coc-diagnostic-prev)
nmap <silent> ]g <Plug>(coc-diagnostic-next)

" GoTo code navigation.
nmap <silent> gd <Plug>(coc-definition)
nmap <silent> gy <Plug>(coc-type-definition)
nmap <silent> gi <Plug>(coc-implementation)
nmap <silent> gr <Plug>(coc-references)

" Use K to show documentation in preview window.
nnoremap <silent> K :call <SID>show_documentation()<CR>

function! s:show_documentation()
  if (index(['vim','help'], &filetype) >= 0)
    execute 'h '.expand('<cword>')
  elseif (coc#rpc#ready())
    call CocActionAsync('doHover')
  else
    execute '!' . &keywordprg . " " . expand('<cword>')
  endif
endfunction

" Highlight the symbol and its references when holding the cursor.
autocmd CursorHold * silent call CocActionAsync('highlight')

" Symbol renaming.
nmap <leader>rn <Plug>(coc-rename)

" Formatting selected code.
xmap <leader>f  <Plug>(coc-format-selected)
nmap <leader>f  <Plug>(coc-format-selected)

augroup mygroup
  autocmd!
  " Setup formatexpr specified filetype(s).
  autocmd FileType typescript,json setl formatexpr=CocAction('formatSelected')
  " Update signature help on jump placeholder.
  autocmd User CocJumpPlaceholder call CocActionAsync('showSignatureHelp')
augroup end

" Applying codeAction to the selected region.
" Example: `<leader>aap` for current paragraph
xmap <leader>a  <Plug>(coc-codeaction-selected)
nmap <leader>a  <Plug>(coc-codeaction-selected)

" Remap keys for applying codeAction to the current buffer.
nmap <leader>ac  <Plug>(coc-codeaction)
" Apply AutoFix to problem on the current line.
nmap <leader>qf  <Plug>(coc-fix-current)

" Map function and class text objects
" NOTE: Requires 'textDocument.documentSymbol' support from the language server.
xmap if <Plug>(coc-funcobj-i)
omap if <Plug>(coc-funcobj-i)
xmap af <Plug>(coc-funcobj-a)
omap af <Plug>(coc-funcobj-a)
xmap ic <Plug>(coc-classobj-i)
omap ic <Plug>(coc-classobj-i)
xmap ac <Plug>(coc-classobj-a)
omap ac <Plug>(coc-classobj-a)

" Remap <C-f> and <C-b> for scroll float windows/popups.
if has('nvim-0.4.0') || has('patch-8.2.0750')
  nnoremap <silent><nowait><expr> <C-f> coc#float#has_scroll() ? coc#float#scroll(1) : "\<C-f>"
  nnoremap <silent><nowait><expr> <C-b> coc#float#has_scroll() ? coc#float#scroll(0) : "\<C-b>"
  inoremap <silent><nowait><expr> <C-f> coc#float#has_scroll() ? "\<c-r>=coc#float#scroll(1)\<cr>" : "\<Right>"
  inoremap <silent><nowait><expr> <C-b> coc#float#has_scroll() ? "\<c-r>=coc#float#scroll(0)\<cr>" : "\<Left>"
  vnoremap <silent><nowait><expr> <C-f> coc#float#has_scroll() ? coc#float#scroll(1) : "\<C-f>"
  vnoremap <silent><nowait><expr> <C-b> coc#float#has_scroll() ? coc#float#scroll(0) : "\<C-b>"
endif

" Use CTRL-S for selections ranges.
" Requires 'textDocument/selectionRange' support of language server.
nmap <silent> <C-s> <Plug>(coc-range-select)
xmap <silent> <C-s> <Plug>(coc-range-select)

" Add `:Format` command to format current buffer.
command! -nargs=0 Format :call CocAction('format')

" Add `:Fold` command to fold current buffer.
command! -nargs=? Fold :call     CocAction('fold', <f-args>)

" Add `:OR` command for organize imports of the current buffer.
command! -nargs=0 OR   :call     CocAction('runCommand', 'editor.action.organizeImport')

" Add (Neo)Vim's native statusline support.
" NOTE: Please see `:h coc-status` for integrations with external plugins that
" provide custom statusline: lightline.vim, vim-airline.
set statusline^=%{coc#status()}%{get(b:,'coc_current_function','')}

" Mappings for CoCList
" Show all diagnostics.
nnoremap <silent><nowait> <space>a  :<C-u>CocList diagnostics<cr>
" Manage extensions.
nnoremap <silent><nowait> <space>e  :<C-u>CocList extensions<cr>
" Show commands.
nnoremap <silent><nowait> <space>c  :<C-u>CocList commands<cr>
" Find symbol of current document.
nnoremap <silent><nowait> <space>o  :<C-u>CocList outline<cr>
" Search workspace symbols.
nnoremap <silent><nowait> <space>s  :<C-u>CocList -I symbols<cr>
" Do default action for next item.
nnoremap <silent><nowait> <space>j  :<C-u>CocNext<CR>
" Do default action for previous item.
nnoremap <silent><nowait> <space>k  :<C-u>CocPrev<CR>
" Resume latest coc list.
nnoremap <silent><nowait> <space>p :<C-u>CocListResume<CR>- coc.nvim 插件体系介绍
- CocList 入坑指南
- Create coc.nvim extension to improve Vim experience
- How to write a coc.nvim extension (and why)
Try these steps when you have problem with coc.nvim.
- Make sure your Vim version >= 8.0 by command
:version. - If service failed to start, use command
:CocInfoor:checkhealthon Neovim. - Checkout the log of coc.nvim by command
:CocOpenLog. - When you have issues with the language server, it's recommended to checkout the output.
- If you think Coc is useful, consider giving it a star.
- If you have a question, ask on gitter
- 中文用户请到 中文 gitter 讨论
- If something is not working, create an issue.
Become a backer and get your image on our README on Github with a link to your site.

MIT
Dracula for Vim
A dark theme for Vim.

Screenshot taken with the pangloss/vim-javascript syntax plugin for javascript.
All instructions can be found at draculatheme.com/vim.
This theme is maintained by the following person(s) and a bunch of awesome contributors.
 |
 |
|---|---|
| Derek S. | David Knoble |
A programming font, designed with functionality in mind, and with some wibbly-wobbly handwriting-like fuzziness that makes it unassumingly cool. Download or see installation instructions.

Previously known as Cosmic Sans Neue Mono. It appeared that similar names were already in use for other fonts, and that people tended to extend their instinctive hatred of Comic Sans to this very font of mine (which of course can only be loved). Why the previous name? Here is my original explanation:
The name comes from my realization that at some point it looked like the mutant child of Comic Sans and Helvetica Neue. Hopefully it is not the case any more.
Inspirational sources include Inconsolata and Monaco. I have also been using Consolas a lot in my programming life, so it may have some points in common.


The font includes a bold version, with the same metrics as the regular one. Both versions include the same ranges of characters : latin letters, some accented glyphs (quite a lot), some greek letters, some arrows.
Please note that I have not tested all of the glyphs I have drawn (some letters have those two layers of crazy accents that I have never witnessed before), so it might look bad in some cases. Please report these problems: see next section.
It also features a good italic version, which I designed in a fashion similar to Consolas' italic version, with new glyph designs, not just an added slant.

No distractive lovely loop.
Get the pre-activated version here
or see the issue #67
for techniques to activate the stylistic set.

Created by Jany Belluz <jany.belluz AT hotmail.fr>
Licensed under the SIL Open Font License (see LICENSE.txt).
Please send me an e-mail or report an issue on Github if you stumble upon bad design or rendering problems (with screen shot if possible), or if you need more characters, or if you want to compliment me (I love compliments).
You can download the latest version
and install it by hand. In the NoLoopK variant, the looped lowercase k is
replaced with a straight version. The LargeLineHeight variant is especially
useful for users of accented capitals. For more info, see the CHANGELOG.
Automatic installation on macOS with homebrew:
brew tap homebrew/cask-fonts #You only need to do this once for cask-fonts
brew install --cask font-fantasque-sans-mono
Instructions for other platforms might follow.
The build process requires:
- FontForge with python scripting support,
ttfautohintsfnt2woff(from thewoff-toolspackage on Ubuntu)woff2_compressfrom the Google WOFF2 tools orwoff2package on Ubuntu
Run make. You should see green stuff and some "OK" messages.
If you are using Ubuntu, please note that the FontForge version
in the default Ubuntu repositories is much outdated at the time of this writing,
and that is known to have caused subtle problems.
You are advised to install FontForge from
this PPA
(using sudo add-apt-repository ppa:fontforge/fontforge prior to the installation).
Alternatively, you can always download
the latest prebuilt release of these fonts.
make install will install the TTF fonts into your local .fonts/ directory
and update the font cache. It comes in handy while modifying the font.
Alternatively, if you'd like to build Fantasque without installing required
dependencies, a Dockerfile is provided. Run the following command, and the
fonts will be built to the ./Variants directory.
docker build -t fantasque .
docker run -v "$(pwd)/Variants:/fantasque/Variants" fantasque
Each variant has a Webfonts/ folder which contains various font formats for
use on the web, along with the matching CSS font declarations. To use them,
you must combine in the same folder:
- a custom
.cssfile that you can assemble from the*-decl.cssfragments (you can only pick the styles that you need, e.g. normal and bold) - the matching
.svg,.woff,.woff2files fromWebfonts/ - the matching
.ttffiles from theTTF/folder - the matching
.otffiles from theOTF/folder.
The NERDTree is a file system explorer for the Vim editor. Using this plugin, users can visually browse complex directory hierarchies, quickly open files for reading or editing, and perform basic file system operations.

Use your favorite plugin manager to install this plugin. tpope/vim-pathogen, VundleVim/Vundle.vim, junegunn/vim-plug, and Shougo/dein.vim are some of the more popular ones. A lengthy discussion of these and other managers can be found on vi.stackexchange.com. Basic instructions are provided below, but please be sure to read, understand, and follow all the safety rules that come with your power tools plugin manager.
If you have no favorite, or want to manage your plugins without 3rd-party dependencies, consider using Vim 8+ packages, as described in Greg Hurrell's excellent Youtube video: Vim screencast #75: Plugin managers.
Pathogen
Pathogen is more of a runtime path manager than a plugin manager. You must clone the plugins' repositories yourself to a specific location, and Pathogen makes sure they are available in Vim.- In the terminal,
git clone https://github.com/preservim/nerdtree.git ~/.vim/bundle/nerdtree - In your
vimrc,call pathogen#infect() syntax on filetype plugin indent on
- Restart Vim, and run
:helptags ~/.vim/bundle/nerdtree/doc/or:Helptags.
Vundle
- Install Vundle, according to its instructions.
- Add the following text to your
vimrc.call vundle#begin() Plugin 'preservim/nerdtree' call vundle#end()
- Restart Vim, and run the
:PluginInstallstatement to install your plugins.
Vim-Plug
- Install Vim-Plug, according to its instructions.
- Add the following text to your
vimrc.
call plug#begin()
  Plug 'preservim/nerdtree'
call plug#end()- Restart Vim, and run the
:PlugInstallstatement to install your plugins.
Dein
- Install Dein, according to its instructions.
- Add the following text to your
vimrc.call dein#begin() call dein#add('preservim/nerdtree') call dein#end()
- Restart Vim, and run the
:call dein#install()statement to install your plugins.
Vim 8+ packages
If you are using Vim version 8 or higher you can use its built-in package management; see :help packages for more information. Just run these commands in your terminal:
git clone https://github.com/preservim/nerdtree.git ~/.vim/pack/vendor/start/nerdtree
vim -u NONE -c "helptags ~/.vim/pack/vendor/start/nerdtree/doc" -c qAfter installing NERDTree, the best way to learn it is to turn on the Quick Help. Open NERDTree with the :NERDTree command, and press ? to turn on the Quick Help, which will show you all the mappings and commands available in the NERDTree. Of course, your most complete source of information is the documentation: :help NERDTree.
NERDTree can be extended with custom mappings and functions using its built-in API. The details of this API and are described in the included documentation. Several plugins have been written, and are available on Github for installation like any other plugin. The plugins in this list are maintained (or not) by their respective owners, and certain combinations may be incompatible.
- Xuyuanp/nerdtree-git-plugin: Shows Git status flags for files and folders in NERDTree.
- ryanoasis/vim-devicons: Adds filetype-specific icons to NERDTree files and folders,
- tiagofumo/vim-nerdtree-syntax-highlight: Adds syntax highlighting to NERDTree based on filetype.
- scrooloose/nerdtree-project-plugin: Saves and restores the state of the NERDTree between sessions.
- PhilRunninger/nerdtree-buffer-ops: 1) Highlights open files in a different color. 2) Closes a buffer directly from NERDTree.
- PhilRunninger/nerdtree-visual-selection: Enables NERDTree to open, delete, move, or copy multiple Visually-selected files at once.
If any others should be listed, mention them in an issue or pull request.
In the answers to these questions, you will see code blocks that you can put in your vimrc file.
NERDTree doesn't create any shortcuts outside of the NERDTree window, so as not to overwrite any of your other shortcuts. Use the nnoremap command in your vimrc. You, of course, have many keys and NERDTree commands to choose from. Here are but a few examples.
nnoremap <leader>n :NERDTreeFocus<CR>
nnoremap <C-n> :NERDTree<CR>
nnoremap <C-t> :NERDTreeToggle<CR>
nnoremap <C-f> :NERDTreeFind<CR>Each code block below is slightly different, as described in the " Comment lines.
" Start NERDTree and leave the cursor in it.
autocmd VimEnter * NERDTree
" Start NERDTree and put the cursor back in the other window.
autocmd VimEnter * NERDTree | wincmd p" Start NERDTree when Vim is started without file arguments.
autocmd StdinReadPre * let s:std_in=1
autocmd VimEnter * if argc() == 0 && !exists('s:std_in') | NERDTree | endif" Start NERDTree. If a file is specified, move the cursor to its window.
autocmd StdinReadPre * let s:std_in=1
autocmd VimEnter * NERDTree | if argc() > 0 || exists("s:std_in") | wincmd p | endif" Start NERDTree, unless a file or session is specified, eg. vim -S session_file.vim.
autocmd StdinReadPre * let s:std_in=1
autocmd VimEnter * if argc() == 0 && !exists('s:std_in') && v:this_session == '' | NERDTree | endif" Start NERDTree when Vim starts with a directory argument.
autocmd StdinReadPre * let s:std_in=1
autocmd VimEnter * if argc() == 1 && isdirectory(argv()[0]) && !exists('s:std_in') |
\ execute 'NERDTree' argv()[0] | wincmd p | enew | execute 'cd '.argv()[0] | endif" Exit Vim if NERDTree is the only window left.
autocmd BufEnter * if tabpagenr('$') == 1 && winnr('$') == 1 && exists('b:NERDTree') && b:NERDTree.isTabTree() |
\ quit | endif" If another buffer tries to replace NERDTree, put it in the other window, and bring back NERDTree.
autocmd BufEnter * if bufname('#') =~ 'NERD_tree_\d\+' && bufname('%') !~ 'NERD_tree_\d\+' && winnr('$') > 1 |
\ let buf=bufnr() | buffer# | execute "normal! \<C-W>w" | execute 'buffer'.buf | endif" Open the existing NERDTree on each new tab.
autocmd BufWinEnter * silent NERDTreeMirroror change your NERDTree-launching shortcut key like so:
" Mirror the NERDTree before showing it. This makes it the same on all tabs.
nnoremap <C-n> :NERDTreeMirror<CR>:NERDTreeFocus<CR>let g:NERDTreeDirArrowExpandable = '▸'
let g:NERDTreeDirArrowCollapsible = '▾'The preceding values are the non-Windows default arrow symbols. Setting these variables to empty strings will remove the arrows completely and shift the entire tree two character positions to the left. See :h NERDTreeDirArrowExpandable for more details.
![]()
![]()
Lean & mean status/tabline for vim that's light as air.

When the plugin is correctly loaded, there will be a nice statusline at the bottom of each vim window.
That line consists of several sections, each one displaying some piece of information. By default (without configuration) this line will look like this:
+-----------------------------------------------------------------------------+
|~                                                                            |
|~                                                                            |
|~                     VIM - Vi IMproved                                      |
|~                                                                            |
|~                       version 8.2                                          |
|~                    by Bram Moolenaar et al.                                |
|~           Vim is open source and freely distributable                      |
|~                                                                            |
|~           type :h :q<Enter>          to exit                               |
|~           type :help<Enter> or <F1>  for on-line help                      |
|~           type :help version8<Enter> for version info                      |
|~                                                                            |
|~                                                                            |
+-----------------------------------------------------------------------------+
| A | B |                     C                            X | Y | Z |  [...] |
+-----------------------------------------------------------------------------+
The statusline is the colored line at the bottom, which contains the sections (possibly in different colors):
| section | meaning (example) |
|---|---|
| A | displays the mode + additional flags like crypt/spell/paste (INSERT) |
| B | Environment status (VCS information - branch, hunk summary (master), battery level) |
| C | filename + read-only flag (~/.vim/vimrc RO) |
| X | filetype (vim) |
| Y | file encoding[fileformat] (utf-8[unix]) |
| Z | current position in the file |
| [...] | additional sections (warning/errors/statistics) from external plugins (e.g. YCM, syntastic, ...) |
The information in Section Z looks like this:
10% ☰ 10/100 ln : 20
This means:
10%     - 10 percent down the top of the file
☰ 10    - current line 10
/100 ln - of 100 lines
: 20    - current column 20
For a better look, those sections can be colored differently, depending on various conditions (e.g. the mode or whether the current file is 'modified')
- Tiny core written with extensibility in mind (open/closed principle).
- Integrates with a variety of plugins, including: vim-bufferline, fugitive, unite, ctrlp, minibufexpl, gundo, undotree, nerdtree, tagbar, vim-gitgutter, vim-signify, quickfixsigns, syntastic, eclim, lawrencium, virtualenv, tmuxline, taboo.vim, ctrlspace, vim-bufmru, vimagit, denite, vim.battery and more.
- Looks good with regular fonts and provides configuration points so you can use unicode or powerline symbols.
- Optimized for speed - loads in under a millisecond.
- Extensive suite of themes for popular color schemes including solarized (dark and light), tomorrow (all variants), base16 (all variants), molokai, jellybeans and others. Note these are now external to this plugin. More details can be found in the themes repository.
- Supports 7.2 as the minimum Vim version.
- The master branch tries to be as stable as possible, and new features are merged in only after they have gone through a full regression test.
- Unit testing suite.
If you don't like the defaults, you can replace all sections with standard statusline syntax. Give your statusline that you've built over the years a face lift.

Themes have moved to another repository as of this commit.
Install the themes as you would this plugin (Vundle example):
Plugin 'vim-airline/vim-airline'
Plugin 'vim-airline/vim-airline-themes'
See vim-airline-themes for more.
Sections and parts within sections can be configured to automatically hide when the window size shrinks.

Automatically displays all buffers when there's only one tab open.

This is disabled by default; add the following to your vimrc to enable the extension:
let g:airline#extensions#tabline#enabled = 1
Separators can be configured independently for the tabline, so here is how you can define "straight" tabs:
let g:airline#extensions#tabline#left_sep = ' '
let g:airline#extensions#tabline#left_alt_sep = '|'
In addition, you can also choose which path formatter airline uses. This affects how file paths are
displayed in each individual tab as well as the current buffer indicator in the upper right.
To do so, set the formatter field with:
let g:airline#extensions#tabline#formatter = 'default'
Here is a complete list of formatters with screenshots:


vim-airline integrates with a variety of plugins out of the box. These extensions will be lazily loaded if and only if you have the other plugins installed (and of course you can turn them off).


hunks (vim-gitgutter & vim-signify & coc-git)


vim-airline also supplies some supplementary stand-alone extensions. In addition to the tabline extension mentioned earlier, there is also:

The statusline can alternatively be drawn on top, making room for other plugins to use the statusline:
The example shows a custom statusline setting, that imitates Vims default statusline, while allowing
to call custom functions. Use :let g:airline_statusline_ontop=1 to enable it.

Every section is composed of parts, and you can reorder and reconfigure them at will.

Sections can contain accents, which allows for very granular control of visuals (see configuration here).

Completely transform the statusline to your liking. Build out the statusline as you see fit by extracting colors from the current colorscheme's highlight groups.

There's already powerline, why yet another statusline?
- 100% vimscript; no python needed.
What about vim-powerline?
- vim-powerline has been deprecated in favor of the newer, unifying powerline, which is under active development; the new version is written in python at the core and exposes various bindings such that it can style statuslines not only in vim, but also tmux, bash, zsh, and others.
I wrote the initial version on an airplane, and since it's light as air it turned out to be a good name. Thanks for flying vim!
This plugin follows the standard runtime path structure, and as such it can be installed with a variety of plugin managers:
| Plugin Manager | Install with... |
|---|---|
| Pathogen | git clone https://github.com/vim-airline/vim-airline ~/.vim/bundle/vim-airlineRemember to run :Helptags to generate help tags |
| NeoBundle | NeoBundle 'vim-airline/vim-airline' |
| Vundle | Plugin 'vim-airline/vim-airline' |
| Plug | Plug 'vim-airline/vim-airline' |
| VAM | call vam#ActivateAddons([ 'vim-airline' ]) |
| Dein | call dein#add('vim-airline/vim-airline') |
| minpac | call minpac#add('vim-airline/vim-airline') |
| pack feature (native Vim 8 package feature) | git clone https://github.com/vim-airline/vim-airline ~/.vim/pack/dist/start/vim-airlineRemember to run :helptags ~/.vim/pack/dist/start/vim-airline/doc to generate help tags |
| manual | copy all of the files into your ~/.vim directory |
:help airline
For the nice looking powerline symbols to appear, you will need to install a patched font. Instructions can be found in the official powerline documentation. Prepatched fonts can be found in the powerline-fonts repository.
Finally, you can add the convenience variable let g:airline_powerline_fonts = 1 to your vimrc which will automatically populate the g:airline_symbols dictionary with the powerline symbols.
Solutions to common problems can be found in the Wiki.
Whoa! Everything got slow all of a sudden...
vim-airline strives to make it easy to use out of the box, which means that by default it will look for all compatible plugins that you have installed and enable the relevant extension.
Many optimizations have been made such that the majority of users will not see any performance degradation, but it can still happen. For example, users who routinely open very large files may want to disable the tagbar extension, as it can be very expensive to scan for the name of the current function.
The minivimrc project has some helper mappings to troubleshoot performance related issues.
If you don't want all the bells and whistles enabled by default, you can define a value for g:airline_extensions. When this variable is defined, only the extensions listed will be loaded; an empty array would effectively disable all extensions (e.g. :let g:airline_extensions = []).
Also, you can enable caching of the various syntax highlighting groups. This will try to prevent some of the more expensive :hi calls in Vim, which seem to be expensive in the Vim core at the expense of possibly not being one hundred percent correct all the time (especially if you often change highlighting groups yourself using :hi commands). To set this up do :let g:airline_highlighting_cache = 1. A :AirlineRefresh will however clear the cache.
In addition you might want to check out the dark_minimal theme, which does not change highlighting groups once they are defined. Also please check the FAQ for more information on how to diagnose and fix the problem.
A full list of screenshots for various themes can be found in the Wiki.
The project is currently being maintained by Christian Brabandt and Bailey Ling.
If you are interested in becoming a maintainer (we always welcome more maintainers), please go here.
MIT License. Copyright (c) 2013-2021 Bailey Ling & Contributors.
This file contains additional syntax highlighting that I use for C++11/14/17 development in Vim. Compared to the standard syntax highlighting for C++ it adds highlighting of (user defined) functions and the containers and types in the standard library / boost.
Development is done at: http://github.com/octol/vim-cpp-enhanced-highlight
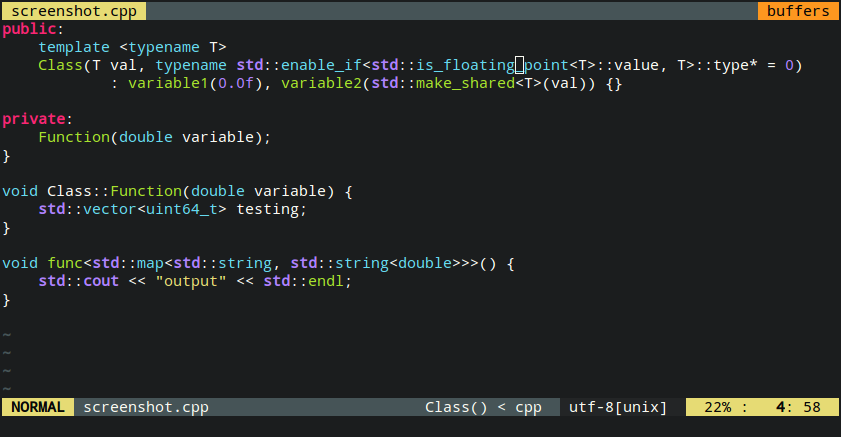
Highlighting of class scope is disabled by default. To enable set
let g:cpp_class_scope_highlight = 1Highlighting of member variables is disabled by default. To enable set
let g:cpp_member_variable_highlight = 1Highlighting of class names in declarations is disabled by default. To enable set
let g:cpp_class_decl_highlight = 1Highlighting of POSIX functions is disabled by default. To enable set
let g:cpp_posix_standard = 1There are two ways to highlight template functions. Either
let g:cpp_experimental_simple_template_highlight = 1which works in most cases, but can be a little slow on large files. Alternatively set
let g:cpp_experimental_template_highlight = 1which is a faster implementation but has some corner cases where it doesn't work.
Note: C++ template syntax is notoriously difficult to parse, so don't expect this feature to be perfect.
Highlighting of library concepts is enabled by
let g:cpp_concepts_highlight = 1This will highlight the keywords concept and requires as well as all named
requirements (like DefaultConstructible) in the standard library.
Highlighting of user defined functions can be disabled by
let g:cpp_no_function_highlight = 1Follow one of the sets of directions below and reload vim afterwards.
Install using vundle by adding
Plugin 'octol/vim-cpp-enhanced-highlight'to .vimrc and run :PluginInstall.
If you have pathogen installed, and you prefer to use git submodules, run
cd ~/.vim
git submodule add https://github.com/octol/vim-cpp-enhanced-highlight.git bundle/syntax/If you don't have either Vundle or Pathogen installed, copy the cpp.vim file (optionally also c.vim) to .vim/after/syntax.
git clone https://github.com/octol/vim-cpp-enhanced-highlight.git /tmp/vim-cpp-enhanced-highlight
mkdir -p ~/.vim/after/syntax/
mv /tmp/vim-cpp-enhanced-highlight/after/syntax/cpp.vim ~/.vim/after/syntax/cpp.vim
rm -rf /tmp/vim-cpp-enhanced-highlightVim tend to a have issues with flagging braces as errors, see for example vim-jp/vim-cpp#16. A workaround is to set
let c_no_curly_error=1- http://stackoverflow.com/questions/736701/class-function-names-highlighting-in-vim
- http://www.vim.org/scripts/script.php?script_id=4293
- http://www.vim.org/scripts/script.php?script_id=2224
- http://www.vim.org/scripts/script.php?script_id=1640
- http://www.vim.org/scripts/script.php?script_id=3064
Jon Haggblad jon@haeggblad.com
Last update: 19 October 2016