This is My eVic VTC Mini.
- eVic VTC Mini
- eVic VTC Dual
- eVic VTwo Mini
- eVic VTwo
- eVic AIO
- eVic Basic
- eGrip II
- Cuboid
- Cuboid Mini
- Wismec Presa 75W
- Wismec Releaux RX75
Original VTC Mini 3.03 firmware
The look-and-feel of the myevic firmware is more-or-less identical to the original firmware, so you shouldn't be lost.
Many new features and options are made available through the menu system; I strongly encourage you to fully read the present documentation.
The binary firmware file is included in the bin/ subdirectory of the project.
If you are only interested in installing and using the firmware, download it here : bin/myevic
Once you've downloaded the firmware binary, you may:
- Use the manufacturer's firmware updater to upload myevic.bin like you would with a usual firmware update from Joyetech or Wismec:
- Download the firmware updater package from the manufacturer Wismec or Joyetech, depending of the brand and model of your box. Be sure to pick the right software for the right box brand and model.
- Unzip the update package and launch the UpdateFirmware.exe (Joyetech) or UpdateWismec.exe (Wismec) found in the package.
- Plug your box into your PC via USB
Be sure you use a data-capable USB cable. Some cheap cables coming with some boxes only ensures box charging. If unsure, use the cable that came with your box. Once done, the updater window should show the model and version of your box. - Click the "Update" button; a file selection dialog will open. Select the "myevic.bin" file.
- Wait for the update process to complete.
If something goes wrong, retry to update. Update fails sometimes; this shouldn't be a concern. - Enjoy.
OR
-
For linux/Cygwin users, use evic-usb to upload myevic.bin to your box, using command line:
evic-usb upload myevic.bin
OR
- Use NFirmwareEditor or FWUpdater to upload myevic.bin to your box.
* ReservedField
* Bane
* TBXin
* maelstrom2001
* Daveee10
* Eugene San
* MarkyAD
Some changes has been made to the overall behavior of the firmware from the original. This paragraph may be read by any new user not to think something is a "bug".
-
Stealth mode:
The stealth mode has been extended to some more screens.
The battery charging screen does no longer show up in stealth mode; only for a few seconds when plugging in the USB cable, just to show it's been correctly plugged.
The Key Lock/UnLock screen reverts to black screen if keys are locked.
The Stealth On/Off screen goes to black when setting stealth On. -
Right (+) and Left (-) buttons:
While editing some values, the speed of change has been made more progressive before reaching the insane terminal velocity.
Pressing those buttons does no longer wake up the box from screen saving, except if configured to do so in the Interface menu (see below). This makes the box more pocket-proof. -
Temperature setting in TEMP mode:
The temperature no longer wraps-around by switching between °C and °F; the temperature unit has to be chosen once and for all in the Interface menu. Default is °C.
The temperature setting vary by +/1 °C or +/-5 °F when edited. -
Fire button Multi-Clicks:
Clicking rapidly 2, 3 or 4 times on the fire button may now have some effect - see below in the Interface menu description to see those effects and how to set (or unset) them up.
Clicking 10 times for board temperature, or 20 times for version screen does no longer require to switch off the box. -
Coils memory:
In POWER mode, the box now reminds of the power setting for any given resistance, up to 10 different (just like in SMART mode). Thus, when swapping between your tanks, the box will automatically set up the power setting you previously entered for that particular coil.
Coils may vary by +/-10% in resistance to still be recognized, and two different coils within 10% won't be distinguished. The coils memory can be erased in the Coils >> Manage >> Zero All menu item (see below). -
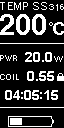
SS316 Temperature Control:
TCR value of TEMP SS mode has been changed. This may mess up your usual temperature setting while vaping on SS316 coils. See at the end of this document for more information. -
Menus:
Menus accessed by pressing Fire and Right button have been completely revamped. See below for new menus description.
-
Double-click:
A double fire click switches between standard view and clock screen.
The clock screen is close to the one viewed on the VTwo box; just better, imo.
See below the Clock menu to know how to configure clock. -
Third info line:
The third info line of the main screen, used to display amps, puffs or time counters now have a few more options:
-
Atomizer voltage
-
Board temperature
-
Real-time clock
-
Real-time atomizer resistance
-
Estimate of vape velocity in ml/day (experimental)
-

###Menus: Holding fire and right button a few seconds enters menus. There's many more to LOGO and Game menus now. See below.
- At any time, you may press simultaneously fire and right button to get out of the menus and return to the main screen.
- When navigating in sub-menus, you may press simultaneously left and right buttons to return to the parent (upper level) menu.
-
Screen
Screen management menu:
-
Contrast:
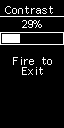 Default VTC contrast is around 17%. This screen gives you access to the full contrast range of the display. -
Protection:
 Configure main screen dim timeout and screen saver timing. After the time setup with the "Main" option, (default 30 seconds) of inactivity, the main screen switches to the screen saver animation (see below) for the duration configured with the "Saver" option, after what the box shuts down. If the "Saver" item is set to "Off", the box will dim after "Main" second, then switch to a black screen for 3 minutes before being shut down. -
Saver:
 Select the screen saver animation. You may choose between None (blank screen), an analog clock or a 3D spinning cube. More to come. Content of this menu will vary from time to time; this document may not always be up to date. Have a look. -
Invert
Toggle display mode between white on black and black on white. -
Miscs
Sub-menu-
LOGO
Guenuine menu -
Game
Flappy bird. Guenuine menu. -
3D
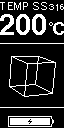 Cool 3D spinning cube. Come back to this menu and set it to "None" to cancel animation. Or reset the box.
-
-

-
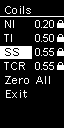
Coils
-
Management:
-
On each line of the four TC modes:
 Click fire to toggle edit mode on the resistance.
 While the resistance value is highlighted, click (+) and (-) to edit its value.
 If you click fire again without editing the resistance value, this will toggle its locked/unlocked status.
 Editing the resistance to any non-zero value automaticaly locks it.
 Setting the resistance to zero with (-) will unlock and reset it.

 You may also fire two seconds on one of the four resistances to reset its value; if the selected resistance corresponds to the current vaping mode, this will force an immediate reading of the atomizer, setting and lock of the new value.

 When entering the Coils Management menu, the resistance corresponfing to the current vaping mode (if applicable) will be pre-selected.
* Zero All: Zeroes all resistances; also zeroes all "SMART" and "POWER" modes saved resistance settings.-
TCR Set:
Enters the TCR Set menu. This is a guenuine menu from the original firmware and is described in your box's manual. This menu can also be accessed by switching off the box and pressing both Fire and Right regulatory button for 5 seconds.
-
-
Vaping
-
Preheat:
Coil preheat function. Set at wich power and how long you want the coil to be preheated when you fire; after this delay, the atomizer will be powered by your regular setting. Set the delay to zero to switch preheating off. A small "P" icon will appear on the main screen next the the power setting to remind you the preheat function is enabled ("POWER" mode only). This function can only be active in "POWER" and "SMART" modes; it is ignored in all other modes.
-
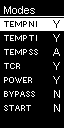
Modes
Configure used/useless modes.
Click on each menu item to set 'Y' or 'N' if you want to see any given mode proposed while cycling between modes in menu mode.
Typically, you'll set "SMART" mode to 'N'. Typically. -
Protec.
Set the long fire protection time. Default and Max is 10.0s.
Admissible values are 2.0s to 10.0s.
-

-
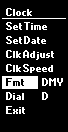
Clock
-
Set Date/Time
Setup date and time. Fire change edited field, + and - set value, and long click on fire saves the setting. Since you need to click 2 seconds on the fire button to save, setup the time 2 seconds in advance if you want to achieve best accuracy. I know... There is some other ways to setup time: * use the ```evic-usb time``` command, if you installed the [python-evic](https://github.com/ClockSelect/python-evic "python-evic") command-line utility; * use the Configuration Editor of the [NFirmwareEditor 5.0](https://github.com/TBXin/NFirmwareEditor/releases); open the Configuration Editor and click "Upload settings" to upload the current time. * MicroSur's [FWUpdater](https://www.dropbox.com/s/ze0z9isrmaegva4/FWUpdater.zip?dl=1) also as a "Set current time" function. Joyetech's official firmware updater also sets date & time when uploading a firmware. -
Fmt (date format)
Toggle date display format between day/month/year (default, logical, universal) format and month/day/year (US) format. -
Dial
Change the format of the clock display between a hand dial clock (A) and a digital clock with date and time (D). This will change the clock display on the main screen as well as on the screen saver, if the clock is chosen as screen saver. -
Clk Adjust
Adjust clock: for small adjustments to clock time + and - adjust clock by seconds. Fire to save. For VTwo owners, this option also adjusts the X32 frequency accordingly if done properly. -
Clk Speed
For owners of VTC-Mini (useless for VTwo owners).
*This setting is only usefull if you have set the Light Sleep mode "OFF" in the Expert menu. See below the "LSL" setting in the Expert menu description. As long as the Light Sleep mode is "ON" (default setting), there is no real need to adjust the Clock Speed Ratio.*
The VTC mini does not have the needed 32kHz crystal soldered on the pcb to regulate the clock speed; so, another time source is used to drive the clock. Since its frequency is quite different, a clock speed ratio is needed to regulate the clock. As long as the box is awake (you're using it), the clock is regulated by the external 12.000MHz crystal, which is an accurate time source. Problem arises when the box enters sleep mode, since the crystal is switched off and the only clock source is the somewhat unreliable 10kHz internal oscillator of the processor. Clock drift mostly occurs when the box is switched off or sleeping.

The procedure to adjust the clock speed ratio is as follow:
* First, setup time accurately via the date/time menu or the "```evic-usb time```" command line.
* Let the box enter sleep mode (leave it alone or switch it off) for several hours. I suggest you're doing this before sleeping yourself.
* Awake the box and go into the "Clk Speed" menu; do not let the box enter sleep mode again in between, or you'll have to redo the whole thing.
* Using + and - buttons, adjust the time shown on top of the screen to catch up the real time. The number shown in the center of the screen is the clock speed ratio; reasonable values should be around 32~34000.
* Once you have adjusted the time to the real time, click fire to save the new clock speed ratio. Your clock should now be as accurate as it can. If not, try to repeat the procedure. Accuracy of a few seconds per day can be achieved this way.
-
-
Interface
-
BatV% Off / % / V
Display battery charge percentage or voltage next to the battery picture on main screen. -
1Watt On/Off
Enable increment of power setting by plus ±1.0 Watt instead of ±0.1 Watts. -
1C5F On/Off
Enable increment of temperature setting by ±1°C and ±5°F instead of ±5°C and ±10°F -
Logo On/Off
Enable/Disable custom logo display -
Wake < > On/Off
Enable/Disable box wake up from sleep mode when pressing the + or - button. -
Font A/B
Change the display font. The font A is the new bold cool-looking font, font B is the guenuine Joyetech's font. -
Temp °C/°F
Choose once and for all your temperature unit, between °C and °F. Nobody needs to switch back and forth between standards. Moreover, Farenheit is not even a standard. Maybe I'll replace it by Kelvins one day. Changing temperature unit by wrapping around the temperature has been disabled. -
PPwr On/Off
*TEMP Mode Only* Toggle Priority Power mode On/Off. In temperature control modes, this switches the power and the temperature display; the power is displayed at top of screen and is directly editable by the + and - keys just like in Power mode, and the temperature is displayed on the first of the 3 informations lines in the center of the screen. Temperature remains editable in Edit mode. The purpose of this function is near the preheat function in PWR mode; once you have set your correct vape temperature (not burning your dry cotton), your comfort come from the heat rise speed. This feature let you adjust this parameter more easily. -
Clicks
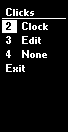 The Clicks submenu allows you to configure the action associated to a Fire button multi-clic. Configurable multi-clicks are double, triple and quadruple clicks. Possible actions are: * Nothing * Enter edit mode * Toggle display of info lines / clock on the main display * Toggle the "Priority Power" mode (basically, switches temperature and power on the main screen display in TC mode, see above "PPwr On/Off" doc) * Switch to next vaping mode ( TC -> POWER -> BYPASS -> ... ) * Switch box On or Off As a security feature, if none of the action are configured to be the "Edit" mode, the firmware will redefine the triple click action to "Edit" at next reset.
-

-
Expert
Some advanced options.
Normal users should barely have anything to do with those options, and can live perfectly well without ever knowing they exist. I do not recommend "testing" those options just to "see what it does". Deny responsability of everything etc. You're supposed to have 18+, after all^^-
USB:
Choose between several USB modes:-
HID: Normal operation mode - factory setting. Disables any other USB device than HID. HID is always active, even in the two others modes of operation. This feature permits communication between the box and firmware utilities.
-
COM: A virtual COM interface; mainly used for debugging with a COM terminal such as putty. May be usefull if you are developping your own version of the firmware.
-
DSK: A virtual drive to download the firmware file. Connect the box to a PC, and a disk device will appear with a "FIRMWARE.BIN" file. This can be read and copied. This file is an encoded firmware file that can be uploaded to another device using evic-usb or the official Joyetech firmware tool.
-
-
DBG
Enables or disables the debug informations mode. Once the DBG option is set to "ON", Debug informations can be shown/hidden by clicking fire button four times. This option is OFF by default to prevent users to inadvertendly mess up their screen. -
X32
Enables or disables usage of the X32 crystal of the PCB. If this setting is "OFF", the firmware won't try to drive the Real-Time Clock with the 32.768kHz crystal. This may solve freezing issues on some malfunctionning boxes (VTwo only). It may also diminish a bit startup time on non-X32 boxes (such as VTC). This setting will be active at next reset. -
LSL
Light Sleep mode. This setting is useless and forced to "OFF" on boxes with a X32 crystal (VTwo etc), and defaults to "ON" on other boxes. On boxes where the Real-Time Clock is emulated (like the VTC-Mini), by setting the Light Sleep mode "ON", the box continues to drive the Real-Time Clock with the external 12.000MHz Crystal instead of the internal LIRC oscillator when entering sleep mode. This makes the Clock far more accurate and eliminates the need for the Clock Speed ratio, at the cost of a greater battery consumption (estimated 60~100mAh/day). Using this setting, Clock accuracy is identical to those of real RTC boxes. -
NFE
*Warning: You can't use Joyetech's firmware updater while this option is "ON".* Enables or disables partial compatibility with the [NFirmwareEditor 5.0+](https://github.com/TBXin/NFirmwareEditor/releases) myEvic Configuration Editor. This option is disabled by default; set it to "ON" if you plan to use developpement features of the NFE. You'll have access to monitoring, screenshot, and COM terminal. -
BAT
Battery model. You can specify your battery brand and model among several ones: 25R, 30Q, HG2, HE4, VTC4 and VTC5. "GEN" is the generic battery used by default and should be used for any other model of battery. At the moment, this information is used by the firmware to compute a more accurate state-of-charge than the generic setting. -
SHR
Shunt Resistance (in mΩ). *Warning: This item is dangerous to your box. Messing with this parameter may cause overcurrent in the atomizer circuitry and lead to definitive box failure.* This item let you edit the value of the Atomizer's circuit shunt resistance. This resistance is involved in every resistance/current/power measures and computation in the whole firmware. This value should only be changed if you know exactly what you are doing. To reset the shunt value, select the SHR menu item and press the fire button during 2 seconds. This will revert the value to the default hardware setting. -
BVO
Battery Voltage Offset
Corrective offset value of the battery voltage. Depending on your box, the displayed battery voltage may be off by a few tens of millivolts. It's usually not a concern, but it may make the box locking the vape too early (wasting some battery capacity) or too late (box resets due to low voltage when firing).
Use an external accurate voltmeter (your battery charger may do the job) to compare the displayed voltage on the box to the actual battery voltage, then adjust the displayed voltage with this item.
Range is -50 to +50 milliVolts.
-
Follow [evic-sdk::Readme] (https://github.com/ReservedField/evic-sdk/blob/master/README.md) instructions to:
-
Setup the environment
-
Install python-evic
-
Install and unpack nuvoton-sdk with the following changes:
- Unpack into this project directory (evic-sdk itself is not required for this project)
- When unpacking nuSDK unpack only
Librarydirectory. For example unpackM451 Series BSP CMSIS V3.01.001/LibraryfromM451_Series_BSP_CMSIS_V3.01.001.ziptomyevic/nuvoton-sdk/Library
-
To build invoke:
EVICSDK=. make
-
Temperature Control on SS316
Temperature Control on SS316 is different in this firmware when compared to the original one. Depending on your setup, you might need to change you regular temperature setting. It's often better to use Temperature Control in TCR mode with SS316L, adapting the TCR/Temperature values to the build by a dry cotton test.
It's hard to find a consensusal value for the TCR of SS316L. Anything from 88 to 100 can be found depending on the source. The original value of 120 is obviously way too high. steam-engine.org gives a value of 87.9, which seems reliable, therefore the TCR for SS316 was selected as 88 instead of original 120.