!>This site is a general guide and ABSOLUTELY NOT an exhaustive, step-by-step tutorial. It is expected that anyone attempting has proficiency with the skills listed in the Recommendations page of this site.
Total estimated install time will be based on understanding and experience.
| Feature | Arduino Nano | STM32 Blackpill |
|---|---|---|
| Integrated Housing | ✔️ | ✔️ |
| Embedded UI | ✔️ | ✔️ |
| Brew/Steam control | ✔️ | ✔️ |
| Auto Shot Timer | ✔️ | ✔️ |
| Graphing | ✔️ | ✔️ |
| Settings persistence | ✔️ | ✔️ |
| Pre-infusion | ✔️ | ✔️ |
| Pressure profiling | ✔️ | ✔️ |
| Manual flow control | ✔️ | ✔️ |
| Descale program | ✔️ | ✔️ |
| Integrated scales | ✔️ | ✔️ |
| Advanced Flow control | ❌ | ✔️ |
| Stop on Weight/Dose | ❌ | ✔️ |
| Steam Boost | ❌ | ✔️ |
| Saving/Loading profiles | ❌ | ➕ |
| Web interface | ❌ | ➕ |
| OTA updates | ❌ | ➕ |
✔️ Complete ❌ Not available ➕ Planned
<iframe width="560" height="315" src="https://www.youtube.com/embed/MxPNQRCxQZc" title="YouTube video player" frameborder="0" allow="accelerometer; autoplay; clipboard-write; encrypted-media; gyroscope; picture-in-picture" allowfullscreen></iframe>MORE FROM THE COMMUNITY(Click to expand)
<iframe width="560" height="315" src="https://www.youtube.com/embed/hpxB1Q6AFkY" title="YouTube video player" frameborder="0" allow="accelerometer; autoplay; clipboard-write; encrypted-media; gyroscope; picture-in-picture" allowfullscreen></iframe>Usage (Click to expand)
- BOILER: Sets the desired temperature at the boiler level
- OFFSET: Sets the offset value used to calculate the real water temperature
- HPWR: Sets the relay start pulse length
- M.C.DIV: Sets the main cycle divider (aka non brew heating behaviour), used in conjunction with HPWR
- B.C.DIV: Sets the brew cycle divider
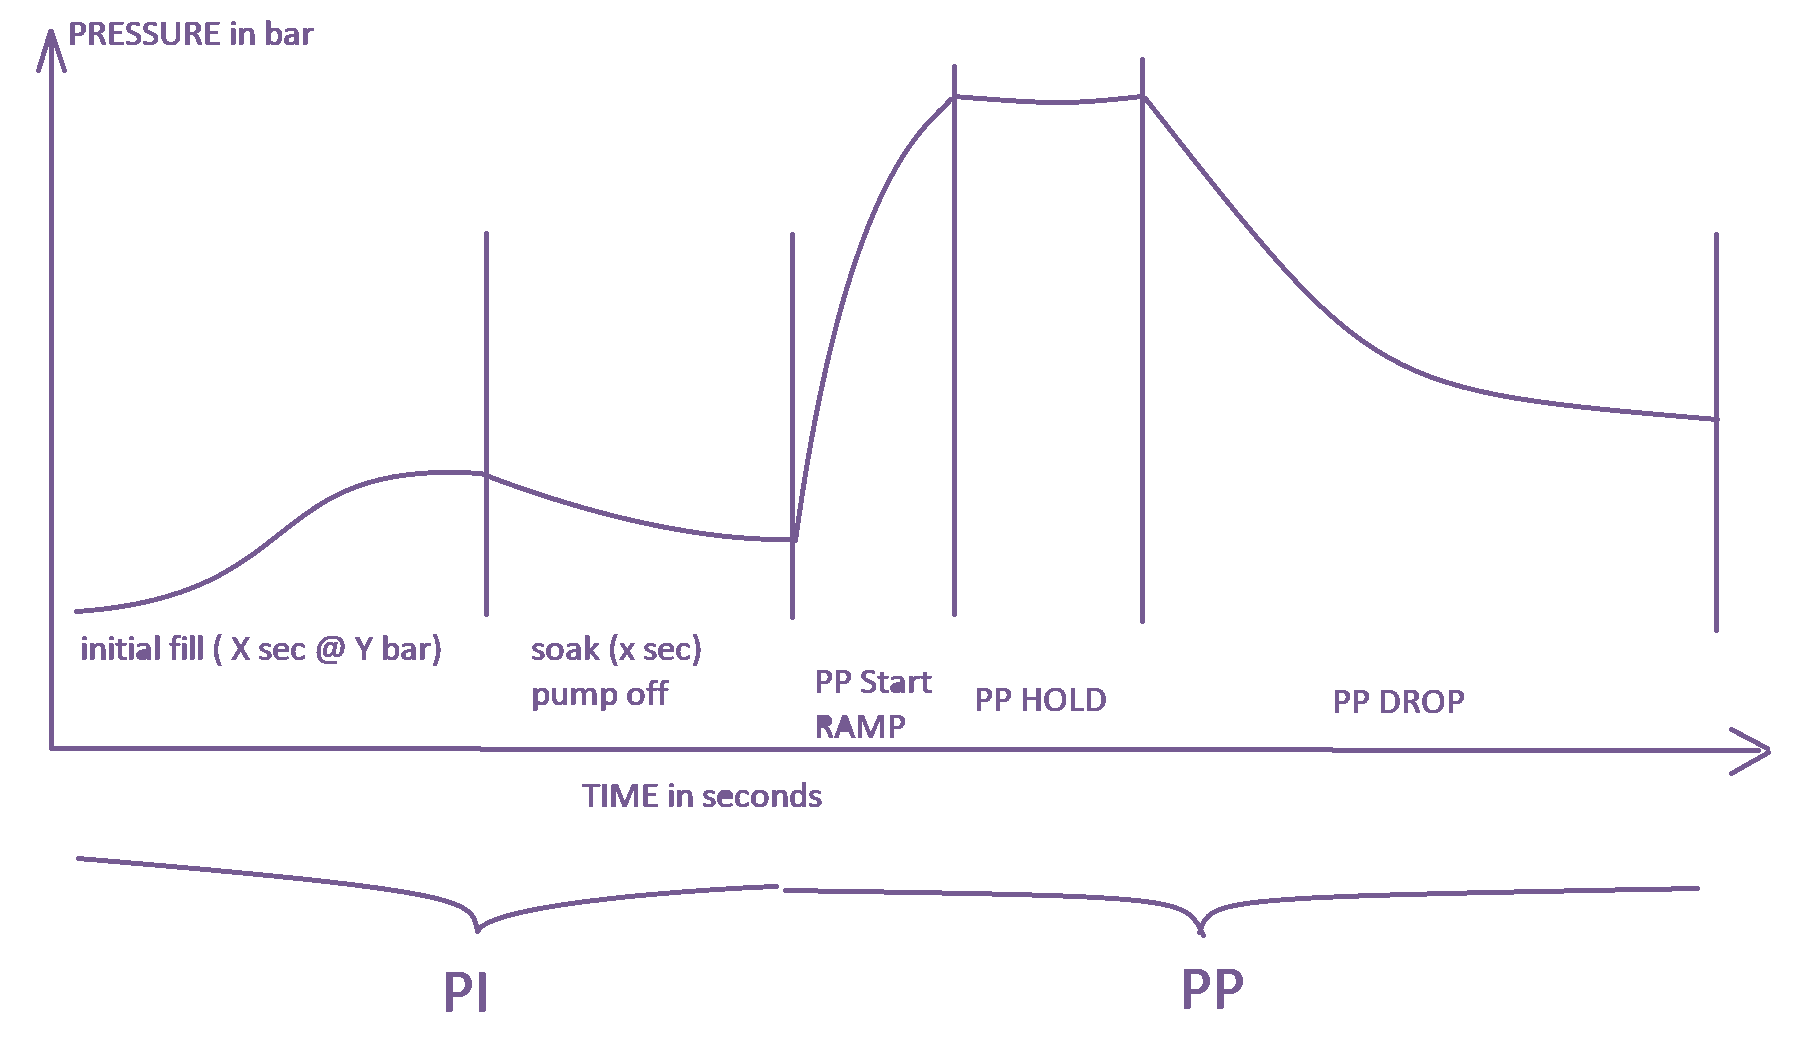
- Brew(Auto): All pressure settings are following the below:
- PREINFUSION: Enables pre-infusion
- Time: Sets the length of the PI phase
- Bar: Sets the max reachable pressure for the PI phase
- Soak: Sets the length of the soaking (blooming) phase
- P-PROFILING: Enables AUTO pressure profiling mode
- Start: Sets the desired starting point of the PP phase, can be High->Low or Low->High.
- Finish: Sets the desired finish point of the PP phase, same as above can be from High->Low or Low->High.
- Hold: Sets the length of the PP hold period, if it's desired to maintain the "Start" pressure for a period of time before the pressure drop/raise is applied this is where it's done.
- Length: Sets the length (AKA speed) of the PP drop/raise behaviour, so one can change the pressure slow or fast if desired.
- PREINFUSION: Enables pre-infusion
- Brew(Manual): Allows for manual pressure control at brew time.
- DESCALE: Enables the descaling program.
Descaling should be done with a blind basket portafilter locked in the group, steam valve slightly open for the water to flow in a separate reservoir and water tank fully loaded with water mixed with descale solution.
-
NANO Development
Arduino NANO based development has reached EOL, if its featureset is enough for your needs grab the code from release-nano-final
-
Pressure control
Pump actuation was switched from PWM to PSM and as a result, if PWM is preferred then
release-0.2.2is the one to stay on. Static pressure control is only possible by using PWM as a result if there are no pressure sensing devices installed it's advised to stay on PWM. -
ACS712
As of
release-0.2.3the hall effect sensor was deprecated due to its unstable work and configuration complexity. It is highly recommended to update to the optocoupler board that took its place as not doing that means being stuck onrelease-0.2.2feature set.
Initial (Click to expand)
-
Purchase the parts listed from Ali and expect a wait of 21 days.
Any parts purchased anywhere else are done so at your own risk (they've not been tested).
-
Connect test components described in the doc to Arduino.
Using the expansion board, twist the ends of cables and connect to the screw terminals. At this point using DuPont connections is fine but please note later we will solder to the boards or pins.
-
Flash Arduino and LCD with code.
-
Plug in and test.
Check for a temp reading. It will contain the default offset of 7 degrees which means the initial temp will be room temp -7.
Base (Click to expand)
- Plan out where the components will sit inside the machine to determine cable length
- Create piggyback cables. Determine what switch points to piggyback from.
- Wire in power delivery method - isolate the board using an enclosure or tape it up after wiring.
- If you have the eco timer, disable it.
- Swap out thermocouple - ease out the boiler (don't fully remove it) in order to gain more access.
- Install the max temp board - isolate the board using an enclosure or tape it up after wiring.
- Place and wire relay - attach the brew thermostat wires to the SSR relay and sit/attach the back plate or relay on the body of the machine, add some thermal paste
- Re-Wire the steam switch for steam handling - you need to swap the brew thermostat wires (above step) for the steam thermostat wires and bridge the brew thermostat wires together then take some wires from the steam switch to the Arduino.
- Wire brew switch for continuity
- Test.
Extended (Click to expand)
- Install the pressure sensor. Ensure it does not leak under pressure.
- Install dimmer - isolate the board using an enclosure or tape it up after wiring.
- Install the load cells.
Finish (Click to expand)
- Make sure all connections are proper i.e., no metal is exposed and well isolated, all soldering is perfect and wrapped in heat-shrink.
- Flash the Arduino and LCD with the latest version from GitHub (there could have been changes since).
- Record your first start. Post this to #first-start on Discord.
- Find out your regional settings and set them in the settings of the Arduino.
- Check all other settings save correctly.
- Record your first shot. Post this to #first-shot on Discord.
The code has been designed to be modular, meaning there is a minimal hardware configuration one can start with if certain features are not something of interest, it's all appropriately split under "BASE" or "EXTENDED" functionality (see below).
- Arduino Nano AT328
- 2.4" Nextion LCD + MicroSD card
- MAX6675 thermocouple
- C-M4 screw K-Type thermocouple sensor
- 40DA SSR Relay
- Thermo-resistant cables AWG15 and AWG20 ( 1m black/red ) and AWG26 ( 5m black/red/yellow/blue )
- Spade connectors M/F 6.3mm
- Power Supply:
- OPTION 1
- OPTION 2
- Optional: Wago connectors (useful for connected the many 5v and GND wires to the Arduino)
-
Gaggia Classic-specific
!> If planning on adding scales check the scales section as the optocoupler is not the right choice then.
- Gaggia Classic Pro-specific
- Hose Just one of the two hose options is needed
- ID4mm x OD9mm READ BELOW WARNING
- Saeco HIGHLY RECOMMENDED ORIGINAL PART, PROBABLY AVAILABLE LOCALLY
- Transducer Fitting - 6mm x 1/4
- T-fitting - 6mm
- Clamps - 100pcs and plier
!> The Aliexpress hose IS NOT rated as high as the original SAECO hose, please use common sense when operating the machine if you can't buy the recommended original SAECO hose use the exact size recommended here as pressure resistance is determined by the hose diameter as well.
- STM32 UPGRADE PACK
- STM32F411CEU6 MAKE SURE THE PROPER BOARD IS SELECTED
- ADS1115
- 5V RELAY Supersedes the 1-bit opto
!>Due to global shortages the semiconductors sector was hit hard, as a result STM32 chips are quite hard to obtain, be wary of resources selling fakes or low quality clones which will lead to either bad experience or no experience. If the reccommended seller doesn't have it in stock you will have to shop around.
-
Scales
-
Gaggiuino Housing&Scales mounting
Cheap services to order the prints if not owning a printer: