Repository navigation
Shopping helpers
All of these are optional – without settings SmartLists behaves as before.
General settings → Global → Stores & zones → 🛤️ Order next to a store. Drag the rows by the handle ⠿ (mouse, finger or pen) or move them with ▲▼ into the order of the aisles. If the store has several zones (branches), choose a branch to give it its own order. In shopping mode, when that store is selected (by hand or automatically through its zone), the list is grouped in this order.
-
Price of an item: type it at the end –
Milk 2 l 1,19€(the price is not part of the name), or ✏️ → Price. A typed price is for the whole line (Milk 2 l 1,19€= 2 l for 1,19 €) and is stored per unit (0,60 €/l), so other quantities are calculated correctly; in ✏️ you enter the price per unit. Offers from the app bring their own price. - The row shows the total and the unit price; a total bar below the list shows open and in-cart sums.
-
Expenses are booked when an item with a price is checked off in the card or the sidebar page
(re-opening within 6 hours takes it back). General settings → Statistics → Expenses shows weeks,
months or years per store;
sensor.smartlists_expenses_this_monthhas the current month. - Items checked off directly in the app or HA's own to-do view are not booked yet.
- Shopping done next to the total sets the "in cart" sum back to 0 (expenses stay booked); optionally it reopens everything checked for lists you reuse every week.
⋯ → Templates in the card header opens the templates: tap one to add it – choose servings (quantities are scaled),
untick items you don't need. Items already open on the list get their quantity increased instead of
being added twice. + New template (one item per line, with quantities and tags), List as template
takes the open items. Assist: "Put pancakes on the shopping list" uses the template of that name;
action smartlists.add_template does the same in automations.
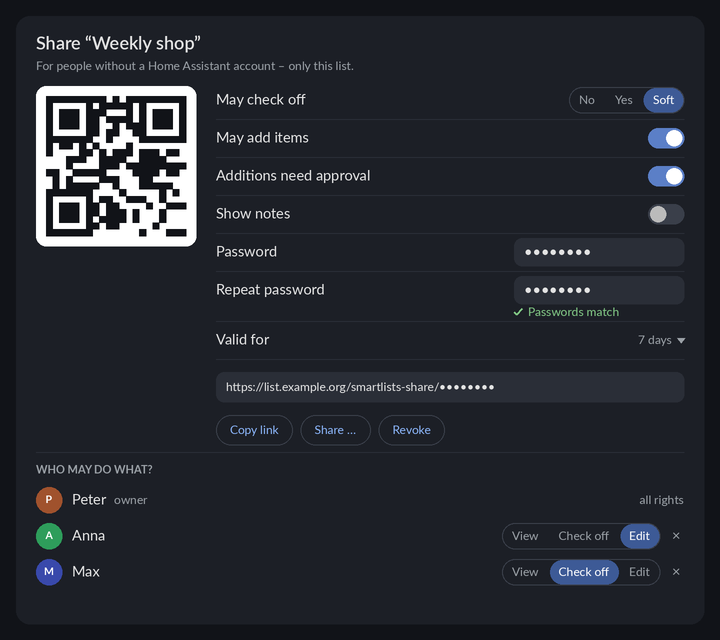
Gear of the list (settings of this list) → Share via link. Who may create links is decided by an admin under General settings → Global → Sharing and permissions: admins only, admins and the list's owner (default), everyone who may edit the list, or nobody (sharing off). There the admin also sets what a link may allow at most, the longest validity for users without admin rights, and sees – and can revoke – the active links of all lists.
- The share window: QR code on the left (after creating), on the right May check off: No · Yes · Soft (soft: the person can mark items; you see "✓ marked by Max (link)" but the item stays open until you check it off), May add items, Show notes (notes of the items appear on the shared page; offers always do), an optional password (entered twice; stored only as a PBKDF2 hash, wrong attempts are slowed down) and valid for 2 hours, 1 day, 7 days, 30 days or until revoked. Below: the link with Copy, Share, Revoke, the active links, and for own lists "Who may do what?" – only people you add have access (view · check off · edit, ✕ removes access); owner and admins always have all rights. Items added via a link are marked 🔗 added via link in your list. Admins set the highest level allowed for users without admin rights (Sharing and permissions → A link may at most).
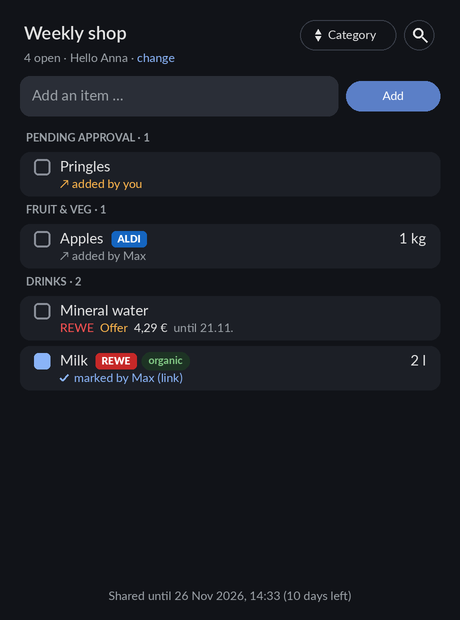
- People opening a link that allows checking off or adding have to enter their first name first (required, remembered long-term on their device – browser storage plus a cookie for the share pages only, about 400 days; changeable on the page). It shows in your list as "marked by Max (link)" / "added by Max via link" and in the item history, so you can tell several friends with the same link apart.
- The shared page greets the person by name ("Hello Anna · change"), has the add field at the top, a 🔍 search, a sort menu (category · store · A–Z · added, remembered on that device), shows offers (store, price, valid until), "🔗 added by Max", and in the footer how long the list is still shared ("Shared until … (10 days left)"). It does not reload while someone is typing.
- As long as a link is valid, the list header shows 🌐 shared on the web (tap it to see or revoke the links).
- You get the link and a QR code once; copy or share it. The list shows active links with expiry and how often they were opened; revoke any time.
-
Security: the link contains a random 256-bit key; only its SHA-256 hash is stored, so even
someone reading
.storagecannot rebuild a link. Without login only two addresses are reachable (/smartlists-share/<key>and/api/smartlists/share/<key>); they return the list name and the items with checkmarks – no notes (unless allowed for the link), no remembered prices, no entities, no users, nothing else from Home Assistant. Since 3.9.9 the page shows the items like the card: name, quantity, store/person/tag badges in your colours and category groups in store order. Writing is limited (30 actions per minute, 120 characters), wrong keys are answered slowly, the page is not indexed and cannot be framed. Note lists of the app cannot be shared. - By default the link uses the external address of Home Assistant (Nabu Casa or your own domain, Settings → System → Network → external URL) – whoever gets the link learns that address. To avoid that, see the next section.
General settings → Global → Sharing and permissions → Public address for links (admins):
| Links via | What happens |
|---|---|
| Home Assistant address (default, as before) | The link points to the external URL of Home Assistant. |
| Cloudflare Quick Tunnel | SmartLists starts cloudflared and gets a random address https://….trycloudflare.com. No Cloudflare account, no port forwarding. |
| Cloudflare Tunnel (fixed address) | A named tunnel on your own domain; SmartLists runs cloudflared with the tunnel's token. The address stays the same after restarts. |
| Own proxy or tunnel | Your own address (Caddy, nginx, Traefik, the Cloudflared add-on, …). |
For the tunnel and the own proxy SmartLists starts a small server of its own (default port 8126) that
serves only the share page and the share API – no login page, no API, nothing else from Home Assistant.
The tunnel/proxy points to that port, never to Home Assistant itself. With the tunnel the server listens on
127.0.0.1 only; with an own proxy on all addresses (the proxy often runs in another container or device).
If the chosen way is not ready (tunnel still starting, port in use), no link is created – SmartLists
never falls back silently to the Home Assistant address.
cloudflared – SmartLists does not download it by itself. If it is already installed (in PATH),
it is used. Otherwise the setting shows a hint: download it from the
cloudflared releases – the setting shows which file
fits your system (Home Assistant OS on a Raspberry Pi: cloudflared-linux-arm64, on x86: cloudflared-linux-amd64).
Put that file into /config or /config/bin (e.g. via the Samba or File editor add-on); renaming it to
cloudflared is optional, and a subfolder cloudflared (even nested) is searched as well. A missing execute
permission is added automatically, and the tunnel starts by itself the next time you open the setting.
Good to know about Quick Tunnels: the address changes every time Home Assistant restarts, so links created before stop working (the card marks them "address has changed"). Cloudflare offers Quick Tunnels for testing and without uptime guarantee. For lasting links use your own proxy or a named Cloudflare Tunnel with your own domain.
Cloudflare Tunnel with a fixed address – needs a free Cloudflare account and a domain managed by Cloudflare:
- Cloudflare dashboard → Zero Trust → Networks → Tunnels → Create a tunnel → type Cloudflared, any name.
- Copy the token shown in the install command (starts with
eyJ…; pasting the whole command works too). -
Routes → Add route → Published application (older dashboards: Public Hostname → Add a public hostname):
e.g.
list.yourdomain.com, service HTTPlocalhost:8126– Cloudflare creates the DNS record itself (the SmartLists share server – not Home Assistant). - In SmartLists choose Cloudflare Tunnel (fixed address), paste the token, enter
https://list.yourdomain.comand Save. cloudflared must be present as described above.
The token is stored in Home Assistant, handed to cloudflared as an environment variable and never shown again.
Own proxy – examples (replace 192.168.1.10 with the IP of Home Assistant):
liste.example.org {
    reverse_proxy 192.168.1.10:8126
}
server {
server_name liste.example.org;
location / { proxy_pass http://192.168.1.10:8126; }
}Cloudflare Tunnel with your own domain (e.g. the Cloudflared add-on): add a public hostname
liste.example.org → http://homeassistant:8126. Then enter https://liste.example.org as the public
address. A sub-path such as https://example.org/list works as well, as long as the proxy strips it.
General settings → For me → Notifications – everyone for themselves: where to (one or more targets), on new items and/or when something is checked off, which lists, from whom (per person), quiet hours. Your own changes only notify you if Also for my own changes is on (handy to try it out, or when you add something on the PC and want it on your phone). Several changes within a minute arrive as one message ("Anna added milk 2 l, bread to Shopping"). Changes from the card, the app, HA itself and shared links count. Messages are sent about a minute after the first change (several changes are combined). If you pick a combined list, changes in its source lists count too. Send test message checks the device right away – if nothing arrives, check the companion app and its notification permission; failed messages are logged in Settings → System → Logs.
Targets (Send to → + Add target) – as many as you like, no companion app required:
-
Notification service – every
notify.*service: companion app devices (📱), Telegram (notify.telegram_…), e-mail, Signal, Pushover, groups … – whatever is set up in Home Assistant. -
Notification entity – new-style
notify.*entities (sent withnotify.send_message). -
Custom service (admins) – any service with JSON data, e.g.
telegram_bot.send_messagewith{"target": 123456789}or ascript.*that does whatever you want.{title}and{message}in the data are replaced; without themtitleandmessageare added.
A failing target does not stop the others; Send test message shows which one failed.
The barcode button next to the input opens the scanner. In the Home Assistant companion app (Android/iOS) its own full-screen scanner is used; in a browser the camera (Chrome) or a field to type the number. The product name comes from SmartLists' own memory. Online lookup is off by default: only when you switch on Look up barcodes online and pick at least one lookup service is the number (nothing else) sent there. No service is preselected.
- For me → Shopping and scanning: the target list (this card's list or any other) and whether a scanned product goes into the input field to check or is added directly.
-
Global → Voice, backup, defaults: which lookup services in which order – Open Food Facts, Open
Beauty Facts, Open Pet Food Facts, Open Products Facts, UPCitemdb, or your own (URL with
{code}and the JSON field holding the name). Look up barcodes online switches the lookup on; without it nothing is sent.
Statistics and expenses is an optional extra (General settings → Global → Extras), off in the setup assistant.
📊 on the sidebar page (or General settings → Statistics): bought most often with rhythm ("every 4 days"), not bought for a while (with + to put it back on the list), shares per category and store. Bought means checked off (since 3.9.11) – items that were only put on the list do not count; checking off and reopening right away (mistap, undo) does not count either. Check-offs from the item history are added once after the update. Admins can remove wrong items (×) from the history, tick several and remove them or reset the statistics completely (purchases and rhythm – suggestions while typing stay). Under Bookings single, selected or all expense bookings can be deleted (admins all, others their own).

The meal plan is an extra: switch it on or off under General settings → Global → Extras (the setup assistant leaves it off). Off hides the tab, the menu entry and the calendar; planned dishes are kept.
⋯ → Meal plan shows a week (← → for other weeks). Put dishes – i.e. templates – on days. Changes are kept until you press Save (then you are asked whether the ingredients should go on the list) or Add ingredients to list (saves and puts everything of that week on the list; equal items are added up). Clicking next to the window does not discard changes. The plan is also the calendar SmartLists Meal plan in Home Assistant (for dashboards and automations).
Mealie: if the Mealie integration is set up, Get from Mealie takes the recipes of the week's Mealie meal plan: each recipe becomes a template (🍽️) with its ingredients and is entered in the plan.
Long press an item → History: who added, checked off, reopened, renamed or deleted it, and when – also changes from the app, Home Assistant, automations ("automation") and shared links. The last 400 changes per list are kept.
General settings → Global → Voice, backup, defaults → Create dashboard adds a dashboard Shopping
dashboard to the sidebar with one sub-page per list (its own address, e.g. /smartlists-shopping/einkauf;
combined lists first, more than 12 lists share a page "More"), plus the meal plan calendar and statistics if they
are switched on. Creating it again updates it (and replaces your own changes to it). It is a normal dashboard
afterwards – edit or delete it like any other.