In the first lecture this week we learned about some key principles of animation in 3D environments, and how we can work with them in Blender. In this practical, you’re going to put that learning into action and do some of the things that were shown in the lecture.
By the end of this practical, you’ll be able to bring objects and even characters to life – making scenes that are dynamic and realistic. In particular, you’ll be able to:
- Create an animated piece of scenery
- Rig your first character
- Combine all of these skills to create an animated character!
In this practical, you’ll be using Blender. This is already installed for you on our lab machines. However, if you’d like to continue to work with it on your personal machine, you can get it here:
You can find some assets you'll be using during this practical in this template Git repository. The best way to access this is to create a new repository from the template in your account and clone it onto the machine you're working on.
In this task we’re going to create our first simple animation: the lock mechanism opening on a sliding airlock door. To get started, open the airlock.fbx model in Blender. You can do this by dragging it into a new scene or by going File>Import>FBX and selecting the asset. Once you’ve opened the model hold 'Z' and press '2' to see the textures.
Take a look at the model; you’ll see it’s an airlock that could be included in a space station scene. If you look at the outliner (Right side of the UI) you’ll see there are three main elements of the model:
- The surrounding walls (airlock_chamber)
- The doors (door_left, door_right)
- Some lock bolts that can move independently (bolt_left, bolt_right)
Tip: in case you’ve not seen the Blender Outliner before, it’s just like the hierarchy view in Unity. You can use it to see all the elements in your scene and how they relate to each other in terms of parent and child relationships – it's really useful!
In the first task, you should use what you learned in the lecture to animate the lock bolts so that they move outwards over a period of 10 frames. The finished result should look something like this:
https://www.youtube.com/watch?v=oXExEj6YUYE
Some quick tips to help you achieve this task:
- Consider animating just one of the bolts first – keep it simple
- You can use ‘i’ to quickly set a key on an object
- Set the position on the timeline when you want the key to happen before you manipulate the object to the position you want to be in
- If the timeline is too long, you can change its length by editing the 'End' frame option
Now the door is unlocked, we need to open it up so players can pass through. In this task, use the same approaches you applied to animate the bolts to animate the doors. The doors should open between frames 10 and 90, and the bolts should move with the doors in the open position. The finished result should look something like this:
https://www.youtube.com/watch?v=zDTr4n1BlmQ
Getting the bolts to move with the doors is the tricky aspect of this task. However, you can achieve this quite easily if you select both the bolt and the door (either in the scene or the outliner) and manipulate and key them together.
You can apply the principles you’ve learned in the last two tasks to animate a whole range of objects in your scenes.
Animating the 3D models that make up the scenery of your 3D environments is crucial for a realistic effect in many cases. However, when we think of 3D animation, it's common to want to animate the characters in our scenes too. In the remainder of this practical we’re going to learn how to rig and animate a human character.
To get started, open up the zombie.fbx file from the practical resources folder in a new Blender scene. You should see a 3D model of a Zombie. If you don’t see the textures on the model, hold 'Z' and press '2'. In this task, we’re going to create a skeletal rig that’ll let us animate the complex mesh of this character using some simpler geometry.
To rig a human character in Blender we follow what we covered in the lecture:
- Create the first bone by pressing Shift + A and clicking on 'Armature', this will make our first bone
- Make the bone always visible by clicking on the orange icon in the Properties window (below the outliner), go to Viewport Display>In Front
- Click on the bone and press Tab to enter edit mode, the bone is made of 3 parts Head, Body and Tail. All 3 can be selected and moved using the transform tools.
- Move the bone to be at the zombies hips, this will be our 'Root' bone, the parent of all our other bones.
- Select the head of the bone and press 'E' to create a new bone, either position it with the mouse or left click to apply and edit with the transform tools.
- Continue to build on this to create a full upper body skeletal rig, the more bones we have the more points we have to edit when animating but we don't need to over do it, see the example below

To make the lower body rig we need to start slightly differently:
- Select the 'Root' bone, the first bone we created and press Shift + D to duplicate it
- Move the new bone to be at the top of the right leg
- Select the new bone and then the 'Root' bone while holding Shift
- Press Control + P and choose 'Keep Offset', you will see the bone will stay where it is but a dotted line with connect the new bone and the 'Root' bone. This keeps all out bones together
- Continue to create the right leg like we did for the upper body
- Repeat with the left leg, your rig should look similar to the example below

Finally, to move our Zombie we need to apply the skeletal rig to the mesh:
- Make sure you are in Object Mode and not Edit Mode, press Tab to swap between the two modes
- Select the Zombie mesh, then hold Shift and select the skeletal rig (Armature) you created
- Press Control + P and choose 'With Automatic Weights', the skeletal rig will not be automatically applied to the mesh.
- Select the skeletal rig and change to Pose Mode, there is a drop down at the top left of the UI which will let you change to this 3rd mode.

- In Pose Mode select a bone and try moving or rotating it to move the mesh.
- If you need to reset the bones to their original position press 'A' to select all bones and then Option + R to reset their position (Only works with not IK bone in the rig).
Have a go at manipulating these controllers to put the character in some different poses (e.g. bending over, crouching, waving). When doing this you should notice that the bone are hierarchical, meaning that if you, for example, move the hips, the shoulders will move too make animating characters a lot easier than it could be!
At this point, save a back-up of your rigged character. It’ll make it easier to create animations from scratch over the next two tasks.
Now we’ve got a character that can be moved around we may want to make it easier for us to create animations with by having multiple bones react when we move one. As we saw in the lecture we can do this using Inverse Kinematics (or IK).
To this we need to:
- Enter Edit Mode, if you are in Pose Mode press Tab, otherwise select the skeletal rig and change to Edit Mode
- On the right leg, select the Tail of your foot bone, add a new bone here that extends backwards behind the foot, we will use this to control our IK movement
- Select the Head/Tail that makes up the knee joint, add a new bone that extends forward
- Select the two new bones you created and press 'Option + P' and choose 'Clear Parent', drag the new knee bone away from the rig
Your leg should now look like this:

- Now enter Pose Mode, select the new foot bone and the lower leg bone.
- Press 'Shift + i' and select 'To Active Bone', the lower leg bone will now turn yellow
- Select the yellow bone, in the Properties window choose the 'Bone Constraints' tab, it is a blue icon just above the red texture icon.
- In this section you will see a number of options for our IK, we are interested in 2 'Pole Target' and 'Chain Length'
- Lets set out Pole Target, select the eye drop icon and click anywhere on your skeletal rig. This will choose our rig and make a new 'Bone' option appear.
- We want to set 'Bone' to be the new knee bone we created. You may need to select this manually, there are a few ways to find the name of this bone so please as one of the lecturers for help.
- We will now see that our mesh and rig has twisted, to fix this we will set the 'Chain length' to 2. This limited the number of bones out IK movement effects only 2 bones, itself and the previous bone it is attached to.
- Now move the new foot bone we created and the knee should bend in a realistic way

Continue this process on the left leg and arms (the knee bone becomes an elbow bone and the foot bone becomes a wrist bone), to create a fluid IK based model can take a lot of time so after adding IK to the legs and hand continue to the next task.
Now we’ve got a character, and we can move it around, the next thing we want to do is apply some animations to it! This can be done in Blender using the same key frame approach we used in the previous tasks, except we apply the key frames now to bones and IK control points.
In this task, you should use this approach to create an “idle animation” for the zombie. An idle animation is basically an animation that pretty much all characters have, which moves them around slightly when they’re doing nothing (i.e. being idle). People don’t ever really stand deadly still, and so applying an idle animation to your characters is essential for making them look lifelike (or whatever is the equivalent for a Zombie!).
To create an idle animation, simply apply some subtle movements to some of the different parts of the body using key frame animation. You might consider:
- Making the shoulders sway left and right
- Rotating the head a little
- Moving the hands a little bit
- Moving the hips forward and backwards
Don’t overdo these movements, or else you’ll end up with a bad dancing animation! Having said this, an idle animation for a zombie can be a bit more pronounced than for a “living” human, so be creative and see how you can make it look. 3 seconds (~120 frames) might be a good length for an idle animation.
Tip: you’ll want to make you idle animation a seamless loop. One quick way to achieve this is to put key the character in the same pose at the start and end of your animation. To do this, put the character in a pose and then press S with both 0 and 120 frames selected on the timeline.
Here is an example of such an animation: https://www.youtube.com/watch?v=UwpKw-pbeJ4
Now we’ve done some basic animation, let’s try and create a type of animation called a walk cycle. A walk cycle animation can be run on a loop when we have a character that is walking around in Unity.
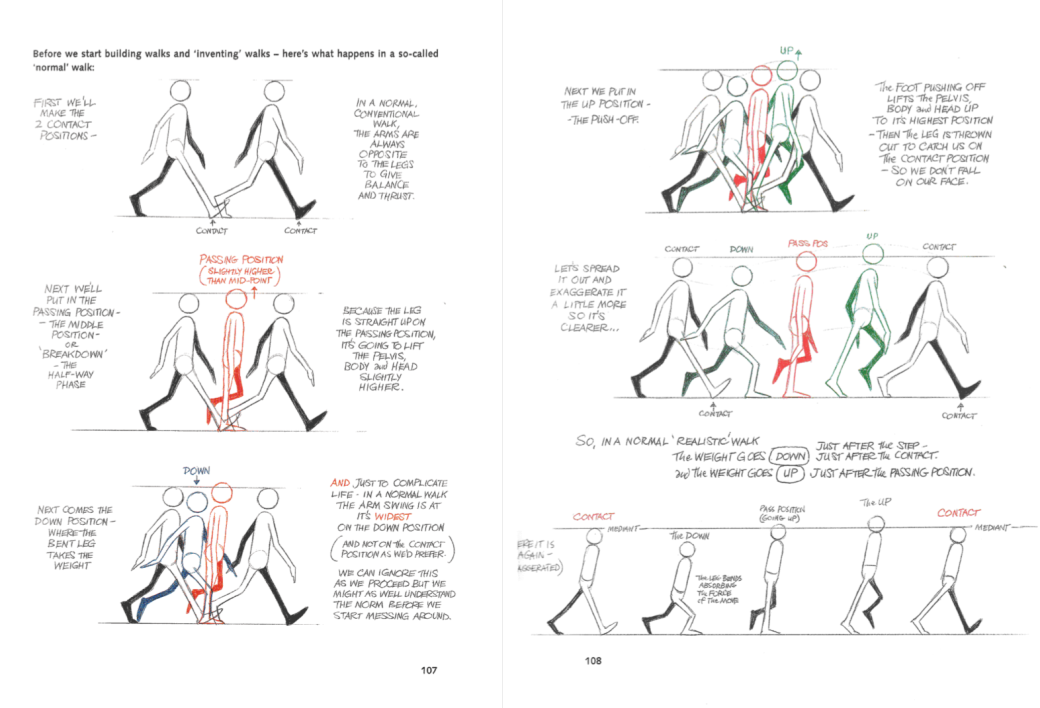
To create your walk cycle, see if you can animate a character through some of the following positions shown in these diagrams.
Some tips when trying to do this:
- Don’t try and create a seamless loop this time. Just try and create a single step animation that looks good. Once you’ve got one step, them you can try another.
- It can help to use one of the side views in Blender when doing this task. Recall, you can switch between views using the axis in the top left of the viewport or numpad keys.
- You can import the image (also in resources) and make in the background of your view to trace over using “Shift + A> Image> Refrence”.
- Animate your character such that they remain in the same position throughout (i.e. they don’t actually walk anywhere). Walking animations that do include character movement (called progressive) are also common to create, but for now let’s keep things simple.
The walk cycle that’ll come from these diagrams may look quite realistic. Can you see if you can change it to make it look more like a Zombie?
The diagrams in this task are from the Animator’s Survival Kit, which is an excellent reference book should you wish to pursue character animation further. You can get it reasonably cheaply second hand on Amazon (https://www.amazon.co.uk/Animators-Survival-Kit-Richard-Williams/dp/0571238343/).
- The character we used in this practical was from Adobe Mixamo (https://www.mixamo.com). This is a great resource with loads of characters, and also loads of animations you can download should you wish to not focus on animation in your own practice. Why not take a look around and see what you can find on there?
- In this practical, we used an existing character model. Why not see if you can model your own and rig it.