Getting started
This Quick Start guide will get you up and performing scanning as quickly as possible. All steps described in this guide are required for the integration.
This guide sets up basic Machine readable travel document (MRTD) and US Driver's license (USDL) scanning functionality. It closely follows the BlinkId-sample app. We highly recommend you try to run the sample app. The sample app should compile and run on your device, and in the iOS Simulator.
The source code of the sample app can be used as the reference during the integration.
- Download BlinkID SDK to your filesystem, or clone this git repository. Do that by running:
git clone git@github.com:BlinkID/blinkid-ios.git-
Copy MicroBlink.embeddedframework to your project folder.
-
In your Xcode project, open the Project navigator. Drag the MicroBlink.embeddedframework to your project, ideally in the Frameworks group, together with other frameworks you're using. When asked, choose "Create groups", instead "Create folder references" options.
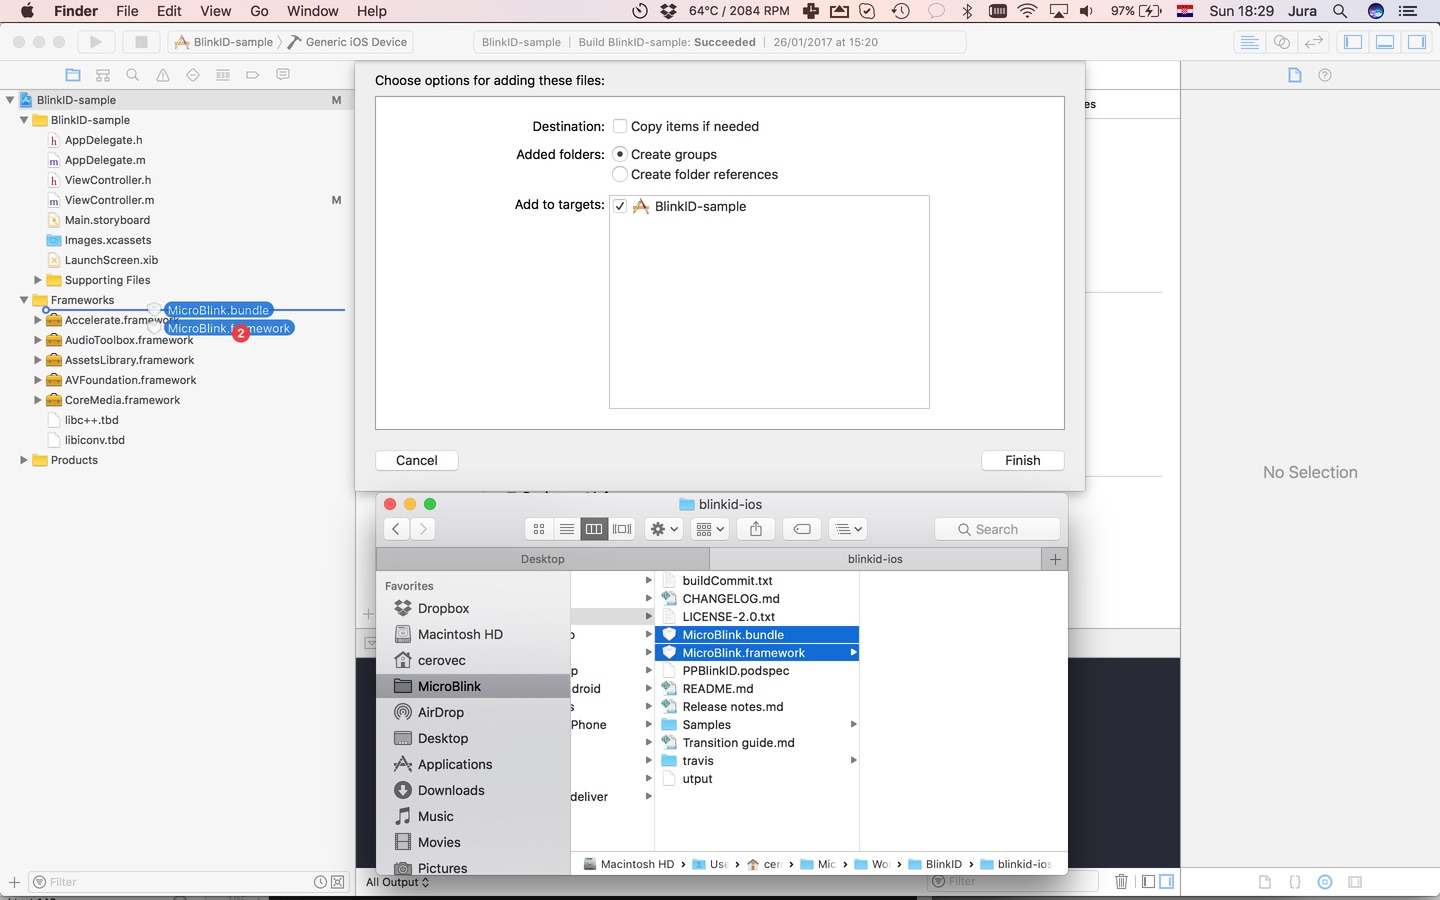
-
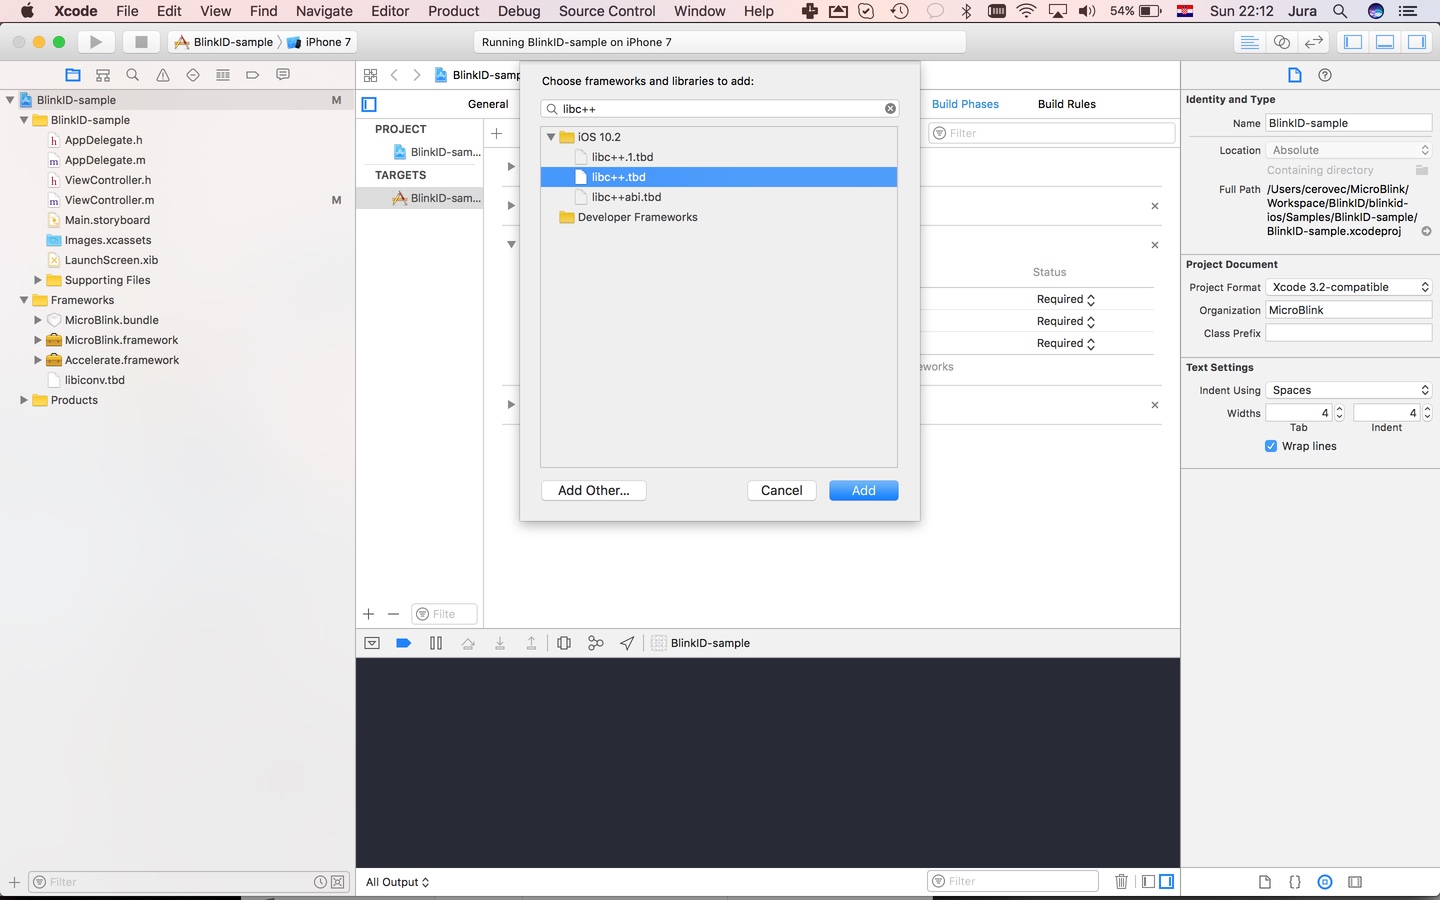
Include the additional frameworks and libraries into your project in the "Linked frameworks and libraries" section of your target settings.
- libc++.dylib
In files in which you want to use scanning functionality place import directive.
#import <MicroBlink/MicroBlink.h>To initiate the scanning process, first decide where in your app you want to add scanning functionality. Usually, users of the scanning library have a button which, when tapped, starts the scanning process. Initialization code is then placed in touch handler for that button. Here we're listing the initialization code as it looks in a touch handler method.
/**
 * Method allocates and initializes the Scanning coordinator object.
 * Coordinator is initialized with settings for scanning
 *
 *  @param error Error object, if scanning isn't supported
 *
 *  @return initialized coordinator
 */
- (PPCoordinator *)coordinatorWithError:(NSError**)error {

    /** 0. Check if scanning is supported */

    if ([PPCoordinator isScanningUnsupported:error]) {
        return nil;
    }


    /** 1. Initialize the Scanning settings */

    // Initialize the scanner settings object. This initialize settings with all default values.
    PPSettings *settings = [[PPSettings alloc] init];


    /** 2. Setup the license key */

    // Visit www.microblink.com to get the license key for your app
    settings.licenseSettings.licenseKey = @"6EZH3JXN-CYKHWVII-4EOV34IK-AJMPUV3I-VJKQRYI4-MKDM4QXI-SNQ3V527-VARHA7EY";


    /**
     * 3. Set up what is being scanned. See detailed guides for specific use cases.
     * Here's an example for initializing MRTD and USDL scanning
     */

    // To specify we want to perform MRTD (machine readable travel document) recognition, initialize the MRTD recognizer settings
    PPMrtdRecognizerSettings *mrtdRecognizerSettings = [[PPMrtdRecognizerSettings alloc] init];

    // Add MRTD Recognizer setting to a list of used recognizer settings
    [settings.scanSettings addRecognizerSettings:mrtdRecognizerSettings];

    // To specify we want to perform USDL (US Driver's license) recognition, initialize the USDL recognizer settings
    PPUsdlRecognizerSettings *usdlRecognizerSettings = [[PPUsdlRecognizerSettings alloc] init];

    // Add USDL Recognizer setting to a list of used recognizer settings
    [settings.scanSettings addRecognizerSettings:usdlRecognizerSettings];


    /** 4. Initialize the Scanning Coordinator object */

    PPCoordinator *coordinator = [[PPCoordinator alloc] initWithSettings:settings];

    return coordinator;
}

- (IBAction)didTapScan:(id)sender {

    /** Instantiate the scanning coordinator */
    NSError *error;
    PPCoordinator *coordinator = [self coordinatorWithError:&error];

    /** If scanning isn't supported, present an error */
    if (coordinator == nil) {
        NSString *messageString = [error localizedDescription];
        [[[UIAlertView alloc] initWithTitle:@"Warning"
                                    message:messageString
                                   delegate:nil
                          cancelButtonTitle:@"OK"
                          otherButtonTitles:nil, nil] show];

        return;
    }

    /** Allocate and present the scanning view controller */
    UIViewController<PPScanningViewController>* scanningViewController = [coordinator cameraViewControllerWithDelegate:self];

    /** You can use other presentation methods as well */
    [self presentViewController:scanningViewController animated:YES completion:nil];
}In the previous step, you instantiated PPScanningViewController object with a delegate object. This object gets notified on certain events in scanning lifecycle. In this example we set it to self. The protocol which the delegate has to implement is PPScanDelegate protocol. You can use the following default implementation of the protocol to get you started.
- (void)scanningViewControllerUnauthorizedCamera:(UIViewController<PPScanningViewController> *)scanningViewController {
    // Add any logic which handles UI when app user doesn't allow usage of the phone's camera
}

- (void)scanningViewController:(UIViewController<PPScanningViewController> *)scanningViewController
                  didFindError:(NSError *)error {
    // Can be ignored. See description of the method
}

- (void)scanningViewControllerDidClose:(UIViewController<PPScanningViewController> *)scanningViewController {

    // As scanning view controller is presented full screen and modally, dismiss it
    [self dismissViewControllerAnimated:YES completion:nil];
}

- (void)scanningViewController:(UIViewController<PPScanningViewController> *)scanningViewController
              didOutputResults:(NSArray *)results {

    // Here you process scanning results. Scanning results are given in the array of PPRecognizerResult objects.

    // first, pause scanning until we process all the results
    [scanningViewController pauseScanning];

    NSString* message;
    NSString* title;

    // Collect data from the result
    for (PPRecognizerResult* result in results) {

        if ([result isKindOfClass:[PPMrtdRecognizerResult class]]) {
            PPMrtdRecognizerResult* mrtdResult = (PPMrtdRecognizerResult*)result;
            title = @"MRTD";
            message = [mrtdResult description];
        }
        if ([result isKindOfClass:[PPUsdlRecognizerResult class]]) {
            PPUsdlRecognizerResult* usdlResult = (PPUsdlRecognizerResult*)result;
            title = @"USDL";
            message = [usdlResult description];
        }
    };

    // present the alert view with scanned results
    UIAlertView *alertView = [[UIAlertView alloc] initWithTitle:title message:message delegate:self cancelButtonTitle:@"OK" otherButtonTitles:nil];
    [alertView show];
}

// dismiss the scanning view controller when user presses OK.
- (void)alertView:(UIAlertView *)alertView clickedButtonAtIndex:(NSInteger)buttonIndex {
    [self dismissViewControllerAnimated:YES completion:nil];
}With this performed, you've successfully integrated the scanning functionality in your app.
For next steps, you will either want to:
-
Know more about obtaining scanning results in general.
-
Jump directly to using different recognizers:
- Using USDL recognizer for scanning and parsing US Driver Licenses
-
Know more about customizing Camera UI.
-
Learn about Direct Processing API which you can use to process UIImage objects directly, without using camera management in the SDK.
For additional help, contact us directly at help.microblink.com.