- If you are able, and you haven't already, install the AWS CLI (version 2).
- Make sure you are logged in on github and fork this workshop (using a different name for the repo) and pull it down to your local machine.
- Set up an AWS account and log into it.
- Go to https://console.aws.amazon.com/billing/home?#/account and note your numeric AWS account ID in the accounts.txt file.
First we will set up the AWS CLI, but for the CLI to authenticate itself to AWS, it will need credentials, that is to say - we will need to make it a User. This is done in an AWS Service called Identity And Management (IAM)
- Navigate to the IAM console, create a user with both Programmatic Access and Console Access and add the 'existing policy' called
AdministratorAccess. Make sure you note down the Secret Access Key.
This policy is, as you would expect, the most powerful access you can have other than the root account (which you are currently logged into). It is good practice to avoid logging into the root account, so we have delegated all its permissions to this new user. AWS encourages this kind of security thinking because AWS accounts can be so valuable and control such critical resources that even risks which may be improbable, such as keyloggers even in well-secured premises, need to be taken seriously.
You should use this new user to log into the AWS Console in future. We have also given the user Programmatic Access so that we can use it with the AWS CLI. The CLI doesn't use a password to authenticate. Instead it uses Access Keys. If you don't want the keys to your admin account hanging around on your machine, you can remove Programmatic Access at the end of the week, or revoke the Access Keys.
You're now ready to set up the AWS CLI with aws configure (see https://docs.aws.amazon.com/cli/latest/userguide/cli-chap-configure.html#cli-quick-configuration and use eu-west-2 as your default region).
Don't lose the secret key, as you will not be able to view it again.
Any time you want to check that your AWS CLI is configured, you can aws sts get-caller-identity, which makes a CLI call that does not require any special permissions.
Setting up the AWS CLI will save you time hunting around the AWS console if you need to perform very simple tasks quickly in future. However, for most tasks this week we'll use the AWS console - so you become familiar with the console and its many options.
- Create an S3 bucket
- Create another S3 bucket!
- You can choose to add one alias to your account instead of the Account ID.
(Either go to https://console.aws.amazon.com/iam/home#/home and click customise, or run
aws create-aliasin the terminal. - Add both bucket names (and your alias if you made one) to accounts.txt, add commit, push.
Notice that we didn't set up a VPC, as we did in most of the labs.
S3 is called 'simple' partly because, as well as being elastically scalable, the architectural decisions about availability and connectivity are done behind the scenes.
We will use a simple webpage to access pictures we have uploaded to an S3 bucket.
-
grab a picture (or any file you can display in a browser) from the internet, upload it to the bucket.
-
navigate to the picture's URL (ie, on the internet). You'll hit Access Denied, but keep the tab open, we'll be coming back.
-
Go to both 'Block public access' in the left pane, and to the Permissions tab of your bucket, and ensure that public access is NOT blocked in either. Even though these two permission locations have the same name, they work at two different levels. If either of them are turned on (ie are blocking), then access will be blocked.
These are example of 'explicit deny' policies. Explicit deny always takes priority. Anywhere AWS encounters an explicit deny that relates to a given action and resource, it will block access, no matter how manyallows it also encounters. -
Check out the Access Control List - ACLs are another layer of 'explicit deny'. Luckily, in this default ACL, no denials are set.
-
Now try to navigate to the picture's URL.
Trying to navigate to the image, you will find you still get still Access Denied.
Even though we didn't block public access, we didn't allow it either.
This is an example of AWS's 'default deny' policy.
Before we do this:
- Go to the list of buckets and click the checkbox for your bucket so that we can Copy Bucket ARN.
- Click on the bucket name again and go back to the Permission Tab.
- Find the Policy Generator (open it in a new tab) and add a Get Object action to a statement for the
*Principal (NB:*means everyone).
When entering the ARN, you can compare it with the general form of the ARN in grey under the ARN textbox, and see how it is composed. It's not a pretty naming system. Imagine trying to work out what went wrong if you accidentally missed a colon out of the ARN :( - Copy the JSON the Policy Generator generates and paste it into the editor.
You are almost ready to save the policy but there is one last gotcha -
The ARN you copied refers to the bucket, not to the objects in the bucket. The ARN naming system for S3 works a little like filenames on a disk - there are (conceptually, even if not in reality) folders separated by/and you can use the wildcard*.
So:arn:aws:s3:::app-that-makes-ya-go-awrefers to a bucket,
arn:aws:s3:::app-that-makes-ya-go-aw/refers to a folder andarn:aws:s3:::app-that-makes-ya-go-aw/*refers to all of the resources (including subfolders) within that folder.
Once you've edited the policy to allow*access to the resources in the bucket and saved it, you should be able to access the picture via its URL.
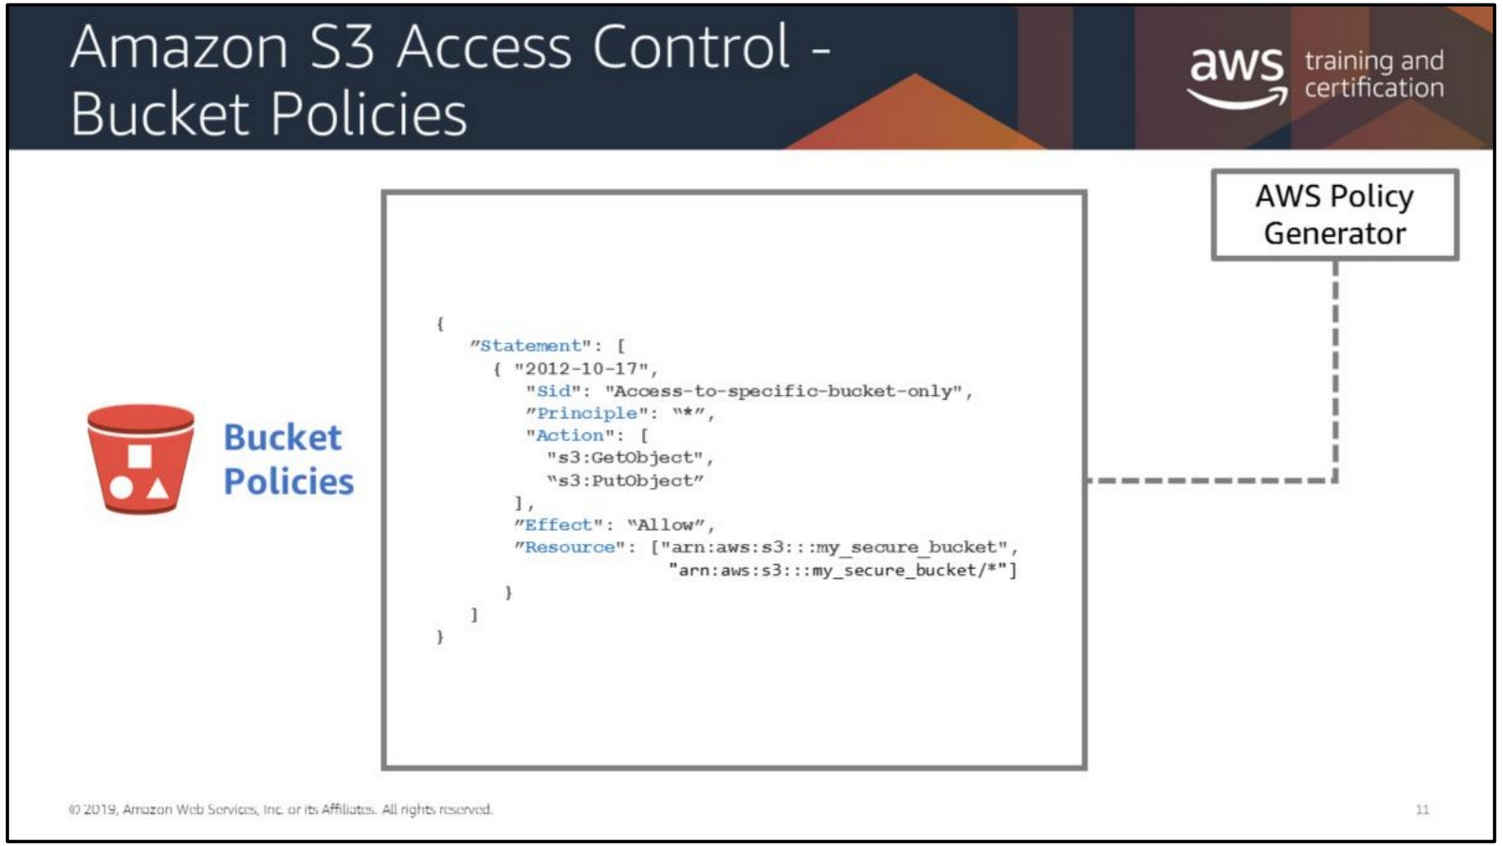 An S3 bucket policy yesterday
Go to https://s3.console.aws.amazon.com/s3/access?region=eu-west-2
There won't be an Analyzer set up yet, so click through to create it.
In the messages at the top of the screen, you should see the blue message 'Scanning Resources'.
We have allowed some public access to the bucket. AWS sees this as a potential security problem but, since we intended this bucket to be for public access, this is fine.
You can return to this page at the same URL, but this won't make the Analyzer rescan. To reach the option to Rescan, you need to click on a 'finding' in the lists in one of the tabs. If you don't have any 'findings', it means your bucket is secured against public access (but also means that you'll need to delete and recreate the Analyzer in 'Analyzer details' if you want to force a rescan).
In the picUrls array main.js, comment out the local filename and add a string to the array containing the picture's URL. Now when you access index.html in your browser, the page should try to fetch the picture from the bucket.
Nothing will show in the browser, however - check why not by opening the browser console. You should find a CORS error (if you find some other error, go back and check your edits to main.js).
This is one more layer of security we need to deal with, but this one comes from your browser. Even so, we deal with it in the AWS console.
Add this CORS policy in the CORS tab:
<?xml version="1.0" encoding="UTF-8"?>
<CORSConfiguration xmlns="http://s3.amazonaws.com/doc/2006-03-01/">
    <CORSRule>
        <AllowedOrigin>*</AllowedOrigin>
        <AllowedMethod>GET</AllowedMethod>
        <MaxAgeSeconds>3000</MaxAgeSeconds>
        <AllowedHeader>Authorization</AllowedHeader>
    </CORSRule>
    <CORSRule>
        <AllowedOrigin>*</AllowedOrigin>
        <AllowedMethod>PUT</AllowedMethod>
        <MaxAgeSeconds>3000</MaxAgeSeconds>
        <AllowedHeader>Content-Type</AllowedHeader>
        <AllowedHeader>x-amz-acl</AllowedHeader>
        <AllowedHeader>origin</AllowedHeader>
    </CORSRule>
</CORSConfiguration>
and, on refreshing the page, your image should show in the browser.
Now we've verified that our bucket works to read from, we can start to think about write access. We'll be using the file upload.js to upload.
Everything in AWS requires permissions to be explicitly set - often in multiple places.
But before we can grant permissions, we will need someone to grant permissions to. This could be a Role, but in this case we will create a User.
So:
- Navigate back to the IAM console, create another user and make sure you have a Secret Access Key.
- Connect your app up to the first S3 bucket by string the Access Key ID and Secret Access Key in the .env file.
By convention,.envor similar is a file we store environment variables, including secrets, for an app. One of the first things to do when making any app which will be stored on a repository such as Github is to include the name of the.envfile in the.gitignorefile (it's a list of files want thegitsoftware to ignore). This makes sure that the secrets in this file are never pushed to Github where they can be stolen.
You used the IAM Console to grant the public read access to the first bucket using a Statement generated in JSON by the Policy Generator. You can use the Policy Generator generator to generate the write permissions to the User you created too, but be careful of how much of the generated policy you cut and paste.
Your team of consultants has reached a milestone and will hand over access to the client (ie a different company).
How would you grant appropriate permissions to only this app's buckets, to only your client's AWS user?
You will need to grant the GetObject permission and also the ListBucket permissions to your User in your AWS account. GetObject is a permission that acts on an object resource, or a set of object resources, and ListBucket, as it sounds, acts on an entire bucket. So the resources will have slightly different ARNs.
- Grant read access to AWS account
ec4f19089da38e120cba5f19d592e8de7a57b253900658d86b076670a46ba371(Tom).
You should now have: One bucket which any user on the internet can use, without authenticating, but to which no-one but you can write; Another bucket, which yourself and your client can read and write to, and Tom can read from, with no further permissions than those.
- In
index.js, delete or comment out each filename in thepicUrlsarray. The JS is written so that if this array is empty, the app will search the bucket for files it can display - as long as it has permissions to! - In
upload.js, setbucketName. Notice that this is a variable for AWS to process internally, once we pass it to AWS through the SDK. So this is just the name of the bucket, not an internet-accessible URL. - Grab some more pictures from the internet and store them in the
assets/folder. - Run the upload app (
node upload.js), to upload pictures to your pair's bucket one by one. Before each upload, though, you will need to set filePath to the local filename.
NB: In a large scale system, we would Block Public Access even to an S3 bucket which we want the public to access, and the public access point would instead go through CloudFront. Mediating requests through CloudFront means you have full control over access control and logging and, especially, load-balancing (even if load-balancing itself is mostly taken care of by S3, there are other functions of load-balancers which you could not use if you were to direct customers direct to S3's endpoints).
- read https://docs.aws.amazon.com/IAM/latest/UserGuide/id_roles_create_for-user.html
and create a policy allowing write access to the user GIFmaker on AWS account
ec4f19089da38e120cba5f19d592e8de7a57b253900658d86b076670a46ba371(Tom).
Before Clicking 'Review Policy', view the JSON of the policy to get an idea of what a populated policy looks like.
- Test each others' security skills by trying to exceed the access you have on their app (this could be your partner or anyone who has started out on extras 1)
- Compare Access Analyzer and Trusted Advisor's Bucket Permissions check.
- if you has accidentally exposed SECRET keys, make sure you revoke them!