Custom Widgets
As of munkireport 2.12, you can add custom widgets to your munkireport app. The only thing you need to do is to create the correct folder structure and let Munkireport know where it is.
First create a folder structure:
cd /your/munkireport/directory
mkdir -p local/views/widgets
Second, edit.env and add the path to the folder (which can be a relative or absolute path)
CUSTOM_FOLDER="/path/to/munkireport/local/"or
CUSTOM_FOLDER="../local/"Done!
Every dashboard needs a clock, there is no clock widget yet, so we're going to create one.
First, create the widget file (widgets need to end with _widget.php so munkireport can find them).
touch local/views/widgets/clock_widget.phpWith your favourite text editor, paste the following code into the file:
<div class="col-md-4">

	<div class="panel panel-default" id="clock-widget" style="min-height:138px">

		<div class="panel-body">

			<h1 style="text-align: center; font-size: 60px;"></h1>

		</div>

	</div><!-- /panel -->

</div><!-- /col-lg-4 -->

<script>
$(document).on('appReady', function(e, lang) {

	var delay = 60; // seconds
	var refresh = function(){

		$('#clock-widget .panel-body h1')
			.empty()
			.text(moment().format('LTS'))

		setTimeout(refresh, 1000);
	}

	refresh();

});
</script>
Here is a set of code that is compatible with the yet to be released munkireport v.6 that uses bootstrap 4:
<div class="col-md-4">

	<div class="card" id="clock-widget">

		<div class="card-header" data-container="body" title=Clock">
        	<i class="fa fa-clock-o"></i>
            <span data-i18n="clock_widget.title">Clock</span>
        </div>
		<div class="card-body text-center">
			<h1 style="text-align: center; font-size: 60px;"></h1>
		</div>
	</div><!-- /panel -->

</div><!-- /col-lg-4 -->

<script>
$(document).on('appReady', function(e, lang) {

	var delay = 60; // seconds
	var refresh = function(){

		$('#clock-widget .card-body h1')
			.empty()
			.text(moment().format('LTS'))

		setTimeout(refresh, 1000);
	}

	refresh();

});
</script>
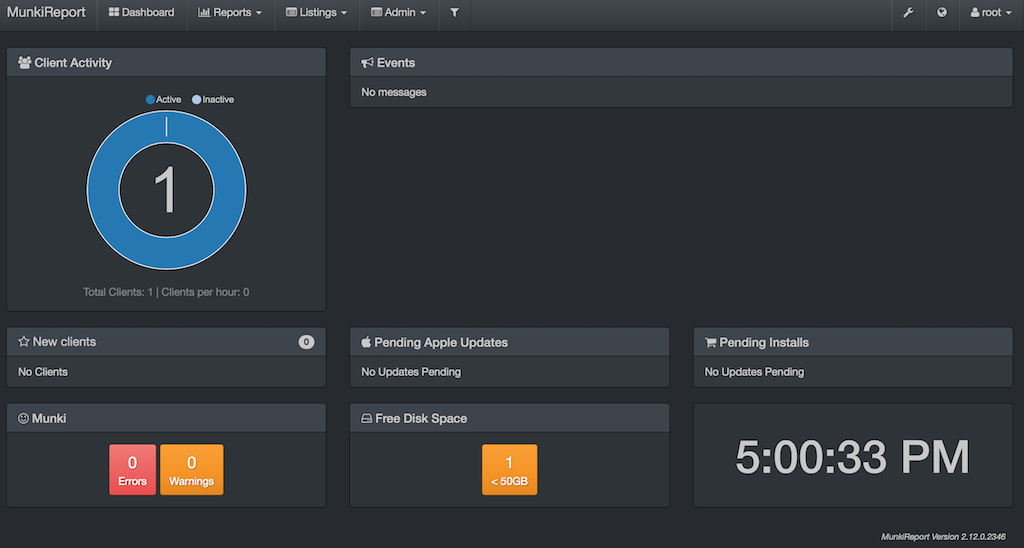
Now, we just need to add the clock to the dashboard. Create a file called default.yml and place it in local/dashboards. Then add the following content:
display_name: My Awesome Dashboard
hotkey: d
row1:
    client:
    messages:
row2:
    new_clients:
    pending_apple:
    pending_munki:
row3:
    munki:
    disk_report:
    clock:
And we should see a nice clock in the bottom right corner.
Dashboard yml supports adding variables for widgets to be able to use. The spacer_widget supports this and adds a good example.
When you add the widget to your dashboard yml file, you can define the variable and configuration. You can then reference that variable in the php for the widget. It is recommended that you also set a default in the widget. This can be done using isset().
spacer: { size:4 }<div class="col-md-<?php
if (isset($size)){
echo $size;
}
else {
echo "2";
} php?>">
</div>or in short code:
<div class="col-md-<?php echo isset($size)?$size:'2'?>">
</div>