Use Command to supercharge your productivity and workflow with personal, fast, and quality AI. Turn your Terminal into a configurable, interactive, and unobtrusive personal AI app. Power of 15+ LLMs and 7 providers at your finger tips. Pair with workflows in Markdown, VS Code, Obsidian, and GitHub. Get productive fast with three simple commands.
Command Is All You Need: A play on the famous "Attention is all you need" paper that introduced Transformers. With Command, a simple terminal command is all you need to harness the power of frontier and local LLMs. No browser tabs, no apps, no context switching—just pure, fast workflow. Try ask "create a table of planets" and watch your Terminal come alive with streaming responses, markdown-formatted tables, and syntax-highlighted code blocks!
Latest Claude Models Built-in: Command now includes Claude 4.5 Sonnet, Claude 4.5 Haiku, and Claude 4.1 Opus—the newest, most capable models from Anthropic. Easy-to-use aliases like sonnet4-5, haiku4-5, and opus4-1 let you switch models instantly. Model configurations are intelligently optimized: use Haiku 4.5 for fast, simple tasks (40% cost savings), Sonnet 4.5 for complex reasoning and code, and Opus 4.1 for deep creative writing and validation.
Effortless Setup: New .env.local support makes API key configuration a breeze. Just copy .env.local.example, add your keys, and go. No shell configuration needed. Command auto-loads your keys from the current directory or home directory. Only configure the providers you actually use.
Top Models and Providers: Switch between private or hosted frontier LLMs with ease. Command supports 15+ leading models including:
- Claude: Sonnet 4.5, Haiku 4.5, Opus 4.1, Sonnet 3.5, Opus 3, Haiku 3
- OpenAI: GPT-4o, GPT-4o Mini, DALL-E 3
- Google: Gemini 1.5 Pro, Gemini 1.5 Flash
- Local: Llama 3.1, Mistral NeMo, Gemma 2, Qwen 2 via Ollama
- Groq, Perplexity, Bedrock and more
Intent-Driven Workflow: Command transforms your intents—tasks, goals, questions—into actionable results. Save your intents as simple markdown outlines, recall them when needed, run models on them, and save results based on your workflow.
Markdown Workflows: Command works seamlessly with markdown content, integrating perfectly with VS Code, Obsidian, and other markdown tools. Design custom workflows that enhance your craft without leaving your favorite environment.
Do More With Less: Simple to use out of the box with sensible defaults. As you grow comfortable, customize everything via a single command.yml configuration file. No complex setup, no steep learning curve.
Make It Your Own: Everything is configurable and extensible—commands, models, providers, prompts, parameters, folders, and document types. Experience true control over your AI workflow, your privacy, your intents, and your artifacts. Your terminal, your rules.
Go to a folder where you want to initialize Command. This could be your Obsidian vault or a VC Code project folder or even an empty folder.
pip install -U command # upgrade or install latest Command
cmnd init # copies config file, quick start samples
cmnd id # identifies active provider and model
ask "How old is the oldest pyramid?" # start prompting the modelNew in Command: Effortless API key management with .env.local support!
The easiest way to get started. Create a .env.local file in your project directory:
cp .env.local.example .env.localThen edit .env.local and add your API keys (only the ones you need):
# Anthropic (Claude models - includes new Sonnet 4.5, Haiku 4.5, Opus 4.1)
ANTHROPIC_API_KEY=your_key_here

# OpenAI (GPT-4o, GPT-4o Mini, DALL-E 3)
OPENAI_API_KEY=your_key_here

# Groq (Ultra-fast inference)
GROQ_API_KEY=your_key_here

# Google Gemini (1.5 Pro, Flash)
GEMINI_API_KEY=your_key_here

# Perplexity (Online search models)
PERPLEXITY_KEY=your_key_here
Benefits:
- Auto-loads from current directory or home directory
- No shell configuration needed
- Easy to share across projects
- Only configure what you use
Alternatively, you can set environment variables in your ~/.zshrc or ~/.bashrc:
export ANTHROPIC_API_KEY=your_key_here  # https://docs.anthropic.com/en/api/getting-started
export OPENAI_API_KEY=your_key_here     # https://openai.com/index/openai-api/
export GROQ_API_KEY=your_key_here       # https://console.groq.com/keys
export GEMINI_API_KEY=your_key_here     # https://ai.google.dev/gemini-api
export PERPLEXITY_KEY=your_key_here     # https://www.perplexity.ai/settings/api
Then reload your shell:
source ~/.zshrc # or source ~/.bashrcFor local, private models, install Ollama and download the latest models you want to run. Popular choices: Llama 3.1, Mistral NeMo, Gemma 2, Qwen 2.
Verify everything works across all configured models:
cmnd test ask      # Test text generation models
cmnd test vision # Test vision-capable modelsSkip this section if you have your Python environment already working.
First, you should be running the latest Python on your system with Python package manager upgraded to the latest.
python --version
# should return Python 3.12.x or higher as on Sep'24- Optionally install latest Python on Mac.
- Safely install Command. Follow this thread to setup
pyenvversion manager.
First change to the directory to your VS Code workspace, Obsidian vault, or folder where you want to install Command. Next create the virtual environment.
python -m venv envNow you can activate your virtual environment like so. You will notice that directory prefixed with (env) to indicate you are now running in the virtual environment.
. env/bin/activateTo leave the virtual environment using deactivate command. Re-enter using same command as earlier.
Now you are ready to install Command.
*Note that cmnd, ask, image and refer are four top level commands available to you when you install Command.
| Command | Example and Description |
|---|---|
| *ask | ask "your prompt"Prompt the LLM for a fast, crisp (default up to 300 words), single turn response askBrowses the configured prompts folder, lists prompt templates for user to run. |
| audit | cmnd auditAnalyze your own usage of Command over time with an insightful command line dashboard and markdown report. |
| config | cmnd config ask save trueEdit command.yml file config from command line |
| gather | cmnd gather "webpage url"Cleanly scrape an article from a webpage, without the menus, sidebar, footer. Includes images. Saves as markdown formatted similar to the HTML source. Refer the scraped markdown content using refer gather command.Use vision on scraped images using cmnd vision command. |
| *refer | refer text-to-extractBrowse a set of raw text files and run custom prompts to extract new structured content. refer inline-prompts-to-runRun prompts embedded inline within text to expand, change, and convert existing documents. refer intentsExpand a set of intents and prompts within an intents template refer your-commandYou can configure your own extensions to refer command by simply copying and changing any of the existing refer-existing model configs. |
| run | cmnd runBrowse Code folder for markdown files with code blocks, create, setup, and run the app in one single command!The Code folder markdown files with code blocks are created using ask command running Create Vite App.md prompt template or similar. |
| id | cmnd idIdentifies the current provider and model for ask commandcmnd id section-nameIdentifies the provider and model defined in specific section |
| *image | imageSelect a prompt template to generate an image. image "Prompt for image to generate"Prompt to generate an image. |
| init | cmnd initInitialize command in any folder. Copies command.yml default config and quick start Intents and Embeds folders and files. Checks before overwriting. Use --force option to force overwrite files and folders. |
| intents | cmnd intents "Financial Analysis"Interactively choose from a list of intents within a template to refer into content embeds |
| merge | cmnd merge "Source File"Finds Source File updated with placeholder tags [merge here] or as custom defined in merge config, then merges the two files into Source File merged. Use along with refer inline-prompts-to-run command to reduce number of tokens processed when editing long text for context but updating only a section. |
| split | cmnd split "Large File"Use this command to split a large file into chunks within a specified ratio of target model context. You can configure target model and ratio in split section of the configuration. Original file remains untouched and new files with same name and part # suffix are created. |
| test | cmnd test askTests command command using all providers and models defined in command.yml config and provides a test summary.cmnd test visionTest vision models. |
| trends | cmnd trendsVisualize latency and token length trends based on cmnd test runs for ask and vision commands across models and providers. You can trend for a period of days using --days 7 command option. |
| validate | cmnd validate "Financial Analysis"Validates prior generated embeds running another model and reports the percentage difference between validated and original content. |
| vision | cmnd vision -p path/to/image.png "Describe this image"Runs vision models on images from local path (-p), url (-u), or camera (-c) and responds based on prompt. |
Transform partial ideas into polished content with Command's powerful refer workflow. Write partial blog posts, seed ideas, intent lists, or incomplete notes—then use Command to expand them into complete, well-researched content.
The refer command works with custom refer-section configs in command.yml to transform partial content into complete posts, notes, articles, or research papers. Experiment with models, tune settings by document type, define custom folders, and specify document-specific system prompts.
Check out the Posts folder with a sample partially written post on startup growth strategies. Here's the related config section (now using Claude Opus 4.1 for creative writing):
refer-post-to-update:
  lookup-folder: Posts
  max-tokens: 4000
  model: opus4-1          # Optimized: Opus 4.1 excels at creative writing
  provider: claude
  save: true
  save-folder: Posts
  system: You will be given a partially written blog post on a topic.
    Your job as an expert blog writer is to expand the post...
  temperature: 0.5
Run the command and watch as the model streams its response:
refer post-to-update "startup-growth-hacking"The expanded post saves to the Posts folder with an updated prefix, preserving your original.
Want to process research papers, class notes, or cooking recipes? Just copy and customize a refer-* section:
refer-notes-to-summarize:
  lookup-folder: Notes
  max-tokens: 4000
  model: haiku4-5      # Haiku 4.5 is fast and cost-effective for summaries
  provider: claude
  save: true
  save-folder: Summaries
  system: Summarize the key points from these notes...
  temperature: 0.3
Then run your custom command:
refer notes-to-summarize "lecture-05-quantum-physics"Model Selection Best Practices:
- Use Haiku 4.5 for simple extraction and templates (fast, 40% cheaper)
- Use Sonnet 4.5 for complex analysis and code generation
- Use Opus 4.1 for creative writing and deep research synthesis
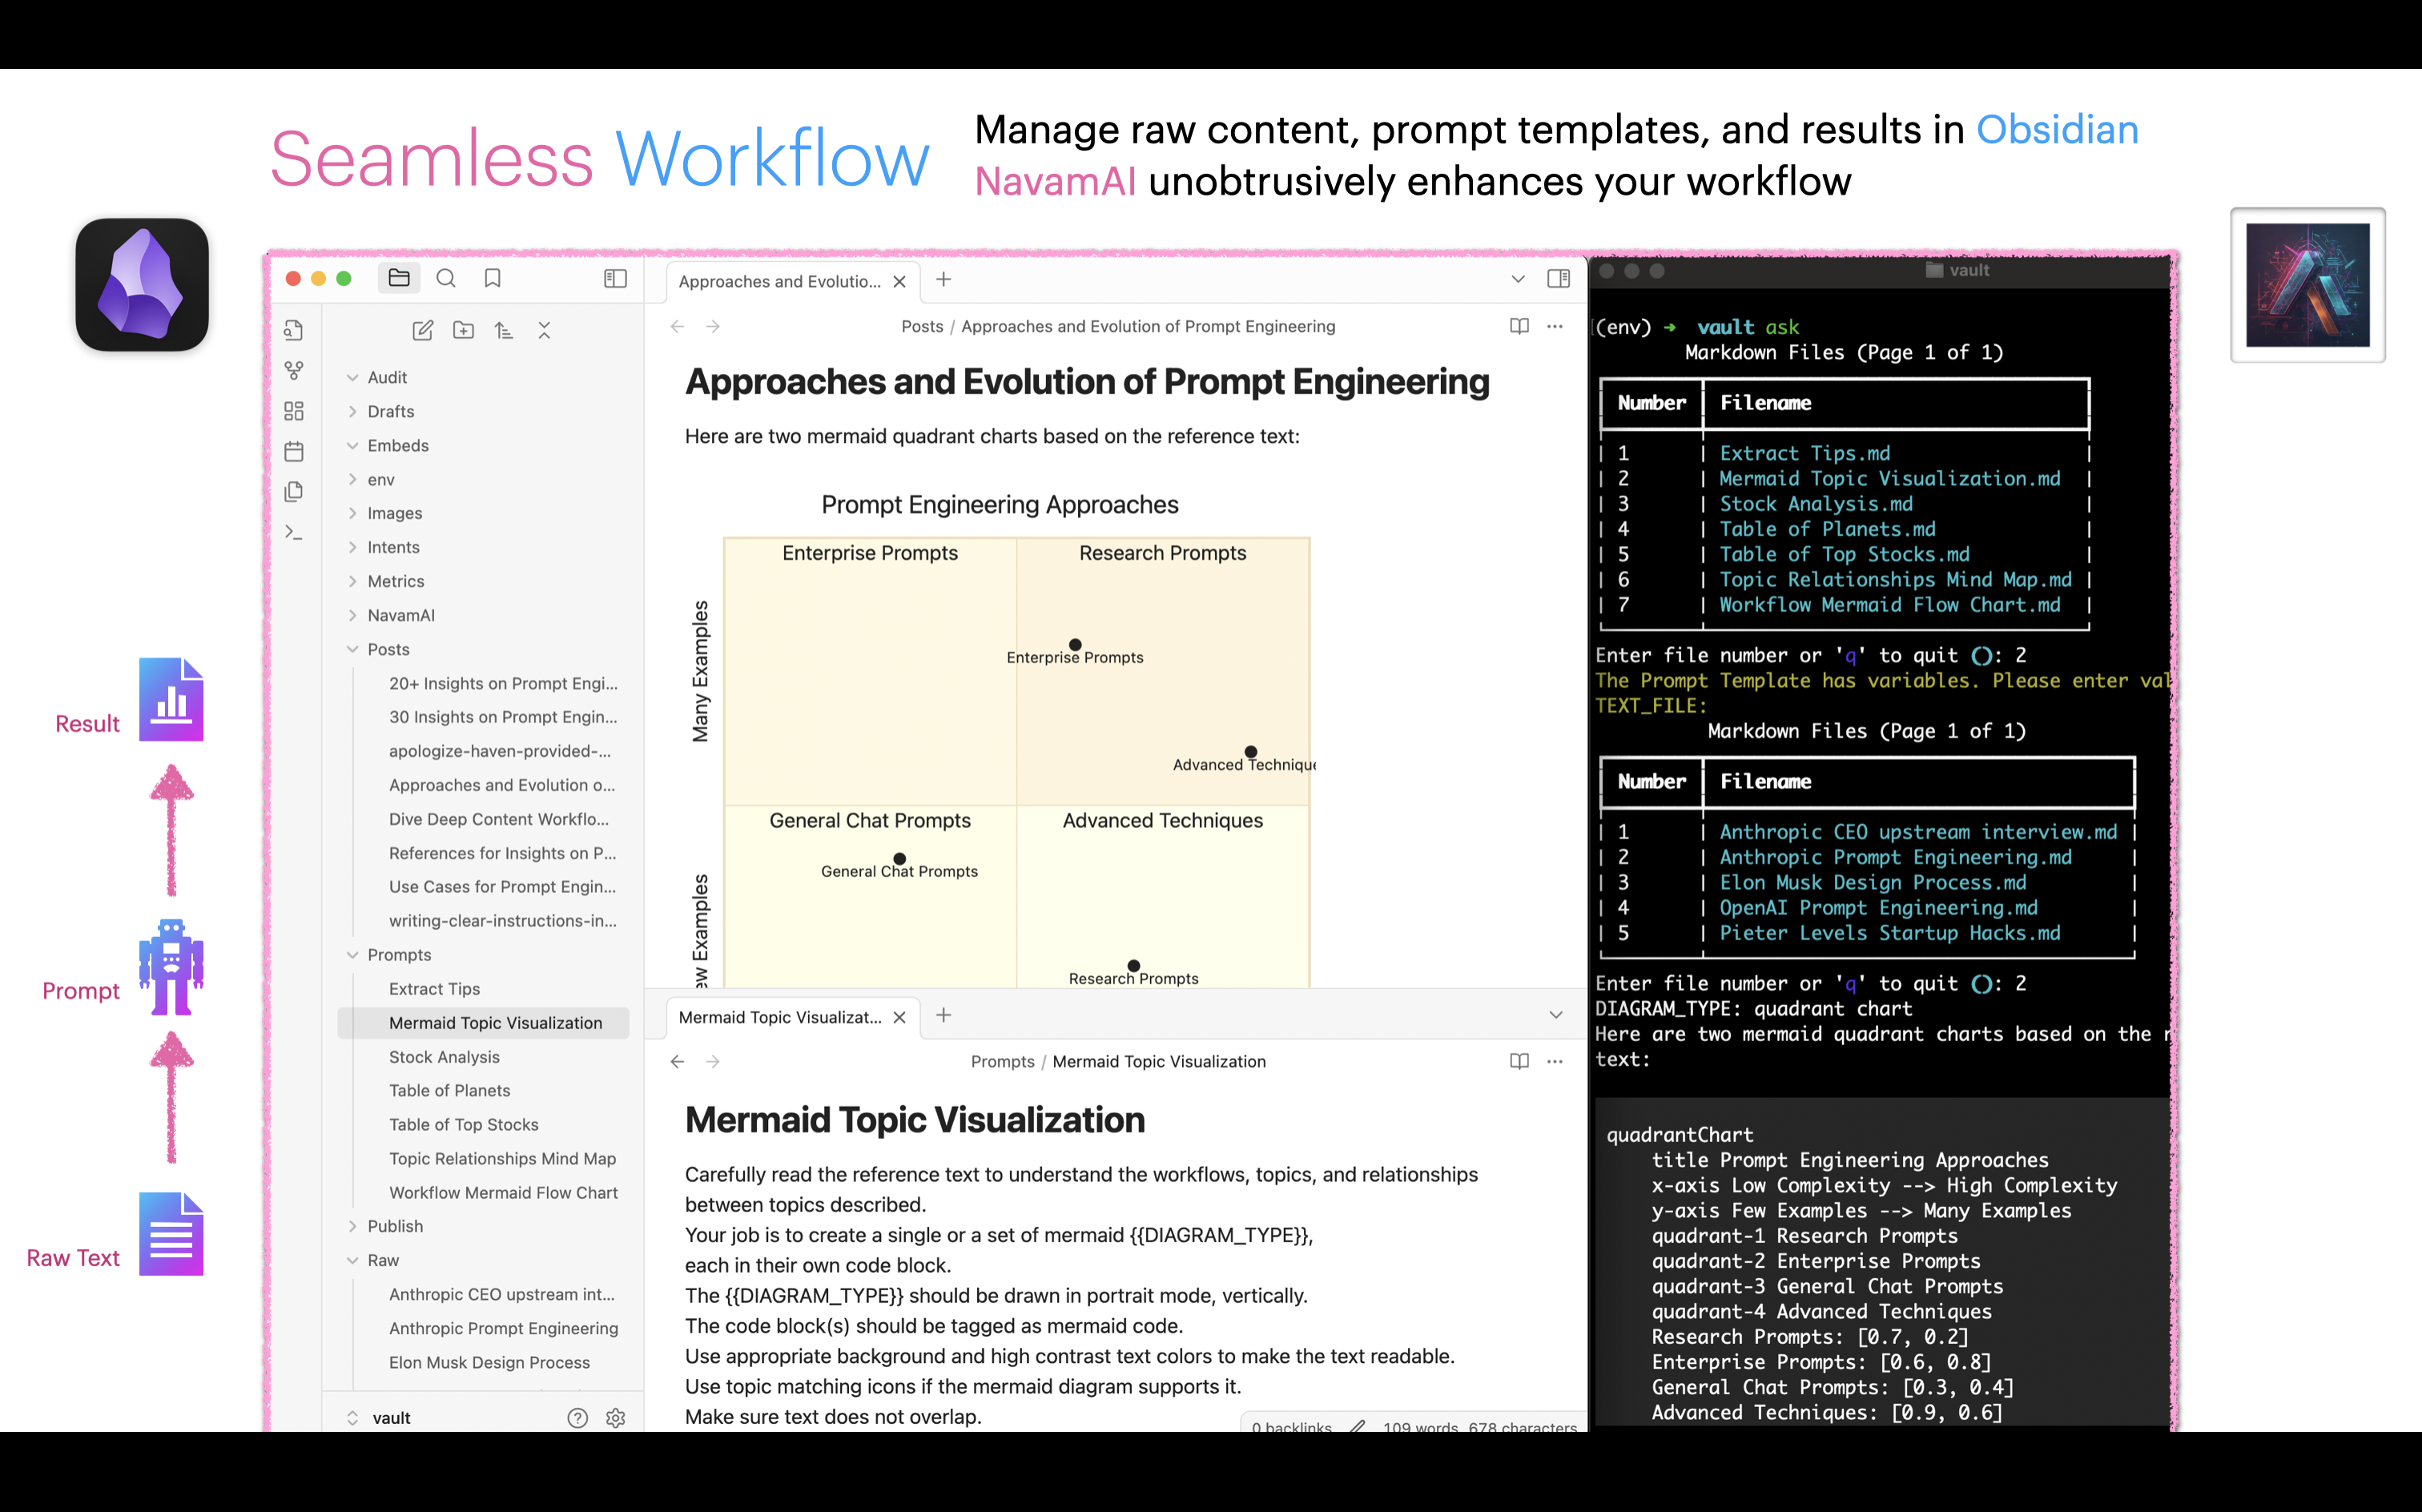
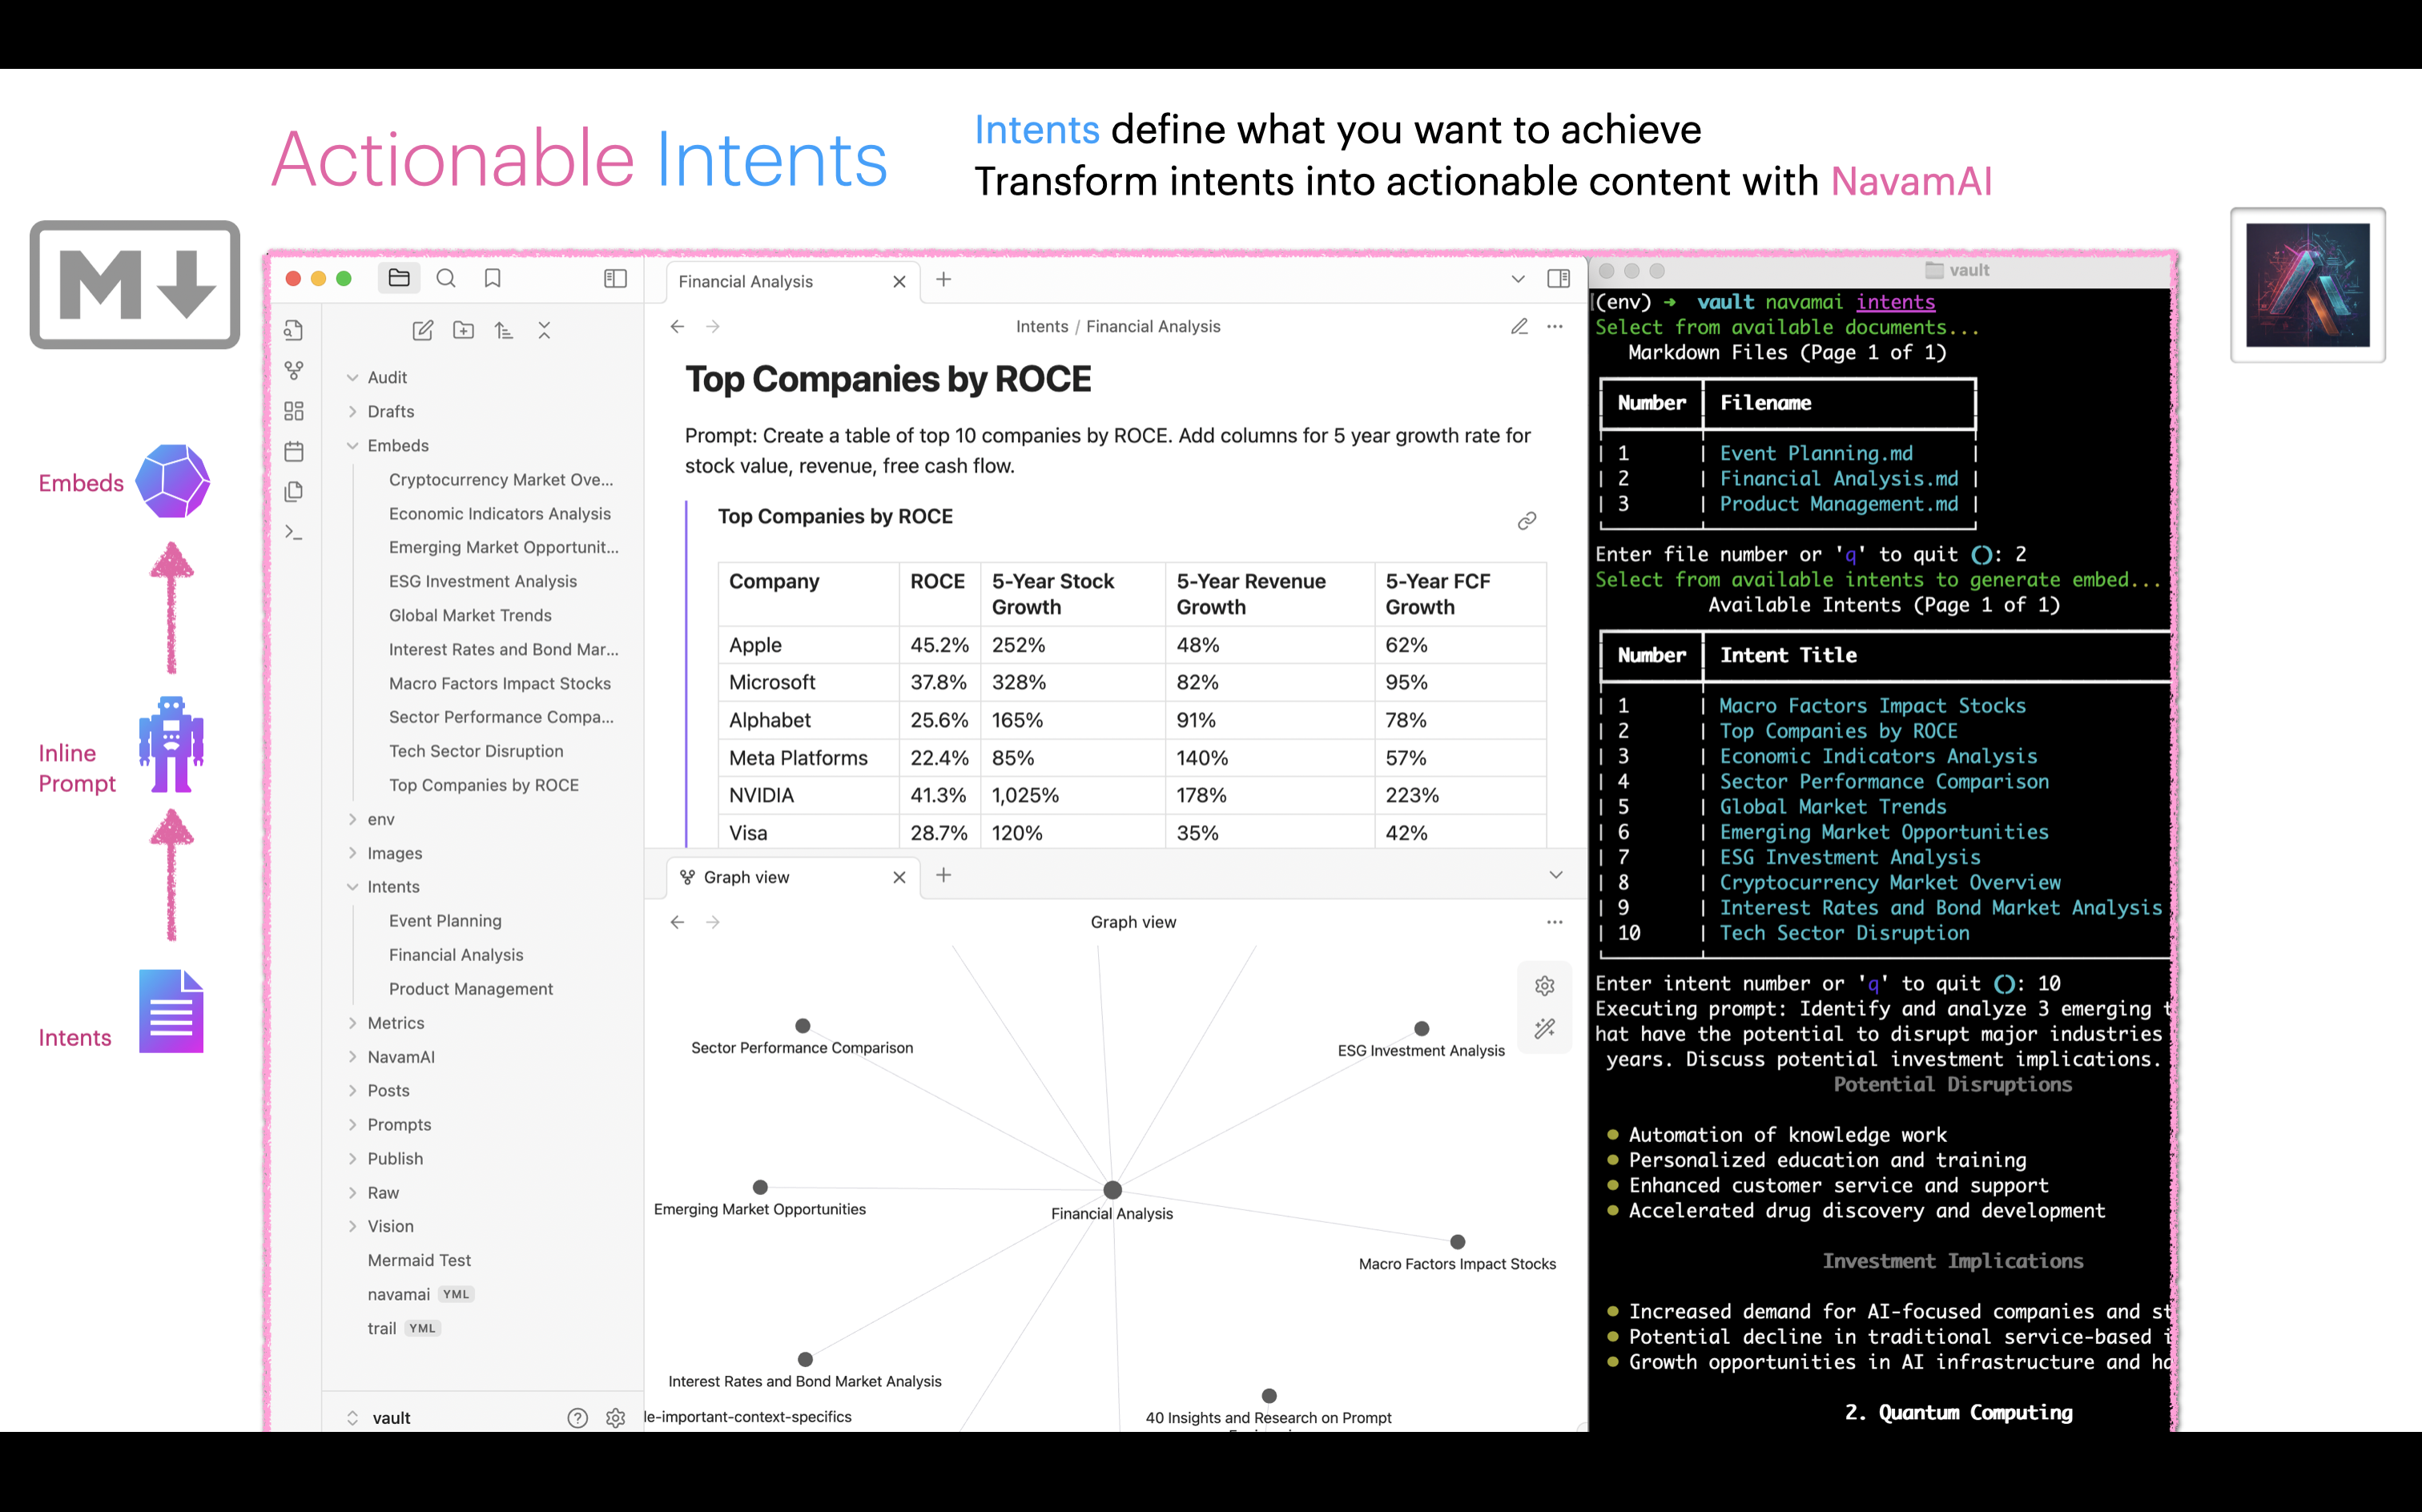
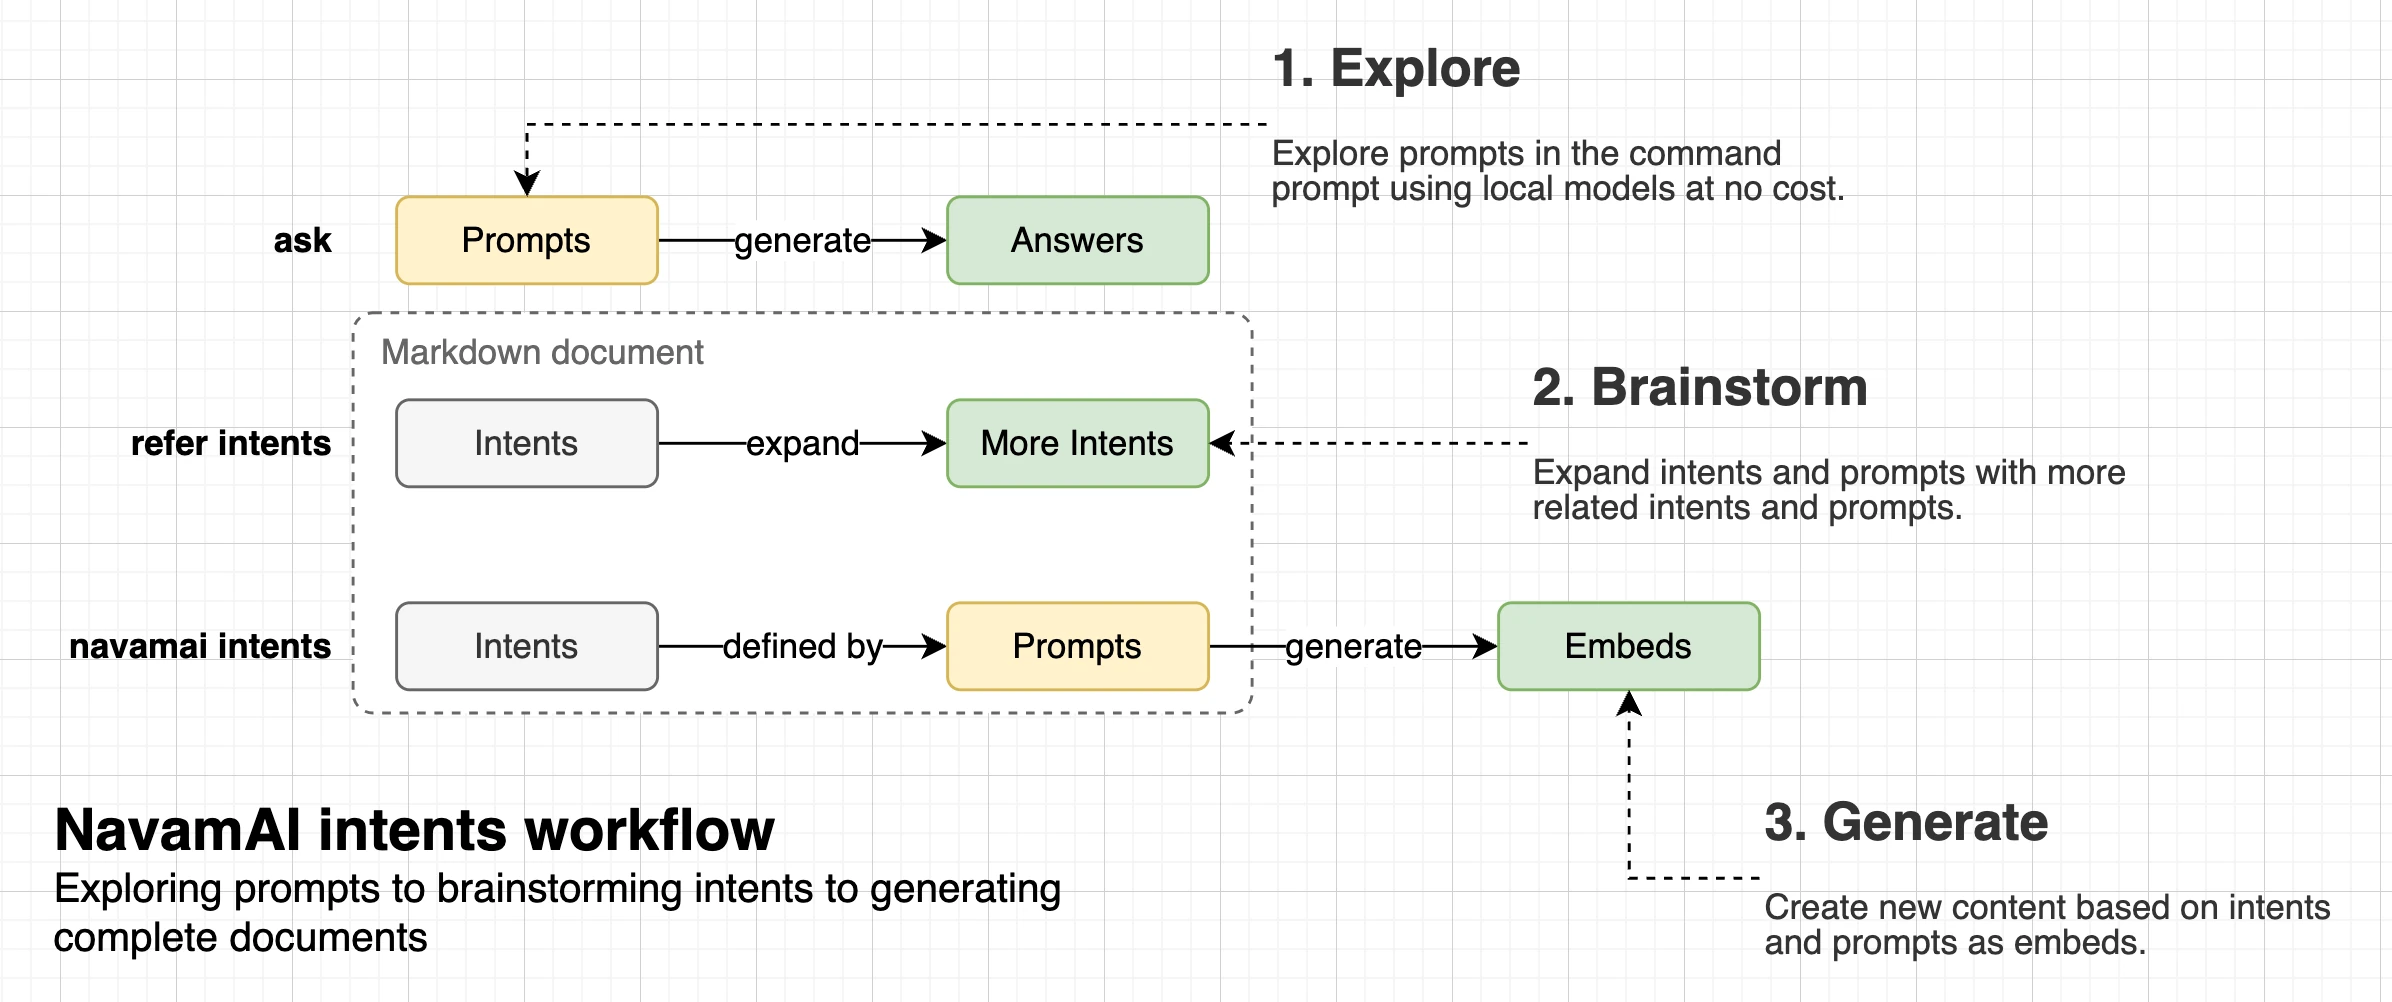
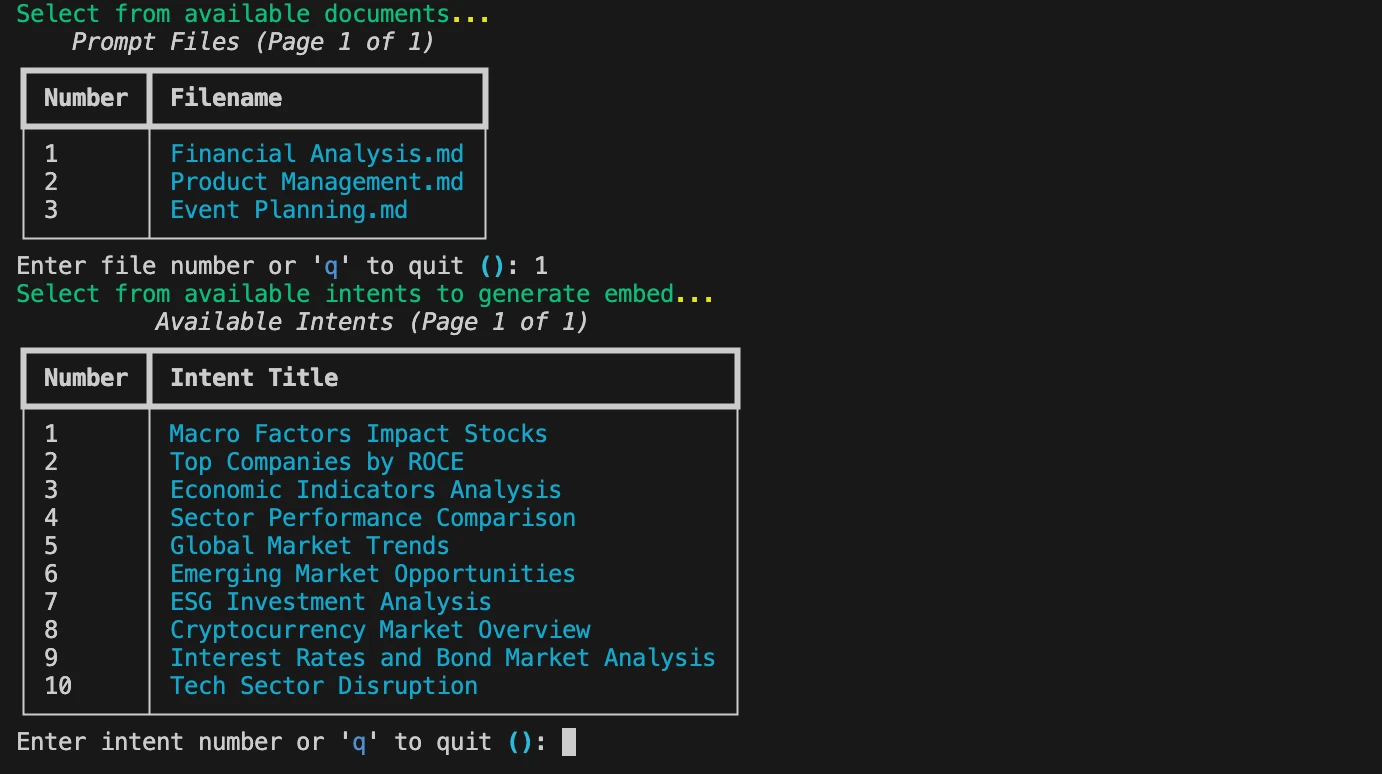
When combined with other Command commands this workflow can get even more powerful. As an example, start by defining your document template for a set of intents and prompts as a simple markdown. For example Financial Analysis or Product Management are shown here. Next add a few intents as headings like, Macro Factors Impact Stocks or Top Companies by ROCE and so on. Then add simple prompts under these intents to generate content. You can now use Command to expand on the set of intents and prompts in your document template with the command refer intents-to-expand "Financial Analysis" and the model will brainstorm more related intents and prompts for you to use.
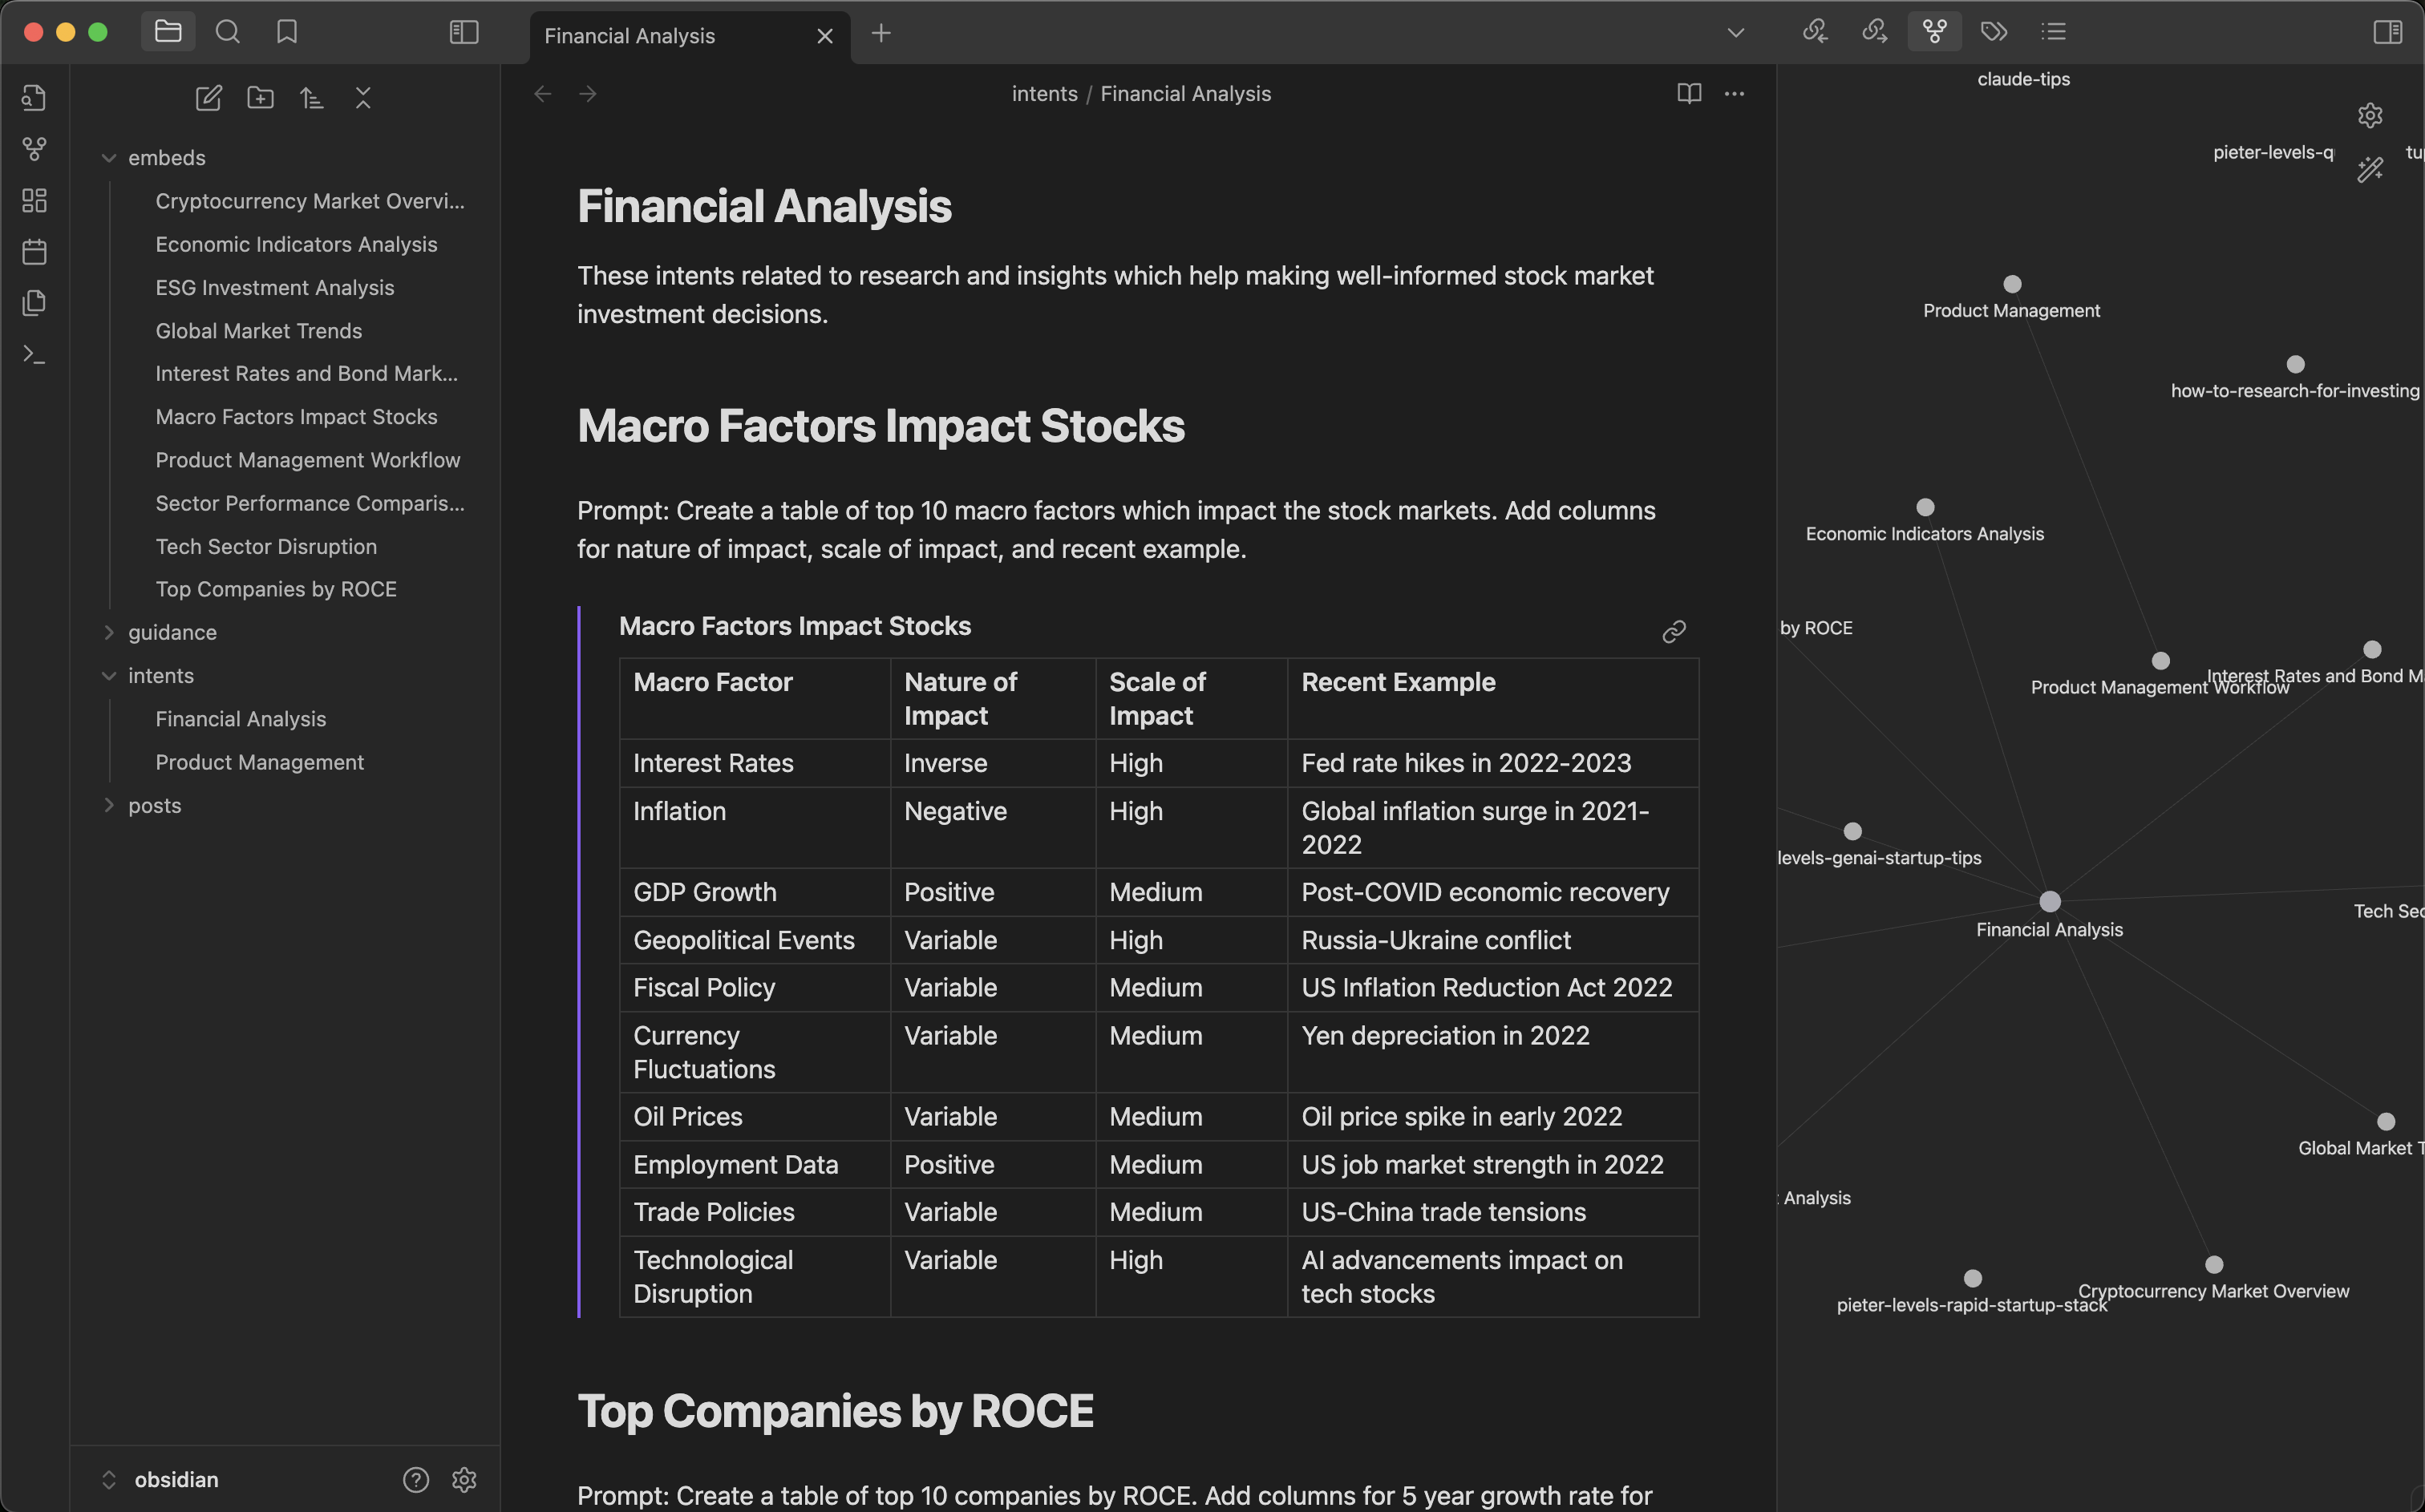
Now run cmnd intents "Financial Analysis" and choose among a list of intents to generate as content embeds. The response is saved under Embeds folder automatically and the embed is linked in your document template instantly. Rinse, repeat.
This workflow can get really useful very fast. As each template has linked embeds, Obsidian Graph view can be used to visualize the links. You can get creative and link related templates or even enhance generated embeds with more intents. Of course this also means you can use all the great Obsidian plugins to generate websites, PDFs, and more. Your creativity + Obsidian + Command = Magic!
Command makes it effortless to compare 15+ leading models from 7 providers (Ollama, Anthropic, OpenAI, Groq, Google, Bedrock, Perplexity). The command test command runs your prompts across all configured provider-model combinations and generates a comprehensive evaluation summary.
What You Can Compare:
- Response Time (Latency): Which models answer fastest?
- Response Quality: Does it follow instructions precisely?
- Response Accuracy: Are the facts correct?
- Token Length (Cost): What's the efficiency-to-cost ratio?
Configure your test prompts in the test section of command.yml, then run:
cmnd test ask      # Test text generation across all models
cmnd test vision   # Test vision-capable models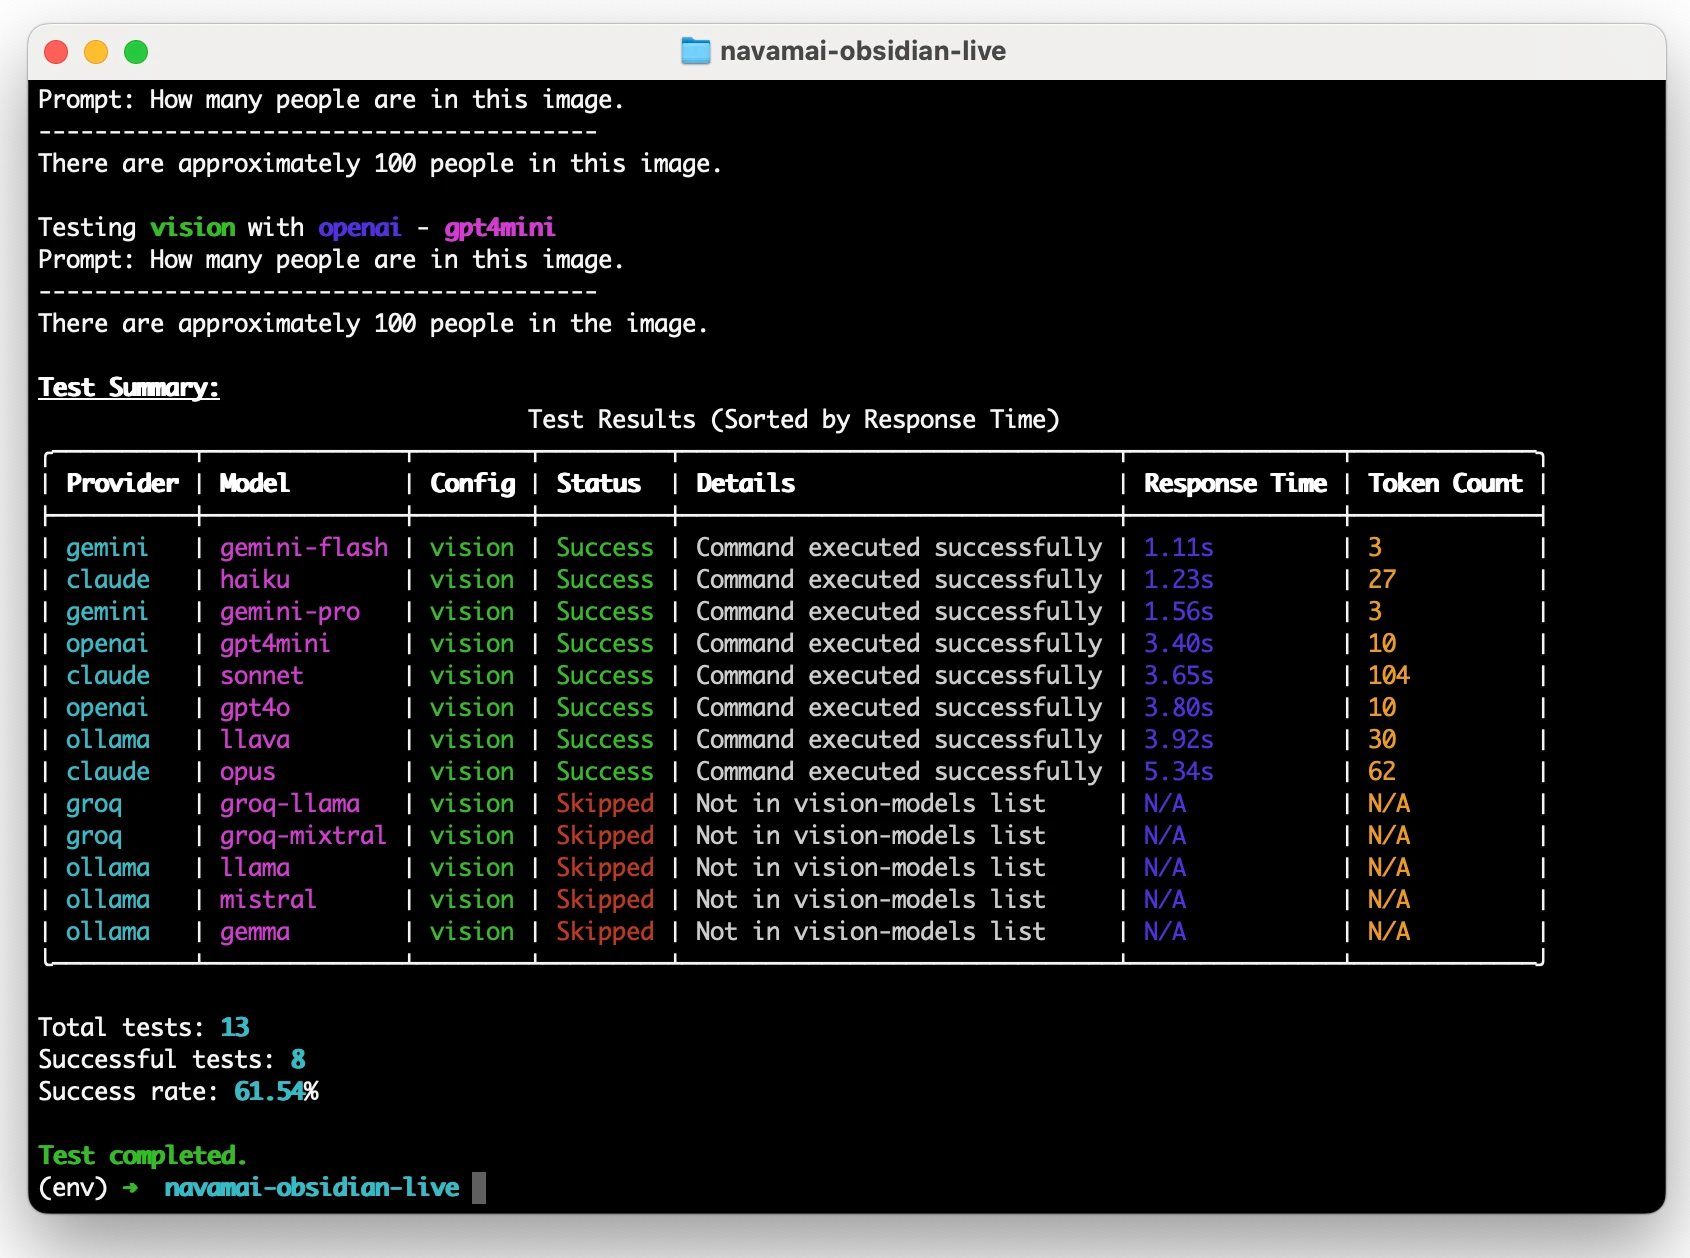
The default vision test uses an image with 150-160 people standing in a circle and asks models to count them. The accuracy of the count reveals each model's vision capabilities. You'll notice:
- Response times correlate with model size: For Claude, Opus 4.1 > Sonnet 4.5 > Haiku 4.5; For Gemini, Pro > Flash; For OpenAI, GPT-4o > GPT-4o Mini
- Groq typically delivers the fastest response times for text generation
- Quality varies: How closely models follow system and user prompts indicates response quality
Run multiple tests to understand model performance patterns. Network latency, server load, and other factors can affect individual runs, but trends emerge over time. Use the cmnd trends command (covered below) to visualize performance patterns across days or weeks.
Every cmnd test run saves detailed metrics (latency, token counts) to the Metrics folder with timestamps and provider-model tags. Over time, these metrics reveal performance patterns and help you make informed decisions about which models to use.
cmnd trends           # View trends for last 7 days (default)
cmnd trends --days 30 # View trends for last 30 days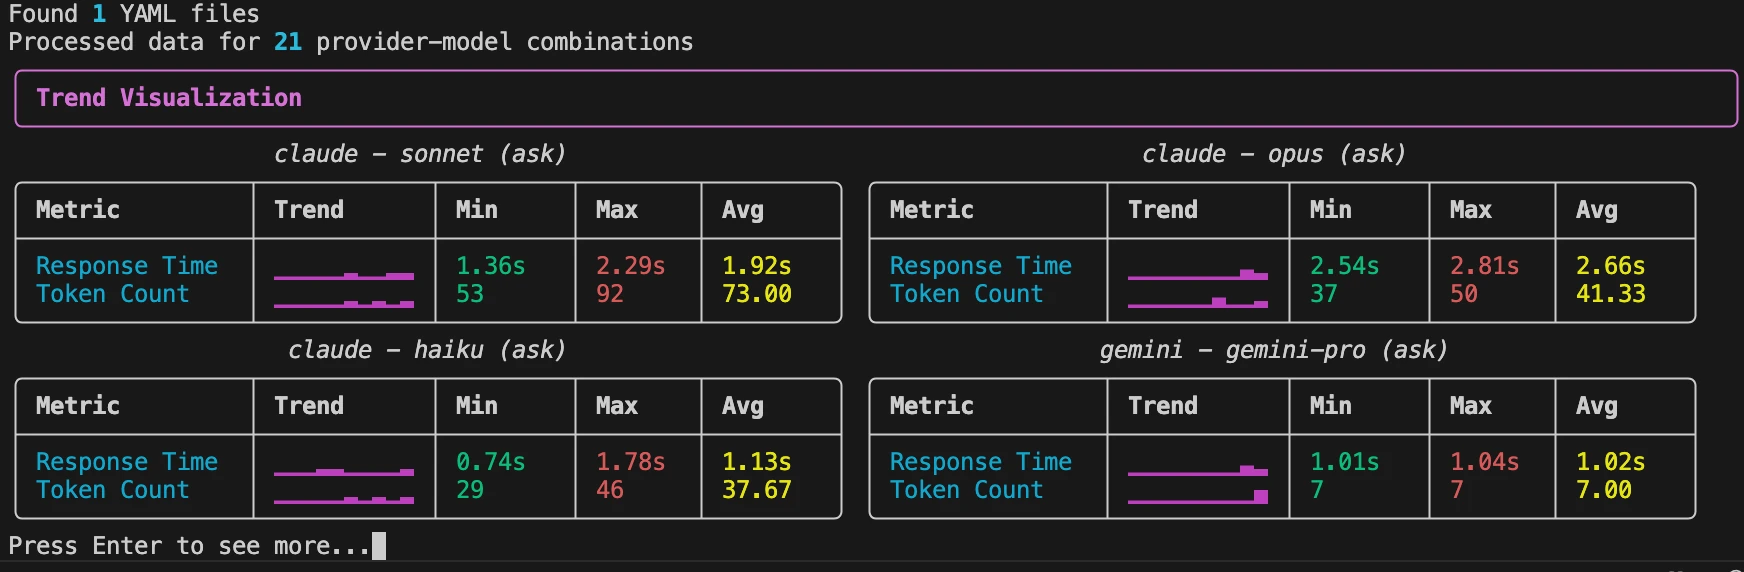
What You'll See:
- Sparkline visualizations showing performance trends over time
- Latency patterns: Are models getting faster or slower?
- Token count trends: Is efficiency improving?
- Consistency metrics: Which models deliver reliable performance?
Use these insights to:
- Decide when to switch models based on degrading performance
- Identify the most reliable models for your workload
- Plan cost optimizations by tracking token usage patterns
- Validate that new model versions (like Sonnet 4.5 or Opus 4.1) deliver expected improvements
Compare models in real-time by running them in parallel terminal windows. Open multiple shells, configure each to use a different model, and run the same prompt to see how responses differ.
Quick Example:
Terminal 1:
cmnd config ask model sonnet4-5
ask "Explain quantum entanglement"
Terminal 2:
cmnd config ask model opus4-1
ask "Explain quantum entanglement"
Terminal 3:
cmnd config ask model haiku4-5
ask "Explain quantum entanglement"

Command reads command.yml from the current directory on every run, enabling sophisticated parallel workflows:
- Copy config to multiple folders for different use cases
- Run long-running tasks on local models in one terminal
- Handle daily workflows with frontier models in another
- Test experimental prompts in a third environment
Example folder structure:
~/projects/research/          # Opus 4.1 for deep analysis
~/projects/quick-tasks/       # Haiku 4.5 for speed
~/projects/code-generation/   # Sonnet 4.5 for coding
Each folder can have its own command.yml with optimized settings for that workflow.
Your terminal, your rules. No behavioral marketing, no growth hacking, no forced workflows. Command puts you in complete control of your AI experience.
Choose Your Path:
- Speed: Groq with Llama 3.1 for ultra-fast responses
- Capability: Sonnet 4.5, Opus 4.1, or GPT-4o for frontier performance
- Privacy: Mistral NeMo, Llama 3.1, or Gemma 2 running locally via Ollama
- Context: Gemini 1.5 Pro/Flash for massive context windows (up to 2M tokens)
- Cost: Haiku 4.5 for 40% savings on simple tasks
Switch between any workflow with a simple config change or terminal command. Work online with fast WiFi or completely offline with local models. No constraints.
Command uses friendly aliases that map to full model names. Switch models instantly:
cmnd config ask model sonnet4-5    # Latest Claude Sonnet
cmnd config ask model haiku4-5     # Fast, cost-effective
cmnd config ask model opus4-1      # Deep creative analysis
cmnd config intents model llama    # Local privacy
Current Model Mappings:
model-mapping:
  # Claude models (including latest 4.x series)
  sonnet4-5: claude-sonnet-4-5
  haiku4-5: claude-haiku-4-5
  opus4-1: claude-opus-4-1
  sonnet: claude-3-5-sonnet-20240620
  opus: claude-3-opus-20240229
  haiku: claude-3-haiku-20240307

  # Ollama local models
  llama: llama3.1
  gemma: gemma2
  mistral: mistral-nemo

  # Groq (ultra-fast inference)
  mixtral: mixtral-8x7b-32768

  # OpenAI models
  gpt4mini: gpt-4o-mini
  gpt4o: gpt-4o

  # Gemini models (massive context)
  gemini-pro: gemini-1.5-pro
  gemini-flash: gemini-1.5-flash
Customize these mappings in your command.yml to match your preferences.
You control your data. Period. Choose models and providers you trust, or run LLMs entirely locally on your laptop with zero external API calls.
Your Privacy Options:
-
Fully Local (Zero Cloud): Use Ollama with Llama 3.1, Mistral NeMo, Gemma 2, or Qwen 2. Your data never leaves your machine.
-
Trusted Cloud Providers: Select from Anthropic (Claude), OpenAI, Google (Gemini), Groq, Perplexity, or AWS Bedrock based on your trust and compliance requirements.
-
Hybrid Workflows: Use local models for sensitive data, cloud models for general tasks.
Switch instantly:
cmnd config ask model llama      # Switch to local Llama 3.1
cmnd config ask provider ollama # Ensure local providerConfigure different privacy levels for different commands. Example: keep quick Q&A local, use frontier models for content generation:
ask:
  provider: ollama          # Local, private
  model: mistral           # Mistral NeMo on your laptop
  max-tokens: 300
  save: false              # Don't save casual Q&A
  temperature: 0.3

intents:
  provider: claude         # Cloud-based for advanced content
  model: sonnet4-5         # Latest Sonnet for quality
  max-tokens: 4000
  save: true              # Save generated content
  save-folder: Embeds
  temperature: 0.3

validate:
  provider: claude
  model: opus4-1          # Opus 4.1 for deep validation
  max-tokens: 4000
  temperature: 0.0
Key Privacy Features:
- API keys stored in
.env.local(never committed to git) - All data saved locally in your chosen folders
- No telemetry, no analytics, no tracking
- Full control over what gets saved and where
- Audit trail via
cmnd auditshows exactly what you've run
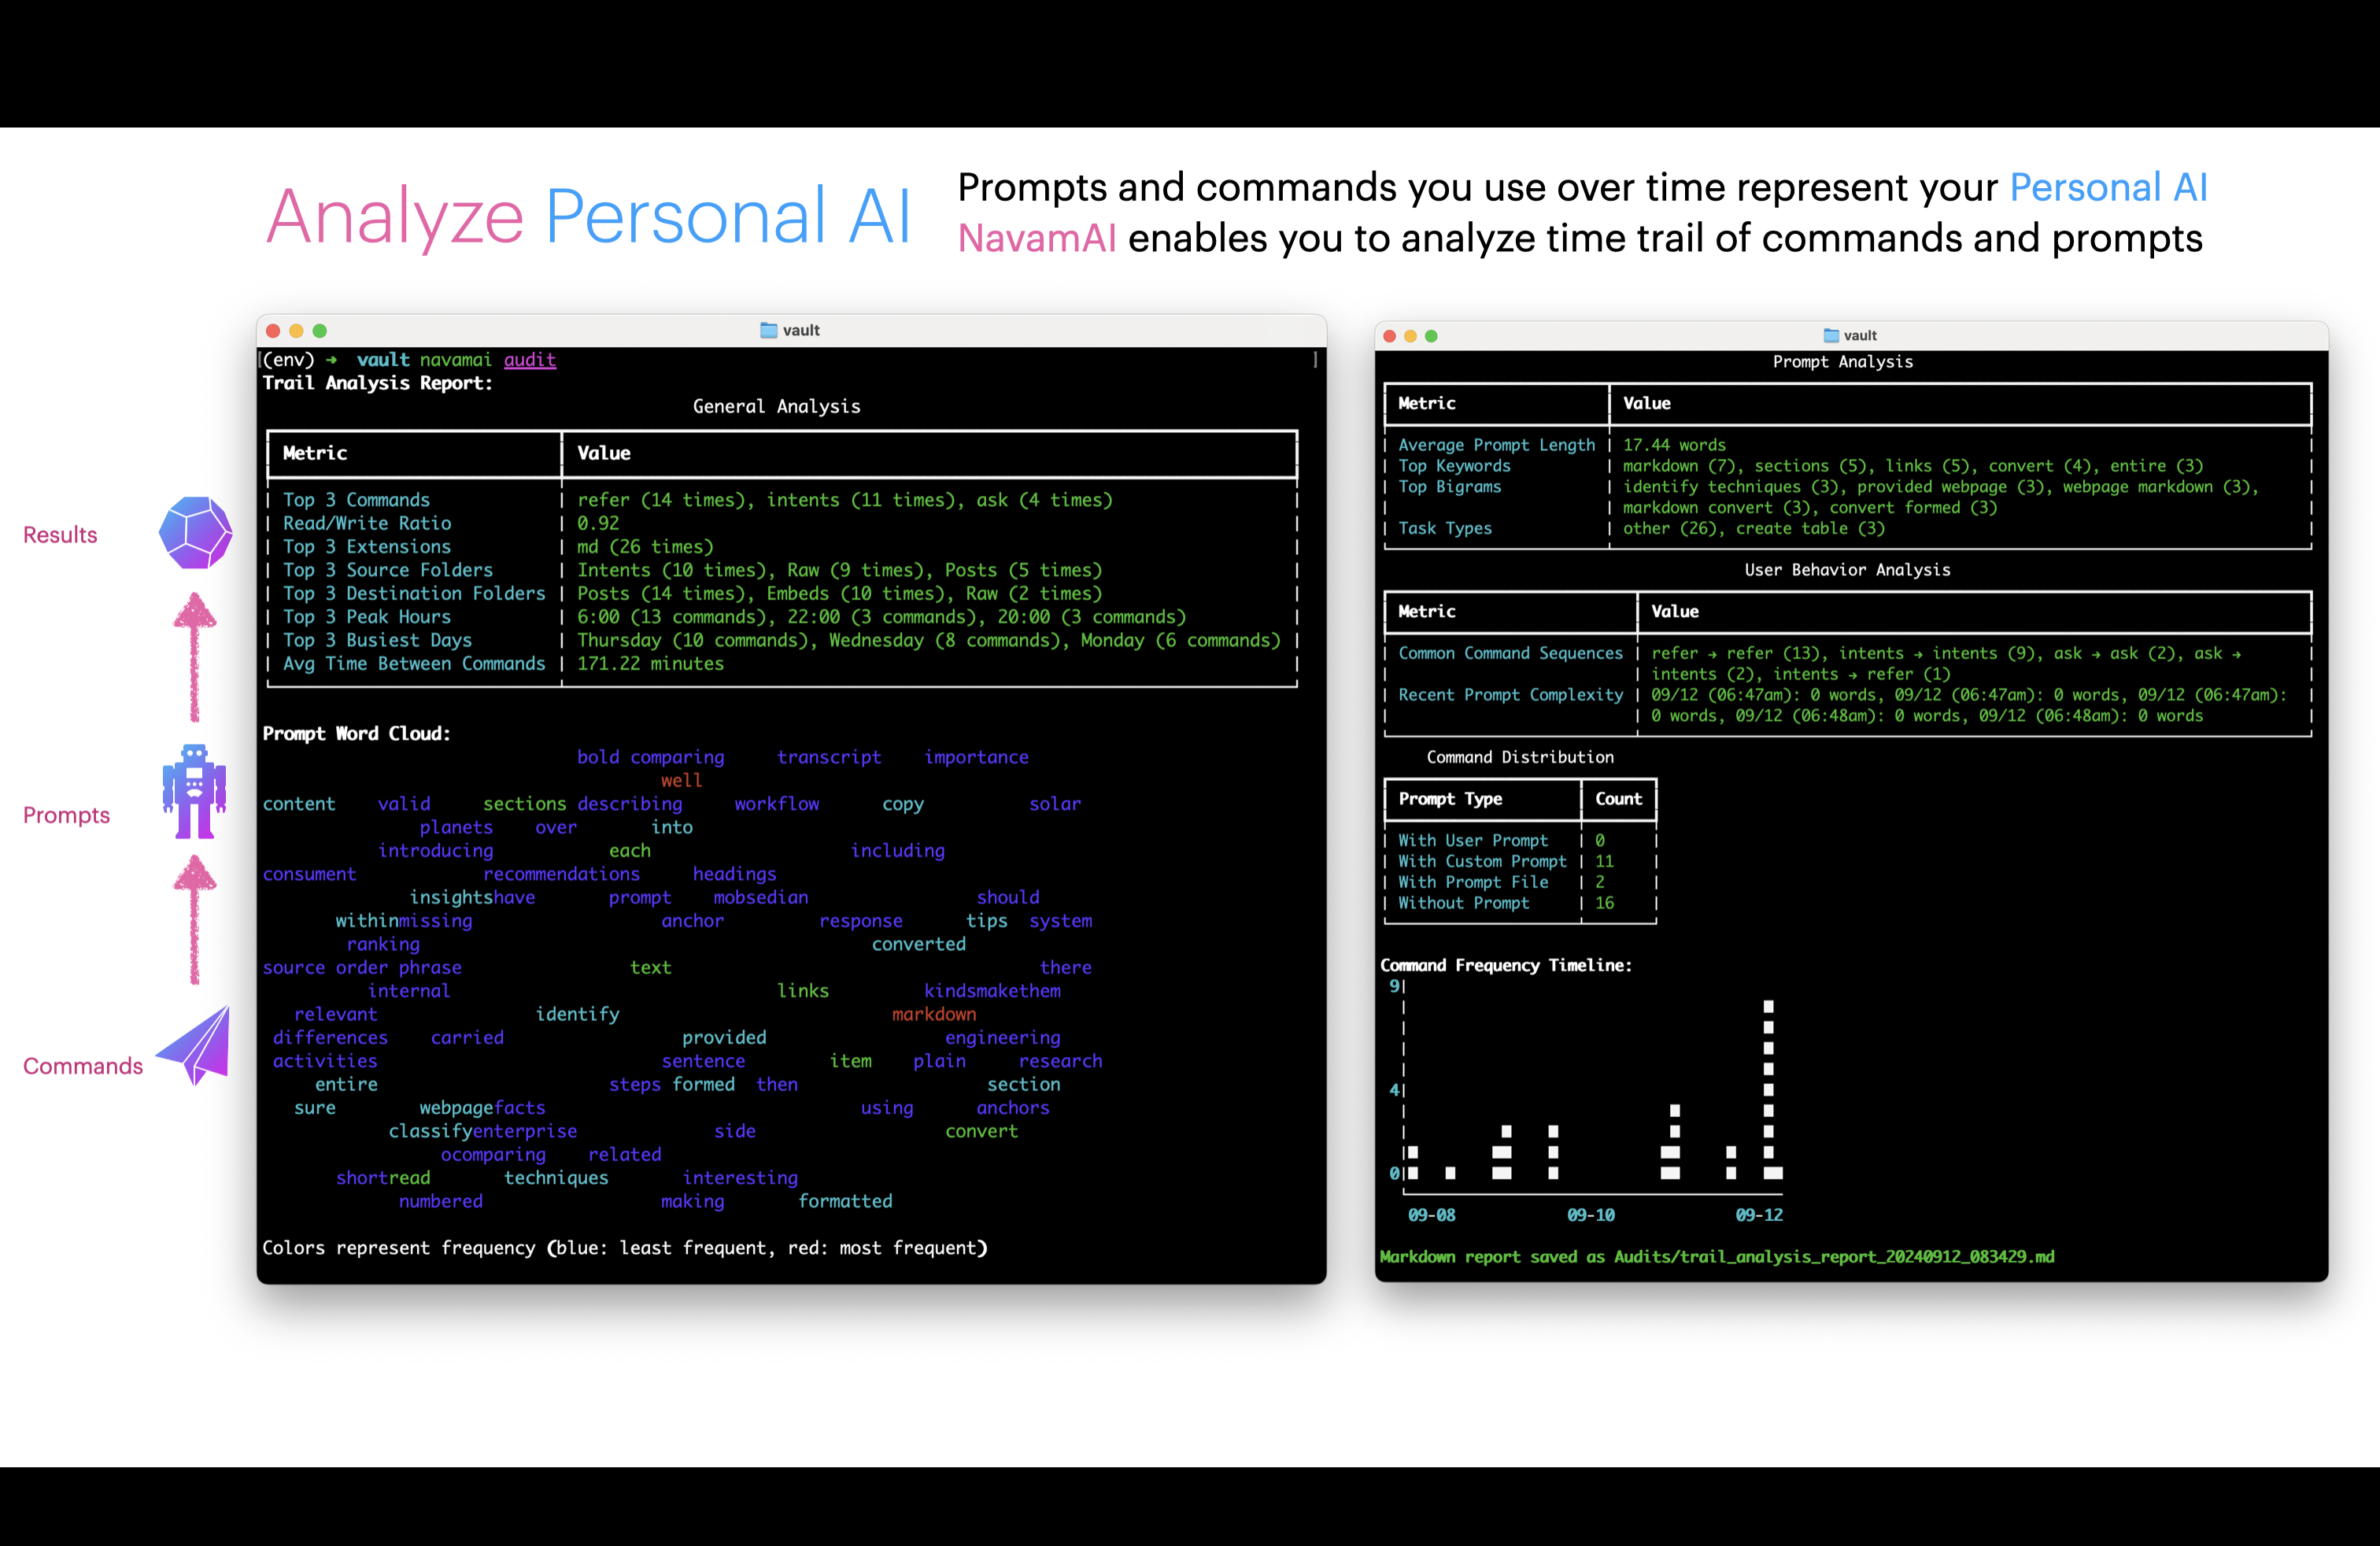
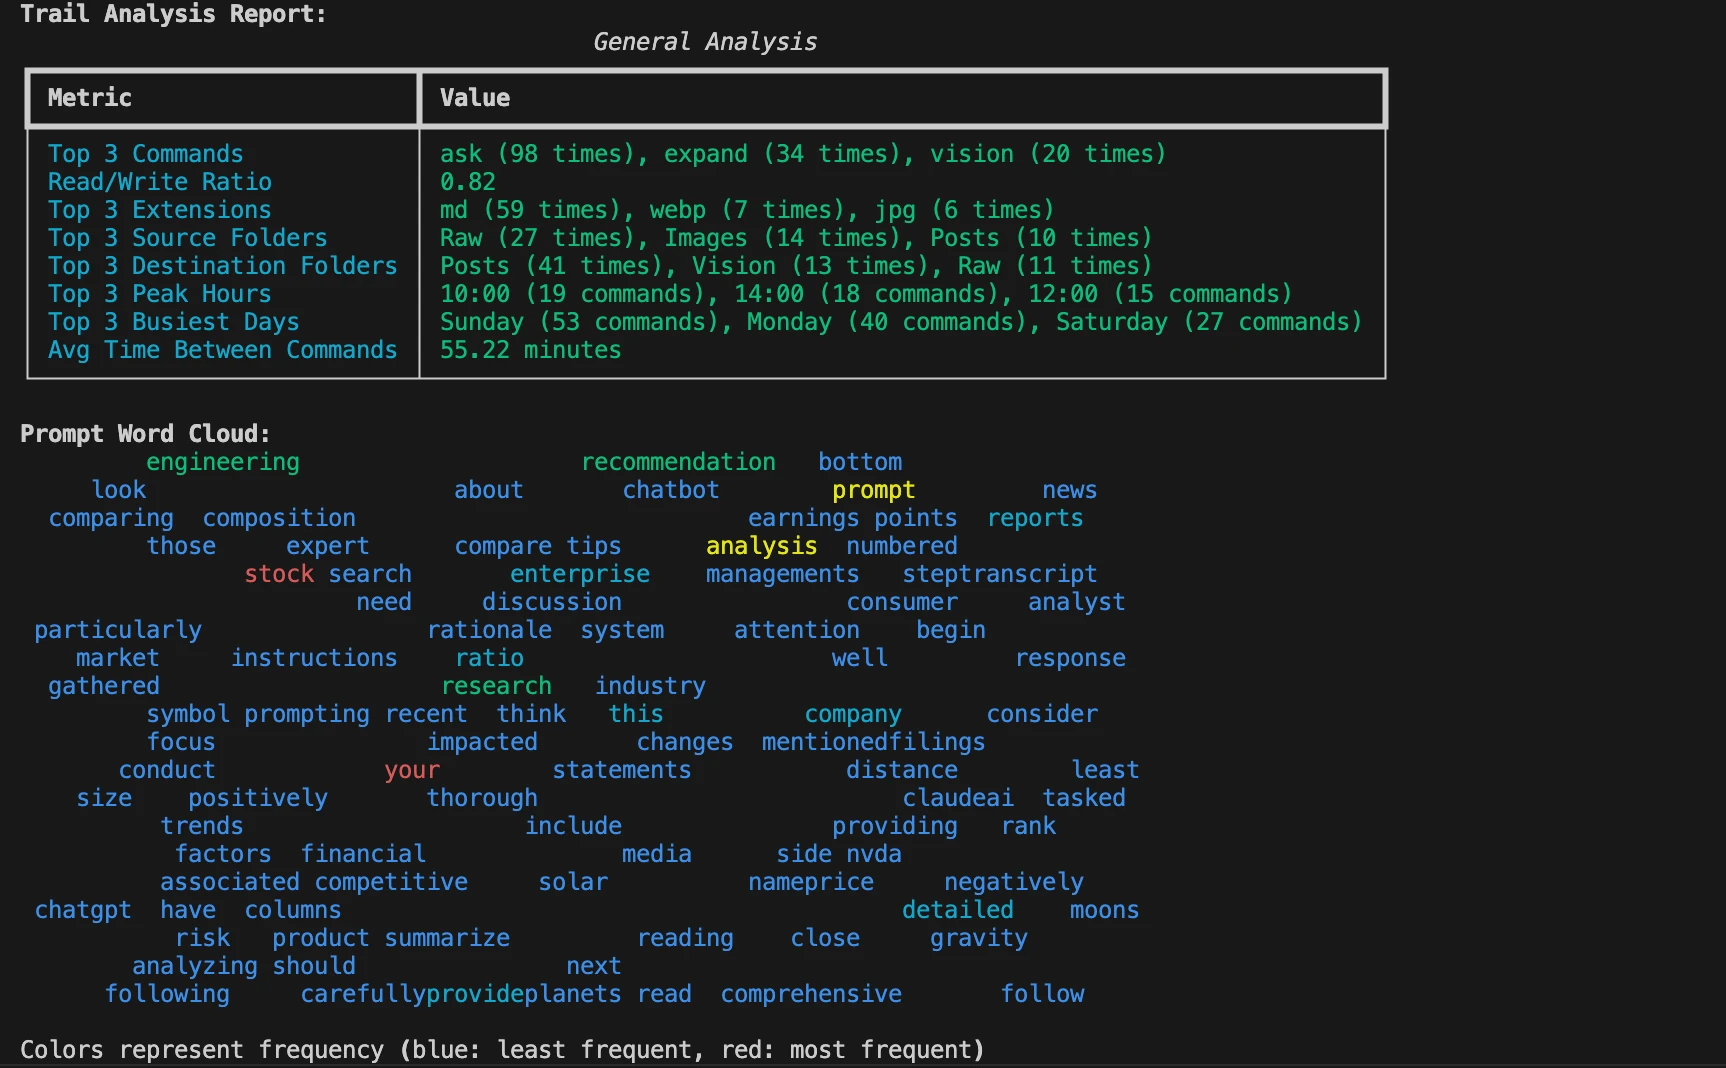
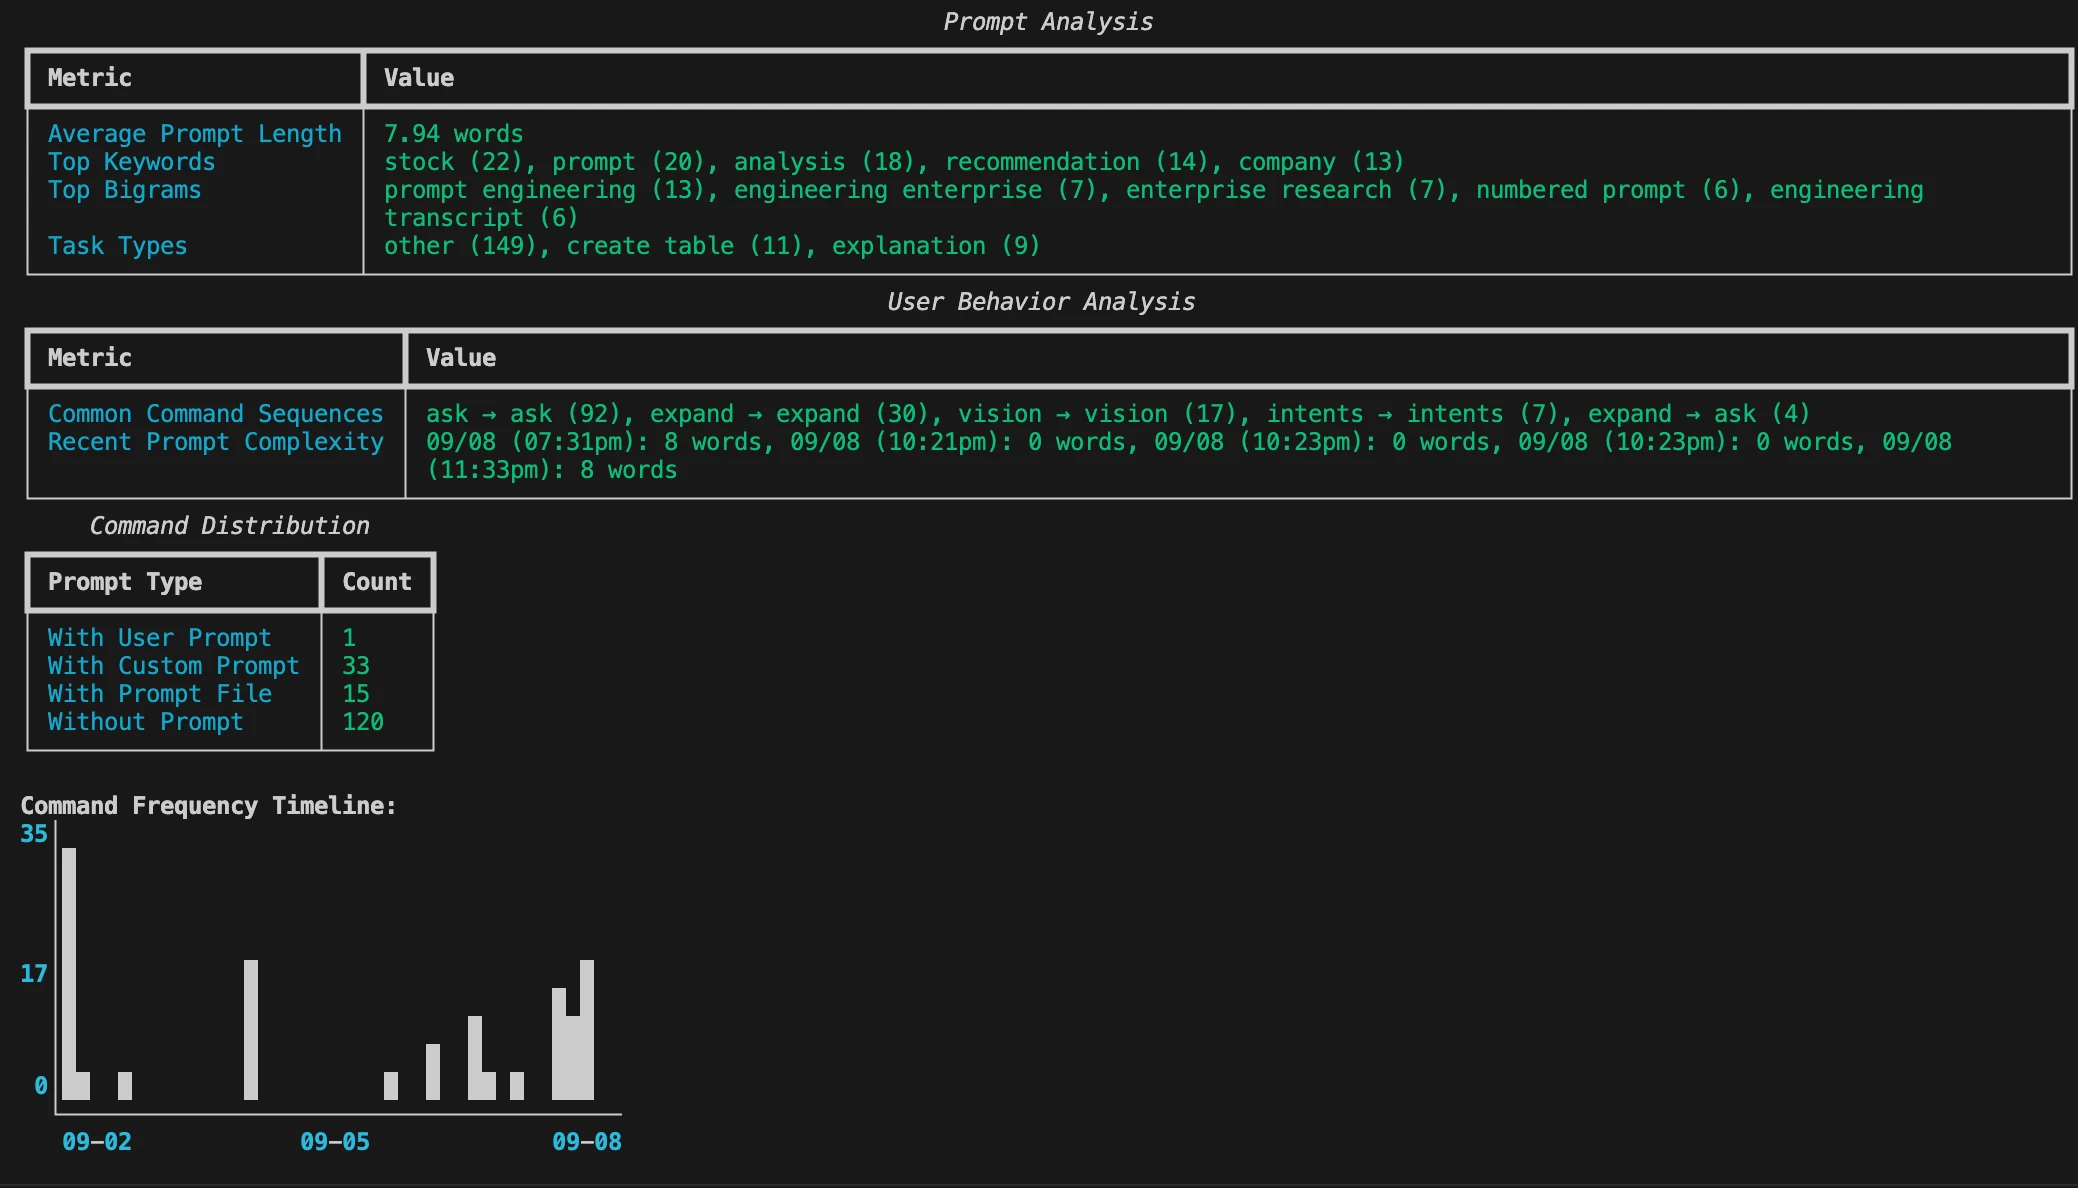
Command saves a trail of commands, prompts, templates, lookup folders, and saved files in trail.yml file. You can visualize this anytime using cmnd audit command to gain insights of your Command usage over time.
Your intents are tasks you want to execute, goals you want to accomplish, plans you want to realize, decisions you want to make, or questions you want to answer. You control your entire Command experience with your intents. You can save your intents as simple outline of tasks in a text file. You can recall them when you need. You can run models on your intents as you feel fit. You can save results based on your intents.
You can verify content generated by one LLM with validation from another model. Make sure you only run validate command after you have run refer intents command to generate the first pass of embeds. Use cmnd validate "Financial Analysis" or any intent template that you have created. The workflow for validation is similar to expand intents. Only in this case the validate model config decides which model and provider to use. You can also modify the validation prompt to check for any specific things relevant for your use case. The diff is calculated on original and validated text removing any newlines, white space, or markdown formatting when making the diff comparison using similarity scoring. Use this to automate quality validation of generated content.