A starter kit for quickly setting up express with any sql databases using knexjs.
Before installing, download and install Node.js. Node.js 0.10 or higher is required. Installation is done using the npm install command:
$ npm install
Start your dev server using following command
$ npm run dev
By default server will start listening on port 3000
- Works with any SQL databases using knex js (https://knexjs.org/)
- Modular Approach
- Databse migrations, rollbacking & seeding
- Uses validator library for validation of body params (https://www.npmjs.com/package/validator)
For understanding purpose, a User entity with CRUD operations have been created. It is highly recomended to go throgh following example so that this code base can be useful for creating more scalable and extendable applications.
├───controller
│   ├───UserController.js
├───dao
│   ├───UserDAO.js
├───database
│   ├───data
│   │   ├───dev.sqlite3
│   ├───migrations
│   │   ├───20221121132854_creat_table_users.js
│   ├───seeds
│   │   ├───users.js
│   ├───db.js
│   ├───knexfile.js
├───error
│   ├───APIError.js
│   ├───errorHandler.js
├───middleware
├───router
│   ├───index.js
│   ├───user.js
├───service
│   ├───UserService.js
├───.gitignore
├───package-lock.json
├───package.json
└───server.js
The idea behind this project structure is to split your code in four parts
- Router
- Controller
- Service
- DAO (Data Access Object)
Each layer has its own role and should not interfere with one another. A routing layer has only one work to do, i.e. to route the request to controller. A Controller will always do the validation of input body params and pass the request with body params if available to service layer. Service layer only focuses on the core business logic and nothing else. To access the data from database, DAO (Data Access Object) model is responsible. Service layer should not directly interact with database.
As from the above description, we can see that the core business logic resides in service layer which is now 100% testable with any testing framework. Also, using this approach we can detect any errors easily and can rectify them quickly.
Let's unserstand the whole idea with User entity example.
Our application always gets bootstraped throgh server.js file. You might rarely have to touch this file as this file only contains port on which the server is listening on. I have created root route of this application with the naming convention followed as '/api/v1'. This will always ensure our route starts with '/api/v1/...'
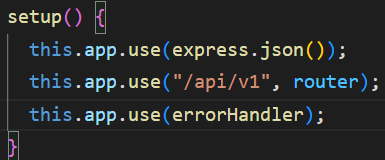
Below that, I have registered the errorHandler of our application so that any error of our application will be handled and our application will not get crashed.
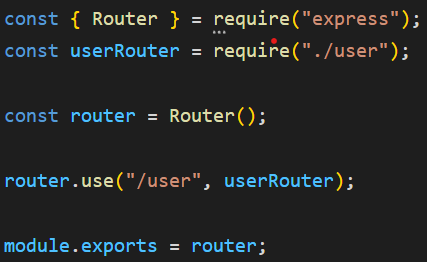
Server.js registers all our application routes throgh router/index.js file. For maintaing file size, I have created sepeate route files for each route entity (here in our case 'user') and then registered that in index.js file. Similarly for each new entity we can create different route files.
In router/user.js, you can see I have created four routes corresponds to four CRUD operations.
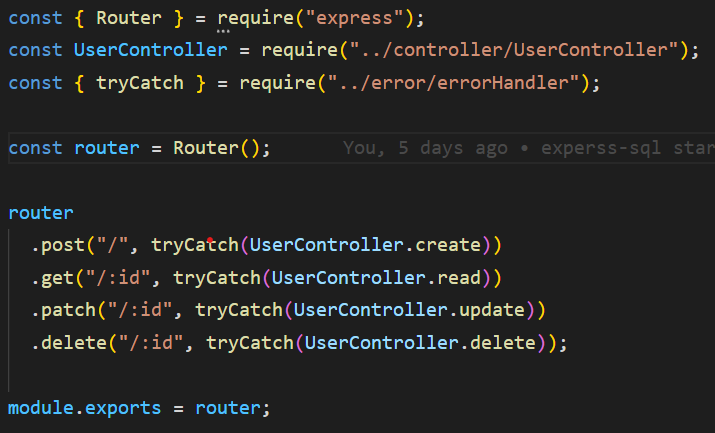
There is one thing to note here, I have wrapped each route handler with tryCatch function. The tryCatch function is called as higher order function. You can learn more about higher order function here: https://www.geeksforgeeks.org/difference-between-first-class-and-higher-order-functions-in-javascript/
This higher order function catches any error from controller, service, DAO layer and throws the exception. This exception is catched by our root error handler which is registered in server.js. Due to this, we do not have to write any try-catch block in any of the mentioned files. Thus improving readability and files does not get flooded with try catch block everywhere. Please explore the error directory for more information.
Now lets explore creating a User route in this application. We will go step by step. In order to create a User, we will first need to setup database. As already mentioned, this starter kit uses knexjs for connecting SQL databases. The main advantage of using knexjs is that, it has a very rich query builder with which we can query any sql databases, we dont need to worry about different quering statements for different databases. Thus knexjs acts as an abstract layer between our application and sql databases. You can have a different database setup in local environment and different in production environment.
In our example I have used 'sqlite3' (as it needs no configuration for getting started) for local environment and for staging and production I have used 'postgresql'. With this, one can imagine the power of knexjs. Please explore database/knexfile.js for more information.
Now after configuring our database, it is time to create user table. You don't need to create tables manually. This is been taken care by knexjs. Here, Knexjs introduces migrations concept. In simple words, migration files are way to keep track of your database structure and is the safest way to create/alter/drop. your tables in both local as well as production environment. No need to manually create/alter/drop databases in any local, staging, production environment. To learn more about migrations, check this out: https://knexjs.org/guide/migrations.html
In order to create user table, First I ran the following command to create migration file,
$ npm run make create_table_users
This creates a file under database/migrations direcotory.

Note that it has prefixed migration file with current timestamp.
It creates a migration file which lets you enter functions to migrate or rollback your database.

Now after registering all the columns that a user entity should include, We have to run the migration command which will generate the table.
$npm run migrate
As shown in the image, migrate command will run 'up' function while rollback command will run 'down' function. (Checkout package.json for commands)
With migrate command, a new table will be created. You can check this out in VS Code itself by installing SQLite extension. (https://marketplace.visualstudio.com/items?itemName=alexcvzz.vscode-sqlite) Knex creates 2 tables, first 'knex_migrations' registering the migration file and second 'users'. 'knex_migrations' is used to track all our migrations. All our migrations run in this order only.
'knex_migrations':

'users':
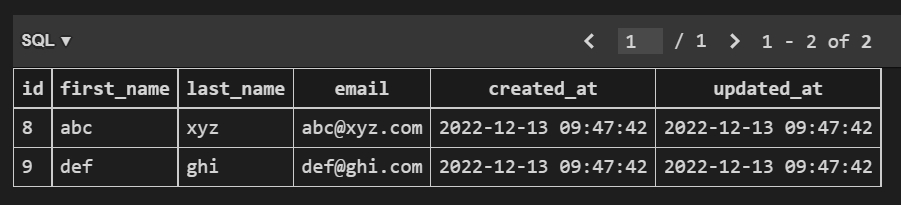
In the above image you can notice that some data is added already. This is because I have used database seeding (a knex feature).
Seeding is nothing but populating database with dummy data. This is helpful for a new developer when he starts working on your codebase, he don't have to worry about the data as it is already predefined. He will simply have to run following command
$ npm run populate-db
To create seed files and predfine the dummy data for user entity, run the following command.
$ npm run seed users
This will create a file in seeds directory which includes following code.

Do not forget to run $ npm run populate-db for populating the database with the above seeds.
After the creation of table, the next steps are easy as explained earlier.
-
Register your routes in router/user.js file
Job: Route the request to dedicated controller
-
Create UserController.js in controller directory
Job: Validate the body params and pass the request to service handler
-
Create UserService.js in service directory
Job: Handle Core business logic and nothing else
-
Create UserDAO.js in dao directory
Job: Query the database according to Service layer needs.
This ensures our business logic is 100% testable.
You can configure and extend this starter kit with any of the testing framework that you like
You can register any middlewares in middleware directory.
If you want to debug the application using chrome dev tools, just run the following command
$ npm run inspect
This will open chrome dev tools, which will enable you to add breakpoits and debug the code more easily.
More on that: https://nodejs.org/en/docs/guides/debugging-getting-started/