Home
Welcome to the nanometer wiki!
nanometer is a script/program written in Python for FL Studio 20.7.3 and later. The main purpose of the script is to turn the Korg nanoKONTROL2 MIDI-device into a multi-functional control tool that not only controls the mixer but a number of other things as well.
The script also mirrors the peak meter in FL Studios mixer by rapid toggling of the light-buttons on the nanoKONTROL2 which together creates a cohesive peak meter made of lights. It works quite well and is made to be as accurate as possible, but is mainly intended as eye-candy.
The nanometer-script consists of three files:
-
device_nanoKONTROL2.py
The main script -
config.py
Configuration script -
nanometer.nktrl2_data
Scene-data file for the KORG Kontrol Editor
Before installing the script, your Korg nanoKONTROL2 must be setup to handle the MIDI CC-codes that the script uses to communicate with the device. To do this, you need to download and install the Korg Kontrol Editor first.
Open the included scene-data file nanometer.nktrl2_data in the Korg Kontrol Editor and write the scene-data to your unit. This will erase any previous scene-data you had before, so make sure you have a backup of it if you for some reason need to restore it later.
Once the scene-data file has been setup, it's time to install the script itself.
Copy the entire folder named KORG nanoKONTROL2 (containing the two .py files) into FL Studios user-data folder at the location where the MIDI-scripts are located.
In Windows, this usually means:
%username%\Documents\Image-Line\FL Studio\Settings\Hardware\
When the files are in place, the script needs to be assigned to the KORG nanoKONTROL2 device in FL Studio. Launch FL Studio and go to Options -> MIDI settings (in the menu).
Click on nanoKONTROL2 in the Output field and set Port to a unique number (not in use by any other device).
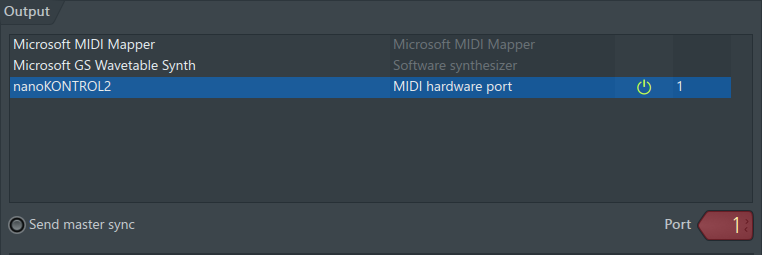
Do the same in the Input field. Make sure the Port number matches the number you chose in the Output field above.

Click on Controller type under the Input field.

It will bring up a huge list of devices to choose from. Click on the nanometer script in the list. If the script was installed correctly, it should show up as: nanometer (KORG nanoKONTROL2)(user)
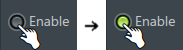
Lastly, make sure the device is enabled. There should be a green light to the left of Controller type. (If it's not green, click on it).
If everything was done correctly, it should look something like this:

Before you close the MIDI settings window, press Refresh device list so the new changes takes hold.
The installation is now complete and the script should be active. Try it out by playing a sound in FL Studio and see if the buttons on your KORG nanoKONTROL2 lights up.
Notes:
- For more detailed instructions on how to install the Korg Kontrol Editor and write the scene-data file, please see this page.
- The location of the user-data folder depends on your OS and how it's been set up in FL Studio. You can learn more about how to locate your user-data folder in FL Studios manual.
- The script will not work if you set its Port number to a number that's already used by another device!
The KORG nanoKONTROL2 has 3 horizontal rows of  ,
,  and
and  buttons with lights. The nanometer-script triggers these lights on and off which gives the effect of lightbars, or "peak meters" that react to the sound output from FL Studio.
Stereo sounds will be indicated by two lightbars, one each on the and rows, the former for the left channel and the latter for the right channel. Mono sounds will instead be indicated by a single lightbar on the row. The nanometer script automatically distinguishes between stereo/mono and will switch between the lightbars immediately when the signal changes.
The lights react to sound starting at -48dB and above. If the signal goes above 0dB (i.e. is "clipping"), the nanometer-script will indicate this by keeping the last button in that respective row lit for approximately 2-3 seconds.
Notes:
- The BigMeter option can be used to replace the stereo/mono lightbars with a single lightbar that engages all three rows simultaneously.
- The clipping-feature can be disabled with the Clipping option.
- The peak meter function is always enabled by default and will react to any sound coming out of the Master-track. This can be changed with the SelectedPeak option. Please see the config for more peak meter options.
The transport-buttons consists of:
-
 (REWIND)
 -
 (FORWARD)
 -
 (STOP)
 -
 (PLAY)
 -
 (RECORD)
They will trigger the corresponding functions in FL Studio.
Note: From v1.2 the button will now flash in sync with the tempo during playback. This can be changed via the PlayBlinkTempo option to get the old behaviour where the Play button stays lit during playback and the button flashes in sync to the tempo while recording.
The button doubles as the pattern/song mode toggle switch. To change between pattern/song mode; press the button and hold it down for 1 second.
Press & hold the button for approximately 1 second to toggle the metronome on or off.
Hold down  and press the button to save the current project in FL Studio. The button will flash 3 times to indicate that the save was triggered.
Pause mode automatically becomes active when FL Studio and the nanoKONTROL2 has been inactive for a period of at least 5 minutes. In this mode, the , and buttons will light up randomly in intervals until either a button is pressed or the script detects some activity in FL Studio.
Note: The inactivity time can be changed with the SleepTimer option.
By default, the nanometer script uses three individual control-modes: The mixer, the channelrack and the playlist. At startup, the mixer mode is active. To switch mode, press the button.
When switching modes, the transport buttons will flash rapidly to indicate the active mode:
- One flashing button means that the first mode (default: the mixer) is active.
- Two flashing buttons means the second mode
- ...and so on.
Apart from the three default modes, there's an optional fourth control mode: the controller link mode (disabled by default) that can be activated in the config.
Notes:
- Each individual control mode can be disabled permanently (i.e. you can remove one or several control modes you're not interested in). Please see the config.
- The flashing effect of the transport buttons can be disabled with the ModeBlink option.
The nanometer script gives you full control of all the insert tracks in the mixer including the master
track. The nanoKONTROL2 has 8 control groups, each with it's own slider, knob and buttons for SOLO: , MUTE: and REC: . At startup, the control groups will control insert tracks 1 to 8.
The 8 insert tracks that are currently controlled by the nanoKONTROL2 are marked in either red or green by default (see the notes below). Press the  buttons to move the marked tracks left or right of their current position by 1 track for each press.
You can also relocate all the controlled tracks anywhere in the mixer by clicking on the track you want to control and pressing the  button. The marked/controlled tracks will then be moved to the track you selected.
Notes:
- Since v1.2 of the script, the control tracks are marked by a red rectangle. This requires at least v20.9+ of FL Studio to work. In earlier versions, the script will mark the tracks by setting their color to green.
- Be aware that the green coloring of the controlled tracks can interfere with your own color-scheme, particularly when saving a project while the mixer-mode is active. Please see the FAQ & Troubleshooting page for more details.
Hold and press to lock the master track to the first control group. Any subsequent moving of the controlled tracks will only move the tracks assigned to control groups 2 to 8. To remove the lock, hold and press again.
There are two ways you can select tracks:
-
Pressing the
 buttons will select the previous or next track. The default setting will step through all the tracks in the mixer.
 -
By default, pressing one of the
buttons will select the track in each particular control group from the tracks in the currently controlled track-range.
Notes:
- The TrackRangeOnly config option can be set to limit the Track-buttons to only step through the tracks that are currently controlled.
- If the ArmedTracks config option is enabled, the buttons can no longer be used to select tracks.
- If the MultiSelect config option is enabled, the script will let you select multiple tracks. This can be used in conjunction with the Multi volume control function.
- The HighlightTimer config option can be set to automatically disable the highlighting of the mixer tracks if no controls have been touched within a specified time.
The sliders and knobs on the nanoKONTROL2 controls the volume and the panning in the mixer. From v1.2 of the script, you may also control the stereo separation by holding down and turning the knobs.
Notes:
- Pickup mode is supported in FL Studio 20.9+ only.
- Stereo separation only works when the knobs are not linked to something in FL Studio.
From v1.3 of the script, multiple tracks can be controlled simultaneously. To do this, you must first select more than one track (from anywhere in the mixer) by either Control+Shift clicking on the tracks or by selecting them with the buttons (only works when the MultiSelect config option is enabled). After the selection is complete, all the selected tracks will respond in unison when one (any) of the sliders on the nanoKontrol2 is moved.
When raising the volume of multiple tracks, the volume of all the faders will max out at +5.6dB. To prevent the volume difference between the tracks to "collapse", you can hold down the button to make the faders stop as soon as the loudest of the selected tracks has reached its maximum point at 5.6dB. This can be set as the default behaviour in the config with the PreserveMixDiff option.
From v1.3 of the script, the volume of the currently selected track/tracks can be fine-tuned by holding down the button and pressing one of the buttons.
From v1.4 of the script, you may also finetune the volume of the 8 controlled mixer tracks by holding the button and moving the slider in each respective control group.
Notes:
- The volume will be increased/decreased in steps of 0.1dB. When finetuning the volume on selected tracks, the fine-tuning will repeat infinitely until the buttons are released.
The and buttons are used to toggle Solo/Mute for each of the 8 insert tracks marked in the mixer. The buttons will be lit while the tracks are in their respective soloed/muted state. This only works while the peak meter lightbars are inactive.
Note: The peak meter lightbars can be disabled permanently with the PeakMeter option.
By default, the buttons are used to select tracks within the currently controlled track-range.
Alternatively, the buttons can be used to control the arm switch of each track by setting the ArmedTracks option in the config. This will disable the track-selection though.
Notes:
-
The nanometer script treats the channelrack controls as an individual mode. While the channelrack control mode is active, the mixer and playlist controls will be disabled. You can easily switch between the modes by pressing the
button. -
The controls described for this mode requires v1.4 of the script. For earlier versions, please refer to this page.
The script gives you two ways to control the channel rack: By selection or by the rectangle marker. The latter will map 1-8 channels to the control groups of the nanoKONTROL2 but by doing so, you will be limited to only controlling the volume and panning.
First, let's go over the selection controls.
Pressing the buttons will change the currently selected channel to the previous/next channel in the channel rack.
The and buttons in the first control group will Solo/Mute the currently selected channel. When soloed/muted, the buttons will be lit to indicate the current state.
Press to toggle the window of the selected channel. The window is either a plugin window, a sampler-window or the automation editor depending on the content of the selected channel.
Turn the knob in the first control group (i.e. the 1st knob from the left) to control the panning of the selected channel. To control the volume of the selected channel, turn the knob in the second control group (i.e. the 2nd knob from the left).
The knob in the third control group (i.e. the 3rd knob from the left) can be used change the mixer track routing of the currently selected channel. Turning the knob slowly will scroll quickly through the targeted tracks in the mixer (the knob first needs to be turned until it picks up the position of the targeted mixer track).
Note: This knob always uses pickup-mode regardless of what it's set to in FL Studios MIDI settings.
Turn the knob in the fourth control group (i.e. the 4th knob from the left) to control the pitch of the selected channel.
The second/alternative way of controlling the channel rack is by using the channel rectangle marker. This will control the volume and panning of up to 8 channels designated by the rectangle marker.
Press the  button to enable the channel rectangle marker. The marker (shown in red in the channel rack) will highlight the 1-8 channels that are currently controlled by the KORG nanoKONTROL2.
The button actually toggles between channel rectangle control and selection control. Please note that the following selection controls are disabled while the channel rectangle is enabled:
- Adjusting the panning of the selected channel
- Adjusting the volume of the selected channel
- Adjusting the mixer track routing of the selected channel
- Adjusting the pitch of the selected channel
Note: The default setting of the channel rectangle marker can be toggled with the ChannelRectCtrl option.
While the channel rectangle marker is enabled, it can be moved by pressing the buttons. The left marker button will move the rectangle upwards and the right marker button will move it downwards. This only works when the number of channels is greater than eight.
You can also relocate the rectangle marker to the currently selected track by pressing the button.
While the channel rectangle marker is enabled, the volume of each of the channels within the red rectangle can be controlled by moving the slider of the respective control group on the KORG nanoKONTROL2.
Similarly, the panning of each channel in the rectangle can be controlled by turning the knob in each control group.
Press the and buttons in each control group to solo and mute the channels within the channel rectangle marker.
Note: The nanometer script treats the playlist controls as an individual mode. While the playlist control mode is active, the mixer and channelrack controls will be disabled. You can easily switch between the modes by pressing the button.
Press the buttons to step between patterns in the pattern panel / picker panel.
Press to toggle the pianoroll window on or off.
Hold down and press to add a new marker at the current position in the playlist. If the current position already has a marker, it will be deleted instead.
Press the buttons to move the playhead between any markers present in the playlist. If there are no markers, the playhead will move to the previous or next bar instead.
Move the slider in the first control group to zoom horizontally in/out of the playlist view. The slider in the second control group will zoom vertically.
Hint: Both sliders can be moved simultaneously to zoom horizontally and vertically at the same time!
The knob in the first control group can be used to adjust the tempo from 80 to 205 BPM in 1 BPM increments. Turn the knob until you find the correct position where it affects the tempo.
Notes:
- The Tempo-knob always uses pickup-mode regardless of what it's set to in FL Studios MIDI settings.
- The TempoBase option can be used to set the tempo range.
The nanometer script supports FL Studios controller link feature.
By default, the , , buttons and the sliders + knobs can be linked and used in three ways:
- Indirectly, from the mixer, channel rack or playlist mode.
Hold down and press/move the desired button, slider or knob simultaneously. Its midi-CC will be picked up by FL Studio and can be linked. This is the default way the script handles linking. - From the optional controller link mode. (disabled by default, please see the config option).
- Directly, from the mixer, channel rack or playlist mode.
From v1.4 of the script, it's possible to link the desired buttons, sliders or knobs directly, without holding the button. This is disabled by default since it can interfere with the normal functionality of the script. To enable it, see the LinkOverriding option in the config.
It's also possible to link the transport buttons (from v1.4 of the script). This is disabled by default (to prevent them from accidentally being linked) but it can be enabled in the config by changing the TranspBtnLink option).
When enabled in the config, the script inserts an extra control mode (placed after the playlist mode) that can be switched to by quick-pressing . When this mode is active, midi-CC will be sent from the , and buttons + the sliders and knobs directly (i.e. without the need to simultaneously hold ).
From v1.4 of the script, this mode has a couple of extra features:
The buttons can be used to navigate between the channels in the channel rack. This makes it easier to use controls that have been linked to instruments in the channel rack (i.e. no need to use the mouse to select a different instrument in the channel rack while the Controller Link Mode is active.)
Global links to the last tweaked control can be assigned directly from the nanoKONTROL2 by pressing and holding the button and then press or move the button, knob or slider that you wish to assign the last tweaked control to. If the script managed to assign the control successfully, it will indicate this by flashing the light on the button.
Problems? Please read the FAQ & Troubleshooting page.