Validator Node on AWS
- 2018/02/02: Add section on keys exchange process and this changelog to make this page similar to non-aws setup guide.
- Start Chrome
- Connect to the desired network in MetaMask by selecting the
Networkdropdown menu on MetaMask and addCustom RPCwith the following endpoints.
- Core Network:
https://core.poa.network - Sokol Test Network:
https://sokol.poa.network
- Upload your initial key to MetaMask that MoC has supplied you using the password provided.
- Navigate your chrome browser to https://ceremony.poa.network/
- Make sure you have your
Initial Keysupplied by MoC, selected in MetaMask.
- Click "Generate keys", confirm transaction.
- ATTENTION: This next part is VERY important and must be done correctly in order to be able to participate in the consensus immediately, follow directions below BEFORE closing out of the browser window. Open up a Notepad and copy required info as follows.
- Click the
CopyButton next to eachAddress. Mining, Payout, Voting. Paste them separately in the Notepad. - Click the
CopyButton next to eachPassword, matching to resulting address in the Notepad. Mining, Payout, Voting. - Finally, Click Button to download the JSON Keystore files for each key and keep the Notepad file & all 3 keys + initial key somewhere safe. NOTE Preferred method to store the keyfiles and information is to store on an encrypted drive. e.g. usb drive If you go this route, please do not forget your password for the encryption as you will lose your data and will have to get your old keys voted out and new ones voted in if any issue happens with the validator's node.
After the initial ceremony stage, it's time for the initial set of validators to vote in new validators using the POA Voting Dapp. One validator will create a Ballot for each of the needed keys to participate and each validator will cast their own vote minus the MoC, who is not allowed to vote on consensus level. It has been agreed upon by the POA network that the next stage would end with 25 Validators on the Core network. This number may change in the future and can have any amount one desires, this would likely be proposed by a ballot to increase.
Before the ballot can be proposed, the applicant would need to generate 3 separate key pairs with passwords & JSON keyfiles. There is a very simple method of doing this, see below.
- Simply go to this URL in your browser to generate 3 key/pass pairs with needed keyfiles.
- ATTENTION: This next part is VERY important and must be done correctly in order to be able to participate in the consensus immediately, follow directions below BEFORE closing out of the browser window. Open up a Notepad and copy required info as follows.
- Click the
CopyButton next to eachAddress. Mining, Payout, Voting. Paste them separately in the Notepad. - Click the
CopyButton next to eachPassword, matching to resulting address in the Notepad. Mining, Payout, Voting. - Finally, Click Button to download the JSON Keystore files for each key and keep the Notepad file & all 3 keys + initial key somewhere safe. NOTE Preferred method to store the keyfiles and information is to store on an encrypted drive. e.g. usb drive. If you go this route, please do not forget your password for the encryption as you will lose your data and will have to get your old keys voted out and new ones voted in if any issue happens with the validator's node.
- Follow the guide on how to Update Validator MetaData.
- For clarity, you may wish to use identical usernames on your Ansible Control Station and your remote node. For example, one could create a user named "ubuntu" on both your Ansible Control Station and your remote note. If you have the means, using a dedicated node for the Ansible Control Station that can be powered down or moved off-network when not in use is ideal. If using a local workstation, creating and using a dedicated Ansible Control Station user reduces potential for error. When you create a new local user (we recommend using our example 'ubuntu' username), ensure this user has sudo or su (Super User) authority on the Ansible Control Station. The rest of this example assumes your user is in the sudo group.
- check that you have git installed
git --version
if not - install it following instructions here
- check that you have python 2 version >= 2.6.5 or python 3 version >= 3.3 installed
python --version
if not - install it choosing appropriate binary from here
- check if you have
pippython package manager install
pip --version
if not - install it following instructions from here. Basically, you need to download this script and save it on your computer https://bootstrap.pypa.io/get-pip.py then run
python get-pip.py
- follow this guide to install ansible. For example, you can use
pipto do it:
sudo pip install ansible
- use
pipto install the following packages:
sudo pip install boto
sudo pip install boto3
- check if you already have a keypair:
ls -la ~/.ssh
if you get error that directory does not exist or the directory is empty, you need to follow the instructions below. If you already have key pair, you can skip this section.
- generate ssh key-pair
ssh-keygen -t rsa -b 4096 -C "your_email@example.com"
insert your email address there and a strong password. By default, keys will be saved to ~/.ssh/ and named id_rsa with your public key being ~/.ssh/id_rsa.pub.
- check if you have aws cli installed
aws --version
if not - install it following these instructions. The simplest way is to use pip:
pip install awscli --upgrade --user
Mac systems with homebrew installed:
brew install awscli
-
Register (if you haven't already) and login to the AWS management console: https://aws.amazon.com/console/
-
to create credentials for cli, open IAM home https://console.aws.amazon.com/iam/home, select "Users" on the left hand side navigation bar and then click "Add user". Pick a username, and check "Programmatic access" for "Access type". NOTE: For clarity we recommend using identical usernames on your Ansible Control Station and your remote node. For example, one can create a user named "ubuntu" on both your Ansible Control Station and your remote note.
-
Click "Next: Permissions" - you can choose any of the available options, and "Attach existing policies directly" is the simplest one. In the list of policy types, search for and then check "AmazonEC2FullAccess". Click "Next:Review". Review your account and click "Create user" to proceed.
-
it is very important that you copy "Access Key ID" and "Secret Access Key" without leaving this page, because there is no other way to retrieve "Secret Access Key" later and you will have to start again and create another user. After copying this important information, select "Close".
-
after you've copied and saved your AWS secret keys, the next step is to upload your SSH public key. In the top left corner of the page select "Services -> EC2". On the left sidebar select "Network & Security" -> "Key Pairs". Click "Import Key Pair". Give a name to this keypair, otherwise base name of the file will be used (by default
id_rsa). Browse your Ansible Control Station file system for the public key, or copy/paste:
pbcopy < ~/.ssh/id_rsa.pub
This will copy your public key into your clipboard and can then be pasted.
- configure aws cli:
aws configure
provide your credentials (Access Key ID and Secret Access Key) from earlier. Choose a region for your account (e.g. us-east-2) and output format (json is recommended).
- check that keypair was correctly imported:
aws ec2 describe-key-pairs
you should see your keypair name in the list.
You may need to add your github info, if you haven't already. This may require the creation of a new "Personal Access Token".
- clone repository with ansible playbooks and checkout branch with the network name you want to join (e.g.
corefor mainnet andsokolfor testnet)
git clone https://github.com/poanetwork/deployment-playbooks.git
cd deployment-playbooks
# for core mainnet
git checkout core
# OR for sokol testnet
git checkout sokol
# check that you ended up on a correct branch (look where the `*` is)
git branch
- prepare files with ssh keys
cat ~/.ssh/id_rsa.pub > files/admins.pub
cp files/admins.pub files/ssh_validator.pub
- create file with configuration settings:
cat group_vars/all.network group_vars/validator.example > group_vars/all
- to choose subnet run the following command
aws ec2 describe-subnets
select any subnet with "State": "available" and non-zero "AvailableIpAddressCount". You need to copy/save "SubnetId" of this subnet for later use.
- open
group_vars/alland edit the following configuration options:
nano group_vars/all
Make the following edits:
-
access_key- your AWS "Access Key ID" -
secret_key- your AWS "Secret Access Key" -
awskeypair_name- name of ssh keypair you uploaded on AWS (by defaultid_rsa) -
vpc_subnet_id- insert "SubnetId" that you chose. The next line should look like this:
vpc_subnet_id: "subnet-..."
-
NODE_FULLNAME- enter your full name (this will be visible to other members of the network) -
NODE_ADMIN_EMAIL- enter your public email (this will be visible to other members of the network) -
NETSTATS_SERVER- this should be a url provided to you by the Master of Ceremony -
NETSTATS_SECRET- this should be a secret code provided to you by the Master of Ceremony -
MINING_KEYFILE- insert content of your mining keystore file. Resulting value should be enclosed in single quotes and look similar to this:
MINING_KEYFILE: '{"address":"..."}'
-
MINING_ADDRESS- insert your mining key address, e.g.
MINING_ADDRESS: "0x..."
-
MINING_KEYPASS- insert your mining key's passphrase - please double-check with Master of Ceremony on what is the current Block Gas Limit in the network and compare it to the value in
BLK_GAS_LIMIToption. Default is currently set as "BLK_GAS_LIMIT: "8000000". -
allow_validator_ssh- leave this value set totrueif you plan to access your node over ssh later -
allow_validator_p2p- set this value totrueto make your node discoverable by peers -
associate_validator_elastic_ip- set this totrueif you want to configure AWS Elastic IP for this node
- examine values in
imageandregionproperties. If your AWS region doesn't match the one inregionyou need to replaceregionwith the correct one and select image from this list https://cloud-images.ubuntu.com/locator/ec2/
Open this page, scroll down, choose your region from the first ("Zone") dropdown list, choose xenial from the second ("Name") dropdown list and hvm:ebs-ssd from the fifth ("Instance type"). This should limit you to a single option, copy value from "AMI-ID" column and paste it in image property.
- you may also choose a different value for the
validator_instance_type. Forregion: "us-east-2"we recommend usingm4.xlarge. Confirm your option of the types of instances available in your region,via: https://aws.amazon.com/ec2/pricing/on-demand/
- with all options configured, you first need to create an instance: (you should still be in: ~/deployment-playbooks)
ansible-playbook validator.yml
Running this script creates and powers up your remote AWS instance. this script will also ask you for your SSH key passphrase unless you didn't set a passphrase or you entered it recently.
- after this process is complete, examine script's output and write down IP (e.g.
192.0.2.1) address and AWS InstanceID (e.g.i-0123456789abcdef0) for later use. If you chose to use elastic IP, write down node's final IP address.
- create file
hostswith the following content (assuming IP address is192.0.2.1, gathered from previous step)
touch hosts
echo [validator] > hosts
echo 192.0.2.1 >> hosts

NOTE:  Feel free to edit the hosts file directly with any text editor (vi, pico, etc.) - file must contain at minimum:
[validator]
192.0.2.1
- run this script to configure your remote node instance:
ansible-playbook -i hosts site.yml
if you get an error that host cannot be reached over SSH, please wait a minute and start again. This error may appear because AWS instance is rebooted after creation, and this may take some time to complete.
- open the url for
NETSTAT_SERVERand check that your node has appeared in the list
NOTE skip this step if you are deploying your node to CORE network. You should not make your enode public as it will make your validator node an easy target for denial of service attacks.
If you are deploying on a testnet (sokol), follow the steps below:
Login to the node and get enode from parity logs:
ssh root@192.0.2.1 OR, if root SSH access is not enabled:
ssh -l ubuntu 192.0.2.1  #NOTE: replace 'ubuntu' with a different remote node user if you are not using the recommended example user.  Once logged in, become Super User by executing:

sudo su    #NOTE:  enter the 'ubuntu' user password, or other user password if you have created a different user.  You should now be Super User, with all of the powers and identity of the 'root' user.  Be careful!

grep enode /home/validator/logs/parity.log
copy enode uri and send it to Master of Ceremony. If this line is not found, restart parity
systemctl restart poa-parity
and try again. If enode uri is still not found, use the commands below to restart all services.
NOTE if after parity restart you notice that on NETSTATS_SERVER url your node starts to fall behind other nodes (block number is less than on other nodes) and has not caught up after a few minutes, try to restart statistics service (assuming you are connected as root):
su validator
pm2 restart all
after that, refresh the NETSTATS_SERVER url in your browser and check your node's block number again. If your node is still not active or missing enode entry, log in to root account and reboot the OS. PLEASE WAIT at least five minutes for your node to "catch up" before rebooting your remote server, and do so only as a final resort.
su
shutdown -hr now
Later, you may wish to change access options for your node. For example, initially you might have disabled access over ssh but now want to re-enable it. These options are set by parameters in the file group_vars/all:
-
allow_validator_ssh-true/false- allow/deny access over ssh -
allow_validator_p2p-true/false- allow/deny peer-discovery
When you make changes, rerun the playbook:
ansible-playbook -i hosts site.yml
NOTE: this script applies simultaneously to all your instances with security group named validator-security and technically any other servers in your 'hosts' file. This note is relevant only if you have several validator node or other instances running.
In case you want to remove your AWS instance
a. do it via AWS GUI: open AWS management console https://console.aws.amazon.com/ec2/v2/home#Instances check the instance you want to remove, click Actions > Instance State > Terminate.
b. do it via aws cli: get AWS Instance ID (the one you saved previously, or you can look it up in AWS management console) and run
aws ec2 terminate-instances --instance-ids i-0123456789abcdef0
(replace i-0123456789abcdef0 with your actual AWS InstanceID).
NOTE: this operation is irreversible! If you want to redeploy, you will have to create a new instance from scratch.
-
Login to your AWS console. In "Services" select "EC2" and navigate to "Instances" > "Instances" in the left sidebar. You should see a list of all your instances in the current region, similar to this:
 Select the instance you want to upgrade. Double check IP address to verify that you're upgrading correct node from correct network
 -
Click "Actions", from dropdown select "Instance State" > "Stop"
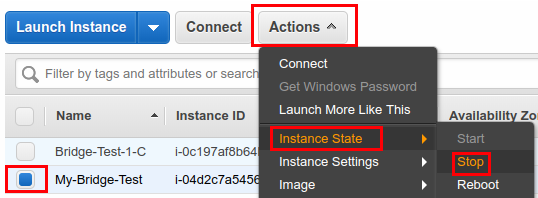 Confirm the instance you want to stop.
 -
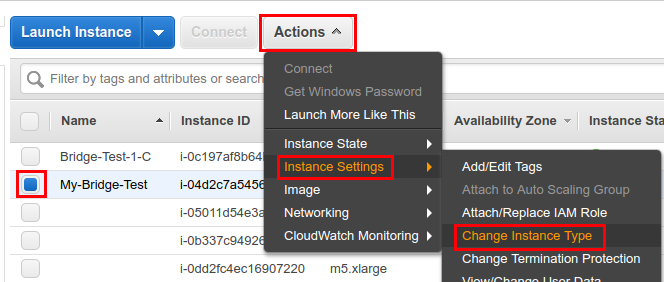
Wait until "Instance state" changes to "stopped", then click "Actions" and select "Instance settings" > "Change instance type"
 Select the new instance type (e.g.
 t2.xlarge)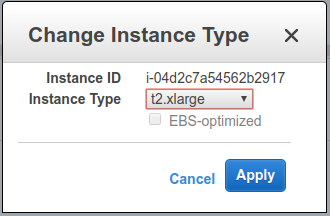 Click OK to confirm.
 -
Check that value in "Instance type" column on the instances list was updated
-
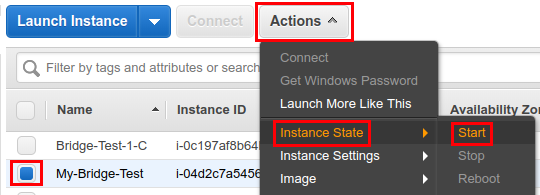
Click "Actions", then "Instance state" > "Start"
-
Wait until "Instance state" changes to "running". Also check in netstat dashboard (sokol netstat/core netstat) that your node is green and catching up. This may take some time to settle down.
-
Back to AWS page, it is important that After upgrade your node's public IP address will change. You should note and save the new IP address in "IPv4 Public IP" column.
-
Login to your node via ssh, e.g.
ssh root@192.0.2.1
- Edit parity configuration file to update your public ip address. To do this open file in your favourite text editor (e.g.
nano)
nano /home/validator/node.toml
Search for a row similar to
nat = "extip:192.0.2.1"
change IP address in this line to a new one, e.g.
nat = "extip:192.0.2.2"
Save and exit text editor (for nano, press CTRL+X then y).
- Restart parity and netstats
sudo systemctl restart poa-parity
Restart netstats
sudo systemctl restart poa-netstats
- Check again that your node is green in netstats.