The following is based on a live event, but has also been written in such a way that anyone could pick it up and code along!
As a disclaimer, this is only a brief introduction and overview of React. Learning React confidently is only possible through many hours of dedicated work. However, this should be a great starting point!
Before starting React, ideally you would be familiar with:
- JavaScript
- HTML & CSS
- The DOM
- MV* Design Pattern
By definition, "a JavaScript library for building user interfaces".
But there are many JavaScript libaries with that definition. What makes React unique?
The essence of React is that it reacts to changes in application data and automatically re-renders views/components in the most efficient way possible.
Before this can make sense, we have to learn a about design patterns in front-end development, specifically, MV*.
As things grow in size, so do their complexity which forces us to adopt organizational systems. Here are a few analogies:
- Clothes have closests and dressers which help organize large clothing collections.
- Large businesses have complex org charts to keep track of who reports to who, and what function they serve in the company.
- Libraries have the dewey decimal system (and stacks, etc) to organize many books.
The same is true for code. Around the advent of the iPhone (~2007), the web started to take off and so did the complexity of the applications we interacted with.
For developers, this meant managing an increasing complex User Interface using HTML, CSS and JavaScript.
So to get things organized, we looked to the MV design pattern. Using the MV design pattern, we broke our code up into the following:
- Model: Represents the data/state/situation of the user interface.
- View: Represents what the user actually sees.
- Event: The way a user interacts with the page.
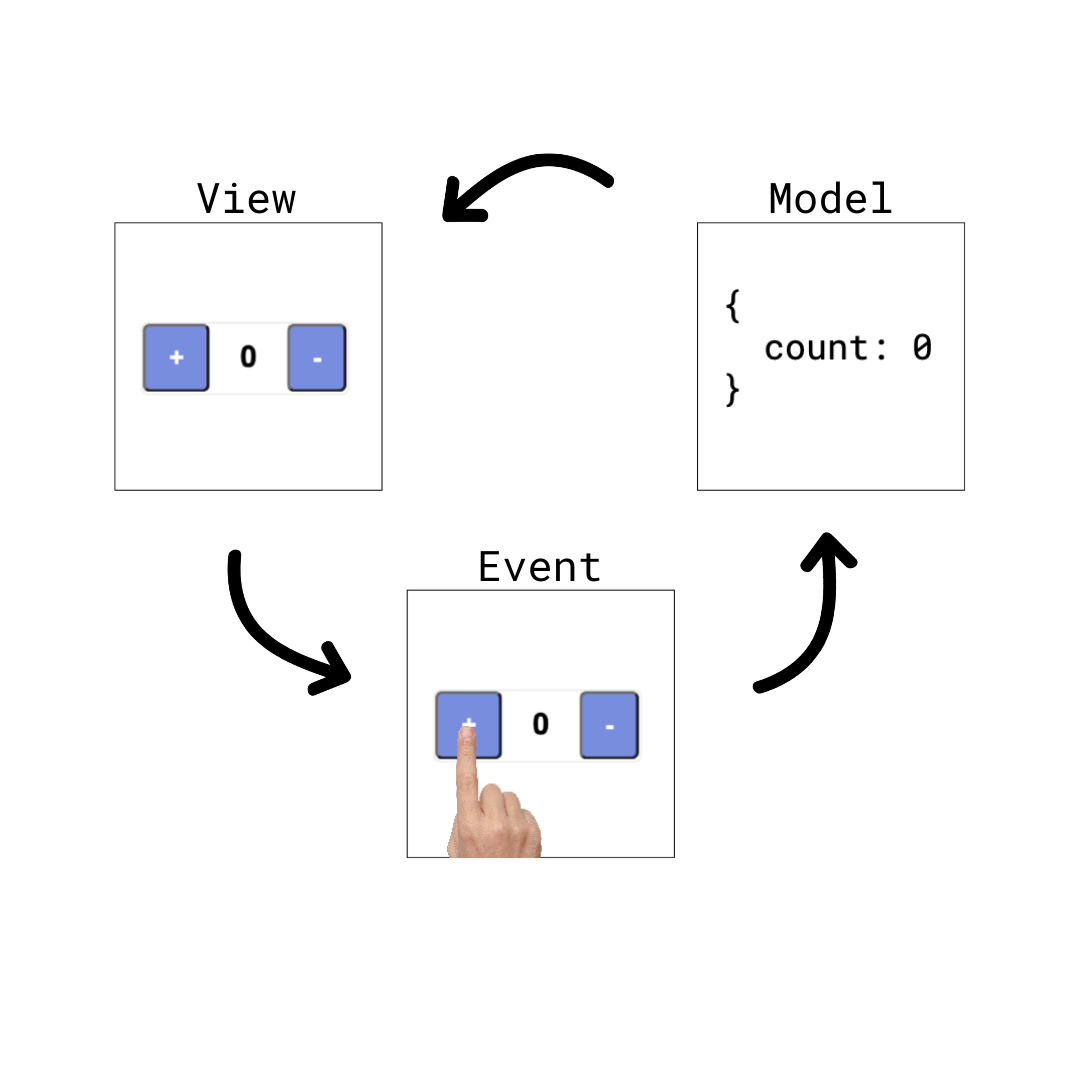
The main thing that makes the UI complex is the fact that it changes. As the user interacts with it, data needs to flow through the application and update what the user sees.
In the image above, we can think of an app that is a simple counter. When the user clicks the +, the number should increase. When the user clicks the -, the number should decrease.
The diagram represents the way the data flows and how that data updates what the user sees.
In order for our organizational system to work, the must be rules. For example, books in a library must be stored in alphabetical order, otherwise the system breaks down.
For our MV pattern, we have the following rules for how the data flows through our app:
-
Store application data only in the model.
-
Update your model only in response to events.
-
Render your views only in response to changes in your model.
Here's how this may look in our counter app:
-
First, the user clicks the
+button... -
This click updates the model's
countproperty by incremnting it by 1 -
The view then see that the model changes and updates it's HTML to now show 1 instead of 0.

Components: In React pieces of the UI are called "Components". Using JavaScript and JSX (a special syntax that looks like HTML, but is actually JavaScript that creates HTML), React Components return (or render) pieces of HTML which represent parts of the UI.
Props: Each Component (optionally) is fed data from other parts of the application. An individual Component knows which properties (props) it's responsible for and uses them to display dynamic data or functions. When these props change, a Component automatically "reacts" by re-rendering (changing) and displaying what it's supposed to display, according to the new data.
State: A React application may have some state (data) that lives independent of a Component. Often times this data is stored in one spot and then given to other Components through props. When the state of the applicaiton changes, the props of Components change and so the app re-renders.
Let's take a look an example of this in code.
First, go here: https://codesandbox.io/s/new. This will allow us to use React without all the set up headaches.
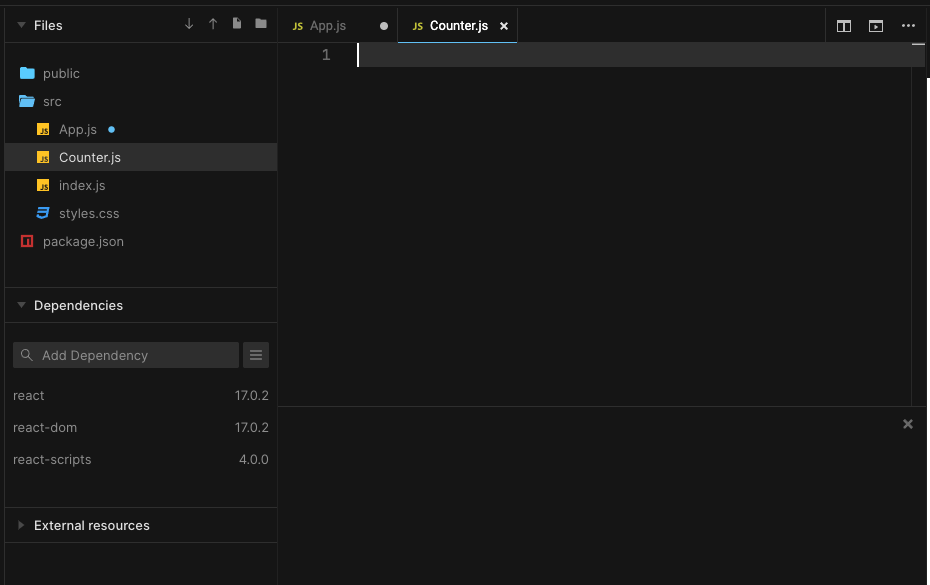
Note the following files inside of the /src folder:
-
App.js: This is a component called, 'App'. It's common to have a single parent component calledApp. -
index.js: This is the main JavaScript file in our React app - this is where the app is "mounted" to the HTML file.
Let's now look at each file.
Right now App.js looks like this:
import "./styles.css";

export default function App() {
  return (
    <div className="App">
      <h1>Hello CodeSandbox</h1>
      <h2>Start editing to see some magic happen!</h2>
    </div>
  );
}
The import and export statements are from ES6/ES2015+ - it's how JavaScript can share code between files.
The App function is our Component (know in React as a "Functional Component"). Whatever is returned from this function will be displayed whenever that Component is rendered.
Change the text in the h2 to see it changed on the page.
This is what index.js looks like:
import { StrictMode } from "react";
import ReactDOM from "react-dom";

import App from "./App";

const rootElement = document.getElementById("root");
ReactDOM.render(
  <StrictMode>
    <App />
  </StrictMode>,
  rootElement
);
We won't make any changes here, but note ReactDOM.render. This magical bit of code injects our React app into our HTML by "mounting" our App component. Now any Components that get rendered into our App component will show up on our page.
We're going to build a small counter app. First, create a new file inside of /src called Counter.js:
Then add the following code to it:
const Counter = () => {
  return 0;
};

export default Counter;
As you can see, for now this Component just returns 1.
Now make App.js look like this:
import "./styles.css";
import Counter from "./Counter";

export default function App() {
  return (
    <div>
      <Counter />
    </div>
  );
}
We're importing Counter and then to render it (using JSX) we wrote:
<Counter />Now let's add the + and - buttons to App.js. It will now look like this:
import "./styles.css";
import Counter from "./Counter";

export default function App() {
  return (
    <div>
      <Counter />
      <button>+</button>
      <button>-</button>
    </div>
  );
}
Our page now looks like this:

Now obviously we don't want to only render 0 - we want that count to change when the buttons are clicked.
To keep track of what that count should be, we'll use React state.
Make App.js look like this:
import "./styles.css";
import Counter from "./Counter";
import React, { useState } from "react";

export default function App() {
  const [countNum, setCount] = useState(0);

  return (
    <div>
      <Counter />
      <button>+</button>
      <button>-</button>
    </div>
  );
}
This looks strange, but here we're using React's useState hook. We won't go into "hooks" right now, but, but let's talk about this code:
const [countNum, setCount] = useState(0);useState is a function that returns an array with 2 items in it.
The first item is countNum which is our count.
The second is setCount (we can call both of these whatever we like, by the way) a function that will be used to update countNum.
And notice that we passed some initial state (0) into useState as an argument.
So what this is saying in english is:
Let's create a new piece of state (data) called
countNumthat starts off as0but can be updated by callingsetCount.
Update App.js to look like this:
import "./styles.css";
import Counter from "./Counter";
import React, { useState } from "react";
export default function App() {
const [countNum, setCount] = useState(0);
const handleIncreaseClick = () => {
setCount(countNum + 1);
console.log(countNum);
};
const handleDecreaseClick = () => {
setCount(countNum - 1);
console.log(countNum);
};
return (
<div>
<Counter />
<button onClick={handleIncreaseClick}>+</button>
<button onClick={handleDecreaseClick}>-</button>
</div>
);
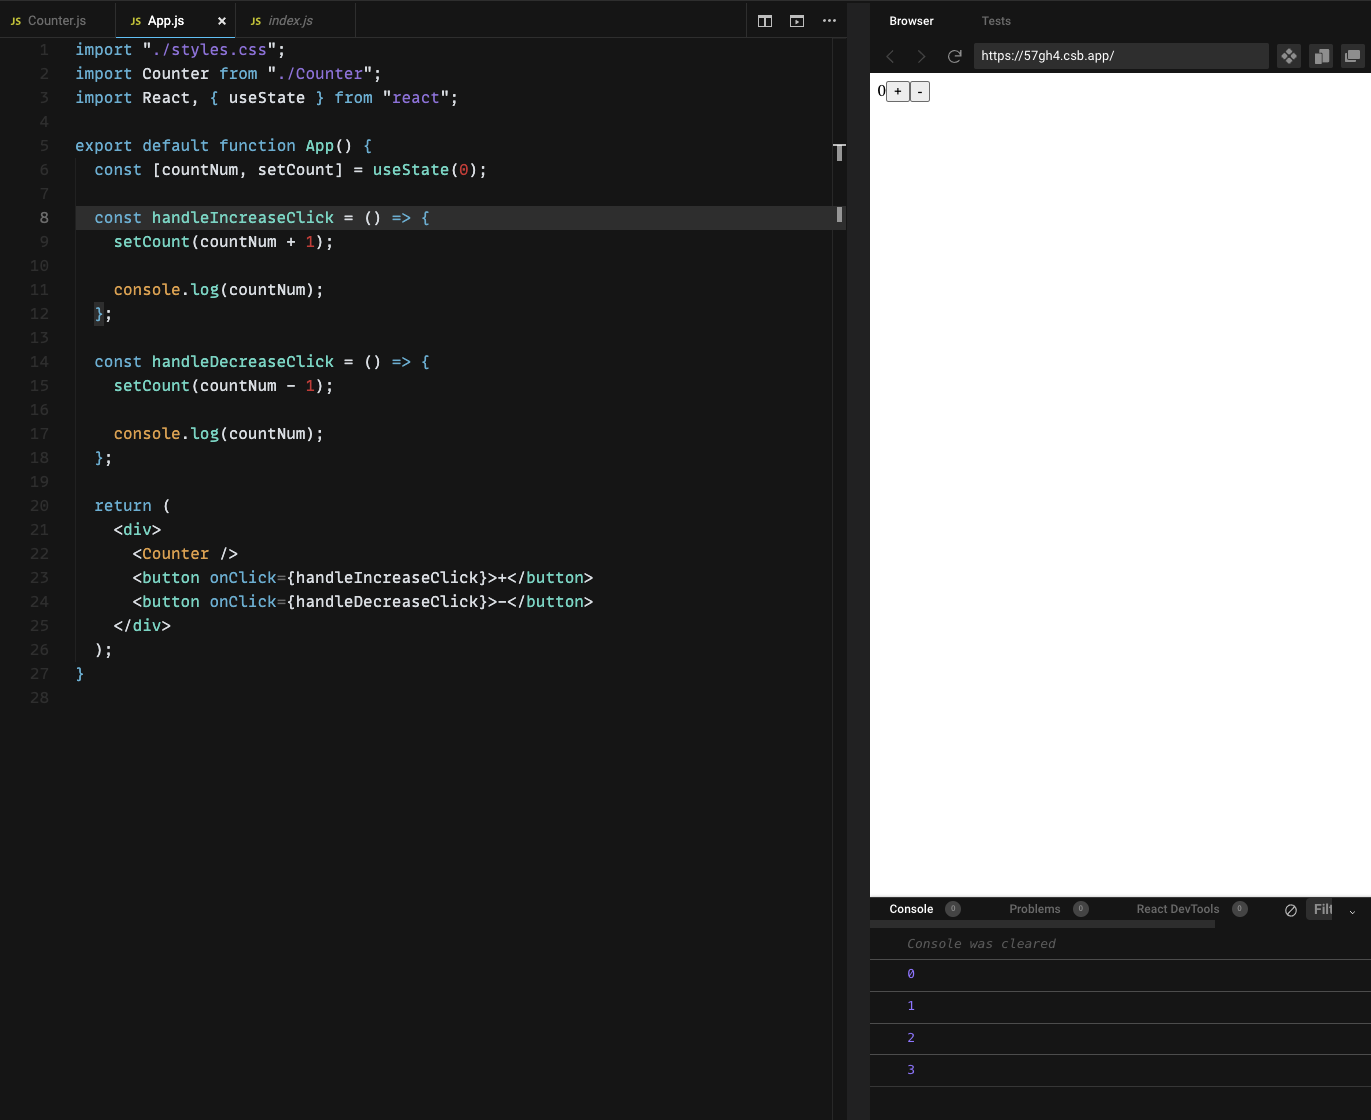
};Notice that we've addded 2 onClick handlers which are invoking 2 functions, handleIncreaseClick and handleDecreaseClick.
Each are calling setCount, which is updating countNum by increasing it by 1 or decreasing it by 1.
It's imporant that we do all of this through useState so that React knows when the change happens.
Now try click the plus and minus buttons - notice that the console log is showing the updated countNum:
Unfortunately Counter is still hardcoded to only display 0. To fix this, let's pass countNum to it as props from App.
It will look like this:
import "./styles.css";
import Counter from "./Counter";
import React, { useState } from "react";

export default function App() {
  const [countNum, setCount] = useState(0);

  const handleIncreaseClick = () => {
    setCount(countNum + 1);

    console.log(countNum);
  };

  const handleDecreaseClick = () => {
    setCount(countNum - 1);

    console.log(countNum);
  };

  return (
    <div>
      <Counter count={countNum}/>
      <button onClick={handleIncreaseClick}>+</button>
      <button onClick={handleDecreaseClick}>-</button>
    </div>
  );
}
With JSX, when we pass props (as we did above)...
<Counter count={countNum}/>syntactically it looks like an HTML attribute. Here we create a new prop on the component called count.
Now we can reference it inside the Counter component and display it.
Make Counter.js look like this:
const Counter = (props) => {
  return props.count;
};

export default Counter;
Now as you click, props.count is updated and Counter re-renders!