Creating Your First FLIP Fluids Simulation
- Introduction
- Creating Your First FLIP Fluids Addon Simulation
- Modifying Your First FLIP Fluids Addon Simulation
- Example 1: Smooth Viscous Liquids
- Example 2: Thick Viscous Liquids
- Conclusion
In this guide, you will learn how to create a basic fluid simulation scene using the FLIP Fluids addon. In this simple scene, we will show you how to create a FLIP Fluid Domain, add an Inflow object that emits fluid, and add a solid Obstacle that the fluid can interact with. We will also show you some basic modifications to the simulation settings that affect how the liquid will look and behave, and how to solve common issues that you may encounter.
At the end of each step of this guide, a Blend file will be supplied just in case you get stuck on a step or lose progress though the guide.
This guide will cover just a small number of settings in the FLIP Fluids addon. Our video guides and tutorials cover many more topics, concepts, and tips for how to use the FLIP Fluids addon. Check out our Video Learning Series!
To follow this guide effectively, you will need:
- An installation of Blender.
- A basic understanding of how to use Blender and the user interface.
-
An installation of the FLIP Fluids addon.
- This guide is also compatible with the free FLIP Fluids Demo addon.
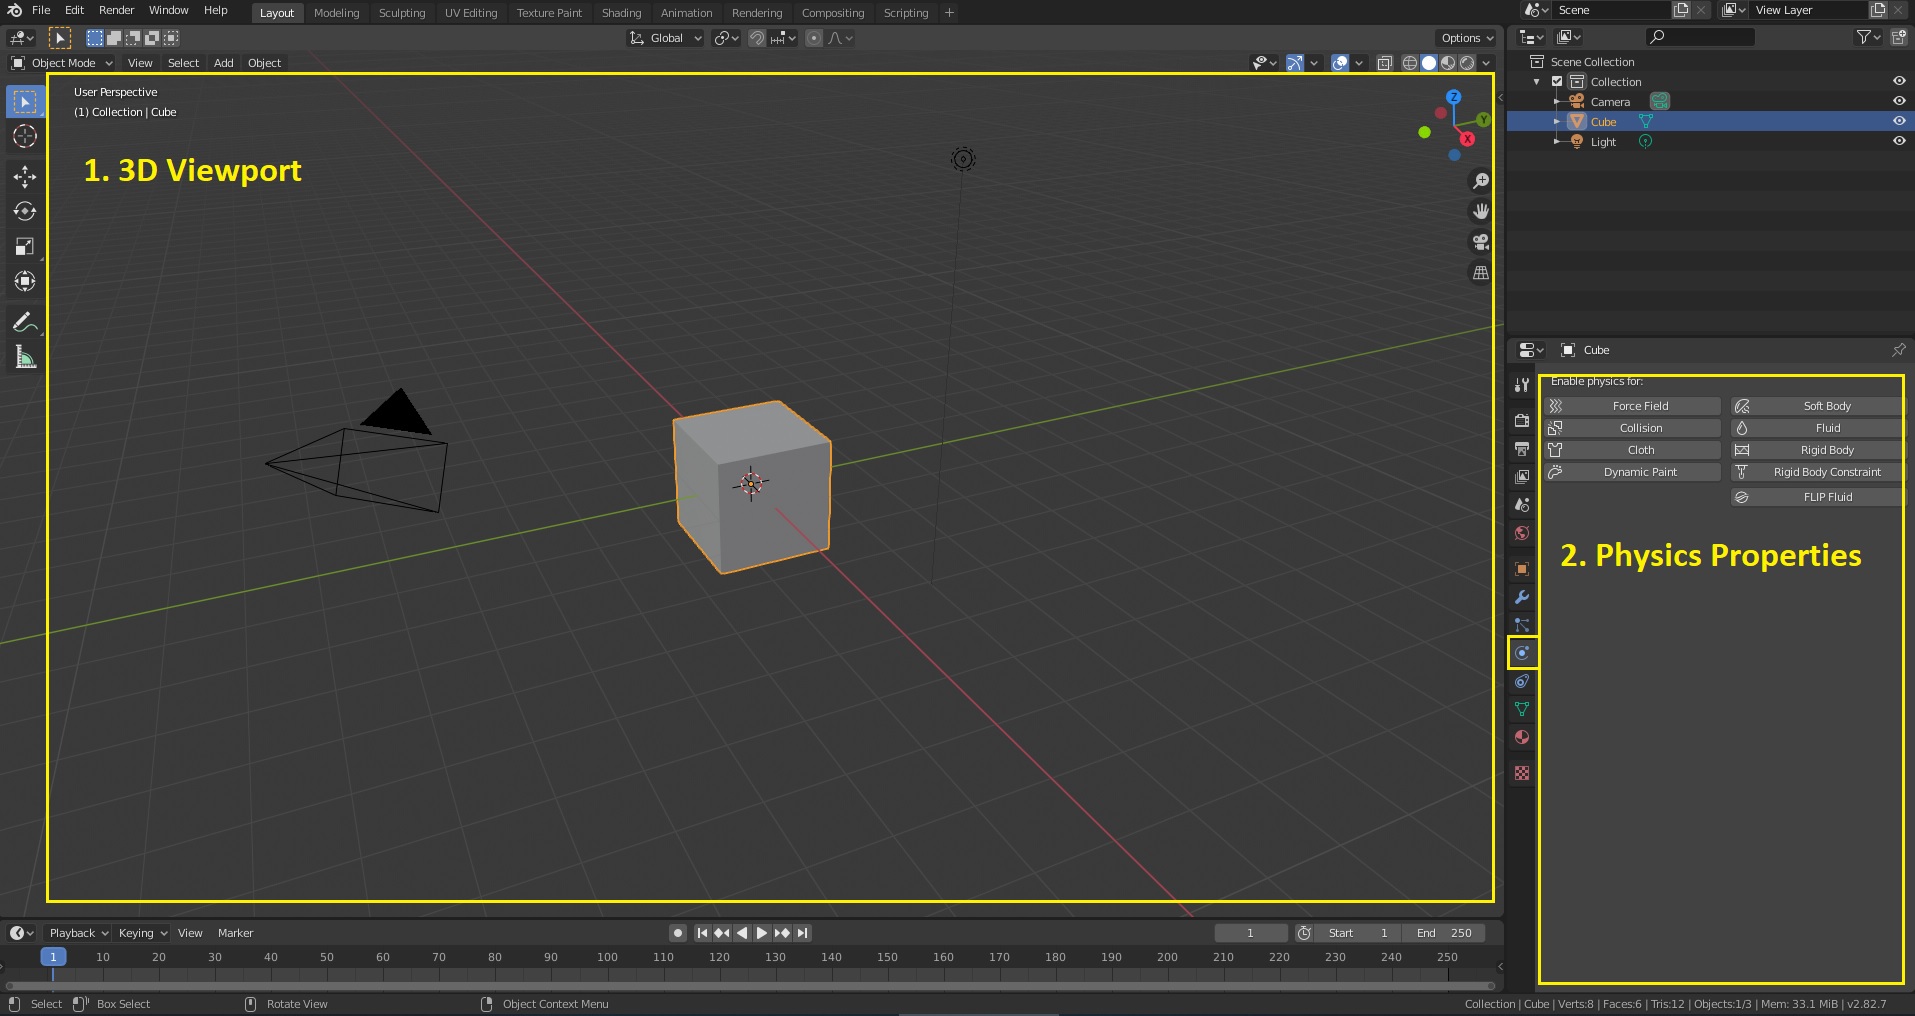
Lets get started! In this guide, we will mainly be focusing on interacting with the following areas of the Blender user interface:
-
The 3D Viewport - For adding, selecting, and manipulating scene objects.
-
The Physics Properties Panel - For interacting with the FLIP Fluids addon simulation settings.
First, we will start off with opening a new Blend file. We will save this file as my_first_simulation.blend. Saving the Blend file is not necessary, but will ensure we don't lose any simulation progress if we accidentally close the .blend file.
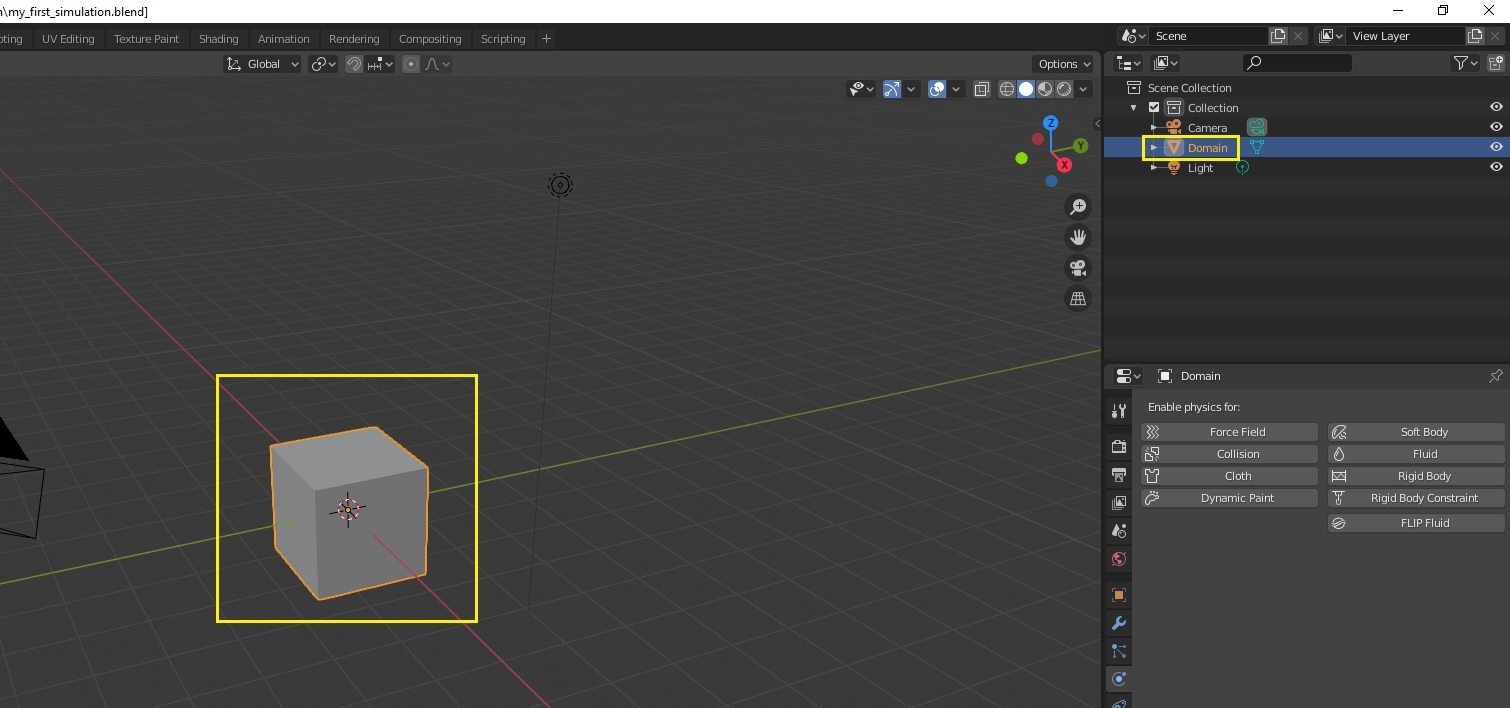
Next, we will create the simulation Domain object. The simulation domain is the volume where the fluid will be simulated. Fluid cannot exist outside of the domain object. The domain object must be cuboid shaped and aligned to the Blender x/y/z axis'.
-
Select the default cube
-
We will use this cube object as our domain. If your scene does not have a default cube, create a cube and select it.
-
To keep our scene organized, let's rename this object to Domain.
-
-
-
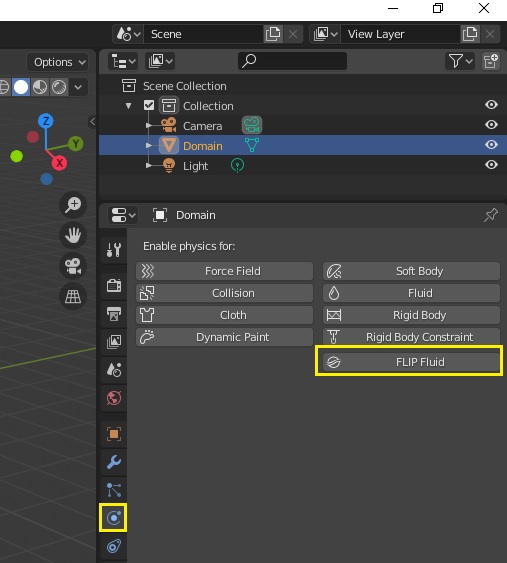
Set this object as a FLIP Fluid object
-
In the Physics Properties panel, click the FLIP Fluid button. This will set the selected object as a FLIP Fluid simulation object.
-
-
-
Set FLIP Fluid object type to Domain
-
In the Type dropdown list, select _Domain__. This will activate the object as a domain object.
-
The physics panel will now contain many panels and settings to control the simulation. We will only need to focus on small number of these settings in this guide.
-

-
-
Set Domain Size and Location
-
Now We will scale the domain object to the size we want. Let's scale the domain to be twice as large and move the domain so that the floor is touching the Z origin.
-
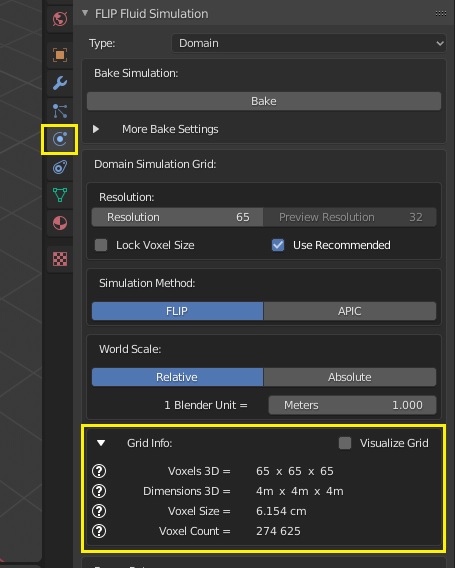
In this example, we have used scale = (x=2, y=2, z=2) and location = (x=0, y=0, z=2). Inside of the simulator, each Blender unit is considered to be 1 meter wide by default. The domain object in this example is 4 Blender units long, so the simulation size will be 4 meters long.
-

-
The exact physical dimensions and other properties of the of the simulation grid can be viewed in the Domain > FLIP Fluid Simulation > Grid Info section. For more information and an explanation about the simulation grid, hover over the ? icons for tooltips or visit the Domain Simulation Grid documentation.
-
-
Now we have finished creating our domain object.
Blend File: my_first_simulation_step_2.blend
Next, we will create an Inflow object. Inflow objects continuously emit fluid into the simulation domain. In this example, our inflow object will be spherical in shape. We will place the inflow object near the top of the domain and tell it to emit fluid downwards.
-
Create an Icosphere object
- We will start by creating a new Blender Icosphere object that will act as our inflow. We will scale the object smaller place the object near the top of the domain.
- In this example, we have used scale = (x=0.25, y=0.25, z=0.25) and location = (x=0, y=0, z=3.5).
- To keep our scene organized, let's rename this object to Inflow.

-
Set this object as a FLIP Fluid Inflow object
- Similarly to how we created the domain, we will select the Inflow object and then click the FLIP Fluid button. This time, instead of setting the type as Domain, we will set the Type to Inflow. The physics panel will now contain settings to configure the inflow object.

-
Set the direction of the inflow object
- By default, the inflow will emit fluid and drop it in the direction of gravity. We want to have the inflow emit fluid downwards a bit more quickly and we will do this by setting the Inflow Velocity vector.
- In our example, the floor of the domain is in the Z- direction, so we will set the Z component of the Inflow Velocity vector to a negative value of -2.0. Inflow velocity values are in units of meters per second (m/s).

Now we have finished creating our Inflow object.
Blend File: my_first_simulation_step_3.blend
Next, we will create an Obstacle object. Obstacle objects act as solids for the fluid to interact with. In this example, our obstacle object will be spherical dome placed off-center at the domain floor.
-
Create an icosphere object
- We will start by creating a new Blender Icosphere object that will act as our obstacle. We will want this object to be fairly smooth, so we will set the subdivisions to 5 in the Add Ico Sphere properties.
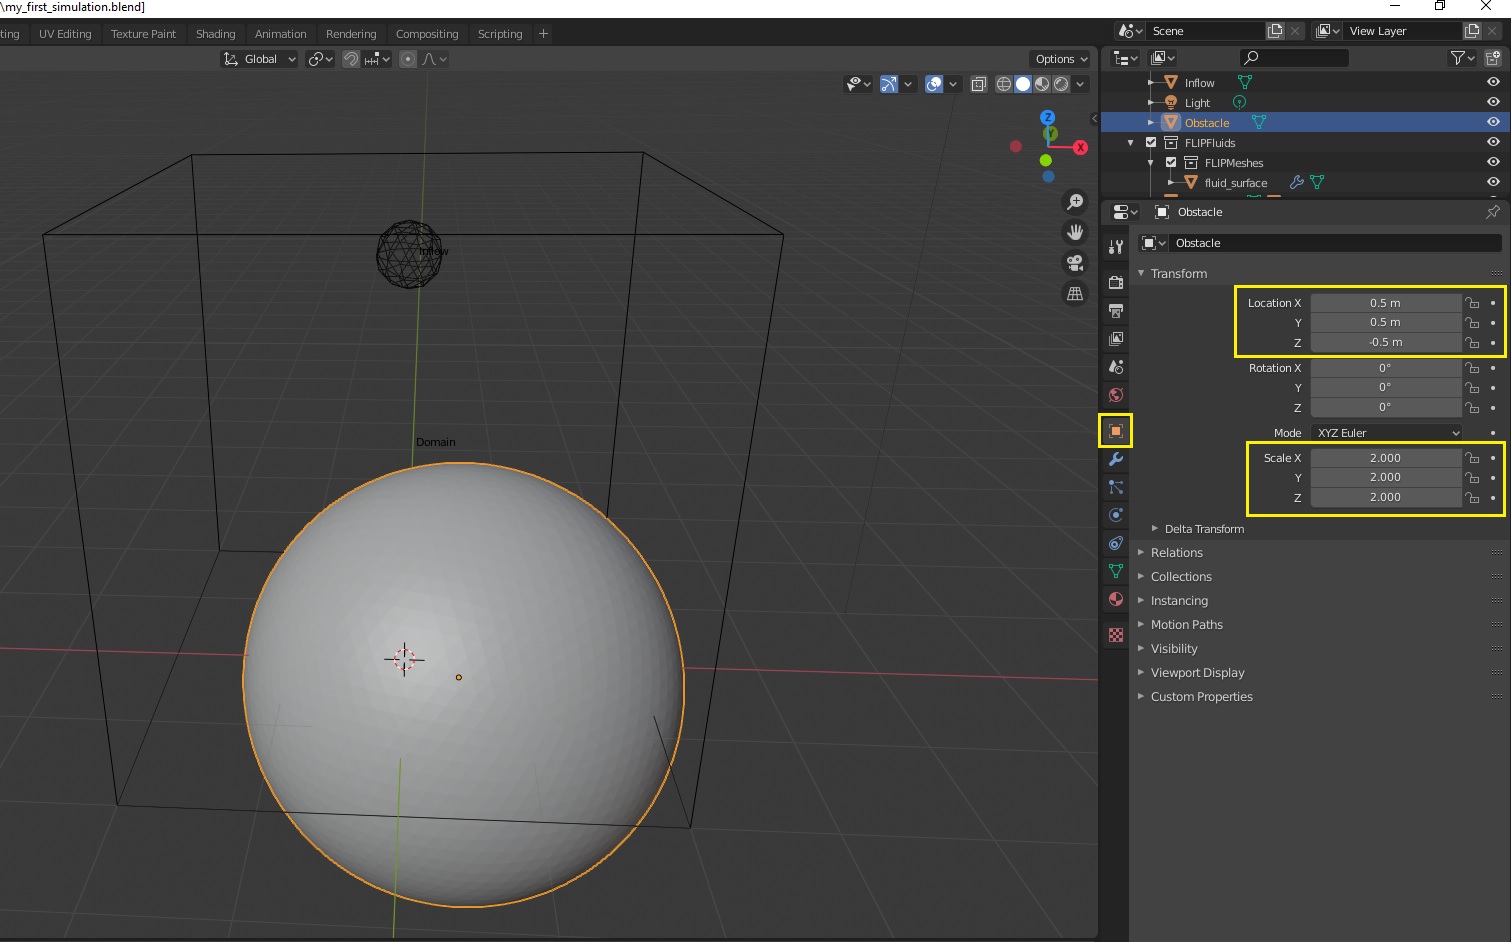
- We will double the scale and place the object closer to one of the bottom corners of the domain. We will position the object so just a smaller portion of the sphere pokes through the domain floor. This will be our dome.
- In this example, we have used scale = (x=2, y=2, z=2) and location = (x=0.5, y=0.5, z=-0.5).
- To keep our scene organized, let's rename this object to Obstacle.
-
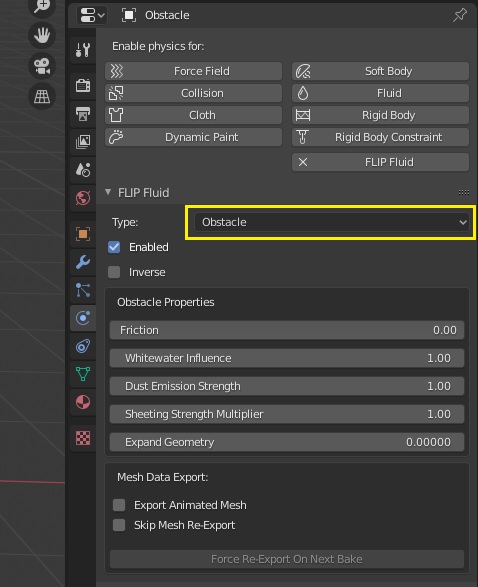
Set the object as a FLIP Fluid Obstacle object
- Similarly to how we created the Inflow, we will select the Obstacle object and then click the FLIP Fluid button. This time, instead of setting the type as Inflow, we will set the Type to Obstacle. The physics panel will now contain settings to configure the obstacle object. We will just leave these settings as is.
Now we have finished creating our Obstacle object.
Blend File: my_first_simulation_step_4.blend
Next, we will run our simulation! This process is called Baking. The simulator will *Bake_ the fluid into an animated sequence of meshes that will become our fluid surface. Depending on how complex and detailed a simulation is, the baking time may range from a few minutes to many hours. Most of the simulations we will be running in this guide are simple with a low level of detail, so the baking process for these simulation should not take longer than a few minutes.
-
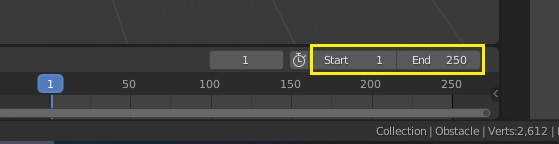
Set the frame range
- By default, the simulator will bake the range of frames that are set in the Blender timeline. For now we will just leave these to the default values of Start=1 and End=250 for this guide.
-
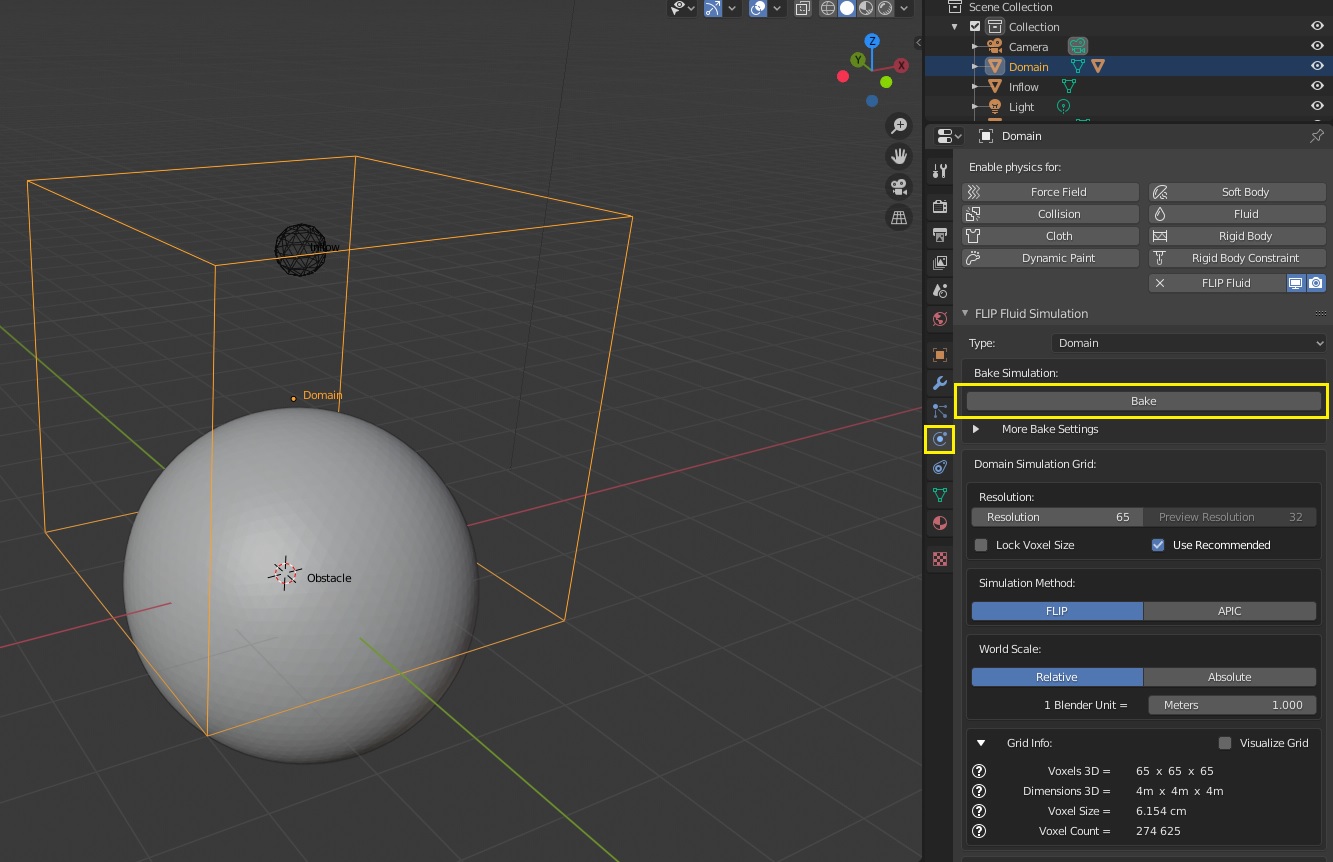
Begin baking the simulation
- Select the Domain object to display the domain settings in the physics panel. Click the Bake operator to begin baking the simulation.
-
Wait for the simulation to finish baking
- While you are waiting for the simulator to finish baking, let's take a look at and try out some of the baking features of the FLIP Fluids addon!
- While the simulation is baking, you can play/scrub through the timeline to see how the simulation is progressing.

- The bake operator will display the percentage of the simulation that has been completed, the number of frames processed, and the most recent timeline frame that the simulator has finished.

- You can stop/pause the simulator at any time.

- And resume baking at a later time. You can change most simulation settings before resuming the simulation.

- You can even change the simulation settings and resume the simulation from an earlier frame. See the Savestates documentation for more details.

- Or if you want to start over, you can use the Reset operator to clear the simulation. This operator will give you a confirmation warning and once the simulation is reset, the simulation will have been deleted permanently.

- The baked simulation results are stored in an external directory called the cache. Expand the the Domain > FLIP Fluid Cache panel to view the current caching location and other settings. See the FLIP Fluid Cache documentation for more details.
- By default, if the Blend file is saved before running a simulation, the cache directory will be named according to your Blend file name and located in the same location as your Blend file. Similar to other caching systems in Blender, if you move your Blend file, you will also want to move the cache directory. Alternatively, you may also set a specific cache directory location or load another cache by using the file selector icon.

- While your simulation is running, or after it has finished, you can view statistics about the simulation for either the entire cache or a specific frame by expanding the Domain > FLIP Fluid Stats panel. See the FLIP Fluid Stats documentation for more details.

Congratulations! You have just run your first FLIP Fluids simulation! It's not perfect and doesn't look too impressive, but this is just a simple example and a good start. In the next section, we will look at ways we can modify and improve our simple simulation scene to create different types of liquids.

Blend File: my_first_simulation_step_5.blend | Example Animation
In this section we will guide you through some simple modifications to your simulation settings to improve on your first simulation and show you how to create different types of liquids.
Let's build upon the my_first_simulation.blend simulation setup and try out the viscosity feature! In this example, we'll show you how start with a basic viscosity simulation and incrementally transform it into a smooth flowing liquid paint by using basic features of the simulator.

Viscosity in this simulator is a value that controls the liquid's resistance to flow. Our previous simulation had a lot of motion and was a bit chaotic. Adding some viscosity to the liquid creates internal friction within the liquid that has the effect of making the fluid look 'thin' like oil or paint at low viscosity values or look 'thick' like honey or molasses at higher viscosity values. Learn more about viscosity in the World > Viscosity documentation.
Our goal in this section will be to create a smooth liquid with a low viscosity that looks like flowing paint. We'll begin where we left off in the my_first_simulation.blend guide. The final step of the previous simulation setup can be downloaded here: my_first_simulation_step_5.blend.
In this setup we will set the Blender timeline range to Start=1 and End=120 to speed up baking, but you can set the frame range to be as short or as long as you like.
-
Open the Domain FLIP Fluid World panel
- Select the Domain object and expand the FLIP Fluid World panel.
- The World panel contains settings related to the physical properties of the liquid and how it will behave within the domain. Learn more in the Domain World Settings documentation.

-
Enable and set the liquid viscosity
- Expand the Viscosity menu and activate the Enable Viscosity checkbox.
- The default viscosity value of 5 will likely be too thick for a liquid that should look like paint. Let's try setting the Base viscosity to a value of 0.01.

-
Open the FLIP Fluids sidebar helper menu
- The FLIP Fluids addon includes a sidebar helper menu that contains common operators, settings, and tools to help you set up, run, and render your simulation. This step and menu is optional to use, but can be convenient to use in your workflow. For example, this sidebar menu contains a Bake operator at the top that you may use instead of scrolling up and down through the domain settings and can also be used when the domain is not selected.
- To open the Blender sidebar, press the hotkey N or click this small arrow icon in the upper right corner of the viewport:

- To display the FLIP Fluids addon sidebar, select the FLIP Fluids tab.

- Learn more about this sidebar menu in the FLIP Fluids Helper Menu documentation.
-
Bake the Simulation
- Let's begin baking the simulation using the sidebar Bake operator to see how the simulation looks. Reset the bake if needed.

-
Result
- The baked simulation looks okay, but does not look necessarily like paint. The viscous motion looks alright, but fluid surface looks 'bumpy' or ' chunky', not really like a smooth flowing paint liquid at all. In the following sections we will show you ways to improve on this result.

Blend File: my_first_simulation_smooth_viscous_liquid_step_1.blend | Viewport Animation
-
Access the fluid surface smooth modifier
- The Blender Smooth Modifier can be used to add some smoothing to the geometry of objects. The FLIP Fluids surface mesh object is automatically set up with a smooth modifier as smoothing is commonly used in liquid simulations.
- To access the smooth modifier, select the fluid_surface object and select the Modifier Properties tab.

-
Increase Smooth Modifier Settings
- By default, the smooth modifier will be set to add no amount of smoothing to the surface mesh.
- The amount of smoothing can be adjusted with the Factor and Repeat values. The values used will depend on the effect and desired results, but in general a larger repeat value will be needed for meshes that have denser polycounts such is in higher detailed simulations. Adjusting the modifier values do not require re-baking the simulation, so it is quick and easy to experiment with the values.
- In this example we have set Factor = 1.5 and Repeat = 8.

-
Result
- The surface is certainly smoother than the last result and is starting to looking more like liquid paint, but there are still some problems. It would be a lot nicer if the surface was even smoother, but increasing the smooth modifier values further does not fix this. The motion of the liquid could be smoother as well and notice how the edges of the fluid look a bit jagged as it flows across the obstacle - in a liquid paint, you would expect the edges to be more rounded. In the next section, we'll show you how to adjust the simulation settings to improve on this result.
Blend File: my_first_simulation_smooth_viscous_liquid_step_2.blend | Viewport Animation
The Surface tension feature in this simulator is another World property of the liquid and this feature simulates the natural cohesion of surface molecules that cause fluids to form into beads, drip, and add an elastic look to splashes. Depending the the type of liquid, surface tension can be an important property of the liquid for realism and often works well in combination with low viscosity liquids. In this example, surface tension will help smooth out the motion and shape of our liquid paint simulation. Learn more about surface tension in the World > Surface Tension documentation.
-
Enable and set the liquid surface tension
- Navigate to the Domain > FLIP Fluid World panel and expand the Surface Tension menu.
- Activate the Enable Surface Tension checkbox.
- In this example, we'll set the Base surface tension value to 0.5.

-
Bake the simulation
- Reset the simulation if needed and begin baking the simulation.

-
Result:
- The simulation is looking a lot more like liquid paint now! Surface tension really helped smooth out the liquid motion and curvature of the edges. There's one last thing we can do in the next section, and that is to increase the simulation detail for a final finished result.
Blend File: my_first_simulation_smooth_viscous_liquid_step_3.blend | Viewport Animation
In the previous examples we were using the default simulation resolution of 65 which is often quick to compute but can be low in detail. Initial experimentation at a low resolution is usually a good idea for speeding up iteration and testing a simulation effect. Physics simulations can often require a lot of testing with different values and setups, and being able to test an idea quickly can be very important for your workflow.
Once you're happy with the motion and look of your liquid, it is common to increase the simulation resolution and re-bake for a final result. The resolution value controls how finely the domain is split up into a 3D grid of voxels. Higher resolution values generate a more detailed grid, which results in more detailed physics calculations within the simulator which in turn produces a more detailed simulation result. Learn more about the simulation grid in this documentation topic: What is the domain simulation grid?
Something to be aware of when increasing resolution, is that this can sometimes affect the behavior and result of the simulation - the fluid may not flow exactly the same as the low resolution simulation. This is due to the nature of how physics simulations are calculated and is something to keep in mind when working with simulations. In our example, increasing resolution should not change the motion very much. For more information, see this documentation topic: Scene Troubleshooting: Fluid behavior changes when increasing resolution.
-
Increase Domain resolution
- Select the Domain object and navigate to the FLIP Fluid Simulation panel at the top of the domain settings.
- Let's try increasing the Resolution value to 120. This will almost double the amount of physics detail compared to the original resolution of 65.
- Alternatively, the resolution can also be set in the FLIP Fluids sidebar helper menu.

-
Bake the simulation
- Begin running the simulation.
- As you increase resolution, the time required to bake the simulation will increase. As you raise the resolution higher, the bake time will increase quickly by a large factor.
- The low detail simulations at 65 resolution took us less than a few minutes to run and increasing to 120 took about 15 minutes. This may be a good point to take a quick break and wait for the bake to finish!

-
Result:
- The final result looks great! Increasing the simulation resolution resulted in an even smoother flow and I think it was worth the extra time to simulate.
- A next step could be to set up the scene to be rendered, but this will not be covered in this guide. Rendering and creating render setups is a huge topic in Blender and there are many resources to be found online to guide you through this process. Our beginner video tutorials also cover the basics of setting up your scenes and simulations for rendering. For the final .blend file in this example, we will include a very basic render setup for this scene.

Blend File: my_first_simulation_smooth_viscous_liquid_step_4.blend | Viewport Animation | Example Render
After seeing the result of the simulation at 120 resolution, you may be tempted to further increase the resolution value to try for an even better result. Increasing resolution can increase simulation time by a huge amount, and depending on the effect, raising the resolution can result in greatly diminishing returns on quality. As an example, the 120 resolution test took us about 15 minutes to simulate and a 250 resolution test took about 4.5 hours! Click here for the result. This render looks very similar to the 120 resolution render. Was the additional hours of simulation worth the added detail? Some may even prefer the 120 resolution result.
Sometimes creating a quick lower quality effect will be the right choice for you, and sometimes it's just fun to experiment with high resolutions and seeing the result after running a simulation overnight. It's up to you as the artist to decide what you prefer and on how much time to budget towards creating an effect.
In this example, we'll show you how modify the setup in last example to create a thick buckling paint simulation.

Our goal in this example will be to create a thick liquid with a high viscosity that looks like thick buckling paint as if it was squeezed from a tube. Some of the instructions in this example will be similar to the previous examples and you may want to have followed the guide up to this point before starting this example as these instructions may be more brief and in less detail.
We will continue to use and modify the setup in the previous example. The final step of the previous simulation setup can be downloaded here: my_first_simulation_smooth_viscous_liquid_step_4.blend.
First, let's start by changing a few settings of the previous example.
-
Adjust domain settings
- For this example, we will want a more narrow fluid stream like the nozzle of a paint tube. We will scale down the inflow object by half. In this example we have set the scale = (x=0.125, y=0.125, z=0.125).
- Set the domain resolution back to the default value of 65 so we can test and iterate quickly.
- Disable the Surface Tension feature. Surface tension forces will be less applicable to this thicker paint fluid and will not be needed.
- We want to create a higher viscosity liquid, so we should raise the viscosity value. Let's start by trying a Base viscosity value of 10

-
Bake the simulation
- Let's bake the simulation to see how this change of settings affected the simulation.

-
Result:
- This is a good start! The higher viscosity causes the fluid to buckle similar to a thick paint squeezed from a tube. Something that can be improved is that the liquid flows down the obstacle too quickly. Unlike the thin paint in the previous example, you would expect a thicker paint to be stickier and adhere more to the obstacle. In the next section we'll show you a setting to improve on this setup.
Blend File: my_first_simulation_thick_viscous_liquid_step_1.blend | Viewport Animation
Adding friction to the obstacle (and also to the domain walls) will help fluid 'stick' to solid surfaces.
-
Set obstacle friction and re-bake the simulation
- Select the Obstacle object.
- In the physics properties, let's try a maximum Friction value of 1.0.
- Re-bake the simulation and view the results.

-
Result:
- The thick paint sticks much better to the obstacle and no longer runs down the side of the obstacle. But there are some problems with the mesh surface. Notice how there is a lot of flickering where different parts of the liquid stream touch and combine. This flickering is the result of low mesh detail due to a coarse simulation grid and we will show you how to improve this in the next section by increasing the simulation resolution.

Blend File: my_first_simulation_thick_viscous_liquid_step_2.blend | Viewport Animation
We will increase the simulation resolution to see if this fixes the surface flickering issue. Surface flickering is more noticeable in highly viscous fluids that move more slowly though the grid voxels. Increasing the simulation resolution results in smaller voxels which results in less noticeable flickering artifacts.
Note: In extreme cases, increasing resolution may not completely solve the flickering issue and if this is the case, the mesh generation quality should also be increased. This can be done by increasing the Domain > FLIP Fluid Surface > Subdivisions value from the default 1 to a value of 2. We will not use this setting in this example, but it could be something to try in your experiments.
-
Increase resolution and re-bake the simulation
- Let's try setting the domain Resolution to 120 and re-baking the simulation.
-
Result:
- The reduced flickering is much better and the viscous buckling has more realistic motion due to the improved accuracy, but now there is a new problem. The surface appears to have many ridges along the fluid stream. In the next section we will show you how to solve this issue by using a different choice of inflow object shape.

Blend File: my_first_simulation_thick_viscous_liquid_step_3.blend | Viewport Animation
The surface ridges and stuttering effect can be solved by using a different choice of object shape. This stuttering effect happens because fluid is only emitted from the inflow shape once per frame (or once per frame substep). If the fluid is being emitted too quickly or if the simulation is at a higher resolution, the curvature of the spherical inflow can be noticeable as it is emitted in discrete steps, especially if the inflow is a smaller size.
To solve this issue, we will instead use a cylinder shape for an inflow. For thinner fluid streams, a cylinder shape is often a good choice for an inflow as there is no curvature along the length in the direction that the fluid is emitted.
-
Replace the spherical inflow with a cylinder object
- Delete the inflow object and add a small cylinder shape in its place.
- Set this cylinder as an inflow with the same velocity direction.
- In this example we have set the scale = (x=0.125, y=0.125, z=0.2), location = (x=0, y=0, z=3.5), and Inflow Velocity = (x=0, y=0, z=-2).

-
Bake the simulation
- Let's re-bake the simulation to see how this changes the result.

-
Result:
- That looks much better! The fluid stream now flows consistently and I think this is good as a final result.
- For the final Blend file we will include a very basic render setup.

Blend File: my_first_simulation_smooth_viscous_liquid_step_4.blend | Viewport Animation | Example Render
There are a lot of additional changes that you can try out in your own experiments. Try lower or higher viscosity values, narrower or thicker inflows, or try using higher mesh quality settings as mentioned in the previous step. Try different inflow or obstacle shapes or different render setups and camera techniques. There are so many possibilities!
This concludes the guide on creating your first FLIP Fluids simulation! There are many more simulation settings that can be used to customize and fine-tune the look and behavior of your fluid. With this guide, we have only experimented with just a small number of settings. There is much more to learn, so visit the Documentation and Wiki to see more of what the FLIP Fluids addon can do!
Our video guides and tutorials cover many more topics, concepts, and tips for how to use the FLIP Fluids addon. Check out our Video Learning Series!
There are a lot of features of the FLIP Fluids addon to experiment with and in this section, we'll add some notes and links to help give you ideas for what to try, what to experiment with, and what documentation topics to check out.
- Don't know where to start in the wiki? Here is a collection of our most recommended topics to help you learn how to use the FLIP Fluids simulator effectively: The Most Important Documentation Topics
- Try using different shapes or more complex geometry for your Inflow and Obstacle objects.
- To ensure that your objects work correctly with the simulation, make sure that the geometry is closed/manifold/watertight. We have info and tools to help you diagnose and debug issues related to geometry (more info).
- In addition to the geometry requirement, thin parts of obstacles should also be sufficiently thick in order to be resolved on the simulation grid. This helps prevents leakage through obstacles (more info).
- Try animating the motion of the Inflow and Obstacle objects. If the motion of your object animation is more complex than just keyframed location/rotation/scale such as with parented relations or armatures, make sure that the Export Animated Mesh option is enabled so that the animation is correctly exported to the simulator.
- Try keyframing simulation settings. For example, to turn an inflow on and off, the Enabled option can be keyframed. Almost all simulation settings can be keyframed! If you right click on a setting and an Insert Keyframe option appears, keyframing this setting is supported.
- Try the Whitewater Simulation feature to simulate large scale water effects with foam, bubble, and spray particles. Our Complete Guide Series covers using and rendering with this feature and we even have a full episode specializing on how to use whitewater in your simulations.
- Experiment with rendering and baking from the command line. Fluid simulations can generate a lot of geometry and Blender can become unstable and crash when rendering huge scenes.
- Rendering from the command line is the most stable method of rendering in Blender and prevents nearly all bugs in Blender related to render crashes or incorrect renders.
- Using the command line may sound intimidating if you are not familiar with these Blender features, but we have a Command Line Toolset in the FLIP Fluids sidebar menu that helps you automatically launch command line processes.
- We highly recommend becoming comfortable with these tools!