Integration Guide
- iOS
- Android
- Windows UWP -> Please request access.
- WebGL (special instructions below)
Roadmap:
- PC
- Request Access to Scuti by visiting scuti.store
- You will receive an e-mail once you have been granted access.
- The email invite will have a link to our dashboard. Click that link to create your account.
- Enter in your email/password:

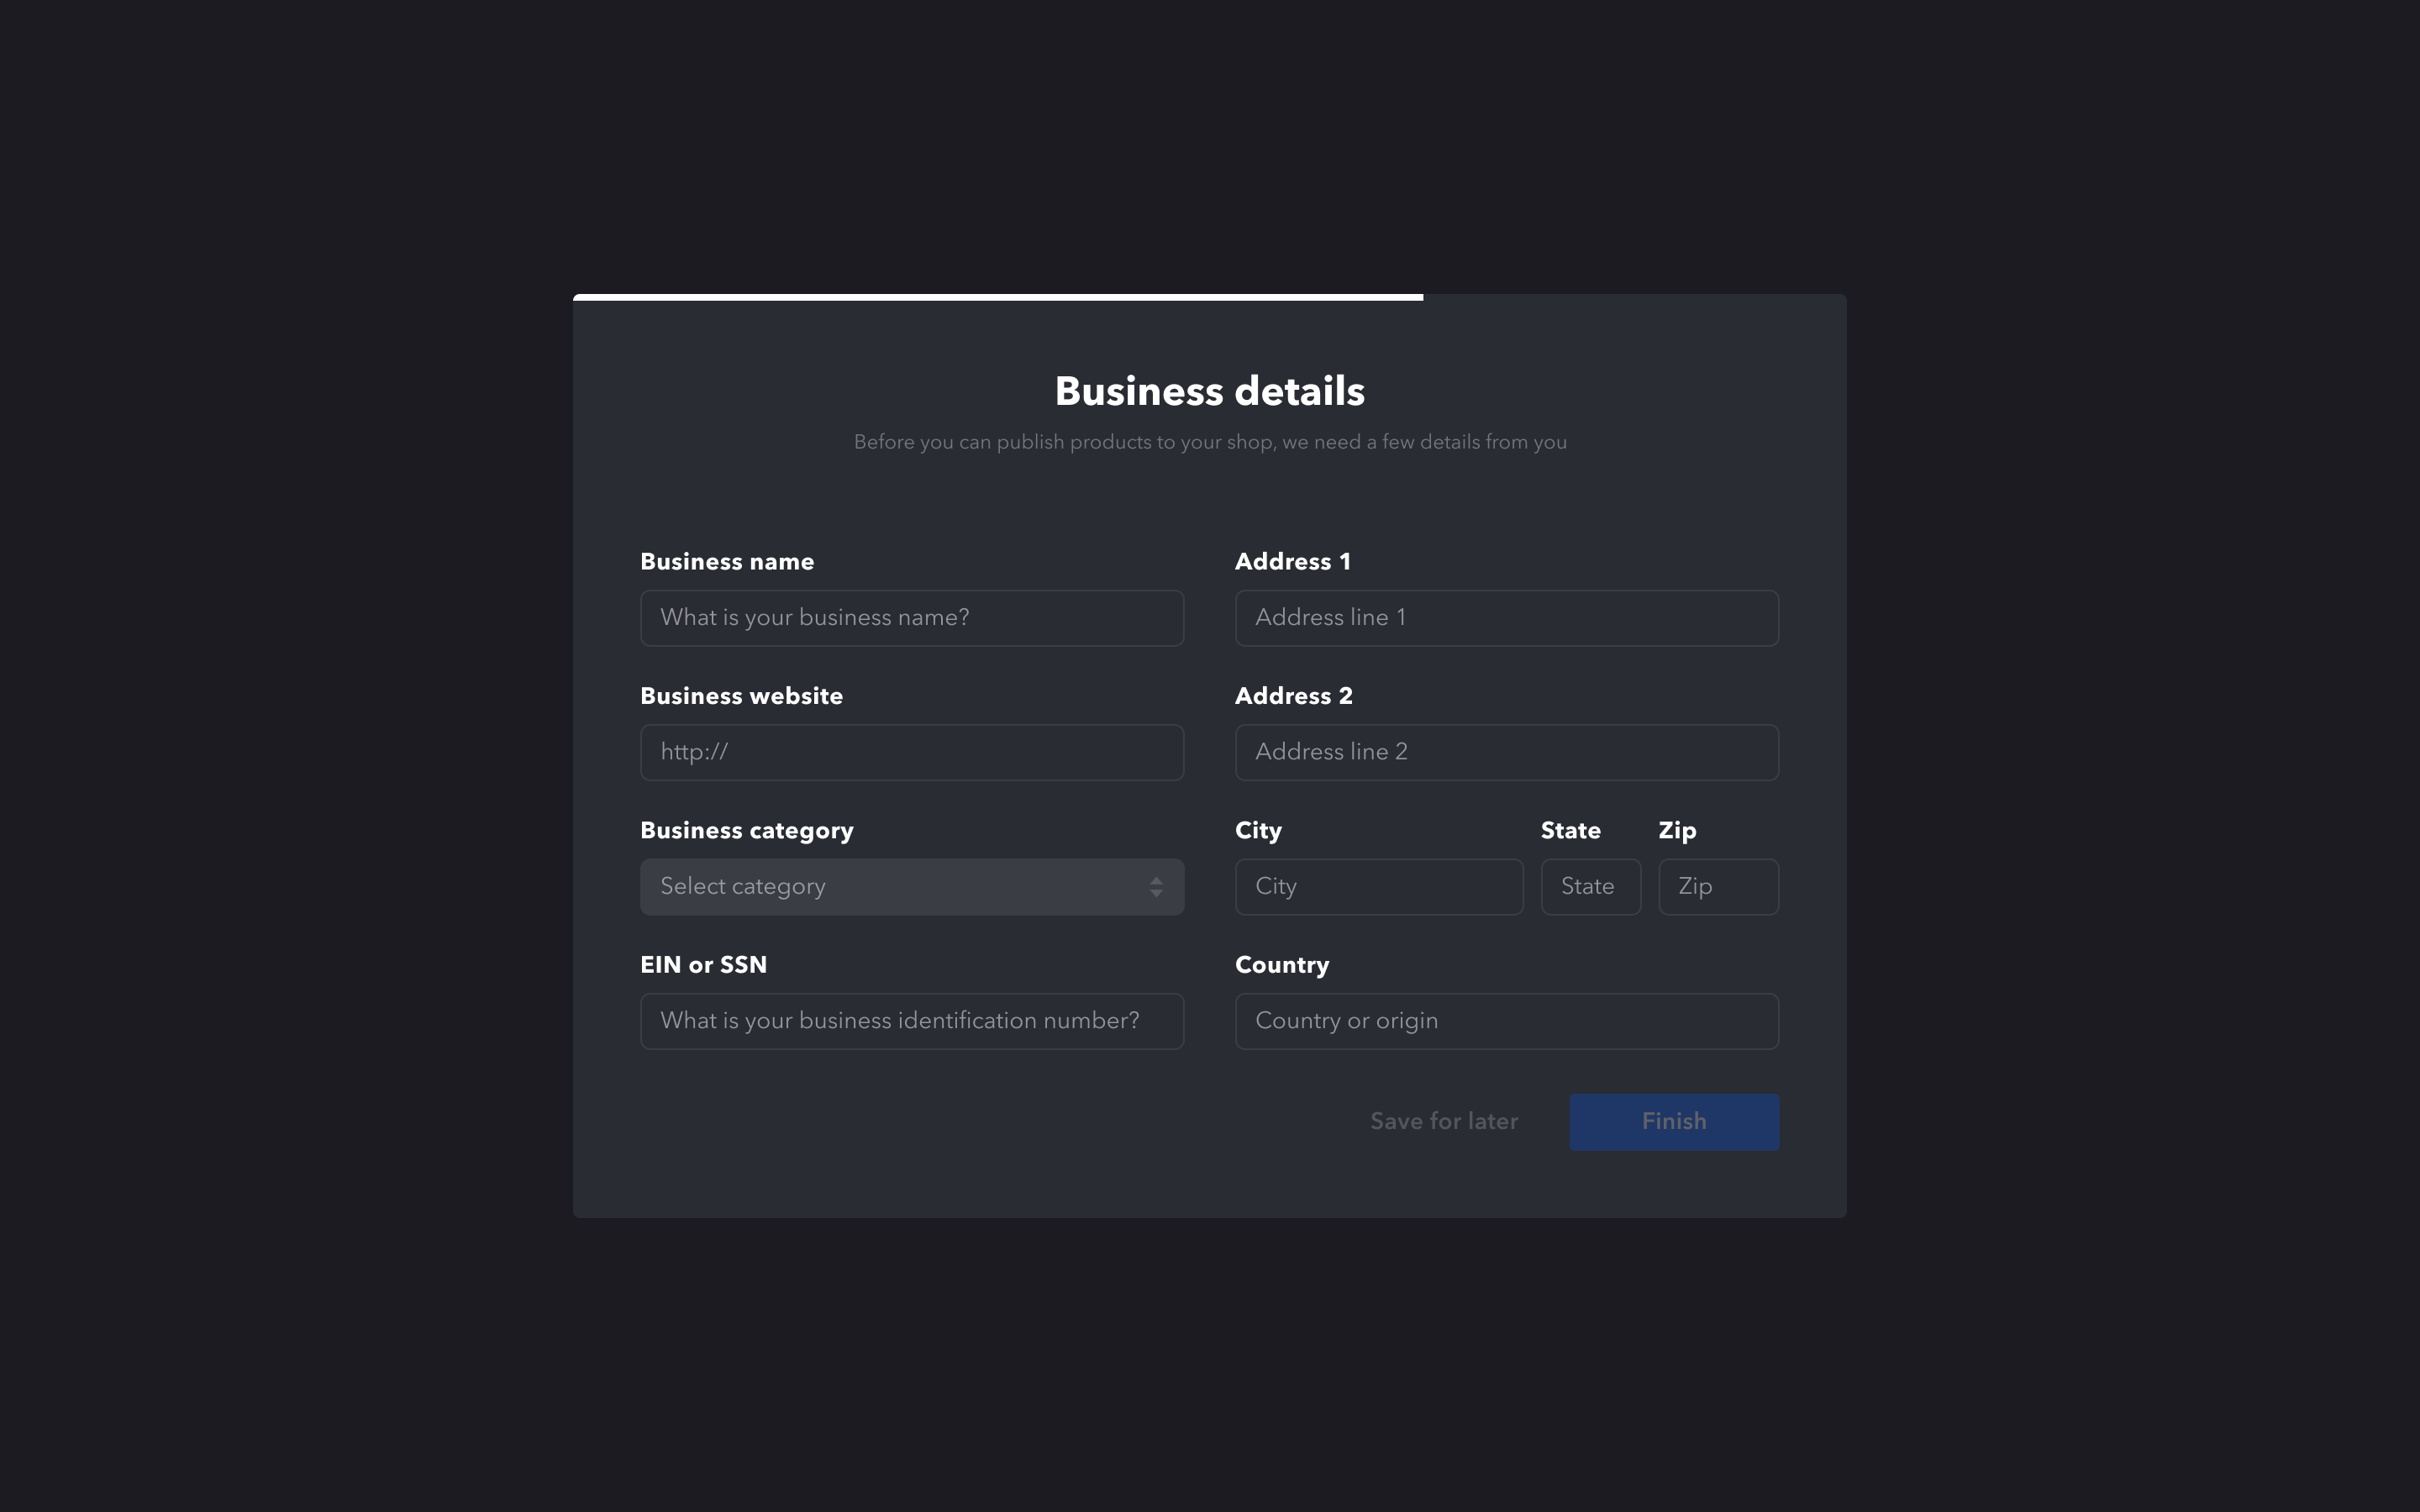
- Add your business details which will be used for tax purposes on any revenue you generate.
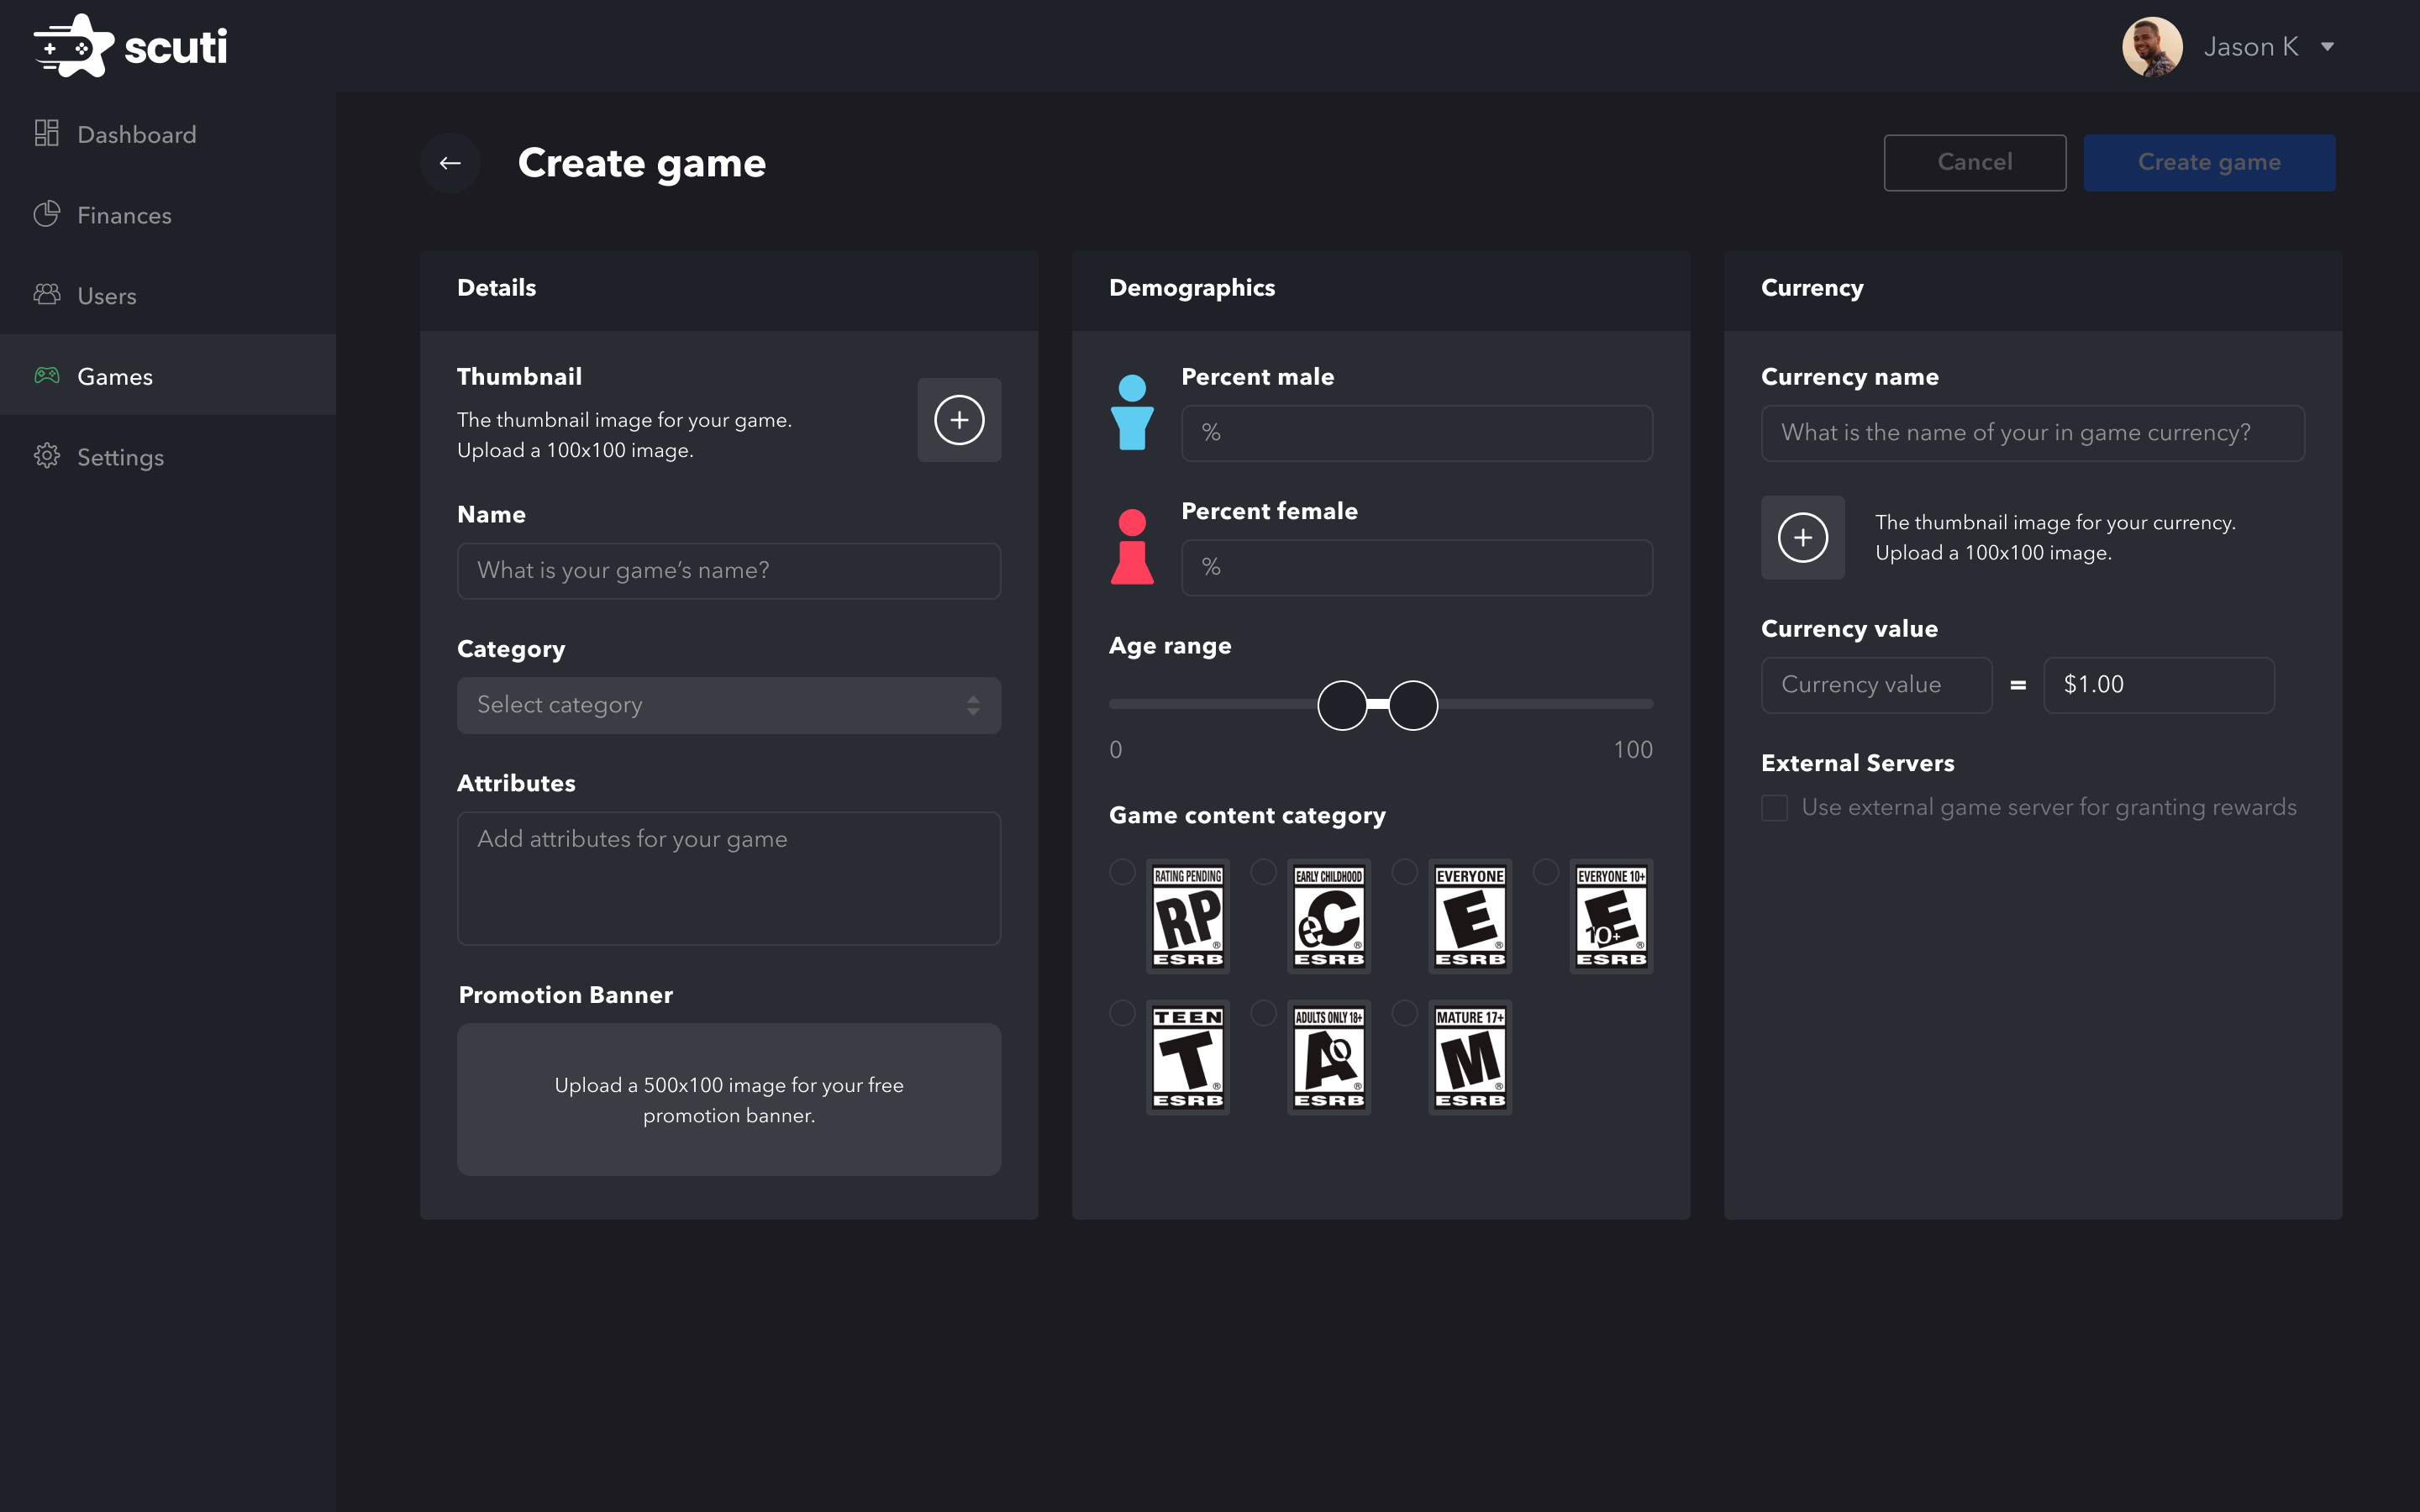
 4. Add your first game to the Scuti Dashboard.
- Record your game's assigned AppId

- Add the Unity SDK to your project using Unity Package Manager. Here are Unity's instructions for adding packages from Github. Here is the URL to use: https://github.com/scuti-ai/scuti-unity-wrapper.git You can add #Staging to the end to point to our test environment or leave it pointing to the main branch for production. (Please note that older versions of Unity such as 2018 do not accept the URL in the package manager. See below for additional download options)
- Settings panel should automatically appear after you import the package. You can also revisit the settings page by opening Scuti->Configuration in the top panel of Unity. Enter your AppId in the settings panel.

- Hit Save Configuration
- Open your game's store scene or prefab. Click the 'Create Scuti' button. This will add the Scuti store to your project. You can then position this prefab wherever you need in the scene or menu.
- The last step is setting up the currency exchange which can either be done by the client or on the server. We recommend the server integration to prevent hacking.
- For Android, Go to Edit->Project Settings->Player->Other Settings and set
Internet AccesstoRequire

For older versions of Unity such as 2018 you will not be able to use the package manager to point directly at a giturl. Instead, download the repository to your machine. Copy the Scuit folder and the ScutiSDK.asmdef and paste them in your plugins folder. You will also need TextMeshPro and NewtonsoftJSON: https://github.com/jilleJr/Newtonsoft.Json-for-Unity
Unity does not give the option to automatically update from GitHub. Instead they say you must either re-add the SDK to the project (simply remove the SDK and then add it back from within the package manager). Or you can manually update the version number in the manifest.json.
We recommend server integration for security purposes. To completed the server integration follow these steps:
- When onScutiExchange is called, it will provide the following params in the payload:
interface payload { id: string; // transactionId scutisSpent: number; currencyEarned: number; currencyName: string; }
- These parameters can be used and passed to your own API’s in order to run the below validation and award appropriate currency to the user.
- Upon receipt of this call, it is recommended to confirm the transaction with our server. To do this run a GET command to
https://commerce.staging.scuti.dev/game/currency-exchange-details/transactionID
- Replace TransactionID with the id string passed by the ExchangePayload.
- For authorization use Bearer as follows
{ "Authorization": "Bearer {SECRET_KEY generated on Dashboard}", }
- SERCRET_KEY is available in the games dashboard when selecting your game.
- Example Response:
{ "id": "7dc18a76-4fb0-4425-b999-db03f2afef44", "gameId": "6db28ef4-69b0-421a-9344-31318f898790", "userId": "6cba4bc5-7a81-46c6-ac23-214c53d369fd", "scutisSpent": 15138, "currencyName": "UBC Coin", "currencyEarned": 3028, "userEmail": "andrew@tigerj.net" }
- Make sure you pass in your user's game Id into the SDK. You can do this by using the following on a monobehavior that is in your initial scene when first loading your application. Alternatively, if you don't know the userId at this time you can set it when they log in. It just can not be set before the OnStoreReady event.
void Start() { ScutiSDK.Instance.OnStoreReady += StoreReady; }
private void StoreReady() { ScutiSDK.Instance.SetUserId("abc"); }
Note: we are in process of developing an additional confirmation call back from the game to confirm the transaction is complete and successful.
We recommend server integration for security purposes. If that is not an option then here are the client-side currency reward instructions:
First you need to pass in your user's game Id into the SDK. You can do this by using the following on a monobehavior that is in your initial scene when first loading your application. Alternatively, if you don't know the userId at this time you can set it when they log in. It just can not be set before the OnStoreReady event.
void Start() { ScutiSDK.Instance.OnStoreReady += StoreReady; }
private void StoreReady() { ScutiSDK.Instance.SetUserId("abc"); }
Then add a listener for any Scutis exchanged. Ensure you only add this once. It is best to add it in a location that will always be available and listening while the Scuti store is active (a menu controller for instance).
ScutiSDK.Instance.OnCurrencyExchanged += OnScutisExchanged
private void OnScutisExchanged(string payload) { // award currency here }
interface payload { id: string; // transactionId scutisSpent: number; currencyEarned: number; currencyName: string; }
Once you have followed the steps above you can test by running your application and navigating to the Scuti button in your UI. Click the button and the Scuti Store should take over the screen.
This example was created to test Unity 2018 on 5/8/2023. It will not be kept up to date but it can be used as a reference: https://github.com/scuti-ai/ScutiUnityTest
For WebGL you will need to complete the following:
- At the top of the Unity window, find the "Scuti" menu. Click on the "Scuti" menu to reveal its options.
- In the Scuti menu, select "Copy WebGL Template."
This action will create a copy of the Scuti WebGL template in the Assets folder, which is essential for setting up your WebGL build correctly. Make sure that there is no other folder called WebGLTemplates
- Configure Build Settings. This is where you'll specify whether your project is using Unity 2020 or newer. Under the "Builds" section, locate the "Resolution and Presentation" options. You'll see two templates available: "unity-webview" and "unity-webview-2020."
For Projects using Unity 2020 or Newer: Select "unity-webview-2020." For Projects using Older Versions of Unity: Choose "unity-webview."