This repo was initially created with a very specific purpose:
- Solve an OTA space constraint with Secure Boot enabled ..
- .. using a specific GSDK version, with a specific Z-Wave protocol version
- .. using an independent BTL bootload (bootloader sent alone in a GBL)
- This project is used for the Z-Wave protocol OTA, which consumes too much space for a GBL containing App + BTL + SE.
- .. not using the Application partition for staging
- .. by changing the bootloader project memory addresses
The scripts were then adapted to be a bit more generic, though still tied to Z-Wave protocol, and most of the points above.
I'll be building this repo out to include other parts/scenarios. For now the first project begins below:
The following instructions walk through using the secure-boot-btl-zwave project toward satisfying all items in the description above. General knowledge of Simplicity Studio is assumed.
The project was designed for use with the Z-Wave protocol on the ZGM230 on a GSDK greater than 4.1 (though not all versions are tested).
The main.sh script has some automatic features, such as scanning for device part number and WSTK emulator. This will be described more in the steps that follow.
Any deviation from the protocol or projects below may require changes to the following steps.
- We know that BTL over OTA is successful with the memory addresses proposed below - such that we don't walk over the App, but we have yet to test BTL + SE over OTA with the current memory addresses.
- We would like to document the Z-Wave memory map here, for making fast decisions on staging locations during OTAs.
- Using GSDK 4.1.2, create a
bootloader-storage-internal-single-512kproject - Open the .slcp file and adjust the configuration as follows: Software Components --> Platform --> bootloader --> Core --> Bootloader Core --> Configure
- Adjust bootloader settigns as displayed below to create
basebootloader image:
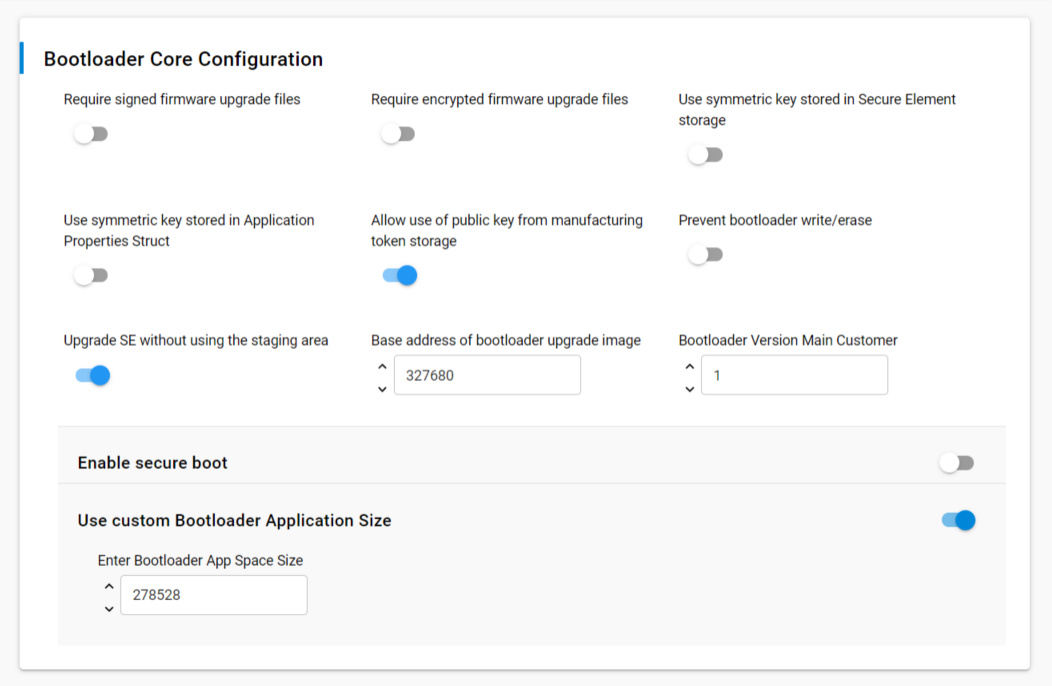
- Build bootloader project and save resulting .hex file in a location that you can later access. Append the filename with
_v1.hex - Increment the bootloader version to 2, as shown to create an
updatebootloader image for packaging in a .gbl file:

- Build bootloader project and save resulting .hex file in a location that you can later access. Append the filename with
_v2.hex
- Using GSDK 4.1.2, create a
zwave_soc_switch_on_offproject - Open the .slcp file and make and make any required adjustments to the region
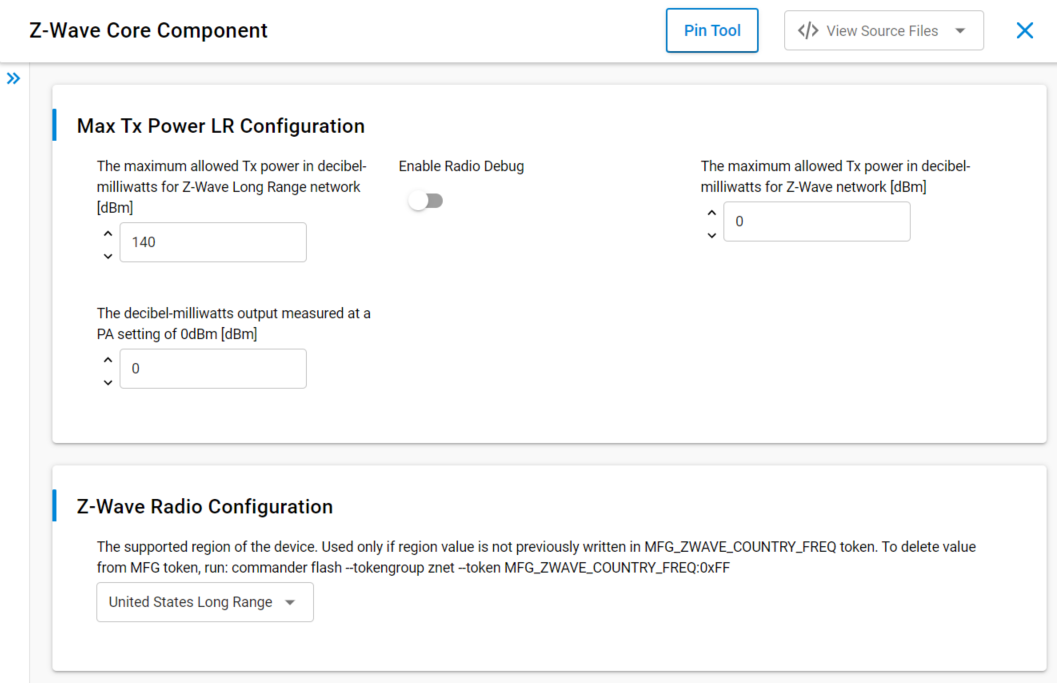
- Software Components --> Z-Wave --> Z-Wave Core Component --> Configure
- USLR was selected for our purposes, shown below:
- Copy the resulting .hex image to the same location where you've placed your bootloader
_v1and_v2images above
- If you have existing keys that have been used with your target device, then locate them, as they'll be used in next steps
- If not, you'll be leaving the key parameters of the main.sh script blank, and the script will generate new keys for use with your device
- Your device must not have been used for Secure Boot previously if using this option. You must locate keys tied to that device otherwise
- As mentioned above, the script performs some steps automatically if desired (identifying the device part number, locating the WSTK, and generating keys)
The call to the main script in the example below makes use of these automatic features by placing
junkvalues for device and WSTK, as well as leaving out parameters for existing keys - First call the script with no parameters, as
./main.sh. You will receive instructions on input parameters - Next call the script with your specific parameters. The call below will function properly on a new ZGM230 Thunderboard if all instructions were followed to this point
- You will see output as follows, but Make sure to store the resulting keys! Your device cannot be updated in the future without them!
Below we use the ../images/ folder as the location where we placed our bootloader_v1/_v2 and application binaries from steps above.
./main.sh junk_value_1 ../images/bootloader-storage-internal-single-512k_gsdk_4.1.2.hex ../images/bootloader-storage-internal-single-512k_gsdk4.1.2.hex ../images/zwave_soc_switch_on_off_gsdk_4.1.2.hex test_user_config.json junk_value_2

Program: commander.exe was found..
Requested device 3453434 was not found!
We've found an attached: ZGM230SB27HGN3. Set as target (y/n)? y
ZGM230SB27HGN3 set as target..
Requested device 44026927B was not found!
We've found an attached: 440269190. Set as emulator (y/n)? y
440269190 set as WSTK emulator..
Using Windows' Cryptographic random number generator
DONE
Generating ECC P256 key pair...
Writing private key file in PEM format to sign_privkey.pem
Writing public key file in PEM format to sign_pubkey.pem
DONE
Starting process..
QObject::connect: No such signal UtilCommandHandler::errorEncountered(QString)
QObject::connect: No such signal UtilCommandHandler::infoMessage(QString)
Writing EC tokens to sign_key.token...
DONE
Parsing file ../images/bootloader-storage-internal-single-512k_v1.hex...
Found Application Properties at 0x080028a0
Writing Application Properties signature pointer to point to 0x080029d8
Setting signature type in Application Properties: 0x00000001
Image SHA256: 45b30d42f0b237d5e930b88bf4d2f6888a9bac9b698c680323104cae38bb6935
R = 87124EB2C7D5C92D1AA337BEFEF2DA4204717185A307978DCA7B11CD49F49A8D
S = 959837ACBE72390227872EA8F1E06856BE9D59459514DF75B52E7D282FE46330
Writing to bootloader-base-signed.hex...
DONE
Parsing file ../images/bootloader-storage-internal-single-512k_v2.hex...
Found Application Properties at 0x080028a0
Writing Application Properties signature pointer to point to 0x080029d8
Setting signature type in Application Properties: 0x00000001
Image SHA256: 69abb2fe5bfbddff92287cc64d10c2f8f378be6452611e9a93032cd411a8ea80
R = 8C3D3B5AEF13EAE087CC82986DA9FF5142F3101F83429B025EC256614C06ABA1
S = E1B07C414B3AEB2D31C1C274CFEE9B4AB8497474D7321688841416925E7AA3E9
Writing to bootloader-upgraded-signed.hex...
DONE
Parsing file ../images/zwave_soc_switch_on_off_gsdk_4.1.2.hex...
Found Application Properties at 0x08037974
Writing Application Properties signature pointer to point to 0x0803feb4
Setting signature type in Application Properties: 0x00000001
Image SHA256: 92d290e1695dfb1c89fc8d82c9e022944a4579f8d4e4c5aea610b1ed00cf6c30
R = E52CA6D83297F75BB9E10961D2702C83E4E4F7C5A97498E85BC100C7DBF77AB1
S = 804E558C143EB447F0C46D0843EF881D8A02D36682DAFDA9030AC78FF46A5C07
Writing to application-signed.hex...
DONE
Initializing GBL file...
Adding bootloader to GBL...
Encrypting GBL...
Signing GBL...
Image SHA256: 1c2921dde4ca47274c06f08e991ce3b5ee1bfec42b5e4b1d520fe96a7c16a5cf
R = B021523EF2B2E7088180E38571A1AE5E8C7C6BAF4E04D9C2BBE1D3FF914ED53B
S = 7B8E1D756F50D0E643C8EF47D572426ADDF85F1F91659C41502742AD9B41E964
Writing GBL file bootloader-upgrade.gbl...
DONE
Erasing chip...
Flash was erased successfully
DONE
Resetting chip...
DONE
Parsing file bootloader-base-signed.hex...
Writing 16384 bytes starting at address 0x08000000
Comparing range 0x08000000 - 0x08003FFF (16 KB)
Programming range 0x08000000 - 0x08001FFF (8 KB)
Programming range 0x08002000 - 0x08003FFF (8 KB)
DONE
Parsing file application-signed.hex...
Writing 237568 bytes starting at address 0x08006000
Comparing range 0x08006000 - 0x08025FFF (128 KB)
Comparing range 0x08026000 - 0x0803FFFF (104 KB)
Programming range 0x08006000 - 0x08007FFF (8 KB)
Programming range 0x08008000 - 0x08009FFF (8 KB)
Programming range 0x0800A000 - 0x0800BFFF (8 KB)
Programming range 0x0800C000 - 0x0800DFFF (8 KB)
Programming range 0x0800E000 - 0x0800FFFF (8 KB)
Programming range 0x08010000 - 0x08011FFF (8 KB)
Programming range 0x08012000 - 0x08013FFF (8 KB)
Programming range 0x08014000 - 0x08015FFF (8 KB)
Programming range 0x08016000 - 0x08017FFF (8 KB)
Programming range 0x08018000 - 0x08019FFF (8 KB)
Programming range 0x0801A000 - 0x0801BFFF (8 KB)
Programming range 0x0801C000 - 0x0801DFFF (8 KB)
Programming range 0x0801E000 - 0x0801FFFF (8 KB)
Programming range 0x08020000 - 0x08021FFF (8 KB)
Programming range 0x08022000 - 0x08023FFF (8 KB)
Programming range 0x08024000 - 0x08025FFF (8 KB)
Programming range 0x08026000 - 0x08027FFF (8 KB)
Programming range 0x08028000 - 0x08029FFF (8 KB)
Programming range 0x0802A000 - 0x0802BFFF (8 KB)
Programming range 0x0802C000 - 0x0802DFFF (8 KB)
Programming range 0x0802E000 - 0x0802FFFF (8 KB)
Programming range 0x08030000 - 0x08031FFF (8 KB)
Programming range 0x08032000 - 0x08033FFF (8 KB)
Programming range 0x08034000 - 0x08035FFF (8 KB)
Programming range 0x08036000 - 0x08037FFF (8 KB)
Programming range 0x08038000 - 0x08039FFF (8 KB)
Programming range 0x0803A000 - 0x0803BFFF (8 KB)
Programming range 0x0803C000 - 0x0803DFFF (8 KB)
Programming range 0x0803E000 - 0x0803FFFF (8 KB)
DONE
Writing 8192 bytes starting at address 0x0807e000
Comparing range 0x0807E000 - 0x0807FFFF (8 KB)
Programming range 0x0807E000 - 0x0807FFFF (8 KB)
DONE
Resetting chip...
DONE
DSK: 2914423133167241351759781082055162226895
Device has serial number 0000000000000000a49e69fffe049879
DONE
DONE
- Use Simplicity PC Controller to create a Z-Wave network
- Provision the device to the network, and use Basic On/Off to confirm that the device toggles the LED (or another method if using custom hardware)
- Check firmware versions, as shown below, and note them (click
Getto refresh):

In the image above, Target 1 - Firmware Id: 00 01 represents the bootloader and its firmware version.
4. Section Running the script will have created a bootloader-upgrade.gbl file in the same directory as main.sh. This .gbl file signs both the inner
bootloader image, and the outer .gbl file.
5. Use Simplicity PC Controller to perform an OTA.
6. Click Get again to refresh the firmware version, and you should see that it has incremented:
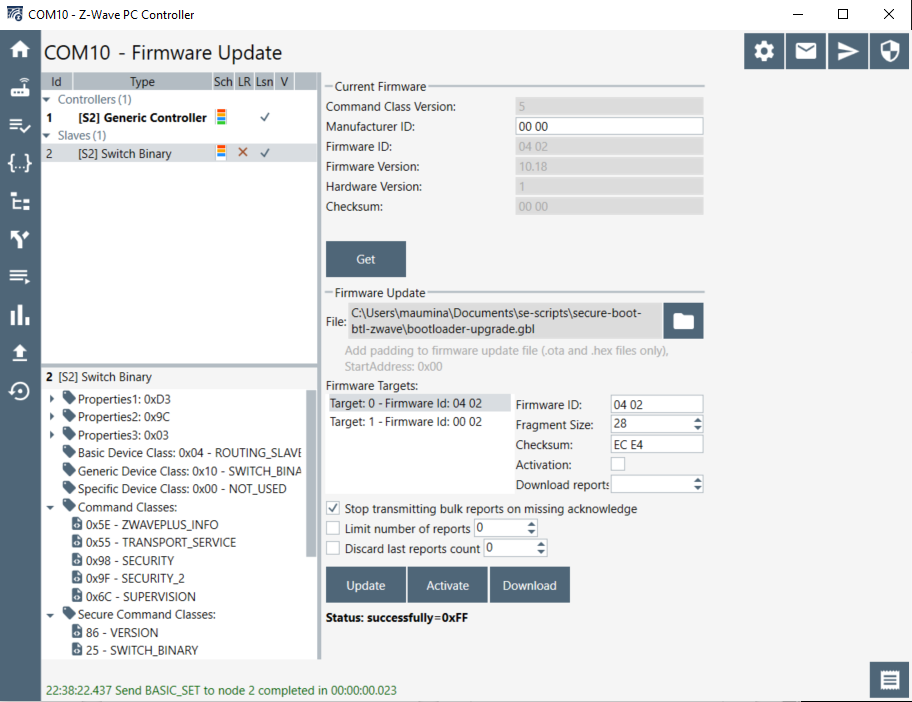
In the image above, Target 1 - Firmware Id: 00 02 represents the bootloader and its updated firmware version.