StartersGuide
Is there an error? Something missing? Funky grammar? Do not hesitate to leave a comment.
- Download the version of Simulationcraft for your platform.
- Unzip it anywhere you want.
- On Linux, you will build the executables yourself, see HowToBuild#Building_SimulationCraft_on_Linux.
- Remarkable files and directories:
- SimulationCraft.exe is the graphical client (SimulationCraft under Unix OS).
- simc.exe is the command-line client (!simc under Unix OS).
- profiles contains some sample profiles.
Let's import a character from Battle.net and perform a basic simulation. First, run SimulationCraft.exe (not simc.exe!). Notice its icon:

- Click on the import tab. Browse your name on the battle.net webpage until you reach your character's page or directly paste the url of your character on the bottom of the form. Then click the import! button.

If your character is on a non-US realm, go to the options tab, then to the globals inferior tab. Change the "armory region" setting to your own region.
- If Battle.net is up and running, the progress bar will start and a couple of seconds later you will find yourself on the simulate tab. The instructions listed here describe your character and include a default actions list and a couple of options, such as use_pre_potion for pre-potting. They're documented in Options.

- Right now, let's just perform a simple simulation, click the simulate! button.

- A couple of seconds later, you will find yourself on the results tab with your report displayed. If you want to understand the meaning of some of the acronyms used, give a look at the legend tab or click the headers.

The report is full of informations, in this section we want to draw your attention to some important points.
- Among the first informations displayed is a very important one: the number of iterations. This setting is the number of fights that have been simulated (remember: Simulationcraft is a simulation, see FormulationVsSimulation). The higher this setting, the longer the computations times will be. But the accuracy of your results will also increase and they will be more stable across runs (smaller variations).

The fact that results may change across runs is really not that bad: getting slightly different results that are always close to the truth is better that getting a constant result far from the truth. You may be displeased by this behaviour at first, especially if you are used to formulation-based tools but, once you understand how it improves the accuracy of our results, you also understand it's a small price to pay. So, again, take time to read FormulationVsSimulation.
- Simulationcraft then provides you with an evaluation of the accuracy: the error. It will help you to estimate whether you should use more iterations or whether the default value was enough: here, 0.3% is not that bad.

- However, if we give a look at the dps distribution, we can see that some of the worst or best cases have been sampled a few times only. The image below show you what figure you can get with 10k iterations instead of 1k.

By the way, did you notice ? Between our worst and our best fights, there is a 7k dps difference! Yes, the random numbers generator is that much of a tough beast, it's true both in game and in Simulationcraft!
- Below the pretty graphs come some tables. First of all is the spells details. You can compare it to what you observe in game and see by yourself that Simulationcraft does a good job at reproducing the ingame behaviour.

Beware! Some addons or web sites can group together things in a slightly different way: for example, the raging blow spell for warriors involve two hits. Some tools will display two distinct categories, one for every hand, some others will aggregate the results under a single entry, raging blow. Simulationcraft displays both.
- Next comes the buffs data, with their uptimes and the real benefit you got from them (% of time you were able to benefit from a buff). Finally come some special procs data, additional data you may not be able to get anywhere else.

Stats scaling allows you to calculate the weight of every stat, reflecting its importance and affecting your itemization choices.
- Go to the options tab, then on scaling. Check analyze all stats or just the stats you want to scale. Then, go to globals options. Use 10,000 for the number of iterations in order to ensure a great accuracy.

Simulationcraft will compute scale factors by adding a delta to every stat. By default, all deltas are positive.
- To compute the scale factors, you have to do another simulation: go to the simulate tab. The profile used by the previous simulation has disappeared and the page is now blank. Just hit the "<" button at the bottom of the page and you will recover it. Once it is done, just click the simulate button. In your report, you will now have a section like the one below.

- On the first line, the strength has a 2.65 scale factor: it means that you will gain 2.65 dps for every point of strength you gain. On the second line are the normalized scale factors: all scale factors are expressed as fractions of your primary stat's scale factor. Here, it means that every scale factor has been divided by 2.65 so that strength is now 1.0. It allows you to easily compare strength with other stats.
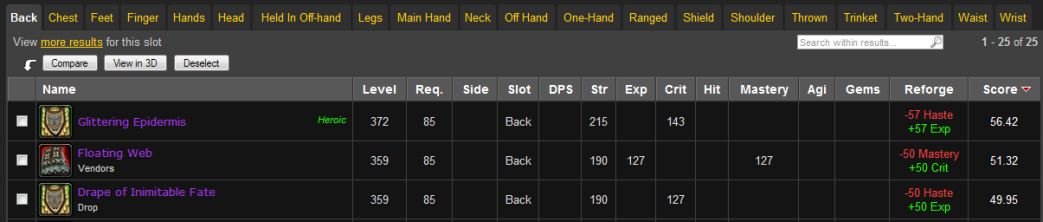
- Below the table are two links, one to Wowhead (sample) and another one to GuildOx (sample). If you click on the wowhead link, you will find yourself with a webpage like the one below. As you can see, the items are sorted according to their stats weighting. You can check the options to see that reforging is automatically performed to get the best possible stats, and that the best possible gem combos, taking into account the gemming bonus, have been added to the items.
- Beware! Anytime you change a piece of equipment, your scale factors change slightly. As a result, you should try to recompute scale factors often.
Here are some nice tips and tricks you can try out.
The existing options in the options tab allow you to use 80% of Simulationcraft's power. However, if you want to use advanced features, like multi-players simulations or custom fights, you need to use the Textual Configuration Interface (TCI). Basically, it's a set of textual options and commands you can write in the overrides tab or provide to the command-line client.
For example, the options in the GUI only allow you to choose between a "Patchwerk" fight (tank'n spank) or a "Helter Skelter" (a crazy fight will every possible raid event). Now, if you just want tank'n spank fight with some 10s movement phases every one minute, select a "Patchwerk" fight and write the following line in the overrides tab:
raid_events+=/movement,cooldown=60,duration=10
With the release of MoP, we started adding support for tanks. See the Simulationcraft For Tanks appendix for details on how to customize your simulation for tanking. Currently only dps is supported for tanks.
At first, Simulationcraft was a command-line tool and people had to use the TCI through configuration files passed as arguments to the command line. Nowadays, although the GUI cover the needs of most of our users, the command-line client remains and many people still prefer to use it. Actually, once you're used to it (and it's really not that hard!), it's far more convenient to use than the GUI.
The command-line client is the "simc.exe" file ("simc" under unix). Remember that the TCI is fully supported by the command line: you do not have to create any external file and you can directly use all options from the command line, for example:
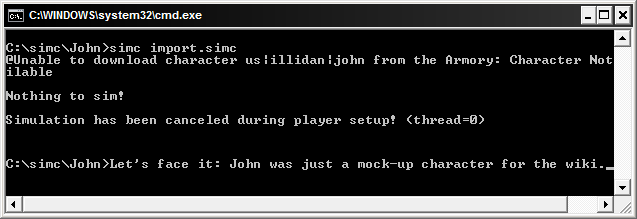
 # Let's import John, compute the scale factors and print out a html report
 simc.exe armory=us,illidan,john calculate_scale_factors=1 html=john.html

 # We can also import John's inactive armory spec before calculating scale factors and printing a report
simc.exe armory=us,illidan,john,spec=inactive calculate_scale_factors=1 html=john.html
However, most of the time you will prefer to use independent and reusable configuration files, usually named with the ".simc" extension.
 # Here is a file named john.simc
 # The following line is for unix systems only (it associates this file with the simc binary)
 #!./simc
 armory=us,illidan,john
 calculate_scale_factors=1
 html=john.html
# Now, let's make simc.exe use john.simc
simc john.simc
# We can also force simc to write its output to a file:
simc john.simc > john.txt
# Under Unix, you can also flag the file as an executable
chmod a+x ./john.simc
./john.simc
Note: your files must be encoded as latin1 or utf-8, please take time to read TextualConfigurationInterface#Characters_encoding if you encounter problems.
You have many ways to work with .simc files on Windows: creating batch files, drag'n dropping the files to Simulationcraft.exe, directly associating them (not simc.exe)!
As a result, we recommend you to directly use command-line prompts. See the instructions below.
First, the setup.
-
Run the windows_env_path.vbs script (bundled with Simulationcraft, double-click it in the windows explorer). It will add the script's directory to your user path environment variable. You only need to do it once. If you had command line windows opened, you will need to open new ones.
-
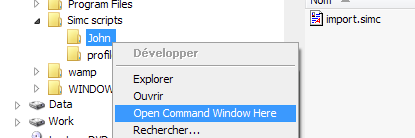
You need an open command window here on your folders' context menu. On Vista and later versions, you only need to hold shift while you right-click a folder to open the context menu.
Next, the example.
- Create a "Simc script" folder anywhere you want.
- Add two sub-directories: "John" and "profiles".
- In "John", create an "import.simc" file (create a text file and rename it) containing the following lines:
 armory=us,illidan,john
 save=../profiles/john.simc
- Open a command window (hold shift while right-cliking on Vista and later Windows versions).
- Finally, just type:
simc import.simc