Getting Started with g2core Development
This page is intended for developers interesting in contributing to the g2core project. If you haven’t already, read through the Project Structure page.
There are things you will need to know, and things you’ll need to have.
-
❏ A basic understanding of modern coding practices and C++.
-
The g2core project is written primarily in C++ with some C-style code mixed in.
-
We’ve done our best to make it approachable, and for changes that aren’t deep in the motion control you should be able to get by with just having some programming experience.
-
However, in some areas the code is just plain dense, and there’s not a lot we can do about it. We’re covering some pretty complicated problems here, and we’re writing the code all the way down to the silicon. We generally try to have readable code, and be complete with our comments for things that are complicated to understand. We also explain higher-level stuff here on the wiki.
-
-
❏ A basic understanding of git and GitHub.
-
Project documentation covers the absolute git basics, and may cover some of the common pitfalls, but you’ll still be better off with a basic understanding how to use git. (The Git Docs are really well written and a great place to start.)
-
If you wish to contribute, then you’ll also need understanding pull requests, and it would be really appreciated if you understand how to rebase the branch you wish to pull so it only reflects the code you wish to be pulled, and write a good description for you pull requests.
-
-
❏ A somewhat modern computer running a modern OS.
-
A computer with an OS for the last 5 years or so should do. The Synthetos team mostly run OS X and test with Windows 10 and Linux running inside Parallels VMs.
-
We support compiling and debugging on OS X (El Capitan, aka 10.11), Windows 10, and popular Linux distros when possible.
-
-
❏ The project, all told, requires just under 750MB of hard drive space.
-
The clone-size of the project is much smaller, but we install the toolchain necessary to compile and that requires roughly 500MB installed.
-
On Windows you also may wish to install Atmel Studio, which is quite large on it’s own. We have seen it require 2GB of hard drive space installed.
-
-
❏ To contribute you’ll need a GitHub account
-
❏ It will help if you have some hardware that is capable of running g2core. The Arduino Due or a Synthetos v9 or g series board (gQuintic, gQuadratic) are our recommended choices.
-
❏ While not strictly necessary, a hardware debugger is really useful to have. The Atmel ICE Basic is the officially supported Atmel product, and has the cable that mates with the 0.050" 2x5 on the Arduino Due and the Synthetos boards. We have also had some luck with the higher-performance Segger JLink units, but offer no further guidance on these.
-
Note: The ICE seems the be very sensitive to a clean USB path or it can throw errors during debug startup and run. At least this has been observed on OSX with Parallels running Windows 10 and Atmel Studio 7. It’s best to use a high-quality USB micro cable, and connect directly to the Mac USB port that has the fewest internal hubs. This USB port can be found by examining About This Mac / System Report / USB.
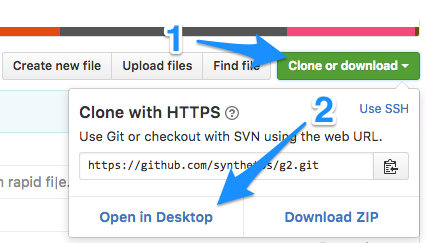
The G2 Core primary repo is located at https://github.com/synthetos/g2
-
If you have the GitHub Desktop app installed (Mac or Windows) then you can simply click on the "Clone or download" button at the top right of the repo page and then choose "Open in Desktop" from the menu that appears.
-
There is one additional step that is only necessary if the
Motate/directory appears to be empty:-
Right click on the repo on the left and choose "Open in Terminal" (OS X) or "Open in Git Shell" (Windows), as shown for Windows (or on OSX or linux just open a terminal window and navigate to the parent git directory, which should be …/g2):

-
Now type (or Copy/Paste) the following command:
git submodule update --init
NoteYou may need to run the above command (without the --init) after you pull in new code in the future. You’ll know if theMotatefolder shows as changed after a pull. See the Git Usage section of our Troubleshooting page for more detail.
-
-
-
Or, on the command line (Linux, OS X, or Windows) — requires a working git install (see below in the compiling section for how to install git):
git clone https://github.com/synthetos/g2.git --recursive
-
Since we use submodules, we need the
--recursiveoption.
-
Now you should have a local clone of the g2 repository.
-
Make a fork of g2 and Motate
-
Clone local fork of g2
-
Update submodule(s) (Motate)
-
Make synthetos/g2 the "upstream" remote for fork/g2
-
Rename the "origin" remote to "upstream"
-
Checkout dev-168-gQuintic in g2
-
Checkout sams70-port in Motate
-
Create issue ticket within g2core
-
Use issue number to generate branch - dev-<issue#>-<brief_description_of_issue>
-
Branch from parent (dev-168-gQuintic, sams70-port, …)
-
Commit often
-
Push changes to fork(s)
-
Make a Pull-Request on synthetos/g2 and/or synthetos/Motate
-
Occasionally sync from upstream
-
Continue to code and push while commenting in the Pull-Request
-
When code is finished, merge parent branch into your branch
-
Test code
-
Close the Pull-Request
-
Close the origin Issue
Each OS requires different setup, so you’ll need to look at the compiling setup for each OS separately:
-
(NOTE: If you have updated to Windows 10 Anniversary Edition and are familiar with Bash then you should enable the Windows Subsystem for Linux and follow the Linux instructions from here on.) (NOTE THIS DOES NOT WORK ON 64-BIT WINDOWS) If you have 64bit Microsoft Windows 10, you can use Docker Desktop and the 64bit Ubuntu image from hub.docker.com. Unminimalize the image, and then add the 32bit library support as you would on native linux. It works as of 1/4/2021. Doesn’t use the wsl microsoft image, but does successfully compile using the Linux instructions on 64-BIT WINDOWS. Details on what worked Google Doc on building under Docker - open to comments
We also have some outdated instructions for compiling with Xcode on OSX/MacOS X. If you’re a whiz with Xcode, they might work well for you:
Be aware they seem to result in a build error due to every target being compiled instead of just the selected one. If you know how to fix that problem, please update the wiki and let us know. 😄
Here’s a page of some common problems with compiling troubleshooting-compile-problems). Please feel free to add to this page.