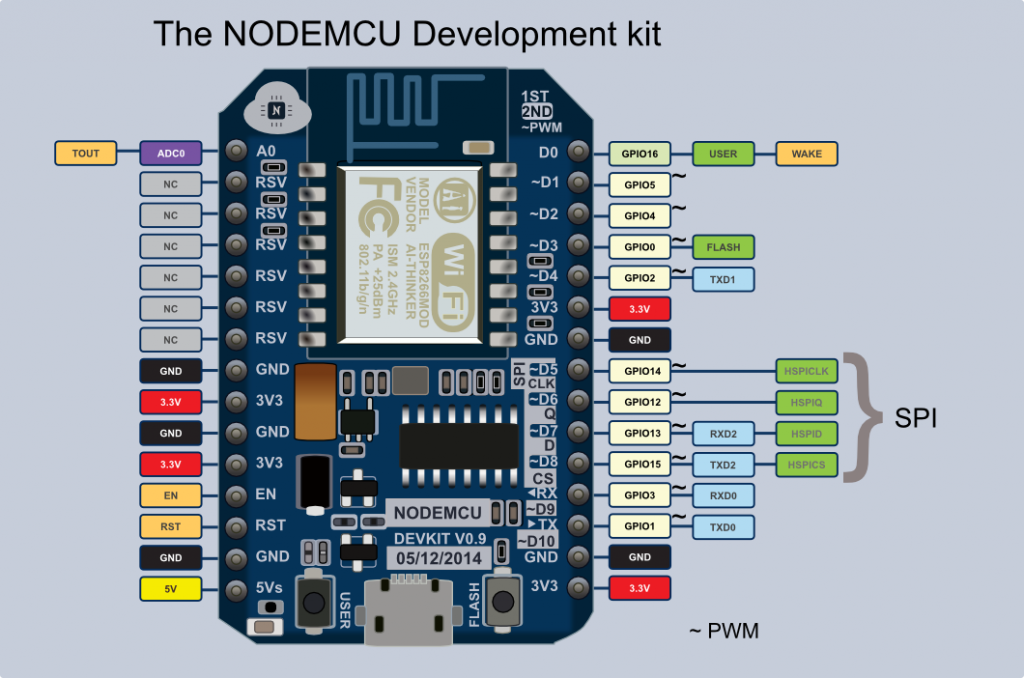
Thank you for deciding to attend the Hackathon. The session is going to be very adhoc and user driven. The primary board we are going to use is the NodeMCU which enables you to connect to any Wifi network and interact with hardware through the internet.
The hackathon is being hosted by
- Garth Wood
- Steve Grey
- NK
The ESP8266 is a popular, inexpensive WiFi/microcontroller system-on-chip (SoC). Although it can be programmed like any microcontroller, the ESP8266’s popularity was gained as a simple, serially-controlled WiFi gateway. Using an AT command set, any microcontroller with a UART can use the ESP8266 to connect to WiFi networks, and interact with the rest of the Internet world over TCP or UDP. It’s an easy (and cheap!) way to get your Arduino on the Internet!
- When specifying the pin numbers use the GPIO values in the diagram below, and not the values on the board.
- The NodeMCU runs at 3.3V which means if you need to drive 5V components you will need step-up converters or transistor/logic-level setups.
- Windows or Mac Laptop
- Micro USB Cable
- Any components you wish to mess around with
Install the NodeMCU Windows or Mac Drivers provided on the memory stick or from the links below. You may need to restart your machine for the driver to be registered.
- Windows Drivers: http://en.doit.am/CH341SER.zip
- MAC Drivers http://www.doit.am/CH341SER_MAC.ZIP
- Install the Arduino IDE
- Download it from here: https://www.arduino.cc/en/Main/Software
- Or grab it from the memory sticks provided, or from the Arduino website if you are doing this beforehand.
- Start Arduino and open Preferences window.
- Enter http://arduino.esp8266.com/stable/package_esp8266com_index.json into Additional Board Manager URLs field. You can add multiple URLs, separating them with commas.
- Open Boards Manager from Tools > Board menu and install esp8266 platform (and don't forget to select your ESP8266 board from Tools > Board menu after installation).
- Once the NodeMU board is installed using the steps above, select the following settings from the Tools menu
- Board: NodeMCU 0.9 (ESP-12 Module)
- CPU Frequency: 80Mhz
- Upload Speed: 230400 (or 115200 if that doesn't work)
- Port: cu.wchusbserial1410
- Go to File -> Examples -> esp8266 -> BlinkWithoutDelay
- Hold down the Flash button and and press the Reset button to allow the board to be flashed
- Click the Upload button and wait for the upload to complete
Once you can successfully upload a sketch to the NodeMCU, you are ready to test the Wifi.
- Go to File -> Examples -> ESP8266WiFi -> WifiClient
- Edit the 'ssid' and 'password' variables using the following:
- SSID: GrayHomeLTE
- Password: (ask Garth or Steve)
- Hold down the Flash button and and press the Reset button to allow the board to be flashed
- Click the Upload button and wait for the upload to complete
It's time for you to take the reigns. Now that you have the NodeMCU up and running, you are free to experiment and develop whatever you can imagine. Here are some examples of what you can try achieve today,
- Turn an AC device on and off using the provided Relay Box.
- Connect to a custom web server and control devices from a web page. (Firebase can be handy here: https://www.firebase.com/)
