
My new startup is focusing on building a portfolio management system that supports not only traditional assets like gold, silver, stocks, etc, but crypto-assets as well! The problem is, there are so many coins out there! It's a good thing you understand how HD wallets work, since I will be building out a system that can create them.
There aren't as many tools available in Python for this sort of thing, yet.
Thankfully, I have found a command line tool, hd-wallet-derive that supports not only BIP32, BIP39, and BIP44, but
also supports non-standard derivation paths for the most popular wallets out there today! I need to integrate
the script into the backend with Python.
Once the "universal" wallet is integrated, I can begin to manage billions of addresses across 300+ coins, giving a serious edge against the competition.
In this project,I will only need to get 2 coins working: Ethereum and Bitcoin Testnet. Ethereum keys are the same format on any network, so the Ethereum keys should work with custom networks or testnets.
The following dependencies are required for this project.
Important: If you have not already installed the dependencies listed below, you may do so by following the instructions found in the following guides:
Dependencies List:
-
PHP must be installed on your operating system.
-
You will need to clone the
hd-wallet-derivetool. -
bitPython Bitcoin library. -
web3.pyPython Ethereum library.
-
Created a project directory called
walletandcdinto it. -
Cloned the
hd-wallet-derivetool into this folder and install it using the HD Wallet Derive Installation Guide -
Created a symlink called
derivefor thehd-wallet-derive/hd-wallet-derive.phpscript. This will clean up the command needed to run the script in our code, as we can call./deriveinstead of./hd-wallet-derive/hd-wallet-derive.php:-
Maked sure that I was in the top level project directory - in this case the directory named
wallet. -
Mac Users: Run the following command:
ln -s hd-wallet-derive/hd-wallet-derive.php derive. -
Windows Users: Creating symlinks is not supported by default on Windows, only reading them, so Windows users must perform the following steps:
-
Open up Git-Bash as an administrator (right-click on Git-Bash in the start menu).
-
Within
bash, run the commandexport MSYS=winsymlinks:nativestrict. -
Run the following command:
ln -s hd-wallet-derive/hd-wallet-derive.php derive.
-
-
Tested that I can run the
./derivescript properly, by running the following command.-
./derive --key=xprv9zbB6Xchu2zRkf6jSEnH9vuy7tpBuq2njDRr9efSGBXSYr1QtN8QHRur28QLQvKRqFThCxopdS1UD61a5q6jGyuJPGLDV9XfYHQto72DAE8 --cols=path,address --coin=ZEC --numderive=3 -g
-
-
The output should match what you see below:
-
+------+-------------------------------------+
| path | address                             |
+------+-------------------------------------+
| m/0  | t1V1Qp41kbHn159hvVXZL5M1MmVDRe6EdpA |
| m/1  | t1Tw6iqFY1g9dKeAqPDAncaUjha8cn9SZqX |
| m/2  | t1VGTPzBSSYd27GF8p9rGKGdFuWekKRhug4 |
+------+-------------------------------------+
-
-
-
Created a file called
wallet.py-- this will be my universal wallet script. -
The directory tree lookes something like this:
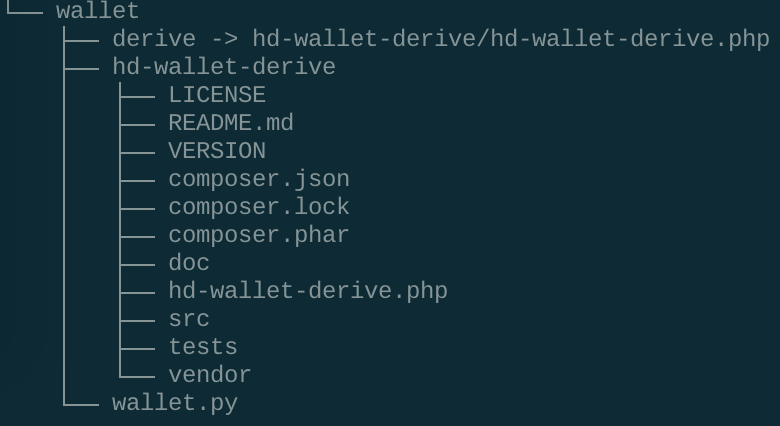
-
In a separate file,
constants.py, set the following constants:BTC = 'btc'ETH = 'eth'BTCTEST = 'btc-test'
-
In
wallet.py, imported all constants:from constants import * -
Used these anytime I referenced these strings, both in function calls, and in setting object keys.
-
Generated a new 12 word mnemonic using
hd-wallet-deriveor by using this tool. -
Set this mnemonic as an environment variable by storing it a an
.envfile and importing it into yourwallet.py.
-
Created a function called
derive_walletsthat does the following:-
Use the
subprocesslibrary to create a shell command that calls the./derivescript from Python. Make sure to properly wait for the process. Windows Users may need to prepend thephpcommand in front of./derivelike so:php ./derive. -
The following flags must be passed into the shell command as variables:
- Mnemonic (
--mnemonic) must be set from an environment variable, or default to a test mnemonic - Coin (
--coin) - Numderive (
--numderive) to set number of child keys generated - Format (
--format=json) to parse the output into a JSON object usingjson.loads(output)
- Mnemonic (
-
-
Created a dictionary object called
coinsthat uses thederive_walletsfunction to deriveETHandBTCTESTwallets. -
When done properly, the final object looked something like this (there are only 3 children each in this image):
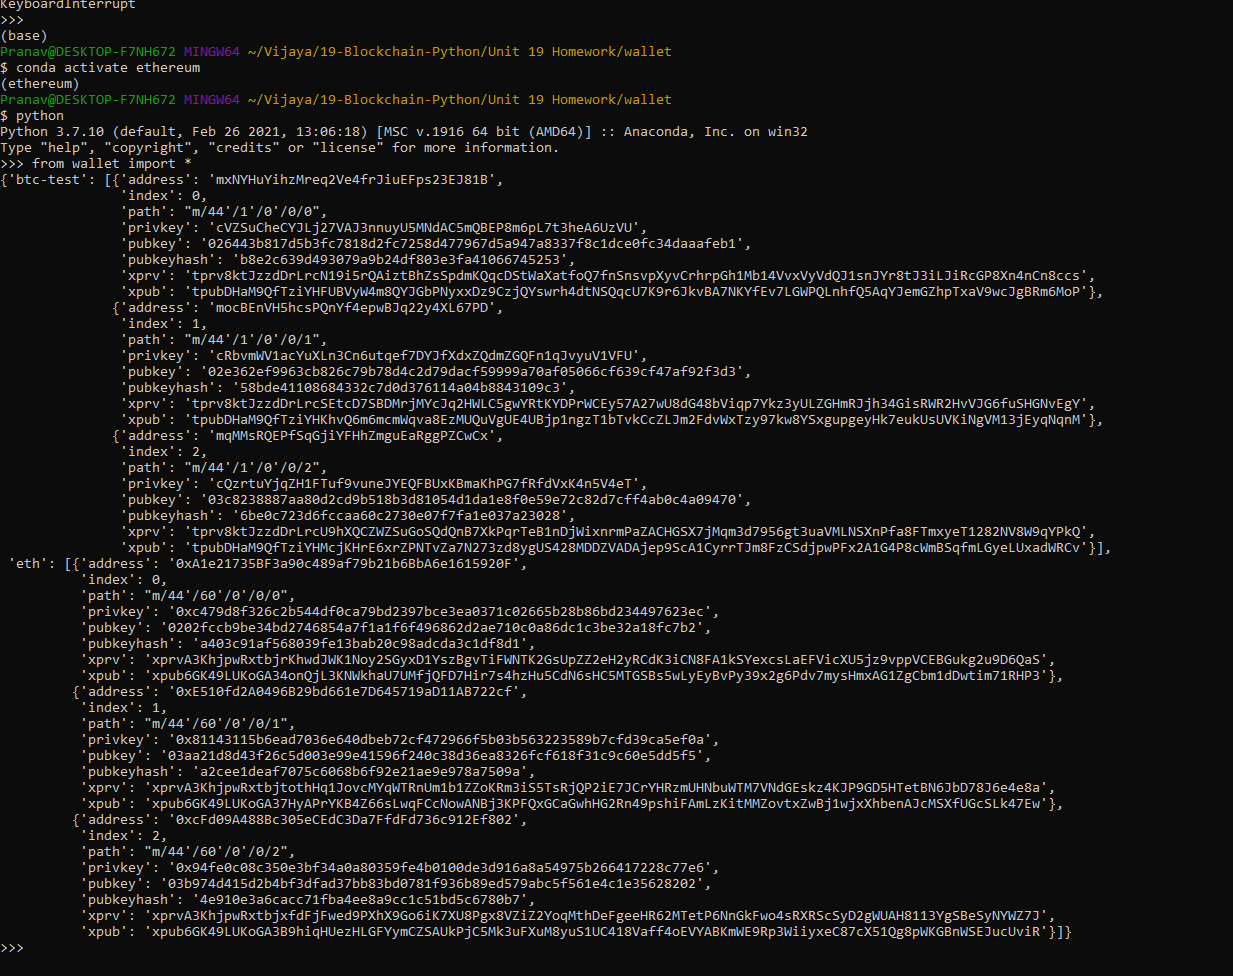
- I will now be able to select child accounts (and thus, private keys) by accessing items in the
coinsdictionary like so:coins[COINTYPE][INDEX]['privkey'].
-
Used
bitandweb3.pyto leverage the keys stored in thecoinsobject by creating three more functions:-
priv_key_to_account:-
This function will convert the
privkeystring in a child key to an account object thatbitorweb3.pycan use to transact. -
This function needs the following parameters:
coin-- the coin type (defined inconstants.py).priv_key-- theprivkeystring will be passed through here.
-
then return one of the following functions based on the library:
- For
ETH, returnAccount.privateKeyToAccount(priv_key)- This function returns an account object from the private key string. You can read more about this object here.
- For
BTCTEST, returnPrivateKeyTestnet(priv_key)- This is a function from the
bitlibarary that converts the private key string into a WIF (Wallet Import Format) object. WIF is a special format bitcoin uses to designate the types of keys it generates. - You can read more about this function here.
- This is a function from the
- For
-
-
create_tx:-
This function will create the raw, unsigned transaction that contains all metadata needed to transact.
-
This function needs the following parameters:
coin-- the coin type (defined inconstants.py).account-- the account object frompriv_key_to_account.to-- the recipient address.amount-- the amount of the coin to send.
-
Checked the coin type, then return one of the following functions based on the library:
- For
ETH, return an object containingto,from,value,gas,gasPrice,nonce, andchainID. Make sure to calculate all of these values properly usingweb3.py! - For
BTCTEST, returnPrivateKeyTestnet.prepare_transaction(account.address, [(to, amount, BTC)])
- For
-
-
-
send_tx:-
This function will call
create_tx, sign the transaction, then send it to the designated network. -
This function needs the following parameters:
coin-- the coin type (defined inconstants.py).account-- the account object frompriv_key_to_account.to-- the recipient address.amount-- the amount of the coin to send.
-
You may notice these are the exact same parameters as
create_tx.send_txwill callcreate_tx, so it needs all of this information available. -
Checked the coin, then create a
raw_txobject by callingcreate_tx. Then, I signed theraw_txusingbitorweb3.py(hint: the account objects have a sign transaction function within). -
Once signed the transaction, sent it to the designated blockchain network.
- For
ETH, returnw3.eth.sendRawTransaction(signed.rawTransaction) - For
BTCTEST, returnNetworkAPI.broadcast_tx_testnet(signed)
- For
-
-
Now, I should be able to fund these wallets using testnet faucets.
-
Open up a new terminal window inside of
wallet. -
Then ran the command
pythonto open the Python shell. -
Within the Python shell, ran the command
from wallet import *. This will allow me to access the functions inwallet.pyinteractively. -
Set the account with
priv_key_to_accountand usedsend_txto send transactions.-
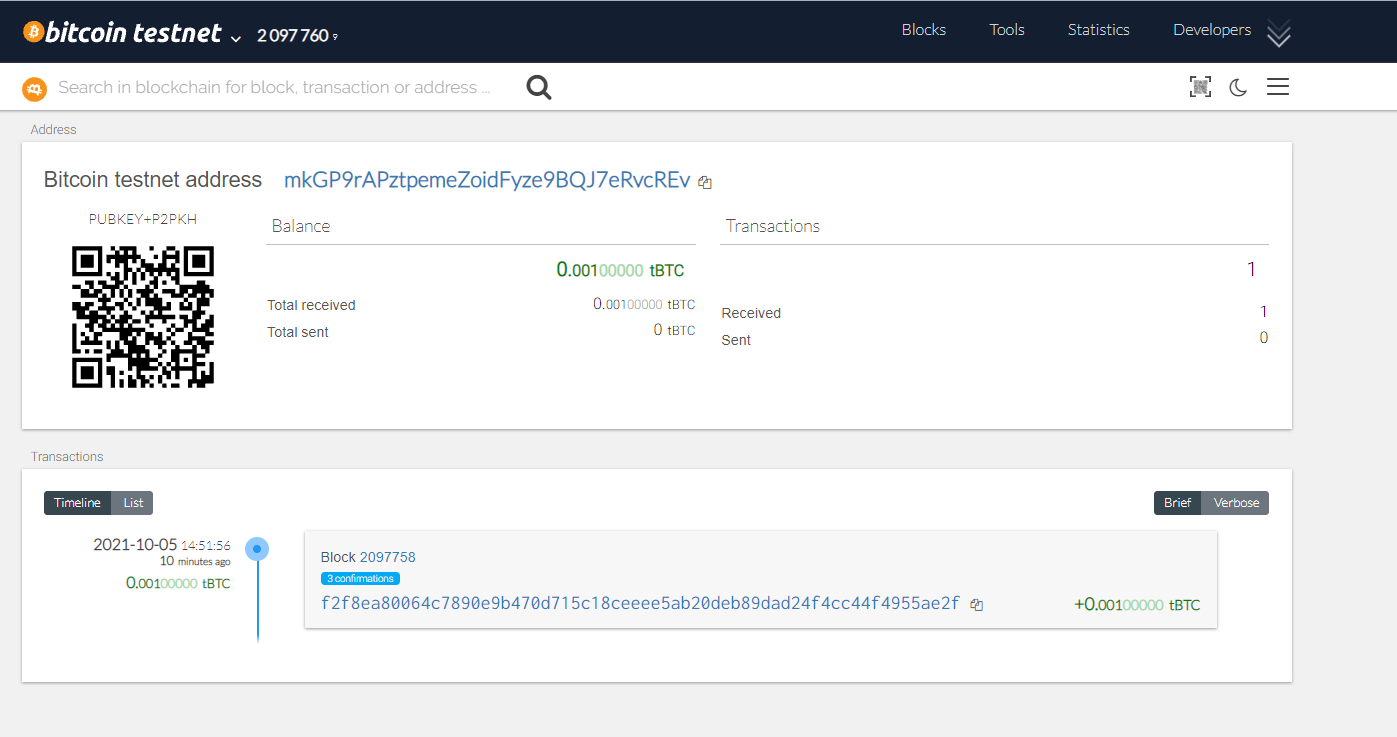
Bitcoin Testnet transaction
-
Fund a
BTCTESTaddress using this testnet faucet. -
Use a block explorer to watch transactions on the address.
-
Send a transaction to another testnet address (either one of your own, or the faucet's).
-
Screenshot the confirmation of the transaction like so:
-
-

-
Local PoA Ethereum transaction
-
Add one of the
ETHaddresses to the pre-allocated accounts in yournetworkname.json. -
Delete the
gethfolder in each node, then re-initialize usinggeth --datadir nodeX init networkname.json. This will create a new chain, and will pre-fund the new account. -
Add the following middleware to
web3.pyto support the PoA algorithm:from web3.middleware import geth_poa_middleware w3.middleware_onion.inject(geth_poa_middleware, layer=0) -
Due to a bug in
web3.py, you will need to send a transaction or two with MyCrypto first, since thew3.eth.generateGasPrice()function does not work with an empty chain. You can use one of theETHaddressprivkey, or one of thenodekeystore files. -
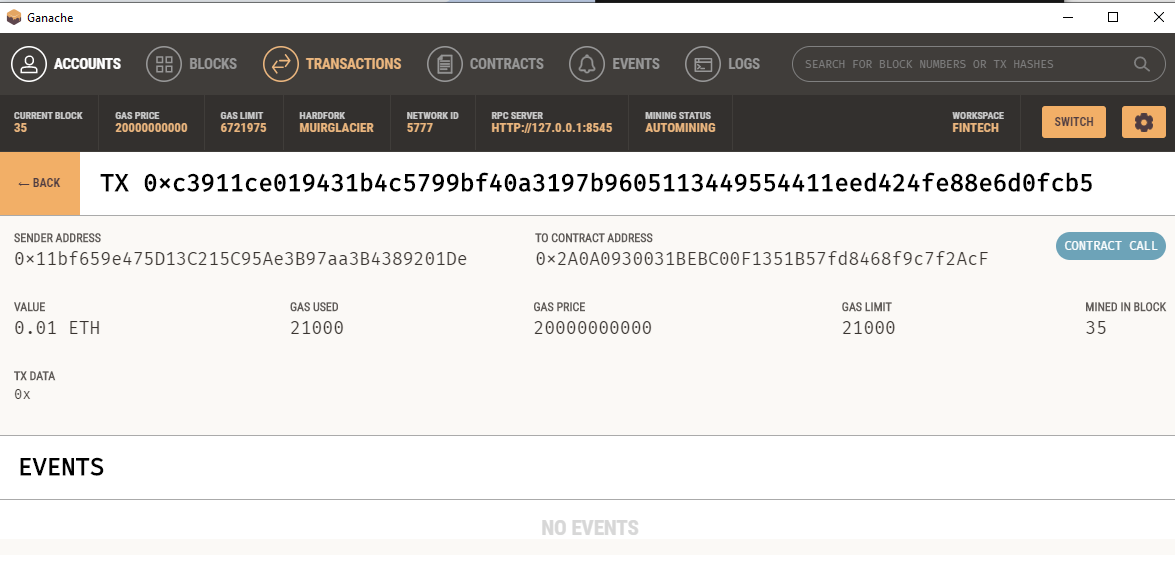
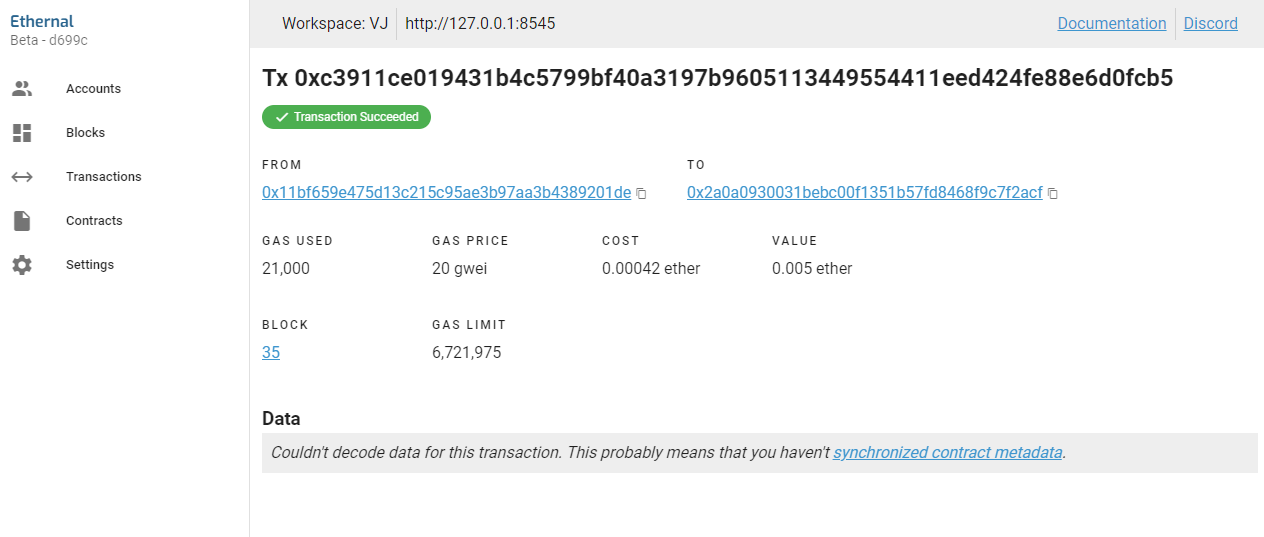
Send a transaction from the pre-funded address within the wallet to another, then copy the
txidinto MyCrypto's TX Status, and screenshot the successful transaction like so: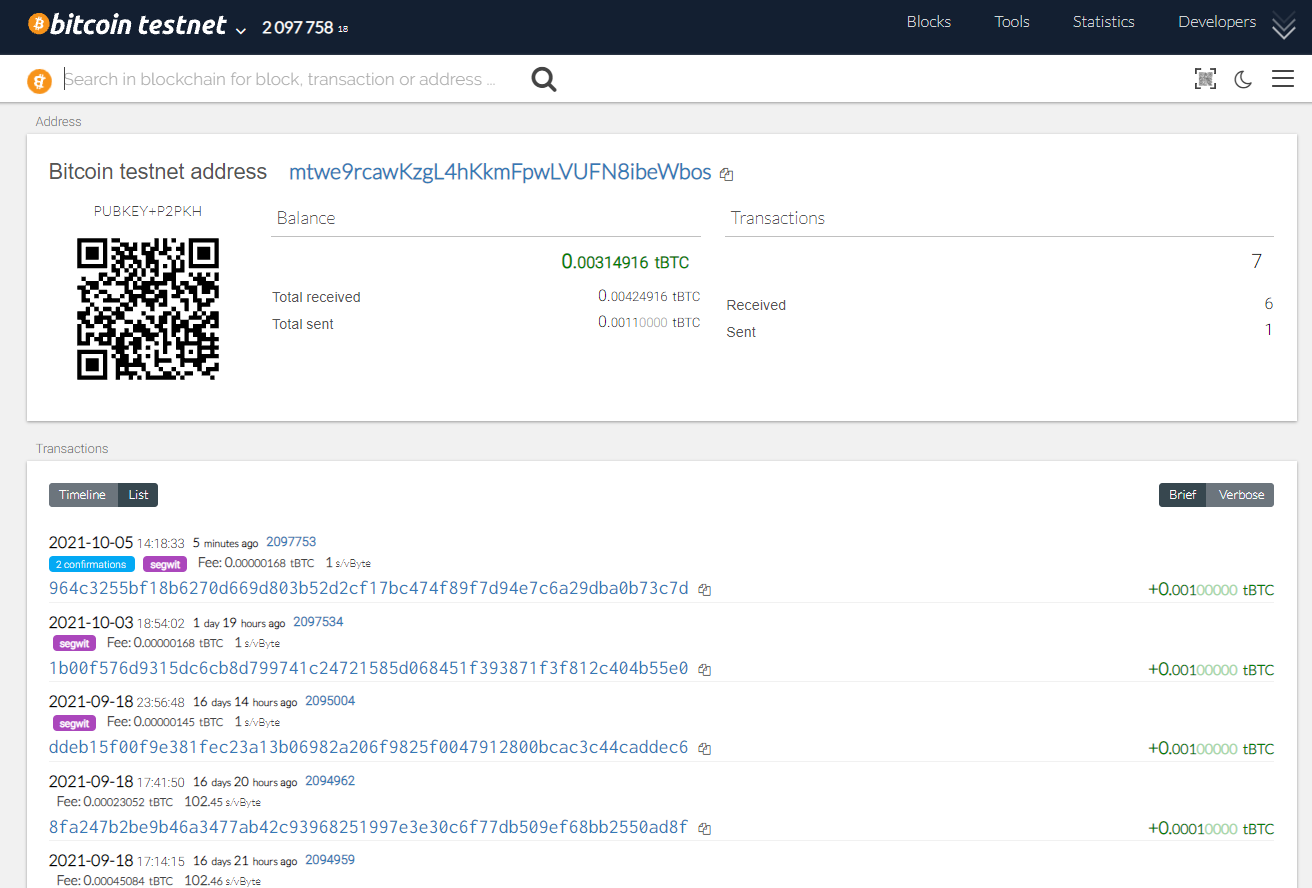
Local PoA Ethereum transaction
-ETH[https://app.tryethernal.com/]
-