ILWIS Python API TechDoc
This document is meant for developers, who want to extend the ILWIS Objects Python API. This Python API is based on SWIG and created in C++ using QtCreator, it is heavily recommended, that you have at least a general knowledge about these subjects. General documentation about ILWIS Objects can be found in ILWIS-Next-Generation-(Architecture) and ILWIS-Objects-overview.
In this document we will go over the set-up and idea behind the Python API's development, and we will also talk about how to set up the development environment. The last part of this document will be about how you can actually expand or edit the Python API.
Please note, that this document was created for Windows environment. Nevertheless it should as well be applicable for other development environments. Be aware of the difference in
\and/when dealing with paths to files and directories. A small error in those can create strange and hard to track down bugs.
Note that the whole set-up is tested only for 32-bit binaries. Make sure all mentioned packages are installed as 32-bit version!
The development environment for the ILWIS Objects Python API is based on the QtCreator IDE and a Python 3 installation combined with the toolbox that actually made the creation of this API possible: SWIG.
In the following paragraphs we will go over the set-up and configuration of the development environment. It is however assumed that you have a copy of the ILWIS source code and the project folder (with the libraries and resources etc.) in your working directory. If not the current version of the source code can be found in our repositories on GitHub (IlwisCore, IlwisConnectors), external libraries and resources are until now only available on our project folder on Google Drive[TODO].
ILWIS Objects is created in QtCreator because of its multi-platform advantage over MS Visual Studio, this however means that in order to run and compile ILWIS Objects you need a Qt installation. And of course the ILWIS Objects project has to be configured correctly within Qt this however will be done in another chapter.
We have to install QtCreator. It is recommended to install all packages, this avoids the risk of missing a vital package later on.
Once installed we have to set up the ILWIS Objects projects within QtCreator:
-
Select projects from the<quick menu><build and run><build> -
Open all current Project files (
<File><OpenProject>), the most important are:-
<your Ilwis folder>\projects\IlwisCore\core.pro -
<your Ilwis folder>\projects\IlwisCore\Ilwisscript.pro -
<your Ilwis folder>\projects\IlwisCore\projectionimplproj4.pro -
<your Ilwis folder>\projects\IlwisCore\rasteroperations.pro -
<your Ilwis folder>\projects\IlwisCore\internalconnector.pro -
<your Ilwis folder>\projects\IlwisConnectors\gdalconnector.pro -
<your Ilwis folder>\projects\IlwisConnectors\Ilwis3connector.pro -
<your Ilwis folder>\projects\IlwisConnectors\baseoperations.pro -
<your Ilwis folder>\projects\IlwisConnectors\gslconnector.pro -
<your Ilwis folder>\projects\IlwisConnectors\spreadsheetconnector.pro -
<your Ilwis folder>\projects\IlwisConnectors\opencvconnector.pro -
<your Ilwis folder>\projects\IlwisConnectors\featureoperations.pro -
<your Ilwis folder>\projects\IlwisConnectors\pythonapi.pro
-
-
Common practice is to change the build directory to the temp sub-folder of projects directory via
<Projects (configuration)><General><Build directory:>like this:<your ILWIS working directory>\projects\temp\<Qt-project name>
The ILWIS Python API is compiled for Python 3.0 and higher[1]. For development we use Python 3.3, so all settings regarding folders will be according to a 3.3.x installation. That means we recommend you to install the most recent 3.3 version. Again it is recommended to do a full installation.
Description from the SWIG website:
"SWIG is an interface compiler that connects programs written in C and C++ with scripting languages such as Perl, Python, Ruby, and Tcl. It works by taking the declarations found in C/C++ header files and using them to generate the wrapper code that scripting languages need to access the underlying C/C++ code. In addition, SWIG provides a variety of customization features that let you tailor the wrapping process to suit your application."
SWIG does not require an actual installation, it only needs to be downloaded and unzipped in a folder of your choice. For later command line usage of SWIG it might be handy to add the path to the swig.exe to your system path environment. Whenever we refer to use the swig.exe, you can as well simply refer to that executable using a full path, so no need to change your system environment.
Make sure all other ILWIS project are properly configured (including additional deployment make-steps like make install and already compiled.
-
Set the
pythonapi.proas Active Project (<in Projects-sidebar><context menu on pythonapi.pro><Set as Active Project>) -
The project configuration of the
pythonapi.proassumes Python 3.3.X to be installed in the standard pathC:\Python33\, if you chose another install directory or version of Python, please correct the linePYTHONDIR = C:/Python33in the project file to refer to the correct directory. -
In the
Buildview of your pythonapi project configuration (<Ctrl>+5) add the following custom build step (<Build Steps><Add Build Step><Custom Process Step>) and move it up to be the first build step beforeqmakeandmake:
- Command :
swig.exe - Arguments:
-python -c++ ilwisobjects.i(pay attention to spaces) - Working directory:
%{sourceDir}\pythonapi
-
In the
Runview of your pythonapi project configuration (<Ctrl>+5) add a make step (<Deployment><Add Deploy Step><Make>) with the following argument:install. -
For the run-configuration of the final Python and SWIG parts I refer to the README file of the Python API, this file explains, how to tell python, where our extension
ilwisobjects.pydcan find theilwiscore.dlland all the derived dependencies. One approach is to adjust the system PATH environment. After proceeding through the README file, your run-configuration can be set up like this:
- Executable:
python - Arguments:
test.py - Working directory:
%{sourceDir}\pythonapi
In this chapter we discuss the actual design of the Python API, as well as some important details within the implementation. This is important as we made some, at first glance, not completely obvious or even logical choices. Most of those choices where made because of SWIG being not perfect and generally incompatibility of Qt and Python sources due to dedication to different C++ compilers (MSVC vs. GCC).
The Python API is made using SWIG to wrap the ILWIS C++ headers, and this way generating a library usable by Python code as an extension (module). It is however not as easy as it looks to wrap the ILWIS header files with SWIG. Because Python on Windows is compiled using MSVC++ (Microsoft Visual Studio) and ILWIS is compiled using gcc of MinGW for multi-platform purposes. This creates an interesting problem with headers during the SWIG compilation: The generated wrapper code tries to include Python (MSVC-)headers first, which causes gcc to fail on finding some of the required declaration for Qt implementations. The solution was to create separate C++ headers that brake down the ILWIS C++ API and the Python API C API to standard C++, which is supported by both sides: Python and ILWIS(Qt). More detailed information about these decisions can be found in ILWIS-Python-API---Requirements.
.png) The essence of the source tree of the Python API. Blue is python, green is Qt gray is standard C++ only. Source: SWIG-Toolchain(C++_-_Python).vsd on Google Drive.
The essence of the source tree of the Python API. Blue is python, green is Qt gray is standard C++ only. Source: SWIG-Toolchain(C++_-_Python).vsd on Google Drive.
The ILWIS side wrappers are generally copied from the original headers, with full path imports. The source files are renamed by adding pythonapi_ in front of it to circumvent possible debugger confusion.
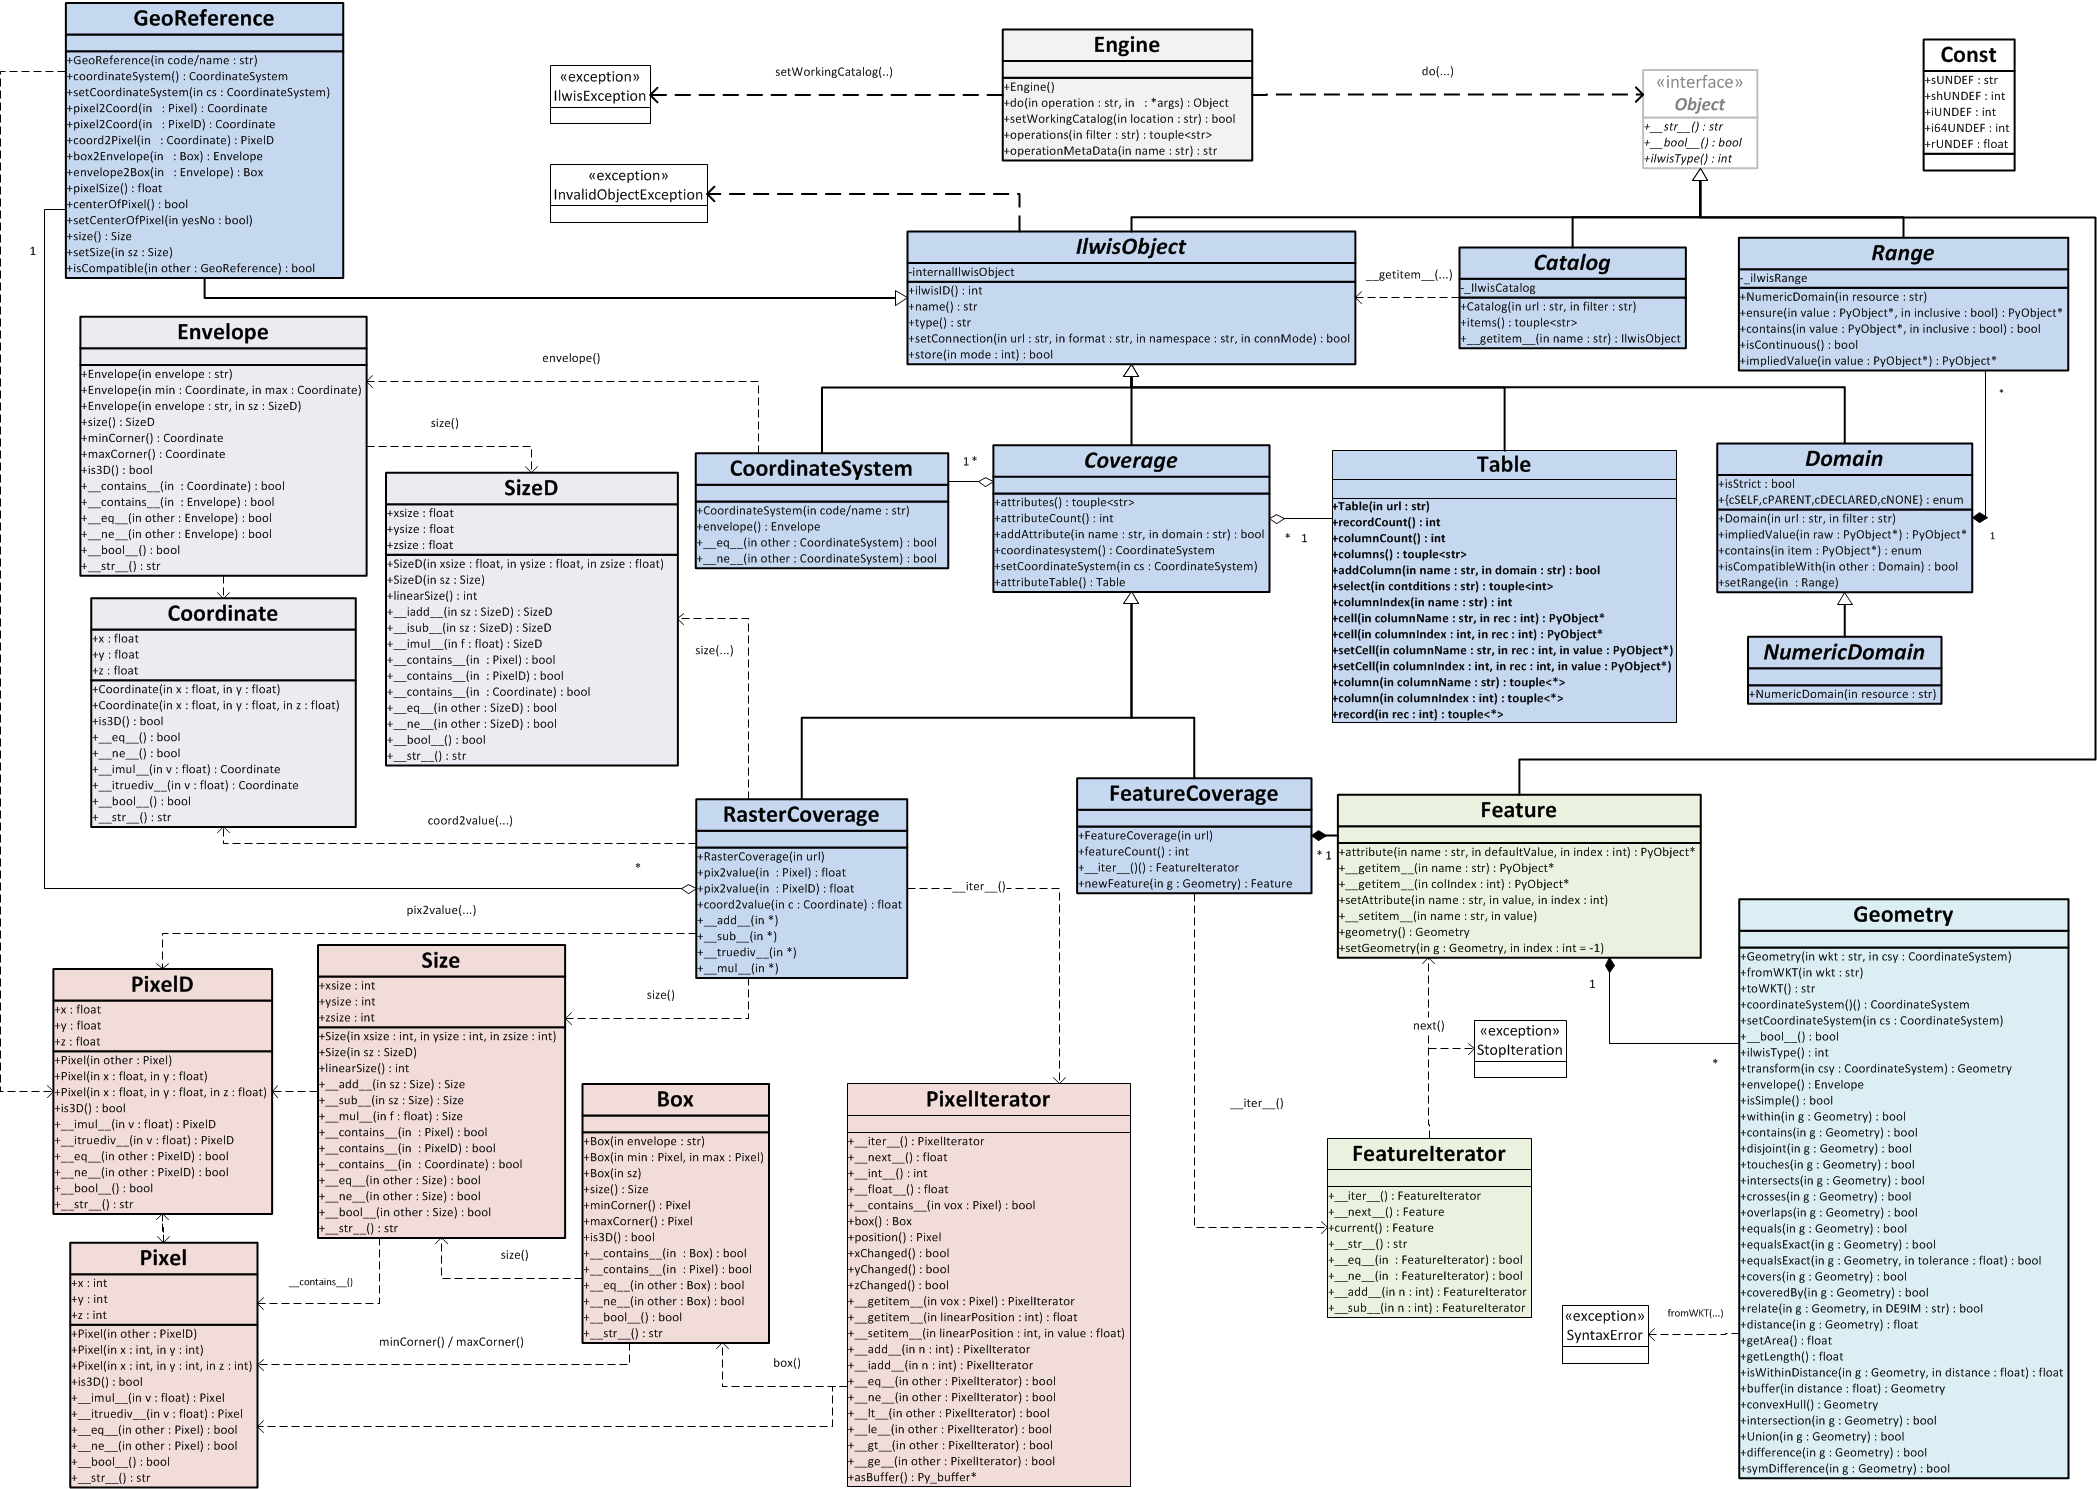 This is an overview over the wrapped ILWIS functionality as a class diagram. Source: ILWIS_Python_API_classdiagram.vsd on Google Drive.
Within the ILWIS framework the QVariant class is generally used to return user data. In the files pythonapi_qvariant.* we provide three methods to translate between the ILWIS basic types and Python basic types stored in a QVariant. Those basic type translations are:
| ILWIS type | Python type |
|---|---|
| QString | str |
| bool | bool |
| double | float |
| (unsigned)(long)*int | int |
| Ilwis::Time | datetime,time,date |
Later for convenience the a conversion from std::vector<QVariant> to Python tuple was added here, which uses functionality of PyContainer.
The files pythonapi_error.* provide the following ILWIS Python API specific C++ exceptions:
| Exception | Meaning |
|---|---|
| InvalidObject | to indicate an error caused by the attempt to use an invalid (ilwis) object |
| ImportError | to indicate an error during module initialization |
| OSError | to indicate an error during operating system interaction (like IO error) |
| NotImplementedError | to indicate that this ilwis functionality is not yet implemented |
| StopIteration | to indicate next() == it.end() the Python way during for(each) loops |
These C++ exceptions are caught by the generated wrapper code and translated into the appropriate Python pendant. See SWIG interface file (ilwisobjects.i) for more information about how exceptions are caught and translated.
Further more wrapper functions like ilwisFeatureCreationError_type_info() help to translate ILWIS internal ErrorObjects to custom Python exceptions.
There is one special source file pythonapi_pyobject, that wraps Python C API functionality for the translation of standard C++ functionality into the Python pendant and back. Until now it contains mainly special container translation, datetime translation and Exception handling.
The proposed SWIG-way to translate std::vector<> via std_vector.i caused include error, so a work around was needed, this work around is basically a custom implementation using the Python C API directly. It does this by creating a tuple of those lists and passing this on to the python part of the code. The currently implemented tuples are string, int (64 and 32), double and long .
The method PyObject* translate_Exception_type(std::exception&) translates the exceptions thrown in C++ code to Errors(PyObjects) catchable by the Python code by comparing their const std::type_info& .. = typeid(...). See SWIG interface file (ilwisobjects.i) for more information about how exceptions are caught and translated.The translation table:
| C++ Exception | Python Exception | Meaning |
|---|---|---|
| pythonapi::InvalidObject | ilwisobjects.InvalidObjectException | to indicate an error caused by the attempt to use an invalid (ilwis) object |
| std::bad_cast | ilwisobjects.InvalidObjectException | to indicate an error caused by the attempt to use an invalid (ilwis) object |
| pythonapi::ImportError | ImportError | to indicate an error during module initialization |
| pythonapi::OSError | OSError | to indicate an error during operating system interaction (like IO error) |
| pythonapi::NotImplementedError | NotImplementedError | to indicate that this ilwis functionality is not yet implemented |
| pythonapi::StopIteration | StopIteration | to indicate next() == it.end() the Python way during for(each) loops |
| Ilwis::FeatureCreationError | ilwisobjects.FeatureCreationError | indicate error during attempt of creating a new feature within |
| Ilwis::ErrorObject | IlwisException | unspecified ilwis internal exception |
| geos::io::ParseException | SyntaxError | indocate wrong syntax detected during WKT(WKB) pasing |
| std::bad_alloc | MemoryError | general system error during memory allocation |
| std::out_of_range | IndexError | indication wrong index on attempt to access container item |
| std::domain_error | ValueError | error during object conversion |
| <else> | Exception | all other unhandled exceptions |
The SWIG interface file forms the basis of our Python ILWIS extension. Here both sides (ILWIS(Qt) and Python) are glued together. Technically speaking SWIG uses this interface file both as an entry point to find C++ declarations to be wrapped and as general configuration file for the extension module.
For the general configuration part please read through the SWIG documentation.
The SWIG directive %init %{ ... %} is used to run ILWIS specific initialization code, when loading (importing) the ilwisobjects extension. In our case we declare our new ILWIS specific Python exception classes and initialize the ILWIS kernel.
The SWIG directive %exception{ ..} tells SWIG to wrap every single API call into a try{..}catch(..){..} clause, which helps to ensure native python exception handling instead of application crash. This way we could also implement a translation (translate_Exception_type(..)) of custom ILWIS exceptions into either native or extension specific Python exceptions.
By stating %include "pythonapi_*.h" SWIG sees only the standard C++ headers wrapping ILWIS(Qt) and the Python header. From these headers it automatically creates wrapper code both in C/C++ and Python. The SWIG directive %include ... in contrast to #include ... only tells SWIG to create the wrapper code for this (and no further referenced headers), so additionally we have to make sure that gcc can find the ILWIS wrapper declarations (the headers) by passing #include "pythonapi_*.h" directly to the SWIG wrapper source ilwisobjects_wrap.cxx via the %{ ...%} directive.
For certain classes you need to make use of the SWIG interface file ilwisobjects.i to write more specialized wrapper code.
- One use-case, which requires Python side wrapper code, solves the problem that Python is dynamically typed but SWIG does only static typing like C++. In our case the method
Engine.do(...)simply returns the general super class typepythonapi::Object. So we have a function of this shapepublic static <classType>* to<classTypeName>(Object*)in a all of the Python API classes which can be returned bydo(...), these are needed to cast the returnedObjectinstance to their specialized Python class type. Finally the Python wrapper code uses the.ilwisType()method to determine the specialized class type and the SWIG wrappedto<classTypeName>(..)methods to finally type-cast the returned object.
To inserted Python code in the relevant class, you can use the %extend .. and %insert(..) %{...%} directive like this:
%extend pythonapi::<class to be inserted in> {
	%insert("python") %{
		<python code>
	%}
}
This is used to turn private attributes into properties by calling getter and setter methods.
The %template(...) ... directive is used to instantiate specialized C++ template classes. This is necessary since templates are compile-time constructs, so no other SWIG-way make C++ templating visible for Python.
Extending the Python API will mainly be done by adding more ILWIS classes to its functionality. Adding a class to the Python API has to be done by creating a wrapper class which SWIG can actually compile.
A wrapper class consists of a header and a cpp file. The following step by step breakdown will go over all the details. For examples we refer to the actual source code, make sure to actually compare the original and the wrappers classes next to each other.
-
Copy the source and header file from the original to the pythonapi version.
-
Rename the source and header file. We adapted the following naming scheme to prevent debugger confusion:
pythonapi_<class>. -
If the new class is not derived from
pythonapi::IlwisObject, the next thing to do is adding a private or protected member (preferably of typestd::unique_ptr<>orstd::shared_ptr<>) that points to the instance of the actual ILWIS class. Like in the pythonapi_pixeliterator.h:std::shared_ptr<Ilwis::PixelIterator> _ilwisPixelIterator;
-
Remove all the imports to non-standard C++ headers from the wrapper header and replace Qt and ILWIS types by their closest SWIG-able equivalent and by
PyObject*and take care about the conversion in the source file. -
Move the wrapper class into the
namespace pythonapiin which you declare the class you are wrapping. -
Afterwards you have to redirect the function calls to the correct ILWIS class, you can actually refer to those ILWIS classes, but it requires relative path imports. (it is recommended to study the code for examples) Example for referring to the Ilwis Feature Coverage featureCount() in pythonapi_featurecoverage.cpp:
unsigned int FeatureCoverage::featureCount() const{
     return this->ptr()->as<Ilwis::FeatureCoverage>()->featureCount();
}
-
Last thing to do Is register the class in the SWIG interface file (
ilwisobjects.i). Registering means sometimes only to add the two include statements, but can also mean more specific SWIG declarations (e.g. for Exceptions or template classes), see SWIG interface file for more information.
It is recommended that you ensure correct functionality for all (new) features of the Python API by adding an new test-case (def test_<selfExplaningName>(self):) or even a new test-class (class Test<IlwisClassName>(ut.TestCase): to the test.py. The test framework automatically detects new tests and executes them, see Python documentation for more explanation.
It is possible to debug ILWIS due to a convenient feature of the QT Creator, which lets you attach its debugger to another running process.
First you have to set a breakpoint in the Python IDE of your choice and start the debugging like usually. Once you have reached the breakpoint you have to switch to the Qt Creator, here you also need to set the breakpoints to the places in the code you want to investigate. To connect the debugger to the running Python process you need to do the following in the QT Creator menu bar:
Debug >> Start Debugging >> Start Remote Debug Server Attached to Process
You will now see a list of running processes. Now you have to look for python.exe. Select it and click Attach to Process. Now the debugger is starting, once it is ready you have to press F5 to make it listen to the Python process. In your Python IDE you can now step through the code an whenever it encouters a place where you have set a breakpoint in the QT Creator it will switch there.
In general the debugging works quite well. One common mistake is to forget to stop the debugger of the IDE, because it doesn't stop automatically once you stop it in the QT Creator, this only works the other way around, once you stop the debugging in the Python IDE the QT Creator stops as well.
Occasionally it might happen that the debugger crashes. In this case you have to abort the debugging in the QT Creator before you can go on. You do this in the menu bar with Debug >> Abort Debugging
[1]: Not yet compiled with define Py_LIMITED_API (stable ABI). See Issue #25.
[TODO]: DLLs and other resources files are not yet available for everyone. A file sharing solution needs to be found.