Scan your network. Understand your risks. Fix them — even if you're not a tech expert.
"Most network scanners just print ports. NetWatcher thinks like a security analyst — it scores risk, simulates attacks, and explains everything in plain English a 14-year-old can understand."
These are actual scans run on a real home network. No fake data.
|
Step 1 — Launch & scan starts 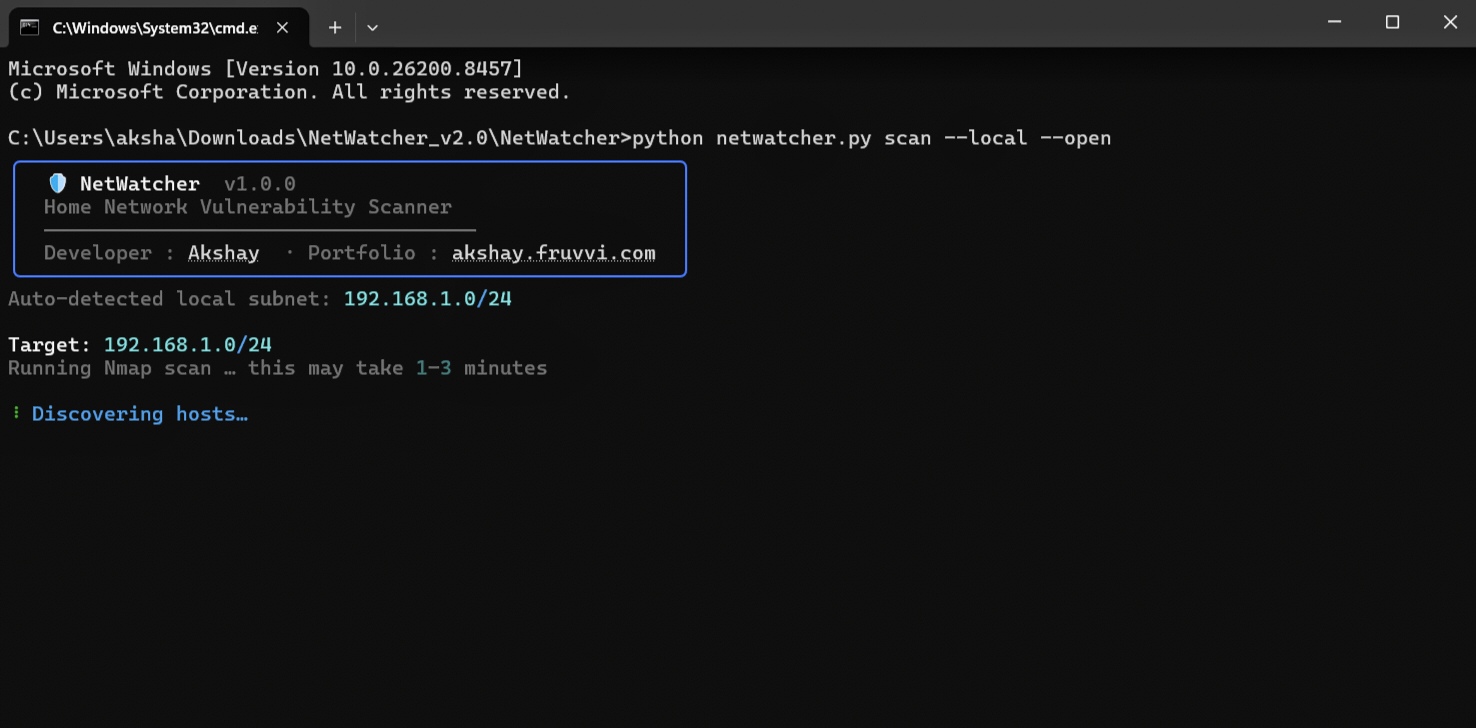
|
Step 2 — Hosts discovered, risk scored 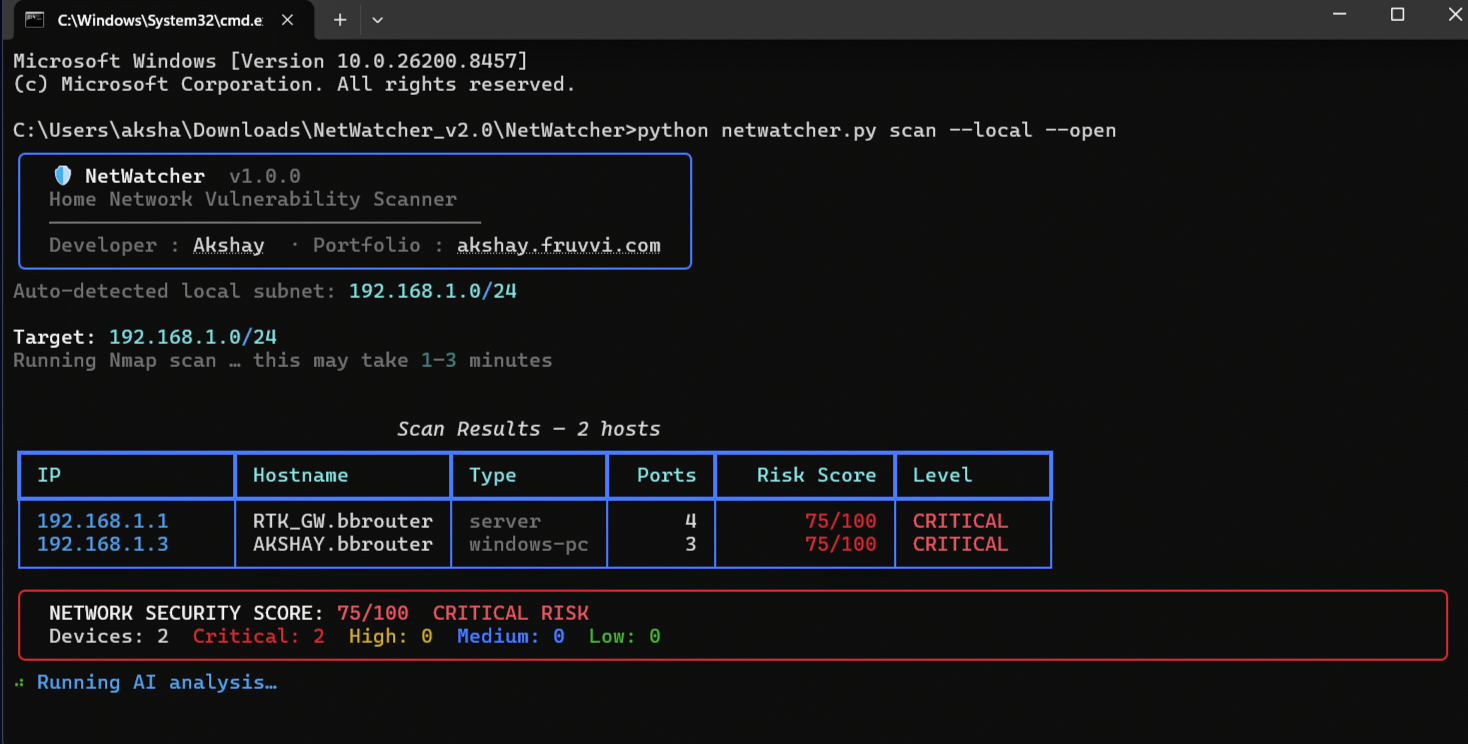
|
|
Step 3 — HTML report opens in browser 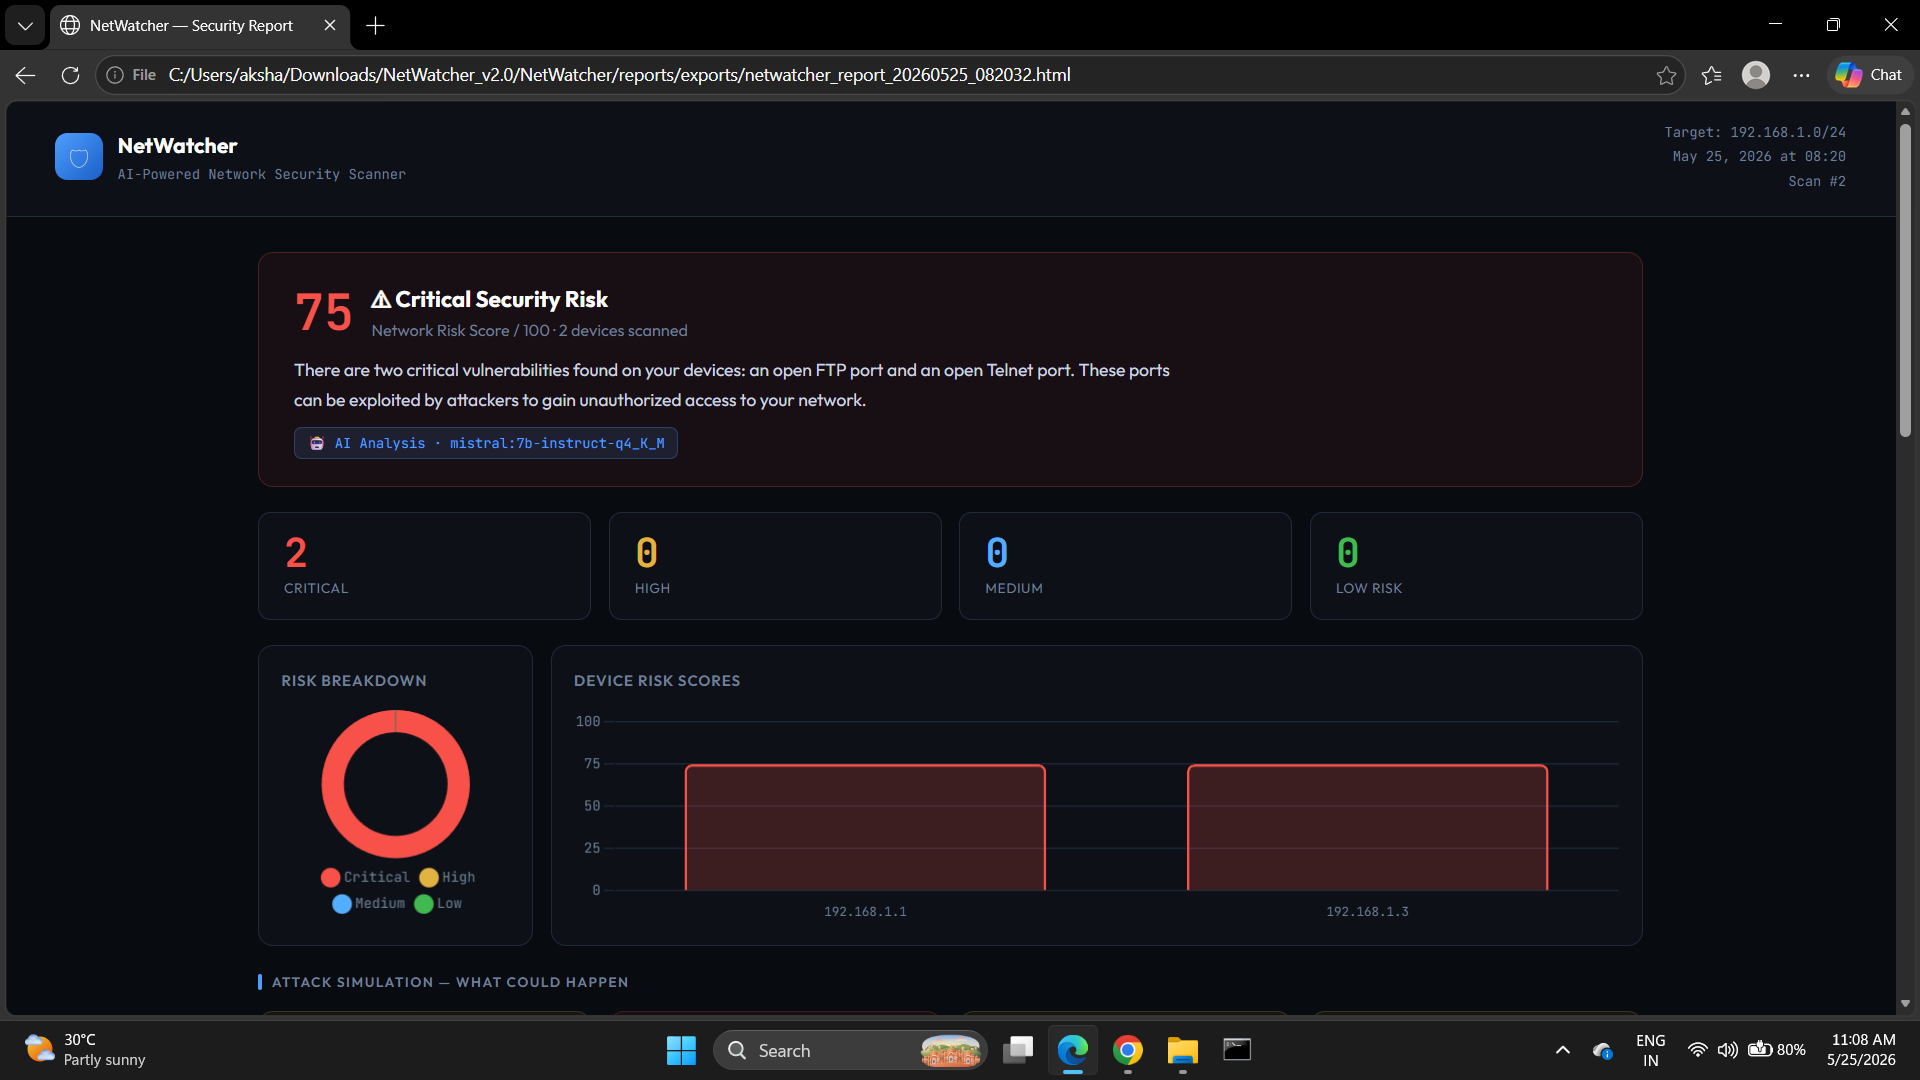
|
Step 4 — Attack simulation flowcharts 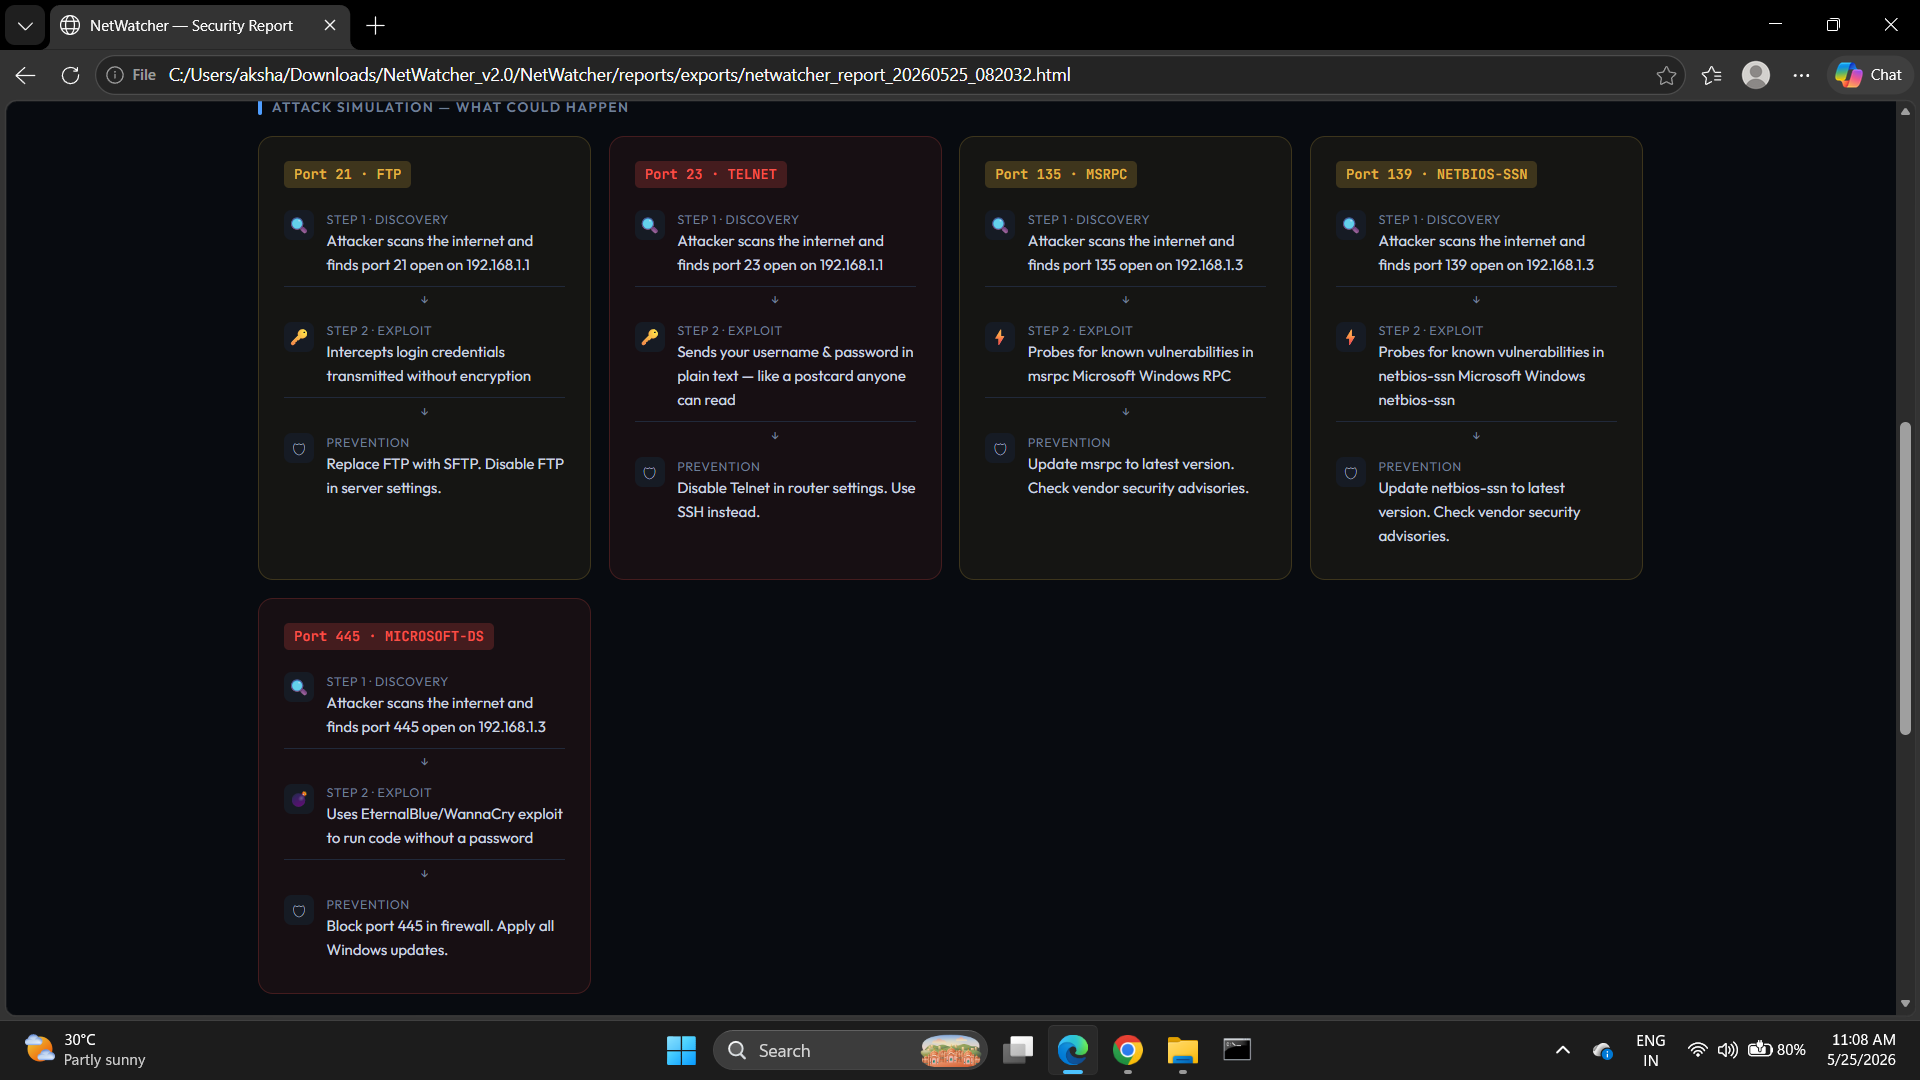
|
|
Step 5 — Device cards with AI plain-English explanations 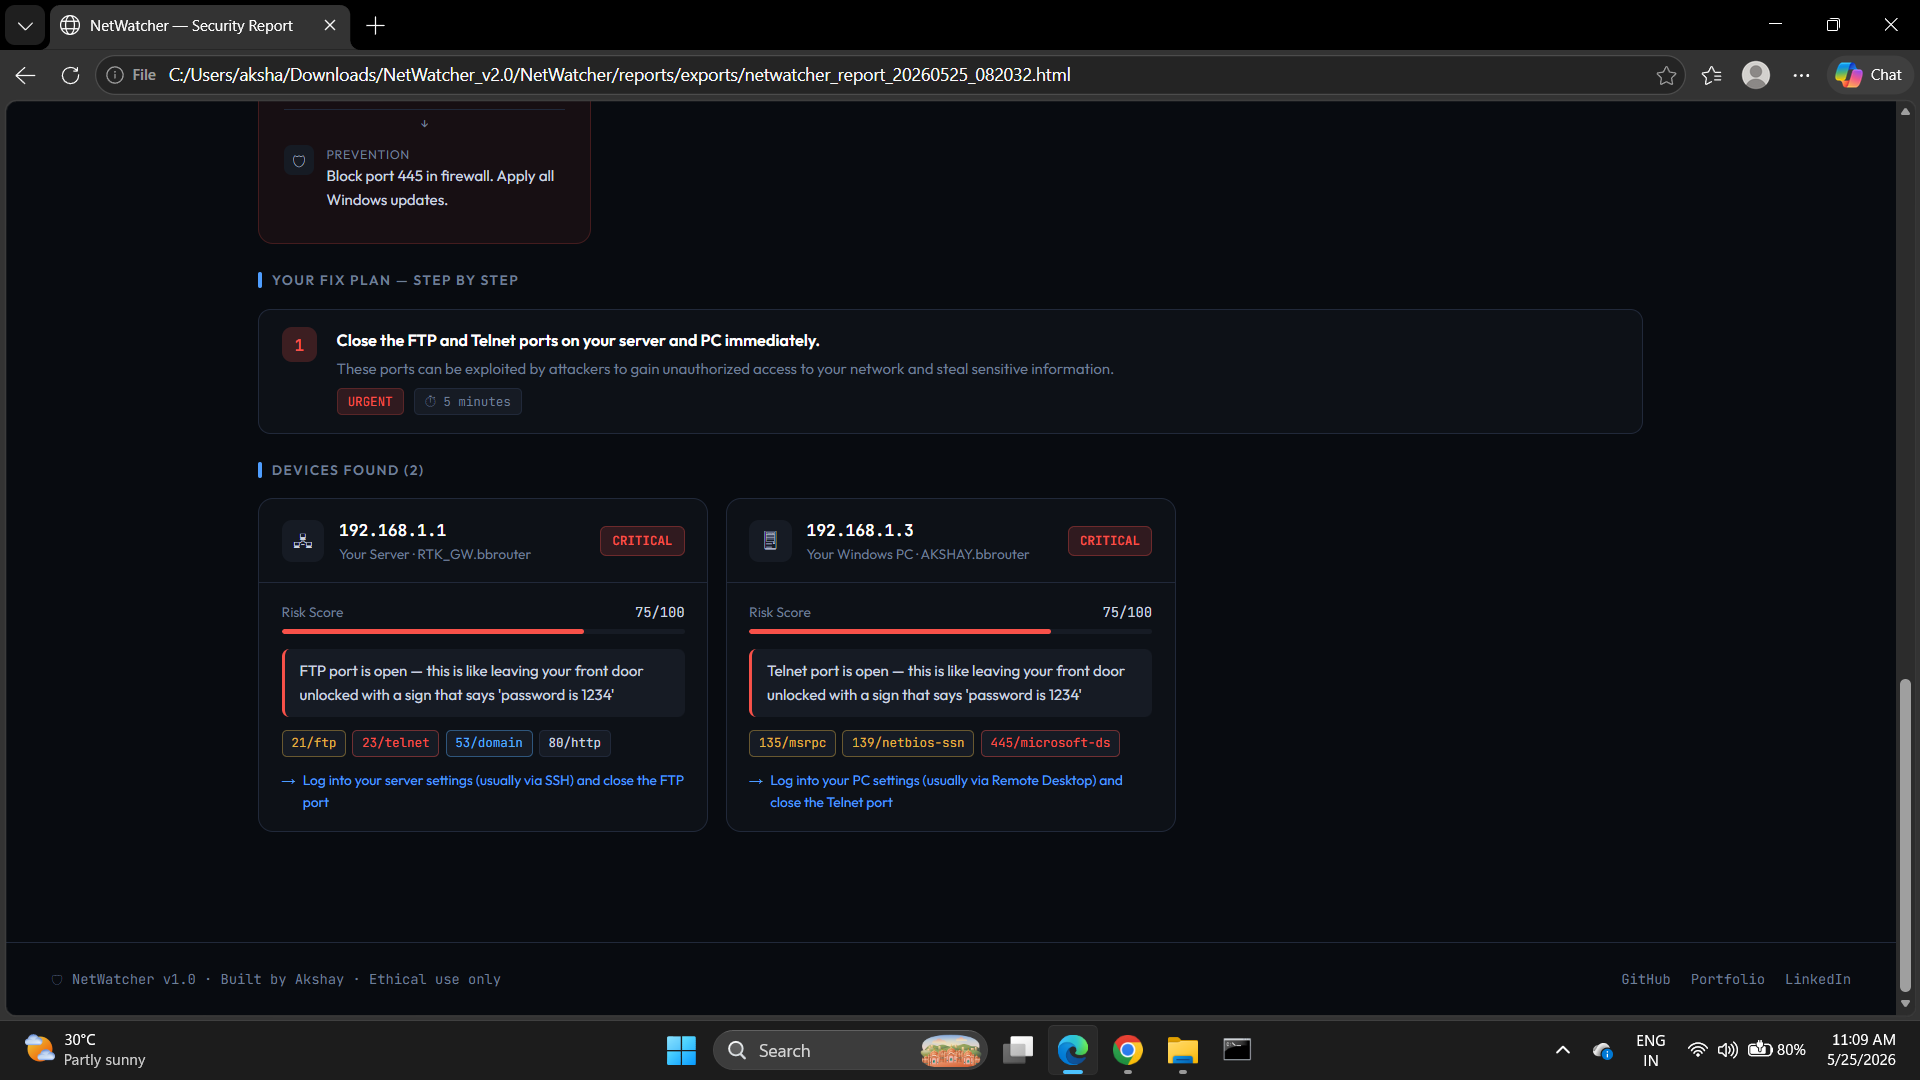
|
|
Click to watch the complete scan-to-report walkthrough (real network, real output)
▶ Watch Tutorial.mp4 — Full walkthrough: install → scan → report → fix plan
- What Is This?
- Who Is This For?
- How It Works
- Architecture
- Feature Breakdown
- AI Engine
- Quick Start
- Usage Guide
- Report Walkthrough
- Risk Scoring Model
- Attack Simulation Logic
- Tech Stack Decisions
- Folder Structure
- Tests
- Roadmap
- Legal Notice
- Developer
NetWatcher is a free, offline-first network security auditing tool that does what paid enterprise scanners do — for your home or lab network, at zero cost.
You run one command. NetWatcher:
- Discovers every device on your network
- Identifies what each device is (router, PC, IoT device, camera…)
- Scans for open ports and dangerous services
- Scores each device 0–100 for risk
- Simulates how an attacker would exploit each vulnerability
- Uses a local AI model to write plain-English explanations
- Generates a beautiful visual HTML dashboard — offline, private, no cloud
Before NetWatcher:   "Port 23 open"

After NetWatcher:    "Telnet is open on your router — this is like leaving your
                      front door unlocked with the key taped to it.
                      Disable it in router settings in under 5 minutes."
This is what separates a script from a product.
| Person | Why NetWatcher helps |
|---|---|
| 🎓 CS / Cybersecurity student | Portfolio project that demonstrates system design, security thinking, and AI integration at once |
| 🏠 Home user | Understand what's exposed on your network without needing security knowledge |
| 🔒 Security hobbyist | Lightweight Nessus alternative for home lab auditing |
| 💼 Internship seeker | Shows recruiters: pipeline architecture, AI integration, product thinking, security domain knowledge |
| 🧑💻 Developer | Learn how real security tools are structured — layers, rules engines, typed data models |
  You type:  python netwatcher.py scan --local
                          │
                          ▼
         ┌────────────────────────────┐
         │   1. NETWORK DISCOVERY     │
         │   scanner.py + Nmap        │
         │                            │
         │   • Pings subnet range     │
         │   • Detects live hosts     │
         │   • Grabs OS fingerprint   │
         │   • Lists all open ports   │
         │   • Reads service banners  │
         └─────────────┬──────────────┘
                       │  List[Device]
                       ▼
         ┌────────────────────────────┐
         │   2. DEVICE FINGERPRINTING │
         │   engine/fingerprint.py    │
         │                            │
         │   • MAC → vendor lookup    │
         │   • Classifies device type │
         │   • router / PC / IoT...   │
         └─────────────┬──────────────┘
                       │  Enriched List[Device]
                       ▼
         ┌────────────────────────────┐
         │   3. RISK ANALYSIS         │
         │   engine/risk_engine.py    │
         │   engine/rules.py          │
         │                            │
         │   • Port → severity lookup │
         │   • Score = Σ weights      │
         │     + device modifier      │
         │   • Tags every port        │
         └─────────────┬──────────────┘
                       │  Scored List[Device] (0–100)
                       ▼
         ┌────────────────────────────┐
         │   4. AI ANALYSIS           │
         │   ai/analyzer.py           │
         │   ai/prompts.py            │
         │   ai/ollama_client.py      │
         │                            │
         │   • Builds surgical prompt │
         │   • Calls Ollama locally   │
         │   • Parses JSON response   │
         │   • Falls back gracefully  │
         └─────────────┬──────────────┘
                       │  AI analysis dict
                       ▼
         ┌────────────────────────────┐
         │   5. PERSISTENCE           │
         │   data/db.py  (SQLite)     │
         │                            │
         │   • Saves scan session     │
         │   • Stores all devices     │
         │   • Tracks risk over time  │
         └─────────────┬──────────────┘
                       │  scan_id
                       ▼
         ┌────────────────────────────┐
         │   6. REPORT GENERATION     │
         │   reports/generator.py     │
         │                            │
         │   • Jinja2 renders HTML    │
         │   • Chart.js bar + donut   │
         │   • Attack flowcharts      │
         │   • AI action plan         │
         └─────────────┬──────────────┘
                       │
                       ▼
            📄  netwatcher_report.html
              (single file, fully offline)
Every module has one job and knows nothing about the layers above or below it. This is the same pattern used in production security tools like Nessus and OpenVAS.
┌─────────────────────────────────────────────────────┐
│                    LAYER MAP                        │
├──────────────┬──────────────────────────────────────┤
│ Presentation │ cli.py, reports/                     │
│              │ → Rich terminal UI + HTML dashboard  │
├──────────────┼──────────────────────────────────────┤
│ AI           │ ai/analyzer.py, ai/prompts.py        │
│              │ → Local LLM via Ollama               │
├──────────────┼──────────────────────────────────────┤
│ Analysis     │ engine/risk_engine.py                │
│              │ → Pure scoring logic, no I/O         │
├──────────────┼──────────────────────────────────────┤
│ Rules        │ engine/rules.py                      │
│              │ → Data only, zero logic              │
├──────────────┼──────────────────────────────────────┤
│ Enrichment   │ engine/fingerprint.py                │
│              │ → MAC OUI, device type detection     │
├──────────────┼──────────────────────────────────────┤
│ Discovery    │ netwatcher/scanner.py                │
│              │ → Nmap wrapper, typed output only    │
├──────────────┼──────────────────────────────────────┤
│ Data Model   │ netwatcher/devices.py                │
│              │ → Device + Port dataclasses          │
├──────────────┼──────────────────────────────────────┤
│ Persistence  │ data/db.py                           │
│              │ → SQLite, scan history               │
└──────────────┴──────────────────────────────────────┘
Why this matters: You can swap Nmap for a different scanner by changing only scanner.py. Swap SQLite for PostgreSQL by changing only db.py. Swap Ollama for OpenAI by changing only ollama_client.py. Nothing else touches.
Nmap XML output
      │
      │  scanner.py parses into:
      ▼
  Device(
    ip="192.168.1.1",
    ports=[Port(number=23, service="telnet", risk_tag="?")],
    risk_score=0          ← not set yet
  )
      │
      │  risk_engine.py fills in:
      ▼
  Device(
    ip="192.168.1.1",
    ports=[Port(number=23, service="telnet", risk_tag="CRITICAL")],
    risk_score=87,
    issues=[{"level":"CRITICAL", "text":"Telnet is open..."}],
    recommendations=["Disable Telnet immediately..."]
  )
      │
      │  .to_dict() for Jinja2 / SQLite:
      ▼
  Plain dict → template renders → HTML report
Not just "port open." Every port is weighted by real-world severity. Telnet (port 23) = 30 points. SSH (port 22) = 10. Device type adds a modifier — routers get +15 because they're the highest-value target on any home network.
Uses MAC OUI (the first 3 bytes of a MAC address identifying the manufacturer) combined with Nmap OS detection to classify every device. Your ESP32 IoT, Raspberry Pi, HP printer, and Windows laptop each get correctly identified.
engine/rules.py is pure data — a dictionary of port numbers mapped to severity, explanation, and fix. No logic lives there. Rules are policy; the engine is mechanism. Adding a new vulnerability = one dict entry, nothing else.
When Ollama is running, a local Mistral 7B model reads the scan and writes explanations a non-technical person can act on. Falls back gracefully if AI is offline — report still generates.
For every CRITICAL or HIGH port, the report shows a 3-step simulation: Discovery → Exploit → Prevention. Based on real attack patterns — EternalBlue, BlueKeep, Redis RCE, Telnet interception.
Every scan saved to local SQLite. Run netwatcher history to see all previous scans with scores. Track whether your network is getting more or less secure week over week.
Single self-contained HTML file. No server. Open in any browser. Chart.js donut + bar charts, color-coded device cards, attack flowcharts, step-by-step action plan.
Your network scan contains sensitive data — IPs, open ports, device names, MAC addresses. Sending that to a cloud API is a privacy anti-pattern for a security tool.
Cloud API:                        NetWatcher:
  Your scan data                    Your scan data
       │                                  │
       ▼                                  ▼
  OpenAI servers ← PRIVACY RISK    Ollama (localhost:11434)
  (leaves device)                    (never leaves machine)
       │                                  │
  ❌ Costs money                    ✅ Free
  ❌ Needs internet                 ✅ Fully offline
  ❌ Data exposed                   ✅ Private
┌─────────────────────────┬──────────┬──────────────┬────────────────┐
│ Model                   │ VRAM     │ JSON Accuracy│ Speed (3050)   │
├─────────────────────────┼──────────┼──────────────┼────────────────┤
│ mistral:7b-q4_K_M  ← ✓ │ ~4.1 GB  │ ★★★★☆       │ ~15 tok/s      │
│ llama3.2:3b             │ ~2.0 GB  │ ★★★☆☆       │ ~35 tok/s      │
│ phi3:mini               │ ~2.3 GB  │ ★★★★☆       │ ~30 tok/s      │
│ llama3.1:8b-q4          │ ~5.0 GB  │ ★★★★★       │ ~10 tok/s      │
└─────────────────────────┴──────────┴──────────────┴────────────────┘
Mistral 7B Q4_K_M chosen because: fits 4GB VRAM exactly (35 GPU layers), instruction-tuned for JSON schema compliance, sliding window attention handles long scan data, ~1% accuracy loss vs full precision.
┌───────────────────────┬──────────────────────────────────────────┐
│ TECHNIQUE             │ WHAT IT DOES                             │
├───────────────────────┼──────────────────────────────────────────┤
│ 1. Role Anchoring     │ "You are a senior security analyst       │
│                       │  writing for non-technical users"        │
│                       │ → Draws from security training data      │
├───────────────────────┼──────────────────────────────────────────┤
│ 2. Strict JSON Schema │ Output format defined in system prompt   │
│                       │ → Model knows the shape before input     │
├───────────────────────┼──────────────────────────────────────────┤
│ 3. Few-Shot Example   │ One worked example shows exact tone      │
│                       │ → Teaches style, not just format         │
├───────────────────────┼──────────────────────────────────────────┤
│ 4. Negative Rules     │ "Do NOT add markdown."                   │
│                       │ → Prevents #1 failure: preamble text     │
├───────────────────────┼──────────────────────────────────────────┤
│ 5. Context Last       │ Scan data injected at END of prompt      │
│                       │ → Recency bias = highest attention       │
└───────────────────────┴──────────────────────────────────────────┘

temperature = 0.0  →  Deterministic JSON. Reliability > creativity.
  Is Ollama running?  →  No  →  Rule-based fallback (identical output shape)
         ↓ Yes
  Model installed?    →  No  →  Rule-based fallback
         ↓ Yes
  JSON parseable?     →  No  →  3 recovery attempts → Rule-based fallback
         ↓ Yes
  AI analysis in report  (badge shows model name)
The report always generates. The template never crashes because AI is optional.
# Prerequisites:
# 1. Python 3.10+ → https://python.org/downloads  (check "Add to PATH")
# 2. Nmap        → https://nmap.org/download.html

git clone https://github.com/Akshay-core/NetWatcher
cd NetWatcher
pip install -r requirements.txt
python netwatcher.py check
python netwatcher.py scan --local --openbrew install python nmap git && \
git clone https://github.com/Akshay-core/NetWatcher && \
cd NetWatcher && \
pip3 install -r requirements.txt && \
python3 netwatcher.py scan --local --opensudo apt update && sudo apt install -y python3 python3-pip nmap git && \
git clone https://github.com/Akshay-core/NetWatcher && \
cd NetWatcher && \
pip3 install -r requirements.txt && \
python3 netwatcher.py scan --local --open# Linux / Mac:
bash scripts/setup_ai.sh
# Windows — download from https://ollama.ai/download then:
ollama pull mistral:7b-instruct-q4_K_M
# Verify everything is ready:
python netwatcher.py checkNo Ollama? Tool works fully without AI. Rule-based analysis still runs and generates the complete report. AI adds the plain-English layer on top.
# Scan local network (auto-detects subnet)
python netwatcher.py scan --local

# Scan and auto-open HTML report in browser
python netwatcher.py scan --local --open

# Scan a specific range
python netwatcher.py scan --target 192.168.1.0/24

# Scan a single device
python netwatcher.py scan --target 192.168.1.1

# Terminal only, no HTML report
python netwatcher.py scan --local --no-report

# Verbose debug output
python netwatcher.py scan --local --verbose

# View scan history
python netwatcher.py history
python netwatcher.py history --limit 5

# Open last report
python netwatcher.py report

# Preflight check
python netwatcher.py check┌──────────────────────────────────────────────────────────────────┐
│ SECTION 1 — VERDICT BANNER │
│ Risk score 0–100, color-coded (red/yellow/blue/green), │
│ AI plain-English summary, model badge │
├──────────────────────────────────────────────────────────────────┤
│ SECTION 2 — STATS ROW │
│ Four counters: Critical / High / Medium / Low devices │
├──────────────────────────────────────────────────────────────────┤
│ SECTION 3 — CHARTS │
│ Donut: risk level breakdown │
│ Bar: per-device risk scores │
├──────────────────────────────────────────────────────────────────┤
│ SECTION 4 — ATTACK SIMULATION FLOWCHARTS │
│ One card per CRITICAL/HIGH port: │
│ Discovery → Exploit → Prevention (plain English) │
├──────────────────────────────────────────────────────────────────┤
│ SECTION 5 — FIX PLAN │
│ Numbered steps, URGENT/SOON/OPTIONAL badges, time estimates │
├──────────────────────────────────────────────────────────────────┤
│ SECTION 6 — DEVICE CARDS │
│ Risk bar, level badge, device icon, AI explanation, │
│ port tags (color by severity), beginner action │
└──────────────────────────────────────────────────────────────────┘
score = min( Σ(port_weights) capped at 70  +  device_modifier,  100 )

Example — Router with Telnet + SMB open:
  Port 23  (telnet) → CRITICAL → +30
  Port 445 (smb)    → CRITICAL → +30
  Base = min(60, 70) = 60
  Modifier (router) = +15
  Final score       = 75 → CRITICAL
| CRITICAL (+30) | HIGH (+20) | MEDIUM (+10) | LOW (+5) |
|---|---|---|---|
| 23 Telnet | 21 FTP | 22 SSH | 80 HTTP |
| 445 SMB | 25 SMTP | 53 DNS | 443 HTTPS |
| 6379 Redis | 135 Win RPC | 110 POP3 | 8080 |
| 27017 MongoDB | 139 NetBIOS | 143 IMAP | |
| 9200 Elasticsearch | 3306 MySQL | ||
| 3389 RDP | |||
| 5900 VNC |
| Device | Modifier | Reason |
|---|---|---|
| router | +15 | Highest-value target on any home network |
| server | +10 | Multiple services, persistence target |
| ip-camera | +10 | Often unpatched, used in botnets |
| printer | +5 | Forgotten, long-lived, rarely patched |
| windows-pc | +5 | SMB + RDP attack surface |
| linux-device | +3 | |
| mobile | 0 | |
| unknown | +5 | Assume worst when can't identify |
75–100  →  🔴 CRITICAL   immediate action required
50–74   →  🟡 HIGH       action within days
25–49   →  🔵 MEDIUM     address when possible
 0–24   →  🟢 LOW        monitor, minor improvements
Each flowchart in the report is based on real attack patterns:
PORT 23 — TELNET
  Discovery:  Shodan indexes millions of Telnet-exposed devices.
              Attackers scan port 23 with a single Nmap command.
              ↓
  Exploit:    Telnet sends your username + password in plain text.
              Anyone on the same network can read it with Wireshark.
              No hacking tools required.
              ↓
  Prevention: Router admin panel → Disable Telnet → Enable SSH.
              Takes 5 minutes.

PORT 445 — SMB
  Discovery:  Same scan NetWatcher just ran finds it instantly.
              ↓
  Exploit:    EternalBlue (CVE-2017-0144) exploits SMBv1.
              WannaCry ransomware used this in 2017 — 230,000 machines
              in 150 countries infected in 4 days.
              ↓
  Prevention: Apply all Windows Updates. Block port 445 at firewall.

PORT 6379 — REDIS
  Discovery:  Attacker connects to 6379. Default Redis: no password.
              ↓
  Exploit:    redis-cli -h 192.168.1.x → KEYS * → full database dump.
              Or: CONFIG SET dir /root/.ssh to write SSH authorized_keys.
              ↓
  Prevention: redis.conf → requirepass yourpassword
              redis.conf → bind 127.0.0.1
| Component | Choice | Why |
|---|---|---|
| Scanner | Nmap + python-nmap | Industry standard. XML output = structured data for free. |
| Language | Python 3.8+ | Standard in security tooling. Clone and run, no compilation. |
| CLI | Typer + Rich | Typer: typed args + auto-help. Rich: tables, spinners, panels. |
| Data model | Dataclasses | Typed contract between layers. No external dependency. |
| Rules | Plain dict in rules.py |
Rules = data. Engine = logic. Same pattern as Snort/YARA/Sigma. |
| AI runtime | Ollama (local) | Zero cost. Private. Offline. GPU-managed model loading. |
| AI model | Mistral 7B Q4_K_M | Best accuracy/VRAM for RTX 3050. Instruction-tuned for JSON. |
| Templates | Jinja2 | Separates HTML from logic. Same engine as Flask/Django. |
| Charts | Chart.js (CDN) | No build step. Single self-contained HTML file output. |
| Database | SQLite | Zero infrastructure. Python stdlib. Swap to Postgres in one line. |
| Skipped | Why |
|---|---|
| Docker | Nmap needs raw sockets, complicates containers. Adds friction. |
| FastAPI / Flask | No server needed. HTML report is static. |
| React | npm install step kills portability. Single HTML = better. |
| OpenAI API | Privacy violation for a security tool. |
| Fine-tuning | Needs labeled data + 16GB VRAM. RAG + prompting = 90% benefit at 1% cost. |
NetWatcher/
│
├── netwatcher/              # Core package
│   ├── __init__.py          # Developer watermark + version
│   ├── cli.py               # CLI (Typer + Rich)
│   ├── scanner.py           # Nmap wrapper → typed Device objects
│   ├── devices.py           # Device + Port dataclasses
│   └── config.py            # All settings in one place
│
├── engine/                  # Analysis brain — pure logic, no I/O
│   ├── risk_engine.py       # Scoring algorithm
│   ├── rules.py             # Vulnerability rules ← EDIT THIS
│   └── fingerprint.py       # MAC OUI + device type detection
│
├── ai/                      # AI analysis layer
│   ├── analyzer.py          # Orchestrates AI pipeline + fallback
│   ├── ollama_client.py     # Ollama API client + model selection
│   └── prompts.py           # All prompts ← EDIT THIS to tune AI
│
├── data/
│   ├── db.py                # SQLite handler (scan history)
│   └── seed_data.json       # Mock CVE reference data
│
├── reports/
│   ├── generator.py         # Jinja2 renderer
│   ├── templates/
│   │   └── report.html      # Dashboard template (Chart.js)
│   └── exports/             # Generated reports saved here
│
├── utils/
│   ├── logger.py            # Centralized logging
│   └── helpers.py           # Shared utilities
│
├── tests/
│   └── test_risk_engine.py  # Unit tests
│
├── scripts/
│   ├── install.sh           # One-command Linux/Mac setup
│   └── setup_ai.sh          # Ollama + model setup
│
├── Screenshot/              # Real scan screenshots (1–5)
├── screenrecod/             # Tutorial.mp4 walkthrough
├── netwatcher.py            # Single entry point
├── requirements.txt         # 4 dependencies only
└── .gitignore
python tests/test_risk_engine.py

  ✓  test_telnet_port_tagged_critical
  ✓  test_ssh_is_medium_risk
  ✓  test_multiple_critical_ports_max_score
  ✓  test_no_ports_low_risk
  ✓  test_router_modifier_applied
  ✓  test_score_devices_sorted_desc
  ✓  test_network_summary_structure

7/7 tests passed
Tests cover the risk engine in complete isolation — no Nmap, no SQLite, no Ollama. Correct unit test design: test pure logic independently from I/O.
- CVE Integration — NVD API, match detected versions against known CVEs
- Network Topology Map — Visual graph of all devices and connections
- Scheduled Scans — Cron-based auto-scan with diff alerting
- RAG Enhancement — FAISS vector store of CVEs for grounded AI context
- Authenticated Scanning — SSH into Linux devices for config audit
- PDF Export — One-click PDF version of the report
- Comparison View — Side-by-side diff of two scan sessions
For authorized networks only.
NetWatcher performs passive reconnaissance only — no exploitation, no credential attacks, no data modification. Only scan networks you own or have explicit written permission to scan. Unauthorized network scanning may violate the CFAA (US), Computer Misuse Act (UK), or IT Act (India). The attack simulations in the report are educational descriptions only — no actual attacks are performed.
Built by Akshay
Security-minded developer focused on building tools that bridge complex technology and everyday usability.
| 🐙 GitHub | github.com/Akshay-core |
| in/akshay-tb-791bb4372 | |
| 🌐 Portfolio | akshay.fruvvi.com |
| @akshayyyy_2007 |
If you are a recruiter or collaborator — feel free to connect.
NetWatcher v1.0 · MIT License · Offline-first · Zero external services · Free forever
Scan smart. Fix fast. Stay secure.